
Owners Manual
Page 4
h If the screen to set the date and time, see page 33. 2 Record. For how to set the date and time appears, press the MENU button 2 times to turn the camera on. h Press the [ ] button again to begin recording a video clip. h A still image is captured. MENU button ON/OFF button [] button [ ] button 10M-S 15 Ful -HD 000:00:17 iii English To record a video clip: h Press the [ ] button to end the recording. Shooting 1 Press the ON/OFF button for at least 1 second to cancel it. To take a photo: h Press the [ ] button.
h If the screen to set the date and time, see page 33. 2 Record. For how to set the date and time appears, press the MENU button 2 times to turn the camera on. h Press the [ ] button again to begin recording a video clip. h A still image is captured. MENU button ON/OFF button [] button [ ] button 10M-S 15 Ful -HD 000:00:17 iii English To record a video clip: h Press the [ ] button to end the recording. Shooting 1 Press the ON/OFF button for at least 1 second to cancel it. To take a photo: h Press the [ ] button.

Owners Manual
Page 10
...used with this camera 15 What "card" means in this manual 15 GETTING THE MOST OUT OF YOUR CAMERA 16 High-quality images with "Full High Definition 16 Includes SIMPLE mode for quick-and-easy operation 17 Image stabilizer for sharp pictures 17 Capture clear images of the targeted subject... the camera 30 Turning off the camera 30 Turning on the camera when the power save (sleep) mode is active 31 DATE AND TIME SETTING 33 SWITCHING BETWEEN THE RECORDING MODE AND PLAYBACK MODE 36 SWITCHING THE OPERATING MODE 37 Switching between the SIMPLE and NORMAL modes 37 Accessing/exiting the SIMPLE...
...used with this camera 15 What "card" means in this manual 15 GETTING THE MOST OUT OF YOUR CAMERA 16 High-quality images with "Full High Definition 16 Includes SIMPLE mode for quick-and-easy operation 17 Image stabilizer for sharp pictures 17 Capture clear images of the targeted subject... the camera 30 Turning off the camera 30 Turning on the camera when the power save (sleep) mode is active 31 DATE AND TIME SETTING 33 SWITCHING BETWEEN THE RECORDING MODE AND PLAYBACK MODE 36 SWITCHING THE OPERATING MODE 37 Switching between the SIMPLE and NORMAL modes 37 Accessing/exiting the SIMPLE...
Owners Manual
Page 15
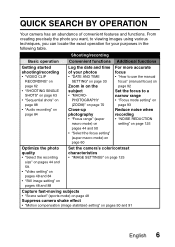
... images using various techniques, you can locate the exact operation for your photos • "DATE AND TIME SETTING" on page 33 Zoom in the following table. Shooting/recording Basic operation Convenient functions Additional functions Getting started shooting/recording • "VIDEO CLIP RECORDING" on page 62 • "SHOOTING SINGLE SHOTS" on page 63 • "Sequential shots" on...
... images using various techniques, you can locate the exact operation for your photos • "DATE AND TIME SETTING" on page 33 Zoom in the following table. Shooting/recording Basic operation Convenient functions Additional functions Getting started shooting/recording • "VIDEO CLIP RECORDING" on page 62 • "SHOOTING SINGLE SHOTS" on page 63 • "Sequential shots" on...

Owners Manual
Page 41
...the camera in the standby mode. For this setting before capturing images. To have not been completed (page 33), the date and time cannot be recorded with the captured images. SETUP HINT To immediately activate the power save mode i Press the ON/OFF button briefly to ...ready to activate the power save function. i When a picture is taken, the date and time it . CAUTION If the K icon appears... If the date and time settings have the date and time recorded with it was captured are recorded with the images, please complete this reason, immediately after the camera is turned on,...
...the camera in the standby mode. For this setting before capturing images. To have not been completed (page 33), the date and time cannot be recorded with the captured images. SETUP HINT To immediately activate the power save mode i Press the ON/OFF button briefly to ...ready to activate the power save function. i When a picture is taken, the date and time it . CAUTION If the K icon appears... If the date and time settings have the date and time recorded with it was captured are recorded with the images, please complete this reason, immediately after the camera is turned on,...

Owners Manual
Page 42
...The Clock Set Screen appears. h To display the Recording or Playback Screen, press the MENU button 2 times. h Press [G] or [H] to "2010/12/24". h To correct the date and time setting, please see under HINT on the camera (page 30), and press the SET button. CLOCK SET DATE TIME DISP 2010/08/01 00:00 D / M ...the number. 4 Press the SET button. CLOCK SET DATE 2010/12/24 OK 33 English Example: To set . on December 24, 2010 1 Turn on page 35. DATE AND TIME SETTING The camera will record the date and time an image or audio recording is set in the following order: Set the year...
...The Clock Set Screen appears. h To display the Recording or Playback Screen, press the MENU button 2 times. h Press [G] or [H] to "2010/12/24". h To correct the date and time setting, please see under HINT on the camera (page 30), and press the SET button. CLOCK SET DATE TIME DISP 2010/08/01 00:00 D / M ...the number. 4 Press the SET button. CLOCK SET DATE 2010/12/24 OK 33 English Example: To set . on December 24, 2010 1 Turn on page 35. DATE AND TIME SETTING The camera will record the date and time an image or audio recording is set in the following order: Set the year...

Owners Manual
Page 44
... Setting Menu 1 (page 121). 3 Select "CLOCK SET" and press the SET button. h The current date and time settings are still correct after replacing the battery pack and before shooting or recording of any type (follow step 1). h The date and time setting is being replaced, an internal battery will last for about 7 days). 5 Press the MENU...
... Setting Menu 1 (page 121). 3 Select "CLOCK SET" and press the SET button. h The current date and time settings are still correct after replacing the battery pack and before shooting or recording of any type (follow step 1). h The date and time setting is being replaced, an internal battery will last for about 7 days). 5 Press the MENU...

Owners Manual
Page 115
... enhance the contrast. However, the file date shown on the computer changes to the date and time the image was not able to correct a flaw. i The camera was revised. Concerning the date and time information for the saved image i When an image is corrected and saved, the recorded date and time of capture (Exif information) remains unchanged from...
... enhance the contrast. However, the file date shown on the computer changes to the date and time the image was not able to correct a flaw. i The camera was revised. Concerning the date and time information for the saved image i When an image is corrected and saved, the recorded date and time of capture (Exif information) remains unchanged from...

Owners Manual
Page 129
... Video clip mode settings 2 Image or sound number 3 Protect setting 4 File size INFO 100-0002 2 A 1600×1200 3 987KB 4 F3.5 7 1/163 8 0.3 6 ISO 50 B 5 Shooting or recording ; 2010.12.25 19:30 9 time 6 Exposure compensation setting 7 Aperture value 8 Shutter speed 9 Remaining battery charge 0 Date and time ...On the Information Screen you can check what the settings were when a file was recorded with your camera. 1 Display the desired file on the camera monitor. h The Information Screen 0.3 6 appears. INFO HD-SHQ 100-0001 2 3 2 1 1280×720 30fps SHQ 4.2MB 4...
... Video clip mode settings 2 Image or sound number 3 Protect setting 4 File size INFO 100-0002 2 A 1600×1200 3 987KB 4 F3.5 7 1/163 8 0.3 6 ISO 50 B 5 Shooting or recording ; 2010.12.25 19:30 9 time 6 Exposure compensation setting 7 Aperture value 8 Shutter speed 9 Remaining battery charge 0 Date and time ...On the Information Screen you can check what the settings were when a file was recorded with your camera. 1 Display the desired file on the camera monitor. h The Information Screen 0.3 6 appears. INFO HD-SHQ 100-0001 2 3 2 1 1280×720 30fps SHQ 4.2MB 4...

Owners Manual
Page 132
...capture date and playback time (video clips). COUNTER: Display the playback time when playing back a video clip. TURN ON/OFF: Mute or enable the sounds when the camera is pressed. 6 Remaining battery charge display (page 140) 123 English are pressed. DATE & TIME: Display the capture date. ...DISPLAY setting h Specify the information to display on in the recording mode. 4 OPERATION BEEP setting h Settings for the camera's operation sounds, audio guide and volume. OFF: Do not display the capture date or playback time. 3 STARTUP DISPLAY setting h Select the display that is produced...
...capture date and playback time (video clips). COUNTER: Display the playback time when playing back a video clip. TURN ON/OFF: Mute or enable the sounds when the camera is pressed. 6 Remaining battery charge display (page 140) 123 English are pressed. DATE & TIME: Display the capture date. ...DISPLAY setting h Specify the information to display on in the recording mode. 4 OPERATION BEEP setting h Settings for the camera's operation sounds, audio guide and volume. OFF: Do not display the capture date or playback time. 3 STARTUP DISPLAY setting h Select the display that is produced...


