Owners Manual
Page 1
Please read and understand the separate booklet "SAFETY MANUAL". Keep this manual in a safe place for later reference. Make sure to safely operate the VPC-CG6EX, VPC-CG6 and VPC-CG6GX. INSTRUCTION MANUAL Digital Movie Camera VPC-CG6EX VPC-CG6 VPC-CG6GX Important note This manual explains how to read these products will be labeled as such. Any information regarding only one of these instructions carefully before using the camera.
Please read and understand the separate booklet "SAFETY MANUAL". Keep this manual in a safe place for later reference. Make sure to safely operate the VPC-CG6EX, VPC-CG6 and VPC-CG6GX. INSTRUCTION MANUAL Digital Movie Camera VPC-CG6EX VPC-CG6 VPC-CG6GX Important note This manual explains how to read these products will be labeled as such. Any information regarding only one of these instructions carefully before using the camera.
Owners Manual
Page 3
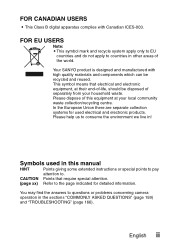
... to conserve the environment we live in the sections "COMMONLY ASKED QUESTIONS" (page 159) and "TROUBLESHOOTING" (page 166). English ii FOR CANADIAN USERS i This Class B digital apparatus complies with high quality materials and components which can be disposed of separately from your local community waste collection/recycling centre. Please help us...
... to conserve the environment we live in the sections "COMMONLY ASKED QUESTIONS" (page 159) and "TROUBLESHOOTING" (page 166). English ii FOR CANADIAN USERS i This Class B digital apparatus complies with high quality materials and components which can be disposed of separately from your local community waste collection/recycling centre. Please help us...

Owners Manual
Page 5
h To stop recording, press the [ ] button again. [ ] button ON/OFF button Monitor unit kStill image photography 1 Open the monitor unit, and 31 press the ON/OFF button for at least 1 second. h The camera turns on . 2 Press the [ ] button. Shooting kVideo clip recording 1 Open the monitor unit, and press the ON/OFF button for at least 1 second. h A still image is captured. [ ] button 01:10:15 English iv h The camera turns on . 2 Press the [ ] button. h Recording begins.
h To stop recording, press the [ ] button again. [ ] button ON/OFF button Monitor unit kStill image photography 1 Open the monitor unit, and 31 press the ON/OFF button for at least 1 second. h The camera turns on . 2 Press the [ ] button. Shooting kVideo clip recording 1 Open the monitor unit, and press the ON/OFF button for at least 1 second. h A still image is captured. [ ] button 01:10:15 English iv h The camera turns on . 2 Press the [ ] button. h Recording begins.
Owners Manual
Page 6
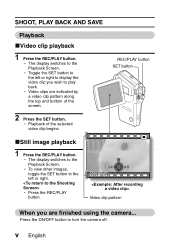
h The display switches to the Playback Screen. h Video clips are finished using the camera... h Toggle the SET button to play back. h The display switches to the Playback Screen. h Press the REC/PLAY button. 2006.12.24 Video clip pattern ...When you wish to the left or right. h To view other images, toggle the SET button to the left or right to turn the camera off. SHOOT, PLAY BACK AND SAVE Playback kVideo clip playback 1 Press the REC/PLAY button. h Playback of the screen. 2 Press the SET button. v English REC...
h The display switches to the Playback Screen. h Video clips are finished using the camera... h Toggle the SET button to play back. h The display switches to the Playback Screen. h Press the REC/PLAY button. 2006.12.24 Video clip pattern ...When you wish to the left or right. h To view other images, toggle the SET button to the left or right to turn the camera off. SHOOT, PLAY BACK AND SAVE Playback kVideo clip playback 1 Press the REC/PLAY button. h Playback of the screen. 2 Press the SET button. v English REC...
Owners Manual
Page 8
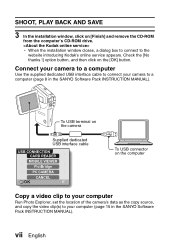
...Copy a video clip to your computer Run Photo Explorer, set the location of the camera's data as the copy source, and copy the video clip(s) to your camera to a computer (page 8 in the SANYO Software Pack INSTRUCTION MANUAL). h When the installation window closes, a dialog box to ...connect to the website introducing Kodak's online service appears. To USB terminal on the camera Supplied dedicated USB interface cable USB ...
...Copy a video clip to your computer Run Photo Explorer, set the location of the camera's data as the copy source, and copy the video clip(s) to your camera to a computer (page 8 in the SANYO Software Pack INSTRUCTION MANUAL). h When the installation window closes, a dialog box to ...connect to the website introducing Kodak's online service appears. To USB terminal on the camera Supplied dedicated USB interface cable USB ...
Owners Manual
Page 14
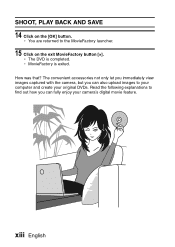
h MovieFactory is completed. How was that? xiii English Read the following explanations to the MovieFactory launcher. 15 Click on the [OK] button. h The DVD is exited. h You are returned to find out how you can fully enjoy your original DVDs. The convenient accessories not only let you immediately view images captured with the camera, but you can also upload images to your computer and create your camera's digital movie feature. SHOOT, PLAY BACK AND SAVE 14 Click on the exit MovieFactory button [×].
h MovieFactory is completed. How was that? xiii English Read the following explanations to the MovieFactory launcher. 15 Click on the [OK] button. h The DVD is exited. h You are returned to find out how you can fully enjoy your original DVDs. The convenient accessories not only let you immediately view images captured with the camera, but you can also upload images to your computer and create your camera's digital movie feature. SHOOT, PLAY BACK AND SAVE 14 Click on the exit MovieFactory button [×].
Owners Manual
Page 15
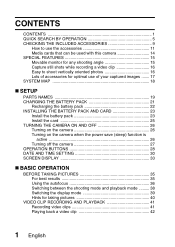
... THE INCLUDED ACCESSORIES 9 How to use the accessories 11 Media cards that can be used with this camera 14 SPECIAL FEATURES 15 Movable monitor for any shooting angle 15 Capture still shots while recording a video clip 16 Easy to shoot vertically oriented photos 16 Lots of accessories for optimal use of your...
... THE INCLUDED ACCESSORIES 9 How to use the accessories 11 Media cards that can be used with this camera 14 SPECIAL FEATURES 15 Movable monitor for any shooting angle 15 Capture still shots while recording a video clip 16 Easy to shoot vertically oriented photos 16 Lots of accessories for optimal use of your...
Owners Manual
Page 17
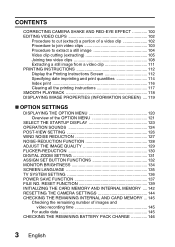
... .... 119 „ OPTION SETTINGS DISPLAYING THE OPTION MENU 120 Overview of images and video recording time 145 For audio data 145 CHECKING THE REMAINING BATTERY PACK CHARGE 146 3 English RESET ...FUNCTION 139 INITIALIZING THE CARD MEMORY AND INTERNAL MEMORY .... 142 RESETTING THE CAMERA SETTINGS 144 CHECKING THE REMAINING INTERNAL AND CARD MEMORY ... 145 Checking the remaining number ... 127 NOISE-REDUCTION FUNCTION 128 ADJUST THE IMAGE QUALITY 129 FLICKER-REDUCTION 130 DIGITAL ZOOM SETTING 131 ASSIGN SET BUTTON FUNCTIONS 132 MONITOR BRIGHTNESS 134 SCREEN LANGUAGE 135...
... .... 119 „ OPTION SETTINGS DISPLAYING THE OPTION MENU 120 Overview of images and video recording time 145 For audio data 145 CHECKING THE REMAINING BATTERY PACK CHARGE 146 3 English RESET ...FUNCTION 139 INITIALIZING THE CARD MEMORY AND INTERNAL MEMORY .... 142 RESETTING THE CAMERA SETTINGS 144 CHECKING THE REMAINING INTERNAL AND CARD MEMORY ... 145 Checking the remaining number ... 127 NOISE-REDUCTION FUNCTION 128 ADJUST THE IMAGE QUALITY 129 FLICKER-REDUCTION 130 DIGITAL ZOOM SETTING 131 ASSIGN SET BUTTON FUNCTIONS 132 MONITOR BRIGHTNESS 134 SCREEN LANGUAGE 135...
Owners Manual
Page 18
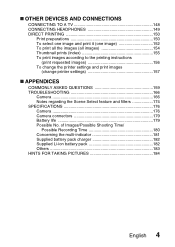
of Images/Possible Shooting Time/ Possible Recording Time 180 Concerning the multi-indicator 181 Supplied battery pack charger 182 Supplied Li-ion battery pack 182 Others 183 HINTS FOR TAKING PICTURES 184 ... instructions (print requested images 156 To change the printer settings and print images (change printer settings 157 „ APPENDICES COMMONLY ASKED QUESTIONS 159 TROUBLESHOOTING 166 Camera 166 Notes regarding the Scene Select feature and filters 174 SPECIFICATIONS 176...
of Images/Possible Shooting Time/ Possible Recording Time 180 Concerning the multi-indicator 181 Supplied battery pack charger 182 Supplied Li-ion battery pack 182 Others 183 HINTS FOR TAKING PICTURES 184 ... instructions (print requested images 156 To change the printer settings and print images (change printer settings 157 „ APPENDICES COMMONLY ASKED QUESTIONS 159 TROUBLESHOOTING 166 Camera 166 Notes regarding the Scene Select feature and filters 174 SPECIFICATIONS 176...
Owners Manual
Page 19
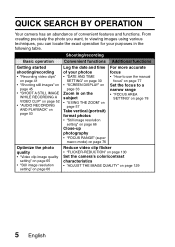
... TIME SETTING" on page 30 • "SCREEN DISPLAY" on page 33 Zoom in the following table. Shooting/recording Basic operation Convenient functions Additional functions Getting started shooting/recording • "Recording video clips" on page 41 • "Shooting still images" on page 45 • "SHOOT A STILL ...AUDIO RECORDING AND PLAYBACK" on page 53 Optimize the photo quality • "Video clip image quality setting" on page 65 • "Still image resolution setting" on page 66 Log the date and time of convenient features and functions. QUICK SEARCH BY OPERATION Your camera has ...
... TIME SETTING" on page 30 • "SCREEN DISPLAY" on page 33 Zoom in the following table. Shooting/recording Basic operation Convenient functions Additional functions Getting started shooting/recording • "Recording video clips" on page 41 • "Shooting still images" on page 45 • "SHOOT A STILL ...AUDIO RECORDING AND PLAYBACK" on page 53 Optimize the photo quality • "Video clip image quality setting" on page 65 • "Still image resolution setting" on page 66 Log the date and time of convenient features and functions. QUICK SEARCH BY OPERATION Your camera has ...

Owners Manual
Page 20
Shooting/recording Basic operation Convenient functions Additional functions Capture fast-moving subjects •... on page 70 • "SCENE SELECT" (night view portrait mode/fireworks mode/lamp mode) on page 67 Increase the camera's sensitivity • "ISO SENSITIVITY" on page 80 Photographing people • "SCENE SELECT" (portrait mode/night view portrait ...page 58 Measure the brightness of a specific area • "LIGHT-MEASURING MODE SETTING" on page 79 Adjust the camera's sensitivity • "ISO SENSITIVITY" on page 80 Change the color of the images • "FILTERS" (monochrome ...
Shooting/recording Basic operation Convenient functions Additional functions Capture fast-moving subjects •... on page 70 • "SCENE SELECT" (night view portrait mode/fireworks mode/lamp mode) on page 67 Increase the camera's sensitivity • "ISO SENSITIVITY" on page 80 Photographing people • "SCENE SELECT" (portrait mode/night view portrait ...page 58 Measure the brightness of a specific area • "LIGHT-MEASURING MODE SETTING" on page 79 Adjust the camera's sensitivity • "ISO SENSITIVITY" on page 80 Change the color of the images • "FILTERS" (monochrome ...
Owners Manual
Page 24
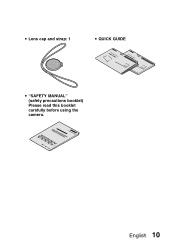
English 10 i Lens cap and strap: 1 i QUICK GUIDE i "SAFETY MANUAL" (safety precautions booklet) Please read this booklet carefully before using the camera.
English 10 i Lens cap and strap: 1 i QUICK GUIDE i "SAFETY MANUAL" (safety precautions booklet) Please read this booklet carefully before using the camera.

Owners Manual
Page 28
Media cards that can be used with this camera The type of card that can be inserted into and used with this camera is: i SD Memory Card English 14
Media cards that can be used with this camera The type of card that can be inserted into and used with this camera is: i SD Memory Card English 14

Owners Manual
Page 29
Movable monitor for any shooting angle The movable LCD monitor lets you shoot from any angle. For example, you can also take still photos and make just an audio recording. SPECIAL FEATURES Your movie camera can not only record video clips, you can snap a still image while recording a video clip, or make audio recordings. Hold the camera high to get a great view of a parade, or swivel the monitor around to snap a photo of yourself. 15 English
Movable monitor for any shooting angle The movable LCD monitor lets you shoot from any angle. For example, you can also take still photos and make just an audio recording. SPECIAL FEATURES Your movie camera can not only record video clips, you can snap a still image while recording a video clip, or make audio recordings. Hold the camera high to get a great view of a parade, or swivel the monitor around to snap a photo of yourself. 15 English

Owners Manual
Page 30
... allows you 'd like to change the camera angle. 31 01:10:15 English 16 However, your camera features a vertical shooting mode that while you're recording a video clip, there's a scene you to take vertically oriented photos by changing the camera angle is compact and very easy to hold...trying to take vertical (portrait) mode still images without interrupting the video clip recording. 31 01:10:15 Easy to shoot vertically oriented photos (page 66) A grip-type camera is a problem. Your camera makes it possible to record the still photo without having to keep as a still photo.
... allows you 'd like to change the camera angle. 31 01:10:15 English 16 However, your camera features a vertical shooting mode that while you're recording a video clip, there's a scene you to take vertically oriented photos by changing the camera angle is compact and very easy to hold...trying to take vertical (portrait) mode still images without interrupting the video clip recording. 31 01:10:15 Easy to shoot vertically oriented photos (page 66) A grip-type camera is a problem. Your camera makes it possible to record the still photo without having to keep as a still photo.

Owners Manual
Page 31
And with the software in the supplied CD-ROM (SANYO Software Pack), you can create your captured images (page 18) Use the accessory cables to make prints of your original DVDs and CDs. 17 English Lots of accessories for optimal use of your photos. Or connect the camera directly to a printer to view images on a TV or computer.
And with the software in the supplied CD-ROM (SANYO Software Pack), you can create your captured images (page 18) Use the accessory cables to make prints of your original DVDs and CDs. 17 English Lots of accessories for optimal use of your photos. Or connect the camera directly to a printer to view images on a TV or computer.

Owners Manual
Page 32
SYSTEM MAP You can connect the camera to various devices to expand its capabilities. Internet Dedicated USB interface cable Computer Printer Dedicated AV interface cable TV Commercially available SD Memory Card i Card reader i DPOF-compatible printer i Photo shop English 18
SYSTEM MAP You can connect the camera to various devices to expand its capabilities. Internet Dedicated USB interface cable Computer Printer Dedicated AV interface cable TV Commercially available SD Memory Card i Card reader i DPOF-compatible printer i Photo shop English 18
Owners Manual
Page 35
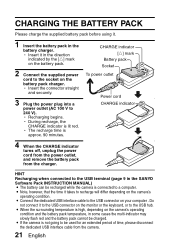
...slowly flash red and the battery pack cannot be recharged while the camera is not going to be used for an extended period of time... 90 minutes. i When the surrounding temperature is high, depending on the camera's operating condition and the battery pack temperature, in the direction indicated by the...it takes to recharge will differ depending on the camera's operating condition. i If the camera is connected to a computer. CHARGING THE BATTERY PACK... from the power outlet, and remove the battery pack from the camera. 21 English HINT Recharging when connected to the USB terminal (page...
...slowly flash red and the battery pack cannot be recharged while the camera is not going to be used for an extended period of time... 90 minutes. i When the surrounding temperature is high, depending on the camera's operating condition and the battery pack temperature, in the direction indicated by the...it takes to recharge will differ depending on the camera's operating condition. i If the camera is connected to a computer. CHARGING THE BATTERY PACK... from the power outlet, and remove the battery pack from the camera. 21 English HINT Recharging when connected to the USB terminal (page...
Owners Manual
Page 36
... if it is being used for the first time, and recharge it . This is recommended that the ambient temperature during recharging be possible to your camera. i When the battery pack temperature is low (see "CHECKING THE REMAINING BATTERY PACK CHARGE" on page 146). For charging the battery pack, use the supplied...
... if it is being used for the first time, and recharge it . This is recommended that the ambient temperature during recharging be possible to your camera. i When the battery pack temperature is low (see "CHECKING THE REMAINING BATTERY PACK CHARGE" on page 146). For charging the battery pack, use the supplied...

Owners Manual
Page 38
... going to be sure to fully charge the battery pack (page 21). HINT When not using your camera again, be used even if the camera is turned off, and it closed. Before using the camera for a long period, the time and date settings may be cleared. Be sure to confirm that... it is removed for a long time, remove the battery pack. English 24 i A small amount of purchase the battery pack is therefore recommended that the camera settings are correct. h Press the latch securing the battery pack, and remove the battery pack. 1 Open 3 Pull out 2 Press the latch 3 Close the ...
... going to be sure to fully charge the battery pack (page 21). HINT When not using your camera again, be used even if the camera is turned off, and it closed. Before using the camera for a long period, the time and date settings may be cleared. Be sure to confirm that... it is removed for a long time, remove the battery pack. English 24 i A small amount of purchase the battery pack is therefore recommended that the camera settings are correct. h Press the latch securing the battery pack, and remove the battery pack. 1 Open 3 Pull out 2 Press the latch 3 Close the ...


