Owners Manual
Page 6
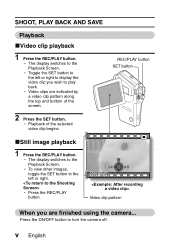
... selected video clip begins. h Video clips are finished using the camera... Press the ON/OFF button to the Playback Screen. SHOOT, PLAY BACK AND SAVE Playback kVideo clip playback 1 Press the REC/PLAY button. h The display switches to turn the camera off. h Playback of the screen. 2 Press the SET button. h To view other images, toggle the SET button to the left or right to the left or right. REC/PLAY button SET button kStill image playback 1 Press the REC/PLAY button. v English h The display switches to play back. h Press the REC/PLAY button. 2006...
... selected video clip begins. h Video clips are finished using the camera... Press the ON/OFF button to the Playback Screen. SHOOT, PLAY BACK AND SAVE Playback kVideo clip playback 1 Press the REC/PLAY button. h The display switches to turn the camera off. h Playback of the screen. 2 Press the SET button. h To view other images, toggle the SET button to the left or right to the left or right. REC/PLAY button SET button kStill image playback 1 Press the REC/PLAY button. v English h The display switches to play back. h Press the REC/PLAY button. 2006...
Owners Manual
Page 8
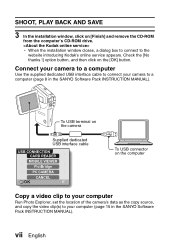
... computer Copy a video clip to your computer Run Photo Explorer, set the location of the camera's data as the copy source, and copy the video clip(s) to your camera to the website introducing Kodak's online service appears. vii English SHOOT, PLAY BACK AND SAVE 3 In the installation window, click on the [OK] button. Check the [No thanks !] option button, and then click on [Finish] and remove the CD-ROM from the computer's CD-ROM drive.
... computer Copy a video clip to your computer Run Photo Explorer, set the location of the camera's data as the copy source, and copy the video clip(s) to your camera to the website introducing Kodak's online service appears. vii English SHOOT, PLAY BACK AND SAVE 3 In the installation window, click on the [OK] button. Check the [No thanks !] option button, and then click on [Finish] and remove the CD-ROM from the computer's CD-ROM drive.
Owners Manual
Page 15
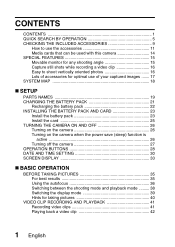
... OFF 26 Turning on the camera 26 Turning on the camera when the power save (sleep) function is active 26 Turning off the camera 27 OPERATION BUTTONS 28 DATE AND TIME SETTING 30 SCREEN DISPLAY 33 „ BASIC OPERATION BEFORE TAKING PICTURES 35 For best results 35 Using the autofocus 36 Switching between the shooting mode and playback mode ......... 38 Switching the display mode 39 Hints for taking pictures 40 VIDEO CLIP RECORDING AND PLAYBACK 41 Recording video clips 41 Playing back a video clip 42 1 English
... OFF 26 Turning on the camera 26 Turning on the camera when the power save (sleep) function is active 26 Turning off the camera 27 OPERATION BUTTONS 28 DATE AND TIME SETTING 30 SCREEN DISPLAY 33 „ BASIC OPERATION BEFORE TAKING PICTURES 35 For best results 35 Using the autofocus 36 Switching between the shooting mode and playback mode ......... 38 Switching the display mode 39 Hints for taking pictures 40 VIDEO CLIP RECORDING AND PLAYBACK 41 Recording video clips 41 Playing back a video clip 42 1 English
Owners Manual
Page 16
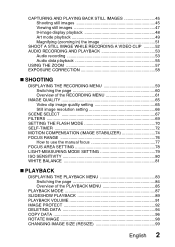
... Audio data playback 55 USING THE ZOOM 57 EXPOSURE CORRECTION 58 „ SHOOTING DISPLAYING THE RECORDING MENU 59 Switching the page 60 Overview of the RECORDING MENU 61 IMAGE QUALITY 65 Video clip image quality setting 65 Still image resolution setting 66 SCENE SELECT 67 FILTERS 69 SETTING THE FLASH MODE 70 SELF-TIMER 72 MOTION COMPENSATION (IMAGE STABILIZER 74 FOCUS RANGE 76 How to use the manual focus 77 FOCUS AREA SETTING 78 LIGHT-MEASURING MODE SETTING 79 ISO SENSITIVITY 80 WHITE BALANCE...
... Audio data playback 55 USING THE ZOOM 57 EXPOSURE CORRECTION 58 „ SHOOTING DISPLAYING THE RECORDING MENU 59 Switching the page 60 Overview of the RECORDING MENU 61 IMAGE QUALITY 65 Video clip image quality setting 65 Still image resolution setting 66 SCENE SELECT 67 FILTERS 69 SETTING THE FLASH MODE 70 SELF-TIMER 72 MOTION COMPENSATION (IMAGE STABILIZER 74 FOCUS RANGE 76 How to use the manual focus 77 FOCUS AREA SETTING 78 LIGHT-MEASURING MODE SETTING 79 ISO SENSITIVITY 80 WHITE BALANCE...
Owners Manual
Page 17
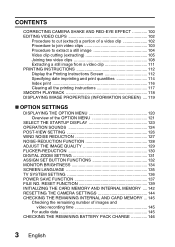
RESET FUNCTION 139 INITIALIZING THE CARD MEMORY AND INTERNAL MEMORY .... 142 RESETTING THE CAMERA SETTINGS 144 CHECKING THE REMAINING INTERNAL AND CARD MEMORY ... 145 Checking the remaining number of the OPTION MENU 121 SELECT THE STARTUP DISPLAY 123 OPERATION SOUNDS 124 POST-VIEW SETTING 126 WIND NOISE REDUCTION 127 NOISE-REDUCTION FUNCTION 128 ADJUST THE IMAGE QUALITY 129 FLICKER-REDUCTION 130 DIGITAL ZOOM SETTING 131 ASSIGN SET BUTTON FUNCTIONS 132 MONITOR BRIGHTNESS 134 SCREEN LANGUAGE 135 TV SYSTEM SETTING 136 POWER SAVE FUNCTION 137 FILE NO. CONTENTS CORRECTING...
RESET FUNCTION 139 INITIALIZING THE CARD MEMORY AND INTERNAL MEMORY .... 142 RESETTING THE CAMERA SETTINGS 144 CHECKING THE REMAINING INTERNAL AND CARD MEMORY ... 145 Checking the remaining number of the OPTION MENU 121 SELECT THE STARTUP DISPLAY 123 OPERATION SOUNDS 124 POST-VIEW SETTING 126 WIND NOISE REDUCTION 127 NOISE-REDUCTION FUNCTION 128 ADJUST THE IMAGE QUALITY 129 FLICKER-REDUCTION 130 DIGITAL ZOOM SETTING 131 ASSIGN SET BUTTON FUNCTIONS 132 MONITOR BRIGHTNESS 134 SCREEN LANGUAGE 135 TV SYSTEM SETTING 136 POWER SAVE FUNCTION 137 FILE NO. CONTENTS CORRECTING...
Owners Manual
Page 18
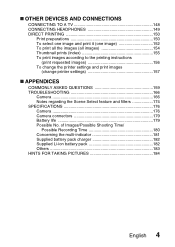
... images according to the printing instructions (print requested images 156 To change the printer settings and print images (change printer settings 157 „ APPENDICES COMMONLY ASKED QUESTIONS 159 TROUBLESHOOTING 166 Camera 166 Notes regarding the Scene Select feature and filters 174 SPECIFICATIONS 176 Camera 176 Camera connectors 179 Battery life 179 Possible No. of Images/Possible Shooting Time/ Possible Recording Time 180 Concerning the multi-indicator 181 Supplied battery pack charger...
... images according to the printing instructions (print requested images 156 To change the printer settings and print images (change printer settings 157 „ APPENDICES COMMONLY ASKED QUESTIONS 159 TROUBLESHOOTING 166 Camera 166 Notes regarding the Scene Select feature and filters 174 SPECIFICATIONS 176 Camera 176 Camera connectors 179 Battery life 179 Possible No. of Images/Possible Shooting Time/ Possible Recording Time 180 Concerning the multi-indicator 181 Supplied battery pack charger...
Owners Manual
Page 19
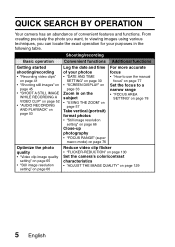
... • "FOCUS AREA SETTING" on page 78 Reduce video clip flicker • "FLICKER-REDUCTION" on page 130 Set the camera's color/contrast characteristics • "ADJUST THE IMAGE QUALITY" on page 33 Zoom in the following table. From creating precisely the photo you want, to viewing images using various techniques, you can locate the exact operation for your photos • "DATE AND TIME SETTING" on page 30 • "SCREEN DISPLAY" on...
... • "FOCUS AREA SETTING" on page 78 Reduce video clip flicker • "FLICKER-REDUCTION" on page 130 Set the camera's color/contrast characteristics • "ADJUST THE IMAGE QUALITY" on page 33 Zoom in the following table. From creating precisely the photo you want, to viewing images using various techniques, you can locate the exact operation for your photos • "DATE AND TIME SETTING" on page 30 • "SCREEN DISPLAY" on...
Owners Manual
Page 35
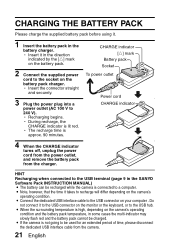
.... 3 Plug the power plug into a power outlet (AC 100 V to the USB hub. CHARGE indicator [o] mark Battery pack Socket To power outlet Power cord CHARGE indicator 4 When the CHARGE indicator turns off, unplug the power cord from the power outlet, and remove the battery pack from the camera. 21 English h During recharge, the CHARGE indicator is connected to the USB terminal (page 9 in the SANYO Software Pack INSTRUCTION MANUAL) i The battery can be recharged while the camera is lit red...
.... 3 Plug the power plug into a power outlet (AC 100 V to the USB hub. CHARGE indicator [o] mark Battery pack Socket To power outlet Power cord CHARGE indicator 4 When the CHARGE indicator turns off, unplug the power cord from the power outlet, and remove the battery pack from the camera. 21 English h During recharge, the CHARGE indicator is connected to the USB terminal (page 9 in the SANYO Software Pack INSTRUCTION MANUAL) i The battery can be recharged while the camera is lit red...

Owners Manual
Page 62
... mode playback (page 49). h If the zoom switch is shown, the camera changes to normal (fullscreen) playback of the selected image. h The 9-image display appears. REC/PLAY button Zoom switch 3 Select the image to display the Playback Screen. 2 Push the zoom switch toward the [W] ([P]) side while the 9-image display is pushed toward the [W] ([P]) side. Video clip SET button Orange frame Still image 100 0001 0002 0003 0004 0005 0006 0007 0008 0009 Audio data Image number Folder number English 48 9-image display playback 1 Press the REC/PLAY button to play...
... mode playback (page 49). h If the zoom switch is shown, the camera changes to normal (fullscreen) playback of the selected image. h The 9-image display appears. REC/PLAY button Zoom switch 3 Select the image to display the Playback Screen. 2 Push the zoom switch toward the [W] ([P]) side while the 9-image display is pushed toward the [W] ([P]) side. Video clip SET button Orange frame Still image 100 0001 0002 0003 0004 0005 0006 0007 0008 0009 Audio data Image number Folder number English 48 9-image display playback 1 Press the REC/PLAY button to play...

Owners Manual
Page 66
... pauses, and then returns to capture as a still image, press the [ ] button. If you 'd like to the video clip display after the still image is suggested that you take note of the remaining video recording time. SHOOT A STILL IMAGE WHILE RECORDING A VIDEO CLIP You can capture a still image while recording a video clip. 1 Turn on the video clip mode setting (page 65). REC 00:00:09 HINT i When shooting a still image while recording a video clip, the flash does not operate. English...
... pauses, and then returns to capture as a still image, press the [ ] button. If you 'd like to the video clip display after the still image is suggested that you take note of the remaining video recording time. SHOOT A STILL IMAGE WHILE RECORDING A VIDEO CLIP You can capture a still image while recording a video clip. 1 Turn on the video clip mode setting (page 65). REC 00:00:09 HINT i When shooting a still image while recording a video clip, the flash does not operate. English...

Owners Manual
Page 67
h The menu display appears. AUDIO RECORDING AND PLAYBACK Your camera can make audio recordings and play them back. Audio memo icon RECORDING MENU VIDEO CLIP MPEG4 640×480 30fps SHQ 3 From the video clip mode menu, select the audio memo icon Audio recording 1 Turn on the camera (page 26). 2 Press the MENU button.
h The menu display appears. AUDIO RECORDING AND PLAYBACK Your camera can make audio recordings and play them back. Audio memo icon RECORDING MENU VIDEO CLIP MPEG4 640×480 30fps SHQ 3 From the video clip mode menu, select the audio memo icon Audio recording 1 Turn on the camera (page 26). 2 Press the MENU button.
Owners Manual
Page 73
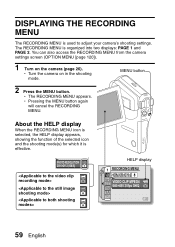
... access the RECORDING MENU from the camera settings screen (OPTION MENU [page 120]). 1 Turn on in the shooting mode. h The RECORDING MENU appears. The RECORDING MENU is used to adjust your camera's shooting settings. About the HELP display When the RECORDING MENU icon is selected, the HELP display appears, showing the function of the selected icon and the shooting mode(s) for which it is effective. PHOTO RESOLUTION 2816×2112 (6M-S) HELP display RECORDING MENU VIDEO CLIP MPEG4 640×480 30fps SHQ 59 English...
... access the RECORDING MENU from the camera settings screen (OPTION MENU [page 120]). 1 Turn on in the shooting mode. h The RECORDING MENU appears. The RECORDING MENU is used to adjust your camera's shooting settings. About the HELP display When the RECORDING MENU icon is selected, the HELP display appears, showing the function of the selected icon and the shooting mode(s) for which it is effective. PHOTO RESOLUTION 2816×2112 (6M-S) HELP display RECORDING MENU VIDEO CLIP MPEG4 640×480 30fps SHQ 59 English...

Owners Manual
Page 94
... ISO sensitivity, you can set to a fixed setting. 1 Display PAGE 2 of the subject. CAUTION Does the image appear to ISO 1600 equivalent (video clip recording mode: ISO 3600). 3 Select the desired icon from the Shooting Screen. However, the ISO sensitivity can be set higher shutter speeds and capture images in darker locations, but noise in the captured images may appear in the image. English 80 t: Sets the ISO sensitivity automatically...
... ISO sensitivity, you can set to a fixed setting. 1 Display PAGE 2 of the subject. CAUTION Does the image appear to ISO 1600 equivalent (video clip recording mode: ISO 3600). 3 Select the desired icon from the Shooting Screen. However, the ISO sensitivity can be set higher shutter speeds and capture images in darker locations, but noise in the captured images may appear in the image. English 80 t: Sets the ISO sensitivity automatically...
Owners Manual
Page 129
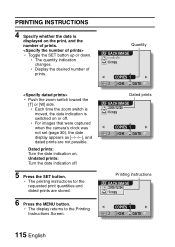
... dated prints are not possible. h Toggle the SET button up or down. h For images that were captured when the camera's clock was not set (page 30), the date display appears as and dated prints are stored. 6 Press the MENU button. PRINTING INSTRUCTIONS 4 Specify whether the date is switched on . Undated prints: Turn the date indication off . h Push the zoom switch toward the [T] or [W] side. h The display returns to the Printing Instructions Screen...
... dated prints are not possible. h Toggle the SET button up or down. h For images that were captured when the camera's clock was not set (page 30), the date display appears as and dated prints are stored. 6 Press the MENU button. PRINTING INSTRUCTIONS 4 Specify whether the date is switched on . Undated prints: Turn the date indication off . h Push the zoom switch toward the [T] or [W] side. h The display returns to the Printing Instructions Screen...
Owners Manual
Page 136
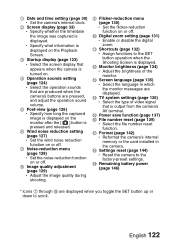
...-reduction menu (page 130) h Set the flicker-reduction function on the monitor after the [ ] button is output from the camera's AV terminal. G Format (page 142) h Reformat the camera's internal memory or the card installed in which the monitor messages are displayed. H Settings reset (page 144) h Reset the camera to the SET button operation when the Shooting Screen is displayed. 1 Date and time setting (page 30) h Set the camera's internal clock. 2 Screen display (page 33) h Specify whether the time/date the image was captured is displayed. English 122 C Screen language (page...
...-reduction menu (page 130) h Set the flicker-reduction function on the monitor after the [ ] button is output from the camera's AV terminal. G Format (page 142) h Reformat the camera's internal memory or the card installed in which the monitor messages are displayed. H Settings reset (page 144) h Reset the camera to the SET button operation when the Shooting Screen is displayed. 1 Date and time setting (page 30) h Set the camera's internal clock. 2 Screen display (page 33) h Specify whether the time/date the image was captured is displayed. English 122 C Screen language (page...
Owners Manual
Page 156
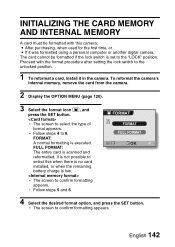
... time, or i If it in the camera. h The screen to confirm formatting appears. FORMAT FORMAT FULL FORMAT OK 4 Select the desired format option, and press the SET button. English 142 FORMAT: A normal formatting is not possible to the unlocked position. 1 To reformat a card, install it was formatted using a personal computer or another digital camera. h The screen to confirm formatting appears. It is executed. To reformat the camera's internal memory, remove the card from the camera. 2 Display the OPTION MENU...
... time, or i If it in the camera. h The screen to confirm formatting appears. FORMAT FORMAT FULL FORMAT OK 4 Select the desired format option, and press the SET button. English 142 FORMAT: A normal formatting is not possible to the unlocked position. 1 To reformat a card, install it was formatted using a personal computer or another digital camera. h The screen to confirm formatting appears. It is executed. To reformat the camera's internal memory, remove the card from the camera. 2 Display the OPTION MENU...

Owners Manual
Page 157
... insert/remove the card while the card is erased from a reformatted card) i If a card is reformatted or the data is being formatted. i If you use the camera's full format function to your camera's internal memory at the time of a card, it . h During formatting, "Formatting" and "do not turn off " are disposing of purchase can be copied to reformat the card, or use of the user. Caution regarding disposing/transferring the card (recovering data from the card using special software for erasing card data...
... insert/remove the card while the card is erased from a reformatted card) i If a card is reformatted or the data is being formatted. i If you use the camera's full format function to your camera's internal memory at the time of a card, it . h During formatting, "Formatting" and "do not turn off " are disposing of purchase can be copied to reformat the card, or use of the user. Caution regarding disposing/transferring the card (recovering data from the card using special software for erasing card data...

Owners Manual
Page 160
... checked on the conditions of use of the camera or the ambient conditions (temperature, etc.), the indicated remaining charge may appear early for battery pack operation, see page 179. 1 Display the RECORDING MENU or PLAYBACK MENU (pages 59 and 83). RECORDING MENU VIDEO CLIP MPEG4 640×480 30fps SHQ Battery pack remaining charge indicator Battery pack remaining charge indicator Battery remaining charge Approx. full. If this indicator before capturing an image. English...
... checked on the conditions of use of the camera or the ambient conditions (temperature, etc.), the indicated remaining charge may appear early for battery pack operation, see page 179. 1 Display the RECORDING MENU or PLAYBACK MENU (pages 59 and 83). RECORDING MENU VIDEO CLIP MPEG4 640×480 30fps SHQ Battery pack remaining charge indicator Battery pack remaining charge indicator Battery remaining charge Approx. full. If this indicator before capturing an image. English...

Owners Manual
Page 178
.... A temporary internal circuitry problem may be operated? Remove the battery pack from the battery charger. Action Please refer to a different medium, format the card. Question Why does a message appear during battery recharging? The lock switch on the card or in different modes. After saving your files to the instruction manual for your printer. Printing Misc. The "Cannot edit video" message appears. You have attempted to join video clips that were saved using a device other...
.... A temporary internal circuitry problem may be operated? Remove the battery pack from the battery charger. Action Please refer to a different medium, format the card. Question Why does a message appear during battery recharging? The lock switch on the card or in different modes. After saving your files to the instruction manual for your printer. Printing Misc. The "Cannot edit video" message appears. You have attempted to join video clips that were saved using a device other...
Owners Manual
Page 181
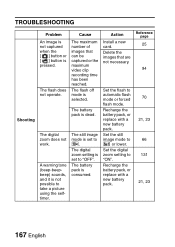
... Install a new card. Set the still image mode to "ON". TROUBLESHOOTING Shooting Problem An image is not captured when the [ ] button or [ ] button is set to "OFF". Set the digital zoom setting to y or lower. The flash does not operate. The still image mode is pressed. The battery pack is selected. Set the flash to take a picture using the selftimer. Recharge the battery pack, or replace with a new battery pack. Cause The maximum number of images that are not necessary. The flash...
... Install a new card. Set the still image mode to "ON". TROUBLESHOOTING Shooting Problem An image is not captured when the [ ] button or [ ] button is set to "OFF". Set the digital zoom setting to y or lower. The flash does not operate. The still image mode is pressed. The battery pack is selected. Set the flash to take a picture using the selftimer. Recharge the battery pack, or replace with a new battery pack. Cause The maximum number of images that are not necessary. The flash...


