Owners Manual
Page 4
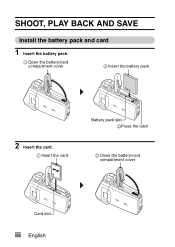
SHOOT, PLAY BACK AND SAVE Install the battery pack and card 1 Insert the battery pack. 1 Open the battery/card compartment cover 3 Insert the battery pack 2 Insert the card. 1 Insert the card Battery pack slot 2Press the latch 2 Close the battery/card compartment cover Card slot iii English
SHOOT, PLAY BACK AND SAVE Install the battery pack and card 1 Insert the battery pack. 1 Open the battery/card compartment cover 3 Insert the battery pack 2 Insert the card. 1 Insert the card Battery pack slot 2Press the latch 2 Close the battery/card compartment cover Card slot iii English
Owners Manual
Page 15
... 11 Media cards that can be used with this camera 14 SPECIAL FEATURES 15 Movable monitor for any shooting angle 15 Capture still shots while recording a video clip 16 Easy to shoot vertically oriented photos 16 Lots of accessories for optimal use of your captured images ....... 17 SYSTEM MAP 18... „ SETUP PARTS NAMES 19 CHARGING THE BATTERY PACK 21 Recharging the battery pack 22 INSTALLING THE BATTERY PACK AND CARD 23 Install the battery pack 23 Install the card 25 TURNING THE CAMERA ON AND OFF 26 Turning on the camera 26...
... 11 Media cards that can be used with this camera 14 SPECIAL FEATURES 15 Movable monitor for any shooting angle 15 Capture still shots while recording a video clip 16 Easy to shoot vertically oriented photos 16 Lots of accessories for optimal use of your captured images ....... 17 SYSTEM MAP 18... „ SETUP PARTS NAMES 19 CHARGING THE BATTERY PACK 21 Recharging the battery pack 22 INSTALLING THE BATTERY PACK AND CARD 23 Install the battery pack 23 Install the card 25 TURNING THE CAMERA ON AND OFF 26 Turning on the camera 26...
Owners Manual
Page 17
... 123 OPERATION SOUNDS 124 POST-VIEW SETTING 126 WIND NOISE REDUCTION 127 NOISE-REDUCTION FUNCTION 128 ADJUST THE IMAGE QUALITY 129 FLICKER-REDUCTION 130 DIGITAL ZOOM SETTING 131 ASSIGN SET BUTTON FUNCTIONS 132 MONITOR BRIGHTNESS 134 SCREEN LANGUAGE 135 TV SYSTEM SETTING 136 POWER SAVE FUNCTION 137 FILE NO.... 117 SMOOTH PLAYBACK 118 DISPLAYING IMAGE PROPERTIES (INFORMATION SCREEN) .... 119 „ OPTION SETTINGS DISPLAYING THE OPTION MENU 120 Overview of images and video recording time 145 For audio data 145 CHECKING THE REMAINING BATTERY PACK CHARGE 146 3 English
... 123 OPERATION SOUNDS 124 POST-VIEW SETTING 126 WIND NOISE REDUCTION 127 NOISE-REDUCTION FUNCTION 128 ADJUST THE IMAGE QUALITY 129 FLICKER-REDUCTION 130 DIGITAL ZOOM SETTING 131 ASSIGN SET BUTTON FUNCTIONS 132 MONITOR BRIGHTNESS 134 SCREEN LANGUAGE 135 TV SYSTEM SETTING 136 POWER SAVE FUNCTION 137 FILE NO.... 117 SMOOTH PLAYBACK 118 DISPLAYING IMAGE PROPERTIES (INFORMATION SCREEN) .... 119 „ OPTION SETTINGS DISPLAYING THE OPTION MENU 120 Overview of images and video recording time 145 For audio data 145 CHECKING THE REMAINING BATTERY PACK CHARGE 146 3 English
Owners Manual
Page 18
of Images/Possible Shooting Time/ Possible Recording Time 180 Concerning the multi-indicator 181 Supplied battery pack charger 182 Supplied Li-ion battery pack 182 Others 183 HINTS FOR TAKING PICTURES 184 English 4 „ OTHER DEVICES AND CONNECTIONS CONNECTING TO A TV 148 CONNECTING HEADPHONES 149 DIRECT PRINTING 150 ...; APPENDICES COMMONLY ASKED QUESTIONS 159 TROUBLESHOOTING 166 Camera 166 Notes regarding the Scene Select feature and filters 174 SPECIFICATIONS 176 Camera 176 Camera connectors 179 Battery life 179 Possible No.
of Images/Possible Shooting Time/ Possible Recording Time 180 Concerning the multi-indicator 181 Supplied battery pack charger 182 Supplied Li-ion battery pack 182 Others 183 HINTS FOR TAKING PICTURES 184 English 4 „ OTHER DEVICES AND CONNECTIONS CONNECTING TO A TV 148 CONNECTING HEADPHONES 149 DIRECT PRINTING 150 ...; APPENDICES COMMONLY ASKED QUESTIONS 159 TROUBLESHOOTING 166 Camera 166 Notes regarding the Scene Select feature and filters 174 SPECIFICATIONS 176 Camera 176 Camera connectors 179 Battery life 179 Possible No.

Owners Manual
Page 23
CHECKING THE INCLUDED ACCESSORIES i Neckstrap and soft case (pages 11 and 13): 1 set i SANYO Software Pack (CD-ROM) (page 4 in the SANYO Software Pack INSTRUCTION MANUAL): 2 i Li-ion battery pack (pages 21 and 23): 1 i Lithium-ion battery pack charger and power cord (page 21): 1 i Dedicated USB interface cable (page 150, pages 8 and 20 in the SANYO Software Pack INSTRUCTION MANUAL): 1 i Dedicated AV interface cable (page 148): 1 9 English
CHECKING THE INCLUDED ACCESSORIES i Neckstrap and soft case (pages 11 and 13): 1 set i SANYO Software Pack (CD-ROM) (page 4 in the SANYO Software Pack INSTRUCTION MANUAL): 2 i Li-ion battery pack (pages 21 and 23): 1 i Lithium-ion battery pack charger and power cord (page 21): 1 i Dedicated USB interface cable (page 150, pages 8 and 20 in the SANYO Software Pack INSTRUCTION MANUAL): 1 i Dedicated AV interface cable (page 148): 1 9 English

Owners Manual
Page 34
Rear [ ] button Multi-indicator [ ] button Monitor ON/OFF button Battery/card compartment cover Bottom Zoom switch REC/PLAY button SET button MENU button USB terminal Tripod stand hole English 20
Rear [ ] button Multi-indicator [ ] button Monitor ON/OFF button Battery/card compartment cover Bottom Zoom switch REC/PLAY button SET button MENU button USB terminal Tripod stand hole English 20
Owners Manual
Page 35
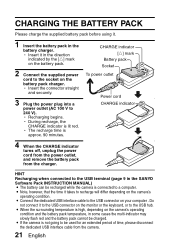
... V to the USB hub. h During recharge, the CHARGE indicator is connected to the USB terminal (page 9 in the SANYO Software Pack INSTRUCTION MANUAL) i The battery can be recharged while the camera is lit red. i If the camera is approx. 90 minutes. HINT Recharging when connected ...h Recharging begins. h The recharge time is not going to the USB connector on the battery pack charger. h Insert it . 1 Insert the battery pack in the battery charger. CHARGE indicator [o] mark Battery pack Socket To power outlet Power cord CHARGE indicator 4 When the CHARGE indicator turns off,...
... V to the USB hub. h During recharge, the CHARGE indicator is connected to the USB terminal (page 9 in the SANYO Software Pack INSTRUCTION MANUAL) i The battery can be recharged while the camera is lit red. i If the camera is approx. 90 minutes. HINT Recharging when connected ...h Recharging begins. h The recharge time is not going to the USB connector on the battery pack charger. h Insert it . 1 Insert the battery pack in the battery charger. CHARGE indicator [o] mark Battery pack Socket To power outlet Power cord CHARGE indicator 4 When the CHARGE indicator turns off,...
Owners Manual
Page 36
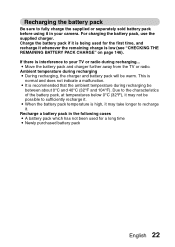
...recharge it. This is low (see "CHECKING THE REMAINING BATTERY PACK CHARGE" on page 146). Recharging the battery pack Be sure to fully charge the supplied or separately sold battery pack before using it . i Move the battery pack and charger further away from the TV or radio... malfunction. i It is interference to sufficiently recharge it in the following cases i A battery pack which has not been used for a long time i Newly purchased battery pack English 22 Recharge a battery pack in your TV or radio during recharging... Ambient temperature during recharging be possible to ...
...recharge it. This is low (see "CHECKING THE REMAINING BATTERY PACK CHARGE" on page 146). Recharging the battery pack Be sure to fully charge the supplied or separately sold battery pack before using it . i Move the battery pack and charger further away from the TV or radio... malfunction. i It is interference to sufficiently recharge it in the following cases i A battery pack which has not been used for a long time i Newly purchased battery pack English 22 Recharge a battery pack in your TV or radio during recharging... Ambient temperature during recharging be possible to ...
Owners Manual
Page 37
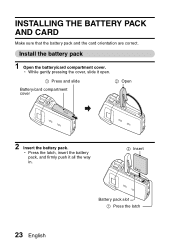
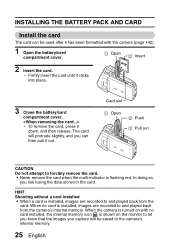
Install the battery pack 1 Open the battery/card compartment cover. h While gently pressing the cover, slide it all the way in. 2 Insert 23 English Battery pack slot 1 Press the latch INSTALLING THE BATTERY PACK AND CARD Make sure that the battery pack and the card orientation are correct. h Press the latch, insert the battery pack, and firmly push it open. 1 Press and slide 2 Open Battery/card compartment cover 2 Insert the battery pack.
Install the battery pack 1 Open the battery/card compartment cover. h While gently pressing the cover, slide it all the way in. 2 Insert 23 English Battery pack slot 1 Press the latch INSTALLING THE BATTERY PACK AND CARD Make sure that the battery pack and the card orientation are correct. h Press the latch, insert the battery pack, and firmly push it open. 1 Press and slide 2 Open Battery/card compartment cover 2 Insert the battery pack.

Owners Manual
Page 38
...is turned off, and it is therefore recommended that the battery pack be removed from the camera if it closed. h Press the latch securing the battery pack, and remove the battery pack. 1 Open 3 Pull out 2 Press the latch 3 Close the battery/card compartment cover. Before using the camera for a long...be cleared. Be sure to confirm that when the battery pack is not going to be sure to fully charge the battery pack (page 21). i A small amount of purchase the battery pack is still used for a long time, remove the battery pack. English 24 Note that the camera settings are...
...is turned off, and it is therefore recommended that the battery pack be removed from the camera if it closed. h Press the latch securing the battery pack, and remove the battery pack. 1 Open 3 Pull out 2 Press the latch 3 Close the battery/card compartment cover. Before using the camera for a long...be cleared. Be sure to confirm that when the battery pack is not going to be sure to fully charge the battery pack (page 21). i A small amount of purchase the battery pack is still used for a long time, remove the battery pack. English 24 Note that the camera settings are...
Owners Manual
Page 39
...to the camera's internal memory. 25 English The card will be used after it has been formatted with no card is installed, images are recorded to and played back from the camera's internal memory. When no card installed, the internal memory icon is shown on with the camera (page...2 Insert the card. i Never remove the card when the multi-indicator is flashing red. INSTALLING THE BATTERY PACK AND CARD Install the card The card can then pull it clicks into place. 3 Close the battery/card compartment cover. Card slot 1 Open 2 Push 3 Pull out CAUTION Do not attempt to forcibly ...
...to the camera's internal memory. 25 English The card will be used after it has been formatted with no card is installed, images are recorded to and played back from the camera's internal memory. When no card installed, the internal memory icon is shown on with the camera (page...2 Insert the card. i Never remove the card when the multi-indicator is flashing red. INSTALLING THE BATTERY PACK AND CARD Install the card The card can then pull it clicks into place. 3 Close the battery/card compartment cover. Card slot 1 Open 2 Push 3 Pull out CAUTION Do not attempt to forcibly ...
Owners Manual
Page 40
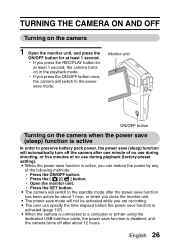
...dedicated USB interface cable, the power save function is disabled, and the camera turns off the camera after about 1 hour, or when you are recording. h Open the monitor unit. i The user can restore the power by any of no use during playback (factory-preset setting). i When ... save function is activated (page 137). English 26 Monitor unit ON/OFF button Turning on in the playback mode. i The camera will switch to preserve battery pack power, the power save (sleep) function will not be activated while you close the monitor unit. h Press the SET button. h Press the [...
...dedicated USB interface cable, the power save function is disabled, and the camera turns off the camera after about 1 hour, or when you are recording. h Open the monitor unit. i The user can restore the power by any of no use during playback (factory-preset setting). i When ... save function is activated (page 137). English 26 Monitor unit ON/OFF button Turning on in the playback mode. i The camera will switch to preserve battery pack power, the power save (sleep) function will not be activated while you close the monitor unit. h Press the SET button. h Press the [...
Owners Manual
Page 46
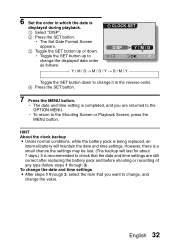
... to change, and change the value. h The date and time setting is recommended to check that you are still correct after replacing the battery pack and before shooting or recording of any type (follow steps 1 through 3). However, there is a small chance the settings may be lost. (The backup will maintain the date... button up or down to the Shooting Screen or Playback Screen, press the MENU button. HINT About the clock backup i Under normal conditions, while the battery pack is displayed during playback. 1 Select "DISP". 2 Press the SET button.
... to change, and change the value. h The date and time setting is recommended to check that you are still correct after replacing the battery pack and before shooting or recording of any type (follow steps 1 through 3). However, there is a small chance the settings may be lost. (The backup will maintain the date... button up or down to the Shooting Screen or Playback Screen, press the MENU button. HINT About the clock backup i Under normal conditions, while the battery pack is displayed during playback. 1 Select "DISP". 2 Press the SET button.
Owners Manual
Page 76
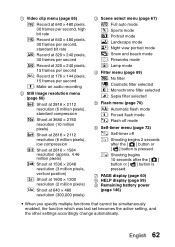
... 30 frames per second, high bit rate a: Record at 640 × 480 pixels, 30 frames per second, standard bit rate l: Record at 320 × 240 pixels, 30 frames per second d: Record at 320 × 240 pixels, 15 frames per second e: Record at 176 × 144 pixels, 15 frames ...is pressed. x: Shooting begins 10 seconds after the [ ] button or [ ] button is pressed. 7 PAGE display (page 60) 8 HELP display (page 59) 9 Remaining battery power (page 146) i When you specify multiple functions that cannot be simultaneously enabled, the function which was last set becomes the active setting, and the...
... 30 frames per second, high bit rate a: Record at 640 × 480 pixels, 30 frames per second, standard bit rate l: Record at 320 × 240 pixels, 30 frames per second d: Record at 320 × 240 pixels, 15 frames per second e: Record at 176 × 144 pixels, 15 frames ...is pressed. x: Shooting begins 10 seconds after the [ ] button or [ ] button is pressed. 7 PAGE display (page 60) 8 HELP display (page 59) 9 Remaining battery power (page 146) i When you specify multiple functions that cannot be simultaneously enabled, the function which was last set becomes the active setting, and the...

Owners Manual
Page 78
... display (page 59) 9 Remaining battery power (page 146) i When you specify multiple functions that cannot be simultaneously enabled, the function which was last set becomes the active setting, and the other settings accordingly change automatically. English 64 u: Sets the sensitivity to ISO 200 equivalent (video clip recording mode: ISO 1800). w: Sets the...
... display (page 59) 9 Remaining battery power (page 146) i When you specify multiple functions that cannot be simultaneously enabled, the function which was last set becomes the active setting, and the other settings accordingly change automatically. English 64 u: Sets the sensitivity to ISO 200 equivalent (video clip recording mode: ISO 1800). w: Sets the...
Owners Manual
Page 99
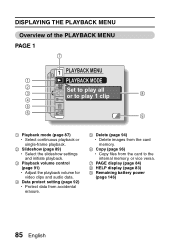
... memory. 6 Copy (page 96) h Copy files from the card to the internal memory, or vice versa. 7 PAGE display (page 84) 8 HELP display (page 83) 9 Remaining battery power (page 146) 85 English
... memory. 6 Copy (page 96) h Copy files from the card to the internal memory, or vice versa. 7 PAGE display (page 84) 8 HELP display (page 83) 9 Remaining battery power (page 146) 85 English
Owners Manual
Page 100
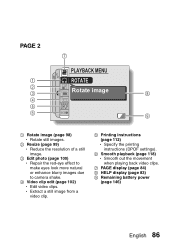
... instructions (DPOF settings). 6 Smooth playback (page 118) h Smooth out the movement when playing back video clips. 7 PAGE display (page 84) 8 HELP display (page 83) 9 Remaining battery power (page 146) English 86 PAGE 2 7 PLAYBACK MENU 1 ROTATE 2 3 Rotate image 8 4 5 6 9 1 Rotate image (page 98) h Rotate still images. 2 Resize (page 99) h Reduce the resolution of...
... instructions (DPOF settings). 6 Smooth playback (page 118) h Smooth out the movement when playing back video clips. 7 PAGE display (page 84) 8 HELP display (page 83) 9 Remaining battery power (page 146) English 86 PAGE 2 7 PLAYBACK MENU 1 ROTATE 2 3 Rotate image 8 4 5 6 9 1 Rotate image (page 98) h Rotate still images. 2 Resize (page 99) h Reduce the resolution of...
Owners Manual
Page 121
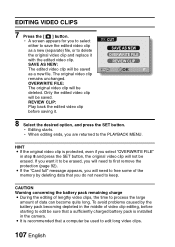
... Select the desired option, and press the SET button. HINT i If the original video clip is installed in the camera. CAUTION Warning concerning the battery pack remaining charge i During the editing of lengthy video clips, the time to process the large amount of video clip editing, before saving it.... the edited video clip as a new file. OVERWRITE FILE: The original video clip will be used to free some of the memory by the battery pack becoming depleted in step 8 and press the SET button, the original video clip will not be deleted. h Editing starts. The original video...
... Select the desired option, and press the SET button. HINT i If the original video clip is installed in the camera. CAUTION Warning concerning the battery pack remaining charge i During the editing of lengthy video clips, the time to process the large amount of video clip editing, before saving it.... the edited video clip as a new file. OVERWRITE FILE: The original video clip will be used to free some of the memory by the battery pack becoming depleted in step 8 and press the SET button, the original video clip will not be deleted. h Editing starts. The original video...
Owners Manual
Page 124
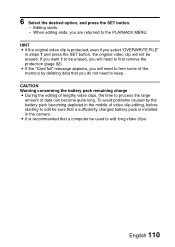
...video clip is protected, even if you will not be used to free some of the memory by the battery pack becoming depleted in the camera. CAUTION Warning concerning the battery pack remaining charge i During the editing of lengthy video clips, the time to process the large amount ... to keep. 6 Select the desired option, and press the SET button. h Editing starts. To avoid problems caused by deleting data that a sufficiently charged battery pack is recommended that a computer be erased. i If the "Card full" message appears, you do not need to the PLAYBACK MENU. i It is...
...video clip is protected, even if you will not be used to free some of the memory by the battery pack becoming depleted in the camera. CAUTION Warning concerning the battery pack remaining charge i During the editing of lengthy video clips, the time to process the large amount ... to keep. 6 Select the desired option, and press the SET button. h Editing starts. To avoid problems caused by deleting data that a sufficiently charged battery pack is recommended that a computer be erased. i If the "Card full" message appears, you do not need to the PLAYBACK MENU. i It is...
Owners Manual
Page 133
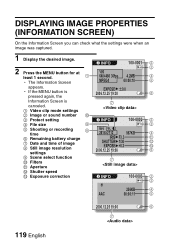
....25 19:30 6 Information Screen is canceled. 1 Video clip mode settings 7 2 Image or sound number ; 3 Protect setting 4 File size INFO 9 100-0002 2 3 5 Shooting or recording 8 time 6 Remaining battery charge 7 Date and time of image 8 Still image resolution settings 2816 2112 987KB F3.3 1/30 +0.3 2006.12.25 19:00 4 A B C 6 9 Scene select function 0 Filters...
....25 19:30 6 Information Screen is canceled. 1 Video clip mode settings 7 2 Image or sound number ; 3 Protect setting 4 File size INFO 9 100-0002 2 3 5 Shooting or recording 8 time 6 Remaining battery charge 7 Date and time of image 8 Still image resolution settings 2816 2112 987KB F3.3 1/30 +0.3 2006.12.25 19:00 4 A B C 6 9 Scene select function 0 Filters...


