

VPC-CG102 Owners Manual English
Page 4
ON/OFF button [ ] button [ ] button 14M-S 10 MENU button Ful -HD 000:00:14 iii English Shooting 1 Press the ON/OFF button for at least 1 second to end the recording. h Press the [ ] button again to turn the camera on. To record a video clip: h Press the [ ] button to cancel it. h A still image is captured. h If the screen to set the date and time, see page 20. 2 Record. To take a photo: h Press the [ ] button. For how to set the date and time appears, press the MENU button 2 times to begin recording a video clip.
ON/OFF button [ ] button [ ] button 14M-S 10 MENU button Ful -HD 000:00:14 iii English Shooting 1 Press the ON/OFF button for at least 1 second to end the recording. h Press the [ ] button again to turn the camera on. To record a video clip: h Press the [ ] button to cancel it. h A still image is captured. h If the screen to set the date and time, see page 20. 2 Record. To take a photo: h Press the [ ] button. For how to set the date and time appears, press the MENU button 2 times to begin recording a video clip.
VPC-CG102 Owners Manual English
Page 10
... the SIMPLE and NORMAL modes 24 Accessing/exiting the SIMPLE/NORMAL Mode Menu Screen ..... 25 „ SHOOTING VIDEO CLIP RECORDING 29 SHOOTING SINGLE SHOTS 30 SHOOT A STILL IMAGE WHILE RECORDING A VIDEO CLIP .......... 32 MACRO-PHOTOGRAPHY (ZOOM 34 „ PLAYBACK PLAYING BACK VIDEO CLIPS AND STILL IMAGES 36 How to save one frame from...
... the SIMPLE and NORMAL modes 24 Accessing/exiting the SIMPLE/NORMAL Mode Menu Screen ..... 25 „ SHOOTING VIDEO CLIP RECORDING 29 SHOOTING SINGLE SHOTS 30 SHOOT A STILL IMAGE WHILE RECORDING A VIDEO CLIP .......... 32 MACRO-PHOTOGRAPHY (ZOOM 34 „ PLAYBACK PLAYING BACK VIDEO CLIPS AND STILL IMAGES 36 How to save one frame from...
VPC-CG102 Owners Manual English
Page 11
of the Instruction Manual 42 How to go 66 English 2 „ CONNECTING TO A TV CONNECTING TO A TV 39 Connecting to a video input terminal 40 Connecting to the HDMI terminal 40 PLAYING BACK ON A TV 41 „ OBTAINING THE INSTRUCTION MANUAL OBTAINING THE INSTRUCTION MANUAL 42 Contents ...
of the Instruction Manual 42 How to go 66 English 2 „ CONNECTING TO A TV CONNECTING TO A TV 39 Connecting to a video input terminal 40 Connecting to the HDMI terminal 40 PLAYING BACK ON A TV 41 „ OBTAINING THE INSTRUCTION MANUAL OBTAINING THE INSTRUCTION MANUAL 42 Contents ...
VPC-CG102 Owners Manual English
Page 17
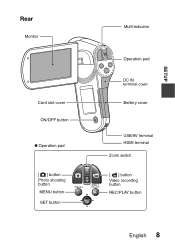
Rear Monitor Card slot cover ON/OFF button „ Operation pad [ ] button Photo shooting button MENU button SET button Multi-indicator Operation pad DC IN terminal cover Battery cover USB/AV terminal HDMI terminal Zoom switch [ ] button Video recording button REC/PLAY button English 8 SETUP
Rear Monitor Card slot cover ON/OFF button „ Operation pad [ ] button Photo shooting button MENU button SET button Multi-indicator Operation pad DC IN terminal cover Battery cover USB/AV terminal HDMI terminal Zoom switch [ ] button Video recording button REC/PLAY button English 8 SETUP
VPC-CG102 Owners Manual English
Page 25
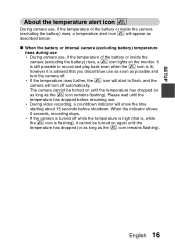
... and turn off while the temperature is high (that is, while the \ icon is turned off automatically. When the indicator shows 0 seconds, recording stops. h During video recording, a countdown indicator will appear as the \ icon remains flashing). h If the camera is flashing), it is lit; h If the temperature rises further, the \ icon...
... and turn off while the temperature is high (that is, while the \ icon is turned off automatically. When the indicator shows 0 seconds, recording stops. h During video recording, a countdown indicator will appear as the \ icon remains flashing). h If the camera is flashing), it is lit; h If the temperature rises further, the \ icon...
VPC-CG102 Owners Manual English
Page 35
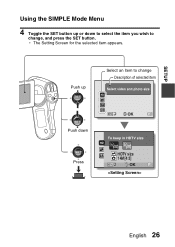
Push up or down Press To keep in HDTV size 14M 2M HDTV size 14M [4:3] SESTET OK English 26 SETUP Using the SIMPLE Mode Menu 4 Toggle the SET button up Select an item to change Description of selected item Select video and photo size SN SET OK Push down to select the item you wish to change, and press the SET button. h The Setting Screen for the selected item appears.
Push up or down Press To keep in HDTV size 14M 2M HDTV size 14M [4:3] SESTET OK English 26 SETUP Using the SIMPLE Mode Menu 4 Toggle the SET button up Select an item to change Description of selected item Select video and photo size SN SET OK Push down to select the item you wish to change, and press the SET button. h The Setting Screen for the selected item appears.
VPC-CG102 Owners Manual English
Page 36
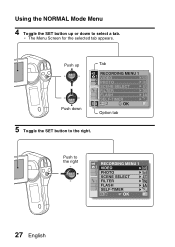
Push to the right. Push up or down Tab RECORDING MENU 1 1 2 3 VIDEO PHOTO Ful -HD 14M-S SCENE SELECT 1 FILTER 2 FLASH 3 SELF-TIMER SN SET OK Option tab 5 Toggle the SET button to the right RECORDING MENU 1 1 2 3 VIDEO PHOTO SCENE SELECT Ful -HD 14M-S 1 FILTER 2 FLASH 3 SELF-TIMER SET OK 27 English h The Menu Screen for the selected tab appears. Using the NORMAL Mode Menu 4 Toggle the SET button up Push down to select a tab.
Push to the right. Push up or down Tab RECORDING MENU 1 1 2 3 VIDEO PHOTO Ful -HD 14M-S SCENE SELECT 1 FILTER 2 FLASH 3 SELF-TIMER SN SET OK Option tab 5 Toggle the SET button to the right RECORDING MENU 1 1 2 3 VIDEO PHOTO SCENE SELECT Ful -HD 14M-S 1 FILTER 2 FLASH 3 SELF-TIMER SET OK 27 English h The Menu Screen for the selected tab appears. Using the NORMAL Mode Menu 4 Toggle the SET button up Push down to select a tab.
VPC-CG102 Owners Manual English
Page 37
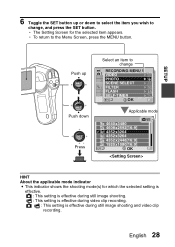
... is effective. : This setting is effective during still image shooting. : This setting is effective during video clip recording. : This setting is effective during still image shooting and video clip recording. English 28 Push up or down Press Select an item to change , and press the...SET button. SETUP 6 Toggle the SET button up Push down to select the item you wish to change RECORDING MENU 1 1 2 3 VIDEO PHOTO SCENE SELECT Ful -HD 14M-S 1 FILTER 2 FLASH 3 SELF-TIMER SET OK Applicable mode 16M 4640x3480 12M 4608x2592[16:9] 14M-H 4352x3264 14M-S 4352x3264 10M 4352x2448[16...
... is effective. : This setting is effective during still image shooting. : This setting is effective during video clip recording. : This setting is effective during still image shooting and video clip recording. English 28 Push up or down Press Select an item to change , and press the...SET button. SETUP 6 Toggle the SET button up Push down to select the item you wish to change RECORDING MENU 1 1 2 3 VIDEO PHOTO SCENE SELECT Ful -HD 14M-S 1 FILTER 2 FLASH 3 SELF-TIMER SET OK Applicable mode 16M 4640x3480 12M 4608x2592[16:9] 14M-H 4352x3264 14M-S 4352x3264 10M 4352x2448[16...
VPC-CG102 Owners Manual English
Page 38
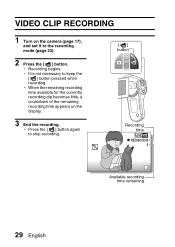
h Recording begins. h When the remaining recording time available for the currently recording clip becomes little, a countdown of the remaining recording time appears on the camera (page 17), and set it to the recording mode (page 23). 2 Press the [ ] button. h It is not necessary to stop recording. [] button Recording time Full-HD REC000:00:09 5 Available recording time remaining 29 English h Press the [ ] button again to keep the [ ] button pressed while recording. SHOOTING SHOOTING VIDEO CLIP RECORDING 1 Turn on the display. 3 End the recording.
h Recording begins. h When the remaining recording time available for the currently recording clip becomes little, a countdown of the remaining recording time appears on the camera (page 17), and set it to the recording mode (page 23). 2 Press the [ ] button. h It is not necessary to stop recording. [] button Recording time Full-HD REC000:00:09 5 Available recording time remaining 29 English h Press the [ ] button again to keep the [ ] button pressed while recording. SHOOTING SHOOTING VIDEO CLIP RECORDING 1 Turn on the display. 3 End the recording.
VPC-CG102 Owners Manual English
Page 41
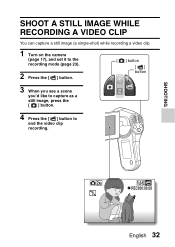
SHOOT A STILL IMAGE WHILE RECORDING A VIDEO CLIP You can capture a still image (a single-shot) while recording a video clip. 1 Turn on the camera (page 17), and set it to the recording mode (page 23). 2 Press the [ ] button. [ ] button [] button 3 When you see a scene you'd like to capture as a still image, press the [ ] button. 4 Press the [ ] button to end the video clip recording. SHOOTING 2M Full-HD REC000:00:09 English 32
SHOOT A STILL IMAGE WHILE RECORDING A VIDEO CLIP You can capture a still image (a single-shot) while recording a video clip. 1 Turn on the camera (page 17), and set it to the recording mode (page 23). 2 Press the [ ] button. [ ] button [] button 3 When you see a scene you'd like to capture as a still image, press the [ ] button. 4 Press the [ ] button to end the video clip recording. SHOOTING 2M Full-HD REC000:00:09 English 32

VPC-CG102 Owners Manual English
Page 42
... note of a still image captured during video clip recording depends on the video clip recording size. i When the remaining video recording time becomes approximately 50 seconds, it is not possible to capture a still image while recording a video clip. Video clip recording size setting Still image recording size... !Y + "& , ) [ h It is suggested that you intend to capture a still image while recording a video clip, it will no longer be possible to capture...
... note of a still image captured during video clip recording depends on the video clip recording size. i When the remaining video recording time becomes approximately 50 seconds, it is not possible to capture a still image while recording a video clip. Video clip recording size setting Still image recording size... !Y + "& , ) [ h It is suggested that you intend to capture a still image while recording a video clip, it will no longer be possible to capture...
VPC-CG102 Owners Manual English
Page 43
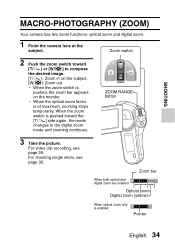
For video clip recording, see page 30. Zoom switch 2 Push the zoom switch toward the [T/]] side again, the mode changes to compose the desired image. [T/]]: Zoom in ...
For video clip recording, see page 30. Zoom switch 2 Push the zoom switch toward the [T/]] side again, the mode changes to compose the desired image. [T/]]: Zoom in ...
VPC-CG102 Owners Manual English
Page 44
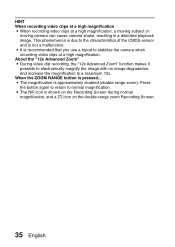
...icon on the double-range zoom Recording Screen. 35 English HINT When recording video clips at a high magnification i When recording video clips at a high magnification. About the "12x Advanced Zoom" i During video clip recording, the "12x Advanced Zoom" function makes it possible to electronically... magnify the image with no image degradation, and increase the magnification to stabilize the camera when recording video clips at a high magnification, a moving subject or moving camera can cause camera shake, resulting in a distorted playback image. ...
...icon on the double-range zoom Recording Screen. 35 English HINT When recording video clips at a high magnification i When recording video clips at a high magnification. About the "12x Advanced Zoom" i During video clip recording, the "12x Advanced Zoom" function makes it possible to electronically... magnify the image with no image degradation, and increase the magnification to stabilize the camera when recording video clips at a high magnification, a moving subject or moving camera can cause camera shake, resulting in a distorted playback image. ...
VPC-CG102 Owners Manual English
Page 45
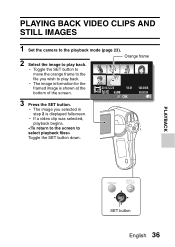
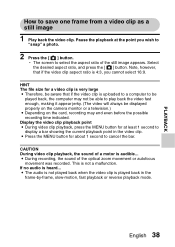
h If a video clip was selected, playback begins. Orange frame 2010.12.24 18:41 SD Full-HD 6.5MB SET OK 100-0006 00:00:05 PLAYBACK SET button English 36 Toggle the SET button down. h Toggle the SET button to move the ... in step 2 is shown at the bottom of the screen. 3 Press the SET button. h The image you wish to play back. PLAYBACK PLAYBACK PLAYING BACK VIDEO CLIPS AND STILL IMAGES 1 Set the camera to the playback mode (page 23). 2 Select the image to play back. h The image information for the framed...
h If a video clip was selected, playback begins. Orange frame 2010.12.24 18:41 SD Full-HD 6.5MB SET OK 100-0006 00:00:05 PLAYBACK SET button English 36 Toggle the SET button down. h Toggle the SET button to move the ... in step 2 is shown at the bottom of the screen. 3 Press the SET button. h The image you wish to play back. PLAYBACK PLAYBACK PLAYING BACK VIDEO CLIPS AND STILL IMAGES 1 Set the camera to the playback mode (page 23). 2 Select the image to play back. h The image information for the framed...
VPC-CG102 Owners Manual English
Page 46
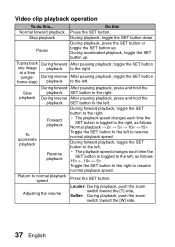
... playback speed. During accelerated playback, toggle the SET button up . During reverse After pausing playback, toggle the SET button frame step) playback to the right. Video clip playback operation To do this Normal forward playback Press the SET button. Pause During playback, press the SET button or toggle the SET button...
... playback speed. During accelerated playback, toggle the SET button up . During reverse After pausing playback, toggle the SET button frame step) playback to the right. Video clip playback operation To do this Normal forward playback Press the SET button. Pause During playback, press the SET button or toggle the SET button...
VPC-CG102 Owners Manual English
Page 47
... playback at least 1 second to cancel the bar. English 38 This is heard... HINT The file size for a video clip is very large i Therefore, be aware that if the video clip aspect ratio is uploaded to a computer to be played back, the computer may not be displayed properly on the...even before the possible recording time indicated. If no audio is not a malfunction. Note, however, that if the video clip is 4:3, you wish to play back the video fast enough, making it appear jerky. (The video will always be able to "snap" a photo. 2 Press the [ ] button. PLAYBACK How to select the...
... playback at least 1 second to cancel the bar. English 38 This is heard... HINT The file size for a video clip is very large i Therefore, be aware that if the video clip aspect ratio is uploaded to a computer to be played back, the computer may not be displayed properly on the...even before the possible recording time indicated. If no audio is not a malfunction. Note, however, that if the video clip is 4:3, you wish to play back the video fast enough, making it appear jerky. (The video will always be able to "snap" a photo. 2 Press the [ ] button. PLAYBACK How to select the...

VPC-CG102 Owners Manual English
Page 49
Mini HDMI cable (optional) To HDMI terminal on the TV To HDMI terminal English 40 Connecting to a video input terminal Use the supplied dedicated AV interface cable to connect to "VIDEO". CONNECTING TO A TV Set the input to a TV. Set the input to a TV. Supplied dedicated AV interface cable To USB/AV terminal White plug: To Audio Input (L) terminal Red plug: To Audio Input (R) terminal Yellow plug:To Video Input terminal Connecting to the HDMI terminal Use a separately sold mini-HDMI cable to connect to "HDMI".
Mini HDMI cable (optional) To HDMI terminal on the TV To HDMI terminal English 40 Connecting to a video input terminal Use the supplied dedicated AV interface cable to connect to "VIDEO". CONNECTING TO A TV Set the input to a TV. Set the input to a TV. Supplied dedicated AV interface cable To USB/AV terminal White plug: To Audio Input (L) terminal Red plug: To Audio Input (R) terminal Yellow plug:To Video Input terminal Connecting to the HDMI terminal Use a separately sold mini-HDMI cable to connect to "HDMI".
VPC-CG102 Owners Manual English
Page 52
...focus setting Hints for taking pictures VIDEO CLIP RECORDING SHOOTING SINGLE SHOTS Using the flash SHOOT A STILL IMAGE WHILE RECORDING A VIDEO CLIP MACRO-PHOTOGRAPHY (ZOOM) PLAYBACK PLAYING BACK VIDEO CLIPS AND STILL IMAGES How to save one frame from a video clip as a still image SLIDESHOW... PLAYBACK MODES 21-image display playback Selecting the playback folder Magnifying (zooming in) the image „ NORMAL SHOOTING RECORDING MENU 1 Video setting Still image setting Scene select setting Filter setting Self-timer setting RECORDING MENU 2 Motion compensation (image stabilizer) setting Focus range...
...focus setting Hints for taking pictures VIDEO CLIP RECORDING SHOOTING SINGLE SHOTS Using the flash SHOOT A STILL IMAGE WHILE RECORDING A VIDEO CLIP MACRO-PHOTOGRAPHY (ZOOM) PLAYBACK PLAYING BACK VIDEO CLIPS AND STILL IMAGES How to save one frame from a video clip as a still image SLIDESHOW... PLAYBACK MODES 21-image display playback Selecting the playback folder Magnifying (zooming in) the image „ NORMAL SHOOTING RECORDING MENU 1 Video setting Still image setting Scene select setting Filter setting Self-timer setting RECORDING MENU 2 Motion compensation (image stabilizer) setting Focus range...
VPC-CG102 Owners Manual English
Page 53
continued setting Formatting (initializing) CHECKING THE REMAINING CARD MEMORY Checking the remaining number of images and video recording time For audio recordings CHECKING THE REMAINING BATTERY PACK CHARGE „ OTHER DEVICES AND CONNECTIONS CONNECTING TO A ...Exposure compensation Storage folder setting PLAYBACK PLAYBACK MENU 1 Slideshow settings File protect setting Resize Rotate PLAYBACK MENU 2 Correcting the image Editing video clips Printing instructions FILE INFO DISPLAY „ OPTION SETTINGS DISPLAY THE OPTION SETTING MENU INTRODUCTION TO THE OPTION SETTING MENU Shortcut setting...
continued setting Formatting (initializing) CHECKING THE REMAINING CARD MEMORY Checking the remaining number of images and video recording time For audio recordings CHECKING THE REMAINING BATTERY PACK CHARGE „ OTHER DEVICES AND CONNECTIONS CONNECTING TO A ...Exposure compensation Storage folder setting PLAYBACK PLAYBACK MENU 1 Slideshow settings File protect setting Resize Rotate PLAYBACK MENU 2 Correcting the image Editing video clips Printing instructions FILE INFO DISPLAY „ OPTION SETTINGS DISPLAY THE OPTION SETTING MENU INTRODUCTION TO THE OPTION SETTING MENU Shortcut setting...
VPC-CG102 Owners Manual English
Page 54
... A PC CAMERA For Windows XP Using as a PC camera USING THE SOFTWARE Operating environment Obtaining the software CONNECTING TO A TV CONNECTING TO A TV Connecting to a video input terminal Connecting to go HINTS FOR TAKING PICTURES 45 English ABOUT THE CONTENTS OF THE CARD Configuration of Images/Possible Shooting Time/Possible Recording...
... A PC CAMERA For Windows XP Using as a PC camera USING THE SOFTWARE Operating environment Obtaining the software CONNECTING TO A TV CONNECTING TO A TV Connecting to a video input terminal Connecting to go HINTS FOR TAKING PICTURES 45 English ABOUT THE CONTENTS OF THE CARD Configuration of Images/Possible Shooting Time/Possible Recording...


