Installation Manual
Page 1
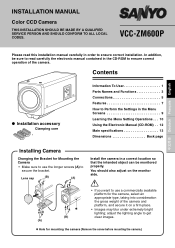
... Menu Screens 9 Learning the Menu Setting Operations . . . 10 Using the Electronic Manual (CD-ROM) . . 12 Main specifications 13 Dimensions Back page Installing Camera Changing the Bracket for mounting the camera (Remove the screw before mounting the camera.) INSTALLATION MANUAL Color CCD Camera THIS INSTALLATION SHOULD BE MADE BY A QUALIFIED SERVICE PERSON AND SHOULD CONFORM TO ALL LOCAL CODES. In addition, be monitored properly. adjust the lighting angle to get (B) clear images...
... Menu Screens 9 Learning the Menu Setting Operations . . . 10 Using the Electronic Manual (CD-ROM) . . 12 Main specifications 13 Dimensions Back page Installing Camera Changing the Bracket for mounting the camera (Remove the screw before mounting the camera.) INSTALLATION MANUAL Color CCD Camera THIS INSTALLATION SHOULD BE MADE BY A QUALIFIED SERVICE PERSON AND SHOULD CONFORM TO ALL LOCAL CODES. In addition, be monitored properly. adjust the lighting angle to get (B) clear images...
Installation Manual
Page 2
...using a chemical cloth, make sure to magnetic fields The magnetic fields may result in a kitchen or boiler room, as the temperature may rise to the unit. Turn off the power immediately and disconnect the power cord, and then consult your dealer or an Authorized Sanyo Service Center. ■ Do not open or modify Do not open... unit. Information To User Precautions ■ In case of a problem Do not use benzine, thinner or other chemical products on the cabinet, as this may cause damage or paint peeling. 1 Be careful when installing close to read all accompanying instructions.
...using a chemical cloth, make sure to magnetic fields The magnetic fields may result in a kitchen or boiler room, as the temperature may rise to the unit. Turn off the power immediately and disconnect the power cord, and then consult your dealer or an Authorized Sanyo Service Center. ■ Do not open or modify Do not open... unit. Information To User Precautions ■ In case of a problem Do not use benzine, thinner or other chemical products on the cabinet, as this may cause damage or paint peeling. 1 Be careful when installing close to read all accompanying instructions.

Installation Manual
Page 3
..., should be disposed of separately from your local community waste collection/ recycling centre. Please help us to the countries in the other area of the copyright holder. 2 This installation manual and the electronic manual are copyrighted by Russian Federation. This symbol means that...the environment we live in any format without the prior permission of the world. No materials contained in these manuals may be recycled and reused. This symbol mark and recycle system are separate collection systems for used electrical and electronic products. SANYO FISHER Sales (...
..., should be disposed of separately from your local community waste collection/ recycling centre. Please help us to the countries in the other area of the copyright holder. 2 This installation manual and the electronic manual are copyrighted by Russian Federation. This symbol means that...the environment we live in any format without the prior permission of the world. No materials contained in these manuals may be recycled and reused. This symbol mark and recycle system are separate collection systems for used electrical and electronic products. SANYO FISHER Sales (...

Installation Manual
Page 4
...-lock) Used to connect the alarm device that an alarm is detected. 3 COM terminal (earth terminal) 4 FOCUS terminal Used to perform the focus adjustment remotely by connecting an external switch. • DC ± (6 - 12 V), +: FAR, -: NEAR 5 ZOOM terminal Used to zoom in/out by connecting an external switch. • DC ± (6 - 12 V), +: WIDE, -: TELE 123 A B COM RS485 UTP 3 POWER lamp 1 2 ALARM IN 1 ALARM OUT FOCUS POWER VIDEO OUT...
...-lock) Used to connect the alarm device that an alarm is detected. 3 COM terminal (earth terminal) 4 FOCUS terminal Used to perform the focus adjustment remotely by connecting an external switch. • DC ± (6 - 12 V), +: FAR, -: NEAR 5 ZOOM terminal Used to zoom in/out by connecting an external switch. • DC ± (6 - 12 V), +: WIDE, -: TELE 123 A B COM RS485 UTP 3 POWER lamp 1 2 ALARM IN 1 ALARM OUT FOCUS POWER VIDEO OUT...

Installation Manual
Page 5
CAMERA VER PROTOCOL ADDRESS X.XX-XX XXXX X Side panel 1 2 SET b For zoom/focus While viewing the live image, you can perform focusing or zooming operation. 1 c: Wide d: Tele j: Near l: Far 2 Pressing the button once starts auto-focus function. c: Changes the setting value or moves the cursor to the next one. 4 Connect this terminal to the power supply. • When the camera is turned on the startup screen for about 10 seconds. b For menu operations 1 j: Moves the...
CAMERA VER PROTOCOL ADDRESS X.XX-XX XXXX X Side panel 1 2 SET b For zoom/focus While viewing the live image, you can perform focusing or zooming operation. 1 c: Wide d: Tele j: Near l: Far 2 Pressing the button once starts auto-focus function. c: Changes the setting value or moves the cursor to the next one. 4 Connect this terminal to the power supply. • When the camera is turned on the startup screen for about 10 seconds. b For menu operations 1 j: Moves the...
Installation Manual
Page 6
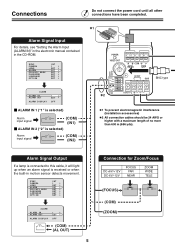
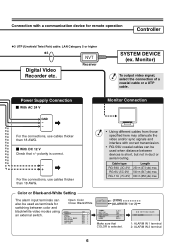
... not connect the power cord until all other connections have been completed. ✱1 Alarm Signal Input For details, see "Setting the Alarm Input (ALARM IN)" in the electronic manual contained in motion sensor detects movement. SYNC CAMERA LENS ALARM PRIVACY MASK PASSWORD LANGUAGE OPTION INT 1 y SET y SET y SET y SET y SET y SET y POWER VIDEO OUT A B COM RS485 UTP ALARM IN 2 AC24V GND BNC type ALARM IN 1 ALARM OUT FOCUS COM ZOOM...
... not connect the power cord until all other connections have been completed. ✱1 Alarm Signal Input For details, see "Setting the Alarm Input (ALARM IN)" in the electronic manual contained in motion sensor detects movement. SYNC CAMERA LENS ALARM PRIVACY MASK PASSWORD LANGUAGE OPTION INT 1 y SET y SET y SET y SET y SET y SET y POWER VIDEO OUT A B COM RS485 UTP ALARM IN 2 AC24V GND BNC type ALARM IN 1 ALARM OUT FOCUS COM ZOOM...
Installation Manual
Page 7
... black/white video modes using an external switch. Open: Color Close: Black/White SYNC CAMERA LENS ALARM PRIVACY MASK PASSWORD LANGUAGE OPTION INT 1 y SET y SET y SET y SET y SET y SET y (COM) (ALARM IN 1 or 2) GAMMA MOTION POSITION DAY/NIGHT PRESET MENU 0.45 OFF OFF COLORy OFF BACK Make sure that +/- Connection with correct transmission. • RG-59U coaxial cables can also be used as terminals for remote operation Controller ✱3 UTP...
... black/white video modes using an external switch. Open: Color Close: Black/White SYNC CAMERA LENS ALARM PRIVACY MASK PASSWORD LANGUAGE OPTION INT 1 y SET y SET y SET y SET y SET y SET y (COM) (ALARM IN 1 or 2) GAMMA MOTION POSITION DAY/NIGHT PRESET MENU 0.45 OFF OFF COLORy OFF BACK Make sure that +/- Connection with correct transmission. • RG-59U coaxial cables can also be used as terminals for remote operation Controller ✱3 UTP...
Installation Manual
Page 8
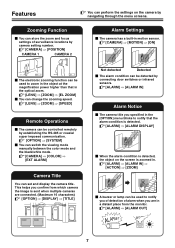
... settings on the screen is zoomed in. & [ALARM] ⇒ [ALARM IN] ⇒ [ACTION] ⇒ [ZOOM] b A buzzer or lamp can be used to notify you of detection of surveillance locations by camera setting number. & [CAMERA] ⇒ [POSITION] CAMERA 1 CAMERA 2 POSITION POSITION x 1.0 SET y x 3.0 SET y b The electronic zooming function can be used to notify that in the optical zoom. & [LENS] ⇒ [ZOOM] ⇒ [EL ZOOM] b You can change the zooming speed. & [LENS] ⇒ [ZOOM] ⇒ [SPEED] Remote Operations b The camera can be detected by connecting...
... settings on the screen is zoomed in. & [ALARM] ⇒ [ALARM IN] ⇒ [ACTION] ⇒ [ZOOM] b A buzzer or lamp can be used to notify you of detection of surveillance locations by camera setting number. & [CAMERA] ⇒ [POSITION] CAMERA 1 CAMERA 2 POSITION POSITION x 1.0 SET y x 3.0 SET y b The electronic zooming function can be used to notify that in the optical zoom. & [LENS] ⇒ [ZOOM] ⇒ [EL ZOOM] b You can change the zooming speed. & [LENS] ⇒ [ZOOM] ⇒ [SPEED] Remote Operations b The camera can be detected by connecting...

Installation Manual
Page 9
...backlight condition by hiding certain part of the monitored image. (Maximum 4 masks) & [PRIVACY MASK] Shutter Speed Settings The camera can monitor a fast-moving object. & [CAMERA] ⇒ [SHUTTER] 8 LOW MID HIGH B/W Color Switchover point & [CAMERA] ⇒ [DAY/NIGHT] ⇒ [AUTO] ⇒ [LEVEL] ...light source in the monitored image so that the white balance adjustment is properly configured. & [CAMERA] ⇒ [WHITE BALANCE] ⇒ [ATW] ⇒ [MASKING] Backlight Compensation b The camera uses 48-part split metering areas to the luminance level, the viewing mode will be used...
...backlight condition by hiding certain part of the monitored image. (Maximum 4 masks) & [PRIVACY MASK] Shutter Speed Settings The camera can monitor a fast-moving object. & [CAMERA] ⇒ [SHUTTER] 8 LOW MID HIGH B/W Color Switchover point & [CAMERA] ⇒ [DAY/NIGHT] ⇒ [AUTO] ⇒ [LEVEL] ...light source in the monitored image so that the white balance adjustment is properly configured. & [CAMERA] ⇒ [WHITE BALANCE] ⇒ [ATW] ⇒ [MASKING] Backlight Compensation b The camera uses 48-part split metering areas to the luminance level, the viewing mode will be used...

Installation Manual
Page 10
... auto-focus function is contained in the supplied CD-ROM describe the operations using the buttons. j: NEAR l: FAR d: WIDE c: TELE A Using the buttons on the camera. For details, refer to the instruction manual for 3 seconds or longer to display the main menu. 2 Moves the cursor during menu setting operations. 3 Switches the menu screen. 4 Performs focusing or zooming in/out operations. How to Perform the Settings in the Menu Screens This manual...
... auto-focus function is contained in the supplied CD-ROM describe the operations using the buttons. j: NEAR l: FAR d: WIDE c: TELE A Using the buttons on the camera. For details, refer to the instruction manual for 3 seconds or longer to display the main menu. 2 Moves the cursor during menu setting operations. 3 Switches the menu screen. 4 Performs focusing or zooming in/out operations. How to Perform the Settings in the Menu Screens This manual...

Installation Manual
Page 11
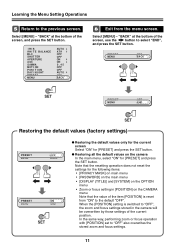
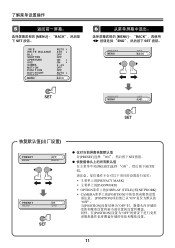
... press the SET button, the submenu screen for about 3 seconds. SYNC CAMERA LENS ALARM PRIVACY MASK PASSWORD LANGUAGE OPTION INT 1 y SET y SET y SET y SET y SET y SET y PRESET MENU OFF END 2 Select a menu item. SET After the expiration of a predetermined time interval (3 minutes) without any operation, the menu screen goes off automatically. Setting value SYNC CAMERA LENS ALARM PRIVACY MASK PASSWORD LANGUAGE OPTION INT 1 y SET y SET y SET y SET y SET y SET y Pressing the dc button switches the setting values...
... press the SET button, the submenu screen for about 3 seconds. SYNC CAMERA LENS ALARM PRIVACY MASK PASSWORD LANGUAGE OPTION INT 1 y SET y SET y SET y SET y SET y SET y PRESET MENU OFF END 2 Select a menu item. SET After the expiration of a predetermined time interval (3 minutes) without any operation, the menu screen goes off automatically. Setting value SYNC CAMERA LENS ALARM PRIVACY MASK PASSWORD LANGUAGE OPTION INT 1 y SET y SET y SET y SET y SET y SET y Pressing the dc button switches the setting values...
Installation Manual
Page 12
... all the default values on the CAMERA menu Note that the resetting operation does not reset the settings for [PRESET] and press the SET button. "BACK" at the bottom of the screen, use the dc button to "OFF", the zoom and focus settings stored in [POSITION] on the camera In the main menu, select "ON" for the following items: • [PRIVACY MASK] on main menu • [PASSWORD] on...
... all the default values on the CAMERA menu Note that the resetting operation does not reset the settings for [PRESET] and press the SET button. "BACK" at the bottom of the screen, use the dc button to "OFF", the zoom and focus settings stored in [POSITION] on the camera In the main menu, select "ON" for the following items: • [PRIVACY MASK] on main menu • [PASSWORD] on...

Installation Manual
Page 13
... to "How to use the Search function, also enable the ActiveX control. 1 Insert the CD-ROM into the CD drive of your PC, visit the Adobe website at http://www.adobe.co.com to download and install the free software program. 12 If it has not been installed on the left of the screen. • Viewing troubleshooting procedure Click "Troubleshooting" on the menu located on your computer and...
... to "How to use the Search function, also enable the ActiveX control. 1 Insert the CD-ROM into the CD drive of your PC, visit the Adobe website at http://www.adobe.co.com to download and install the free software program. 12 If it has not been installed on the left of the screen. • Viewing troubleshooting procedure Click "Troubleshooting" on the menu located on your computer and...
Installation Manual
Page 14
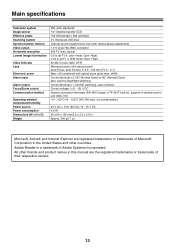
..., open collector Control voltage: ± (6 - 12) V DC System connection terminals (RS-485/Coaxial, UTP (NVT built-in this manual are registered trademarks or trademarks of their respective owners. 13 Main specifications Television system Image sensor Effective pixels Scanning system Synchronization method Video output Horizontal resolution Lowest image illumination Video S/N ratio Lens Electronic zoom Alarm input Alarm output Focus/Zoom control Communication method Operating ambient temperature/humidity Power source Power consumption...
..., open collector Control voltage: ± (6 - 12) V DC System connection terminals (RS-485/Coaxial, UTP (NVT built-in this manual are registered trademarks or trademarks of their respective owners. 13 Main specifications Television system Image sensor Effective pixels Scanning system Synchronization method Video output Horizontal resolution Lowest image illumination Video S/N ratio Lens Electronic zoom Alarm input Alarm output Focus/Zoom control Communication method Operating ambient temperature/humidity Power source Power consumption...

Installation Manual
Page 46
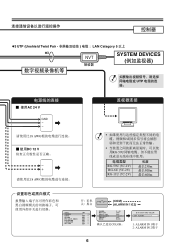
后面板 1 VIDEO OUT BNC型) 2 1 ALARM IN 1/2端子 Day/Night 2 ALARM OUT端子 3 COM 4 FOCUS端子 DC ± (6 - 12 V 5 ZOOM端子 DC ± (6 - 12 V 123 A B COM RS485 UTP 3 POWER指示灯 1 2 ALARM IN 1 ALARM OUT FOCUS POWER VIDEO OUT A B COM RS485 UTP ALARM IN 2 AC24V GND DC12V 4 COM ZOOM ALARM IN 2 ALARM IN 1 ALARM OUT 1 2 3 4 5 COM ZOOM FOCUS b 3
后面板 1 VIDEO OUT BNC型) 2 1 ALARM IN 1/2端子 Day/Night 2 ALARM OUT端子 3 COM 4 FOCUS端子 DC ± (6 - 12 V 5 ZOOM端子 DC ± (6 - 12 V 123 A B COM RS485 UTP 3 POWER指示灯 1 2 ALARM IN 1 ALARM OUT FOCUS POWER VIDEO OUT A B COM RS485 UTP ALARM IN 2 AC24V GND DC12V 4 COM ZOOM ALARM IN 2 ALARM IN 1 ALARM OUT 1 2 3 4 5 COM ZOOM FOCUS b 3
Installation Manual
Page 49
... b 使用DC 12 V - + 请使用比18 AWG RG-59U RG-59U (3C-2V) RG-6U (5C-2V) RG-11U (7C-2V) 长度 最长250m 最长500m 最长600m (COM) (ALARM IN 1ড2) SYNC CAMERA LENS ALARM PRIVACY MASK PASSWORD LANGUAGE OPTION INT 1 y SET y SET y SET y SET y SET y SET y GAMMA MOTION POSITION DAY/NIGHT PRESET MENU...
... b 使用DC 12 V - + 请使用比18 AWG RG-59U RG-59U (3C-2V) RG-6U (5C-2V) RG-11U (7C-2V) 长度 最长250m 最长500m 最长600m (COM) (ALARM IN 1ড2) SYNC CAMERA LENS ALARM PRIVACY MASK PASSWORD LANGUAGE OPTION INT 1 y SET y SET y SET y SET y SET y SET y GAMMA MOTION POSITION DAY/NIGHT PRESET MENU...

Installation Manual
Page 51
Day/Night 功能 LOW MID HIGH फռ ث & [CAMERA] ⇒ [DAY/NIGHT] ⇒ [AUTO] ⇒ [LEVEL] & [CAMERA] ⇒ [WHITE BALANCE] ⇒ [ATW] ⇒ [MASKING] 背光补偿 b 48 5 & [CAMERA] ⇒ [BLC] ⇒ [MULT] or [CENT] b & [CAMERA] ⇒ [BLC] ⇒ [MASK] 隐私掩蔽 4 & [PRIVACY MASK] & [CAMERA] ⇒ [SHUTTER] 8
Day/Night 功能 LOW MID HIGH फռ ث & [CAMERA] ⇒ [DAY/NIGHT] ⇒ [AUTO] ⇒ [LEVEL] & [CAMERA] ⇒ [WHITE BALANCE] ⇒ [ATW] ⇒ [MASKING] 背光补偿 b 48 5 & [CAMERA] ⇒ [BLC] ⇒ [MULT] or [CENT] b & [CAMERA] ⇒ [BLC] ⇒ [MASK] 隐私掩蔽 4 & [PRIVACY MASK] & [CAMERA] ⇒ [SHUTTER] 8
Installation Manual
Page 54
... OFF OFF AUTO y OFF BACK 6 MENU] - "BACK dc END SET 按钮。 PRESET MENU OFF BACK SET PRESET MENU OFF END SET PRESET MENU OFF BACK PRESET MENU ON END SET PRESET]选择 "ON SET按钮。 PRESET]选择 "ON SET按 钮。 PRIVACY MASK] PASSWORD] • OPTION DISPLAY (TITLE)]和[NETWORK] • CAMERA POSITION POSITION ON OFF...
... OFF OFF AUTO y OFF BACK 6 MENU] - "BACK dc END SET 按钮。 PRESET MENU OFF BACK SET PRESET MENU OFF END SET PRESET MENU OFF BACK PRESET MENU ON END SET PRESET]选择 "ON SET按钮。 PRESET]选择 "ON SET按 钮。 PRIVACY MASK] PASSWORD] • OPTION DISPLAY (TITLE)]和[NETWORK] • CAMERA POSITION POSITION ON OFF...
Installation Manual
Page 55
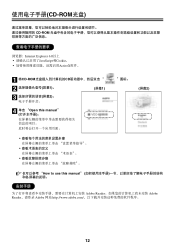
CD-ROM光盘) CD-ROM 浏览器:Internet Explorer 6.0 JavaScript和Cookie ActiveX控件。 1 将CD-ROM CD 2 1)。 (屏幕1) 3 2 4 单击 "Open this manual "图标。 (屏幕2) How to use this manual 安装手册 Adobe Reader Adobe Reader Adobe 网站 http://www.adobe.com 12
CD-ROM光盘) CD-ROM 浏览器:Internet Explorer 6.0 JavaScript和Cookie ActiveX控件。 1 将CD-ROM CD 2 1)。 (屏幕1) 3 2 4 单击 "Open this manual "图标。 (屏幕2) How to use this manual 安装手册 Adobe Reader Adobe Reader Adobe 网站 http://www.adobe.com 12

Installation Manual
Page 56
...;凝) 24 V AC ±10% (50Hz), 12 - 15 V DC 4.9W 56 x 64 x 150 (mm) 约为540g Microsoft、 ActiveX和Internet Explorer是Microsoft Corporation Adobe Reader是Adobe Systems Incorporated Dimensions 3 56 (2.2) (0.1) 147 (5.8) 10 (0.4) 64 (2.5) 11 1/4"-20UNC Unit: mm (inch) 1AC6P1P3256-L5CB2/XE (1107KP-HS) SANYO Electric Co., Ltd. Printed in China
...;凝) 24 V AC ±10% (50Hz), 12 - 15 V DC 4.9W 56 x 64 x 150 (mm) 约为540g Microsoft、 ActiveX和Internet Explorer是Microsoft Corporation Adobe Reader是Adobe Systems Incorporated Dimensions 3 56 (2.2) (0.1) 147 (5.8) 10 (0.4) 64 (2.5) 11 1/4"-20UNC Unit: mm (inch) 1AC6P1P3256-L5CB2/XE (1107KP-HS) SANYO Electric Co., Ltd. Printed in China

