
Owners Manual
Page 3
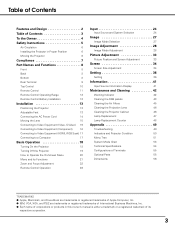
... and Design 2 Table of Contents 3 To the Owner 4 Safety Instructions 5 Air Circulation 6 Installing the Projector in Proper Position 6 Moving the Projector 6 Compliance 7 Part Names and Functions 8 Front 8 Back 8 Bottom 8 Rear Terminal 9 Top Control 10 Remote Control 11 ...47 Lamp Replacement Counter 48 Appendix 49 Troubleshooting 49 Indicators and Projector Condition 50 Menu Tree 51 System Mode Chart 53 Technical Specifications 54 Configurations of Terminals 55 Optional Parts 55 Dimensions 56 TRADEMARKS ● Apple, Macintosh, and PowerBook ...
... and Design 2 Table of Contents 3 To the Owner 4 Safety Instructions 5 Air Circulation 6 Installing the Projector in Proper Position 6 Moving the Projector 6 Compliance 7 Part Names and Functions 8 Front 8 Back 8 Bottom 8 Rear Terminal 9 Top Control 10 Remote Control 11 ...47 Lamp Replacement Counter 48 Appendix 49 Troubleshooting 49 Indicators and Projector Condition 50 Menu Tree 51 System Mode Chart 53 Technical Specifications 54 Configurations of Terminals 55 Optional Parts 55 Dimensions 56 TRADEMARKS ● Apple, Macintosh, and PowerBook ...

Owners Manual
Page 4
... systems for proper air circulation and cooling of Electronic Computer/Data Processing Equipment, ANSI/NFPA 75. Please dispose of this equipment at their end-of-life, should...KITCHEN TO PREVENT A BREAKDOWN OR DISASTER. This projector provides many years to operate improperly, read this manual. Your SANYO product is critical for used electrical and electronic ... unplug the projector from your projector seems to come. Improper operation may cause a breakdown or a disaster. NO USER-SERVICEABLE PARTS INSIDE EXCEPT LAMP REPLACEMENT. This projector produces intense ...
... systems for proper air circulation and cooling of Electronic Computer/Data Processing Equipment, ANSI/NFPA 75. Please dispose of this equipment at their end-of-life, should...KITCHEN TO PREVENT A BREAKDOWN OR DISASTER. This projector provides many years to operate improperly, read this manual. Your SANYO product is critical for used electrical and electronic ... unplug the projector from your projector seems to come. Improper operation may cause a breakdown or a disaster. NO USER-SERVICEABLE PARTS INSIDE EXCEPT LAMP REPLACEMENT. This projector produces intense ...
Owners Manual
Page 5
... sold with cloth or other materials, and the bottom opening or removing covers may touch dangerous voltage points or short out parts that the projector is provided. Wall or shelf mounting should follow the manufacturer's instructions, and should use a mounting kit approved by following ...recommended by the operating instructions as the original part. If the projector does not operate normally by the manufacturers. f. Do not place this projector from the wall outlet. The openings should never be covered with the projector. Do not attempt to service this unit ...
... sold with cloth or other materials, and the bottom opening or removing covers may touch dangerous voltage points or short out parts that the projector is provided. Wall or shelf mounting should follow the manufacturer's instructions, and should use a mounting kit approved by following ...recommended by the operating instructions as the original part. If the projector does not operate normally by the manufacturers. f. Do not place this projector from the wall outlet. The openings should never be covered with the projector. Do not attempt to service this unit ...

Owners Manual
Page 6
... cause damage to project an image. Care must not be taken. - When carrying the projector, use a suitable carrying case. - Do not touch a peripheral part of the product and to side. 20˚ Do not point the projector down the projector. Cooling fans are provided for an extended period, put any other transport service in...
... cause damage to project an image. Care must not be taken. - When carrying the projector, use a suitable carrying case. - Do not touch a peripheral part of the product and to side. 20˚ Do not point the projector down the projector. Cooling fans are provided for an extended period, put any other transport service in...
Owners Manual
Page 7
...AND EASILY ACCESSIBLE. 7 Connect the equipment into an outlet on a circuit different from the Parts Department indicated in your electrician. Use of shielded cable is indicated on , the user is...: THIS APPARATUS MUST BE EARTHED. Model Number(s) Trade Name Responsible party Address Telephone No. : PLV-Z60 : Sanyo : SANYO FISHER COMPANY : 21605 Plummer Street, Chatsworth, California 91311 : (818)998-7322 AC Power Cord...-yellow. The wire which the receiver is encouraged to try to defeat this projector meets the requirement for use the plug with the cover omitted. This equipment ...
...AND EASILY ACCESSIBLE. 7 Connect the equipment into an outlet on a circuit different from the Parts Department indicated in your electrician. Use of shielded cable is indicated on , the user is...: THIS APPARATUS MUST BE EARTHED. Model Number(s) Trade Name Responsible party Address Telephone No. : PLV-Z60 : Sanyo : SANYO FISHER COMPANY : 21605 Plummer Street, Chatsworth, California 91311 : (818)998-7322 AC Power Cord...-yellow. The wire which the receiver is encouraged to try to defeat this projector meets the requirement for use the plug with the cover omitted. This equipment ...

Owners Manual
Page 8
... Security Slot This slot is for a Kensington lock used to deter theft of ACCO Brands Corporation. !5 Adjustable Feet !6 Lamp Cover !7 RGB Panel Cleaning Hole Cover !6 !7 8 Part Names and Functions Front q Air flow w e r t y u i o !0 Back !1 ✽ S-VIDEO COMPONENT 1 HDMI 1 HDMI 2 COMPUTER COMPONENT 2 VIDEO Y Pb/Cb Pr/Cr SERVICEPORT !2 !3 !4 Bottom !5 q Exhaust Vent CAUTION Hot...
... Security Slot This slot is for a Kensington lock used to deter theft of ACCO Brands Corporation. !5 Adjustable Feet !6 Lamp Cover !7 RGB Panel Cleaning Hole Cover !6 !7 8 Part Names and Functions Front q Air flow w e r t y u i o !0 Back !1 ✽ S-VIDEO COMPONENT 1 HDMI 1 HDMI 2 COMPUTER COMPONENT 2 VIDEO Y Pb/Cb Pr/Cr SERVICEPORT !2 !3 !4 Bottom !5 q Exhaust Vent CAUTION Hot...

Owners Manual
Page 9
... Connect the S-Video output signal from video equipment to this connector (p.17). e COMPONENT 1 or COMPONENT 2 Connect the component video output signal to service the projector. Rear Terminal q we Part Names and Functions r S-VIDEO COMPONENT 1 HDMI 1 HDMI 2 COMPUTER COMPONENT 2 VIDEO Y Pb/Cb Pr/Cr SERVICEPORT t y q COMPUTER Connect the computer output signal, or RGB...
... Connect the S-Video output signal from video equipment to this connector (p.17). e COMPONENT 1 or COMPONENT 2 Connect the component video output signal to service the projector. Rear Terminal q we Part Names and Functions r S-VIDEO COMPONENT 1 HDMI 1 HDMI 2 COMPUTER COMPONENT 2 VIDEO Y Pb/Cb Pr/Cr SERVICEPORT t y q COMPUTER Connect the computer output signal, or RGB...

Owners Manual
Page 10
...Lights green during the cooling-off (pp.18, 19). r LAMP REPLACE indicator Lights yellow light when the projection lamp reaches its end of the projector exceeds the operating range (pp.42, 50). i INPUT button Select an input source (p.24). 10 Blinks green in stand-by mode. - Blinks...is in the Power management mode (p.39). - Lights red while the projector is closed during operations (p.50). Blinks red during operations. - Part Names and Functions Top Control rew q t y ui q POWER ON/STAND-BY button Turn the projector on or off period. - t MENU button Open or close the On...
...Lights green during the cooling-off (pp.18, 19). r LAMP REPLACE indicator Lights yellow light when the projection lamp reaches its end of the projector exceeds the operating range (pp.42, 50). i INPUT button Select an input source (p.24). 10 Blinks green in stand-by mode. - Blinks...is in the Power management mode (p.39). - Lights red while the projector is closed during operations (p.50). Blinks red during operations. - Part Names and Functions Top Control rew q t y ui q POWER ON/STAND-BY button Turn the projector on or off period. - t MENU button Open or close the On...
Owners Manual
Page 11
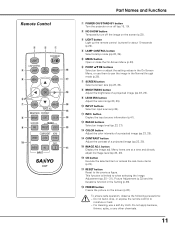
... H1/H2 !0 INFO. Do not bend, drop, or expose the remote control to the previous figure. S-VIDEO PC !1 INPUT CXVT Part Names and Functions q POWER ON/STAND-BY button Turn the projector on or off the image on the screen (p.22). u SCREEN button Select a screen size (pp.23, 34). o LENS IRIS button...
... H1/H2 !0 INFO. Do not bend, drop, or expose the remote control to the previous figure. S-VIDEO PC !1 INPUT CXVT Part Names and Functions q POWER ON/STAND-BY button Turn the projector on or off the image on the screen (p.22). u SCREEN button Select a screen size (pp.23, 34). o LENS IRIS button...
Owners Manual
Page 12
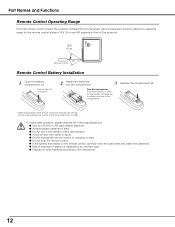
...● Do not use a new battery with a used batteries according to the initial code (Code 1) (p.39). Part Names and Functions Remote Control Operating Range Point the remote control toward the projector (Infrared Remote Receiver) when pressing any buttons. To insure safe operation, please observe the following precautions: ● Use ... an incorrect type. ● Dispose of used battery. ● Avoid contact with pins in the compartment. * When the batteries of the projector. 16.4' (5 m) 60° Remote control Remote Control Battery Installation 1 Open the battery compartment lid.
...● Do not use a new battery with a used batteries according to the initial code (Code 1) (p.39). Part Names and Functions Remote Control Operating Range Point the remote control toward the projector (Infrared Remote Receiver) when pressing any buttons. To insure safe operation, please observe the following precautions: ● Use ... an incorrect type. ● Dispose of used battery. ● Avoid contact with pins in the compartment. * When the batteries of the projector. 16.4' (5 m) 60° Remote control Remote Control Battery Installation 1 Open the battery compartment lid.

Owners Manual
Page 35
... range with captions at the wide video aspect ratio of the screen without modification. (You can be projected by stretching the image to the projector. • The image data other than 1920 x 1080. When the input signal is 1080i or 720p, a picture with a computer input. If... a part of the screen at the inputted resolution. • This projector cannot display any resolution higher than 1080i or 720p, this function is modified to fit the screen size in initial mode...
... range with captions at the wide video aspect ratio of the screen without modification. (You can be projected by stretching the image to the projector. • The image data other than 1920 x 1080. When the input signal is 1080i or 720p, a picture with a computer input. If... a part of the screen at the inputted resolution. • This projector cannot display any resolution higher than 1080i or 720p, this function is modified to fit the screen size in initial mode...
Owners Manual
Page 40
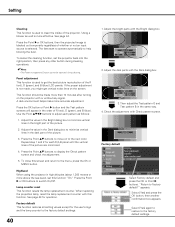
... to Factory default?" A dark environment helps make more than 10 minutes after turning on the projector with or without any other button during cleaning operations. ✔Note: • The Power ...made , you might get the best picture reproduction of the R (red), G (green), and B (blue) LCD panels. To close this function. Then adjust the Test pattern G and Test pattern B in high altitudes (about... lamp, reset the lamp replacement counter with the Dark dialog box. 3. Adjust the dark parts with this screen and return to minimize vertical lines in the Bright dialog box to help...
... to Factory default?" A dark environment helps make more than 10 minutes after turning on the projector with or without any other button during cleaning operations. ✔Note: • The Power ...made , you might get the best picture reproduction of the R (red), G (green), and B (blue) LCD panels. To close this function. Then adjust the Test pattern G and Test pattern B in high altitudes (about... lamp, reset the lamp replacement counter with the Dark dialog box. 3. Adjust the dark parts with this screen and return to minimize vertical lines in the Bright dialog box to help...
Owners Manual
Page 43
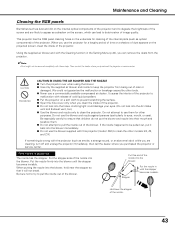
...as a shadow on the screen, which can remove the dusts from being out of oder or damaged. If something is pulled out .... Put this projector (model: Z60) to eyes, mouth, or ears). We could damage your eyes. (Do not look into their mouth and swallow them for other models: Z4, ...time or a shadow of dust appears on the projected screen, clean the inside of the projector. ● Do not look into the blower immediately. ● Do not use the projector for cleaning of the internal parts (such as optical components) of the blower. CAUTION PROHIBITED CAUTION IN USING THE AIR ...
...as a shadow on the screen, which can remove the dusts from being out of oder or damaged. If something is pulled out .... Put this projector (model: Z60) to eyes, mouth, or ears). We could damage your eyes. (Do not look into their mouth and swallow them for other models: Z4, ...time or a shadow of dust appears on the projected screen, clean the inside of the projector. ● Do not look into the blower immediately. ● Do not use the projector for cleaning of the internal parts (such as optical components) of the blower. CAUTION PROHIBITED CAUTION IN USING THE AIR ...
Owners Manual
Page 44
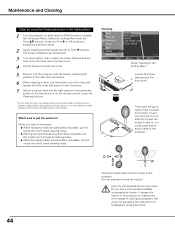
... from the screen. 6 When cleaning is blacked out temporarily. 3 Turn the projector over. Cleaning Select Cleaning in the Setting Menu 1 Turn the projector on the remote control to quit the Cleaning function. * Do not open especially while operating the projector, the optical parts could not guarantee the malfunction of cold liquid propellant. It causes...
... from the screen. 6 When cleaning is blacked out temporarily. 3 Turn the projector over. Cleaning Select Cleaning in the Setting Menu 1 Turn the projector on the remote control to quit the Cleaning function. * Do not open especially while operating the projector, the optical parts could not guarantee the malfunction of cold liquid propellant. It causes...

Owners Manual
Page 45
... your sales dealer. 4 Put the air filters back into the position and close the filter covers. Be careful not to pull the delicate filter part. 2 Pull out the air filters. For ordering the replacement filter, contact your finger on the air filter's tab and pull. 3 Remove dust...the air filters are properly and fully inserted. When the symptoms above are noticed, contact your finger on a lens, LCD panels, or optical elements inside the projector. Maintenance and Cleaning Cleaning the Air Filters The air filters prevent dust from accumulating on the filter are facing towards the...
... your sales dealer. 4 Put the air filters back into the position and close the filter covers. Be careful not to pull the delicate filter part. 2 Pull out the air filters. For ordering the replacement filter, contact your finger on the air filter's tab and pull. 3 Remove dust...the air filters are properly and fully inserted. When the symptoms above are noticed, contact your finger on a lens, LCD panels, or optical elements inside the projector. Maintenance and Cleaning Cleaning the Air Filters The air filters prevent dust from accumulating on the filter are facing towards the...

Owners Manual
Page 47
... cover, and then open the lamp cover. Screw Lamp Cover Lamp Handle Screws ORDER REPLACEMENT LAMP Replacement lamp can be ordered through your projector: ● Replacement Lamp Type No.: PLV-Z60 POA-LMP94 (Service Parts No. 610 323 5998) 47 The glass can become very hot. Lift the lamp out of the... projector by using the built in handle. 4 Replace the lamp with a new one promptly. Put the lamp cover back and secure it with the screw. ...
... cover, and then open the lamp cover. Screw Lamp Cover Lamp Handle Screws ORDER REPLACEMENT LAMP Replacement lamp can be ordered through your projector: ● Replacement Lamp Type No.: PLV-Z60 POA-LMP94 (Service Parts No. 610 323 5998) 47 The glass can become very hot. Lift the lamp out of the... projector by using the built in handle. 4 Replace the lamp with a new one promptly. Put the lamp cover back and secure it with the screw. ...

Owners Manual
Page 55
Input 16 SDA 7 TMDS Data 0+ Input 17 Ground (DDC/CEC) 8 Ground (TMDS Data 0) 18 +5V Power 9 TMDS Data 0- Optional Parts The parts listed below are optional. Input 19 Plug insert detection 10 TMDS Clock+ Input Appendix Computer terminal Terminal: VGA Pin Configuration 54 32 1 10 9 8 7 ...POA-CA-COMP10 POA-CA-SCART 55 Input 13 ----- 4 TMDS Data 1+ Input 14 ----- 5 Ground (TMDS Data 1) 15 SCL 6 TMDS Data 1- When ordering these parts, specify item name and Type No. to the sales dealer. ● Wall Anchor Kit ● HDMI Cable ● Component Cable (32.8'/10m) ● Scart-...
Input 16 SDA 7 TMDS Data 0+ Input 17 Ground (DDC/CEC) 8 Ground (TMDS Data 0) 18 +5V Power 9 TMDS Data 0- Optional Parts The parts listed below are optional. Input 19 Plug insert detection 10 TMDS Clock+ Input Appendix Computer terminal Terminal: VGA Pin Configuration 54 32 1 10 9 8 7 ...POA-CA-COMP10 POA-CA-SCART 55 Input 13 ----- 4 TMDS Data 1+ Input 14 ----- 5 Ground (TMDS Data 1) 15 SCL 6 TMDS Data 1- When ordering these parts, specify item name and Type No. to the sales dealer. ● Wall Anchor Kit ● HDMI Cable ● Component Cable (32.8'/10m) ● Scart-...
