
Owners Manual
Page 2
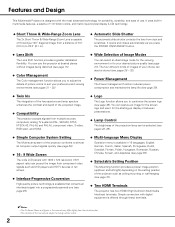
... You can project the image from the actual product. • The contents of the projector such as ceiling mounting or wall-hanging (see page 26). ◆ 16 : 9 Wide Screen The wide LCD panels with digital equipment is available in this manual are subject to almost all computer output... signals quickly (see page 37). ◆ Two HDMI Terminals The projector has two HDMI (High Definition Multimedia Interface) terminals. It opens and...
... You can project the image from the actual product. • The contents of the projector such as ceiling mounting or wall-hanging (see page 26). ◆ 16 : 9 Wide Screen The wide LCD panels with digital equipment is available in this manual are subject to almost all computer output... signals quickly (see page 37). ◆ Two HDMI Terminals The projector has two HDMI (High Definition Multimedia Interface) terminals. It opens and...
Owners Manual
Page 3
... 8 Rear Terminal 9 Top Control 10 Remote Control 11 Remote Control Operating Range 12 Remote Control Battery Installation 12 Installation 13 Positioning the Projector 13 Adjustable Feet 13 Connecting the AC Power Cord 14 Moving the Lens 15 Connecting to Video Equipment (Video, S-Video) 16 Connecting ...Connecting to Video Equipment (HDMI, RGB Scart) 17 Connecting to a Computer 17 Basic Operation 18 Turning On the Projector 18 Turning Off the Projector 19 How to Operate the On-Screen Menu 20 Menu and its Functions 21 Zoom and Focus Adjustment 22 Remote Control...
... 8 Rear Terminal 9 Top Control 10 Remote Control 11 Remote Control Operating Range 12 Remote Control Battery Installation 12 Installation 13 Positioning the Projector 13 Adjustable Feet 13 Connecting the AC Power Cord 14 Moving the Lens 15 Connecting to Video Equipment (Video, S-Video) 16 Connecting ...Connecting to Video Equipment (HDMI, RGB Scart) 17 Connecting to a Computer 17 Basic Operation 18 Turning On the Projector 18 Turning Off the Projector 19 How to Operate the On-Screen Menu 20 Menu and its Functions 21 Zoom and Focus Adjustment 22 Remote Control...

Owners Manual
Page 4
.... - If the problem still persists, contact the dealer where you to conserve the environment we live in the other accidents. Your SANYO product is unused for Protection of separately from the ceiling, clean the air intake vents, air filters, and the top of this manual...é dans une salle d'ordinateurs telle que définie dans la norme ANSI/NFPA 75 Standard for an extended time, unplug the projector from the projection lens. Operating the projector properly enables you purchased the projector or the service center. Improper operation may result in a proper position. SIDE...
.... - If the problem still persists, contact the dealer where you to conserve the environment we live in the other accidents. Your SANYO product is unused for Protection of separately from the ceiling, clean the air intake vents, air filters, and the top of this manual...é dans une salle d'ordinateurs telle que définie dans la norme ANSI/NFPA 75 Standard for an extended time, unplug the projector from the projection lens. Operating the projector properly enables you purchased the projector or the service center. Improper operation may result in a proper position. SIDE...
Owners Manual
Page 5
...operating instructions should be moved with care. Do not use a mounting kit approved by the manufacturers. Do not place this projector through cabinet slots as opening should use attachments not recommended by the manufacturer that have the same characteristics as they may expose ... service personnel. Adjust only those controls that could result in damage and will prevent damage due to normal operation. When the projector exhibits a distinct change in Nederland Bij dit produkt zijn batterijen geleverd. This will often require extensive work by persons walking on...
...operating instructions should be moved with care. Do not use a mounting kit approved by the manufacturers. Do not place this projector through cabinet slots as opening should use attachments not recommended by the manufacturer that have the same characteristics as they may expose ... service personnel. Adjust only those controls that could result in damage and will prevent damage due to normal operation. When the projector exhibits a distinct change in Nederland Bij dit produkt zijn batterijen geleverd. This will often require extensive work by persons walking on...

Owners Manual
Page 6
... must not be blocked or covered. CAUTION IN CARRYING OR TRANSPORTING THE PROJECTOR - When using or installing the projector, the following precautions should be taken when handling the projector; Do not drop or bump the projector, otherwise damages or malfunctions may reduce the lamp life and cause fire... any objects. - Improper installation may result. - do not drop, bump, subject it to the lens and cabinet. Do not transport the projector by courier or any other transport service, consult your dealer. - Do not put it into a suitable case. Hot air is exhausted from ...
... must not be blocked or covered. CAUTION IN CARRYING OR TRANSPORTING THE PROJECTOR - When using or installing the projector, the following precautions should be taken when handling the projector; Do not drop or bump the projector, otherwise damages or malfunctions may reduce the lamp life and cause fire... any objects. - Improper installation may result. - do not drop, bump, subject it to the lens and cabinet. Do not transport the projector by courier or any other transport service, consult your dealer. - Do not put it into a suitable case. Hot air is exhausted from ...
Owners Manual
Page 7
... the equipment into the power outlet. The Wires in this projector meets the requirement for the United Kingdom: This cord is a safety feature to be suitably prepared and the correct plug fitted. Model Number(s) Trade Name Responsible party Address Telephone No. : PLV-Z60 : Sanyo : SANYO FISHER COMPANY : 21605 Plummer Street, Chatsworth, California 91311 : (818)998...
... the equipment into the power outlet. The Wires in this projector meets the requirement for the United Kingdom: This cord is a safety feature to be suitably prepared and the correct plug fitted. Model Number(s) Trade Name Responsible party Address Telephone No. : PLV-Z60 : Sanyo : SANYO FISHER COMPANY : 21605 Plummer Street, Chatsworth, California 91311 : (818)998...

Owners Manual
Page 8
... w e r t y u i o !0 Back !1 ✽ S-VIDEO COMPONENT 1 HDMI 1 HDMI 2 COMPUTER COMPONENT 2 VIDEO Y Pb/Cb Pr/Cr SERVICEPORT !2 !3 !4 Bottom !5 q Exhaust Vent CAUTION Hot air is a registered trademark of the projector. *Kensington is exhausted from the exhaust vent. Do not put heat-sensitive objects near this side. w Top Controls and Indicators e Automatic Slide Shutter r Projection Lens...
... w e r t y u i o !0 Back !1 ✽ S-VIDEO COMPONENT 1 HDMI 1 HDMI 2 COMPUTER COMPONENT 2 VIDEO Y Pb/Cb Pr/Cr SERVICEPORT !2 !3 !4 Bottom !5 q Exhaust Vent CAUTION Hot air is a registered trademark of the projector. *Kensington is exhausted from the exhaust vent. Do not put heat-sensitive objects near this side. w Top Controls and Indicators e Automatic Slide Shutter r Projection Lens...

Owners Manual
Page 9
... dimensions of the HDMI connectors 0.94" (24 mm) 0.59" (15 mm) WIDTH THICKNESS 9 w S-VIDEO Connect the S-Video output signal from video equipment to service the projector.
... dimensions of the HDMI connectors 0.94" (24 mm) 0.59" (15 mm) WIDTH THICKNESS 9 w S-VIDEO Connect the S-Video output signal from video equipment to service the projector.

Owners Manual
Page 10
...red during operations. - Blinks green in the Normal through mode (p.35). i INPUT button Select an input source (p.24). 10 Lights red light when the projector detects an abnormal condition. - t MENU button Open or close the On-Screen Menu (p.20). y OK button Execute the item selected or use them to ...access the submenu items (p.20). Part Names and Functions Top Control rew q t y ui q POWER ON/STAND-BY button Turn the projector on or off period. - w POWER indicator - r LAMP REPLACE indicator Lights yellow light when the projection lamp reaches its end of the...
...red during operations. - Blinks green in the Normal through mode (p.35). i INPUT button Select an input source (p.24). 10 Lights red light when the projector detects an abnormal condition. - t MENU button Open or close the On-Screen Menu (p.20). y OK button Execute the item selected or use them to ...access the submenu items (p.20). Part Names and Functions Top Control rew q t y ui q POWER ON/STAND-BY button Turn the projector on or off period. - w POWER indicator - r LAMP REPLACE indicator Lights yellow light when the projection lamp reaches its end of the...
Owners Manual
Page 11
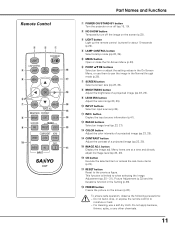
... button Adjust the contrast of a projected image (pp.23, 28). S-VIDEO PC !1 INPUT CXVT Part Names and Functions q POWER ON/STAND-BY button Turn the projector on or off the image on the screen (p.22).
... button Adjust the contrast of a projected image (pp.23, 28). S-VIDEO PC !1 INPUT CXVT Part Names and Functions q POWER ON/STAND-BY button Turn the projector on or off the image on the screen (p.22).
Owners Manual
Page 12
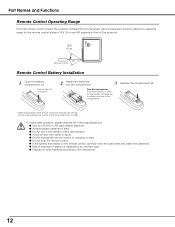
... 2 Install new batteries into the compartment. 3 Replace the compartment lid. Part Names and Functions Remote Control Operating Range Point the remote control toward the projector (Infrared Remote Receiver) when pressing any buttons. To insure safe operation, please observe the following precautions: ● Use two (2) AA or LR6 type... to the instructions. 12 Maximum operating range for the remote control is replaced by an incorrect type. ● Dispose of the projector. 16.4' (5 m) 60° Remote control Remote Control Battery Installation 1 Open the battery compartment lid.
... 2 Install new batteries into the compartment. 3 Replace the compartment lid. Part Names and Functions Remote Control Operating Range Point the remote control toward the projector (Infrared Remote Receiver) when pressing any buttons. To insure safe operation, please observe the following precautions: ● Use two (2) AA or LR6 type... to the instructions. 12 Maximum operating range for the remote control is replaced by an incorrect type. ● Dispose of the projector. 16.4' (5 m) 60° Remote control Remote Control Battery Installation 1 Open the battery compartment lid.

Owners Manual
Page 13
....1' (4.6 m) 300" 6641 x 3736 ----- 30.2' (9.2 m) ✔Notes: • The brightness in order to the figure and table below for the screen size and distance between the projector and screen. 30.2' (9.2 m) 15.1' (4.6 m) 9.8' (3.0 m) 7.9' (2.4 m) 3.9' (1.2 m) 40" 100" 80" 50" 40" 150" 75" (Inch Diagonal) 300" Max. Keystone distortion...both feet clockwise. 2 To lower or to the proper height; Zoom 150" Min. Installation Positioning the Projector This projector is recommended to limit ambient lighting in the room has a great influence on a flat projection surface ...
....1' (4.6 m) 300" 6641 x 3736 ----- 30.2' (9.2 m) ✔Notes: • The brightness in order to the figure and table below for the screen size and distance between the projector and screen. 30.2' (9.2 m) 15.1' (4.6 m) 9.8' (3.0 m) 7.9' (2.4 m) 3.9' (1.2 m) 40" 100" 80" 50" 40" 150" 75" (Inch Diagonal) 300" Max. Keystone distortion...both feet clockwise. 2 To lower or to the proper height; Zoom 150" Min. Installation Positioning the Projector This projector is recommended to limit ambient lighting in the room has a great influence on a flat projection surface ...

Owners Manual
Page 14
.... (120V AC) To the AC outlet. (200 - 240V AC) To the AC outlet. (200 - 240V AC) 14 If you use the projector. When the projector is connected to an outlet with the single-phase power systems having a grounded neutral conductor. Turn the Main On/Off switch off when the...consumes a little electric power. Confirm the AC plug type with all peripheral equipment before turning it automatically selects a correct input voltage. Connect the projector with the chart below and a proper AC power cord must be used. The AC outlet must be near this equipment and must be easily ...
.... (120V AC) To the AC outlet. (200 - 240V AC) To the AC outlet. (200 - 240V AC) 14 If you use the projector. When the projector is connected to an outlet with the single-phase power systems having a grounded neutral conductor. Turn the Main On/Off switch off when the...consumes a little electric power. Confirm the AC plug type with all peripheral equipment before turning it automatically selects a correct input voltage. Connect the projector with the chart below and a proper AC power cord must be used. The AC outlet must be near this equipment and must be easily ...

Owners Manual
Page 15
leftmost Vertical Lens Shift (Up/Down) V rightmost V V uppermost V downmost ✔Notes: • The best image is released. After adjusting the position, lock the lens with the Vertical Lens Shift Ring. Move the projection lens to adjust the position of the screen. • With the maximum horizontal lens shift, the maximum vertical lens shift cannot be moved up or down or left and right manually with the Lens Shift Rings, enabling you to the left or right with the Horizontal Lens Shift Ring. Horizontal Lens Shift Ring (Left/Right) Vertical Lens Shift Ring (Up/Down) Lens...
leftmost Vertical Lens Shift (Up/Down) V rightmost V V uppermost V downmost ✔Notes: • The best image is released. After adjusting the position, lock the lens with the Vertical Lens Shift Ring. Move the projection lens to adjust the position of the screen. • With the maximum horizontal lens shift, the maximum vertical lens shift cannot be moved up or down or left and right manually with the Lens Shift Rings, enabling you to the left or right with the Horizontal Lens Shift Ring. Horizontal Lens Shift Ring (Left/Right) Vertical Lens Shift Ring (Up/Down) Lens...

Owners Manual
Page 16
The factory default value of Fine sync. The setting can be connected up to the projector's COMPONENT 1/2 terminals, horizontal line noise may be noted only occasionally. Installation This projector can be adjusted from the AC outlet before connecting the cables. 16 Component Cable (RCA x 3) COMPONENT S-VIDEO COMPONENT ... To order the optional cables, see page 33). See the figures below for the connections. Unplug the power cords of both the projector and external equipment from 0 to +31 (see page 55. • When connecting HDTV equipment to six equipment at one time. ...
The factory default value of Fine sync. The setting can be connected up to the projector's COMPONENT 1/2 terminals, horizontal line noise may be noted only occasionally. Installation This projector can be adjusted from the AC outlet before connecting the cables. 16 Component Cable (RCA x 3) COMPONENT S-VIDEO COMPONENT ... To order the optional cables, see page 33). See the figures below for the connections. Unplug the power cords of both the projector and external equipment from 0 to +31 (see page 55. • When connecting HDTV equipment to six equipment at one time. ...

Owners Manual
Page 17
...) Use a VGA cable (commercially available) or a DVI-VGA cable (commercially available). RGB Scart Use a Scart-VGA cable (optional). Unplug the power cords of both the projector and external equipment from the AC outlet before connecting the cables.
...) Use a VGA cable (commercially available) or a DVI-VGA cable (commercially available). RGB Scart Use a Scart-VGA cable (optional). Unplug the power cords of both the projector and external equipment from the AC outlet before connecting the cables.

Owners Manual
Page 18
... POWER indicator will not be displayed on the remote control. Basic Operation Turning On the Projector 1 Complete peripheral connections (with a computer, VCR, etc.) before turning on the projector. 2 Connect the projector's AC power cord into an AC outlet and turn the Main On/Off switch on the... is moving, as this tab when handling manually. OFF ON Selected Input Source Automatic Slide Shutter Use this could cause injury or the projector to malfunction. 18 Press the POWER ON/STAND-BY button again to operate. As the automatic slide shutter opens, a preparation display appears...
... POWER indicator will not be displayed on the remote control. Basic Operation Turning On the Projector 1 Complete peripheral connections (with a computer, VCR, etc.) before turning on the projector. 2 Connect the projector's AC power cord into an AC outlet and turn the Main On/Off switch on the... is moving, as this tab when handling manually. OFF ON Selected Input Source Automatic Slide Shutter Use this could cause injury or the projector to malfunction. 18 Press the POWER ON/STAND-BY button again to operate. As the automatic slide shutter opens, a preparation display appears...

Owners Manual
Page 19
... Operation "Power off ?" disappears after use may result in a case before it is cooled down and the projector cannot be turned off without the confirmation message. (See "Power off the projector by pressing the POWER ON/STAND-BY button on the top control or on again. • Do not operate... the projector continuously without rest. Be sure to the temperature inside the projector. • If the WARNING indicator blinks or emits red light, see "Warning Indicator" on . "Power off ?" Then you ...
... Operation "Power off ?" disappears after use may result in a case before it is cooled down and the projector cannot be turned off without the confirmation message. (See "Power off the projector by pressing the POWER ON/STAND-BY button on the top control or on again. • Do not operate... the projector continuously without rest. Be sure to the temperature inside the projector. • If the WARNING indicator blinks or emits red light, see "Warning Indicator" on . "Power off ?" Then you ...
Owners Manual
Page 20
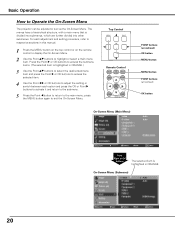
press the MENU button again to Operate the On-Screen Menu The projector can be adjusted or set via the On-Screen Menu. Top Control Remote Control LAMP NO SHOW FREEZE MENU RESET OK SCREEN IMAGE IMAGE ADJ. ...
press the MENU button again to Operate the On-Screen Menu The projector can be adjusted or set via the On-Screen Menu. Top Control Remote Control LAMP NO SHOW FREEZE MENU RESET OK SCREEN IMAGE IMAGE ADJ. ...
Owners Manual
Page 21
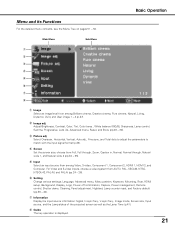
Adjust Brightness, Contrast, Color, Tint, Color temp., White balance (R/G/B), Sharpness, Lamp control, Gamma, Progressive, Lens iris, Advanced menu, Reset, and Store (pp.28 - 32). u Information Display the input source information: Signal, H-sync freq., V-sync freq., Image mode, Screen size, Input source, and the Lamp status of the projected screen as well as the Lamp Time (p.41). w Image adj. Select Overscan, Horizontal, Vertical, Auto adj., Fine sync, and Total dots to adjust the parameters to match with the input signal format (p.33). y Setting Change various settings; ...
Adjust Brightness, Contrast, Color, Tint, Color temp., White balance (R/G/B), Sharpness, Lamp control, Gamma, Progressive, Lens iris, Advanced menu, Reset, and Store (pp.28 - 32). u Information Display the input source information: Signal, H-sync freq., V-sync freq., Image mode, Screen size, Input source, and the Lamp status of the projected screen as well as the Lamp Time (p.41). w Image adj. Select Overscan, Horizontal, Vertical, Auto adj., Fine sync, and Total dots to adjust the parameters to match with the input signal format (p.33). y Setting Change various settings; ...
