Owners Manual
Page 1
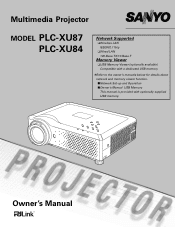
Multimedia Projector MODEL PLC-XU87 PLC-XU84 Network Supported ❏Wireless LAN IEEE802.11b/g ❏Wired LAN 100-Base-TX/10-Base-T Memory Viewer ❏USB Memory Viewer (optionally available) Compatible with a dedicated USB memory ✽Refer to the owner's manuals below for details about network and memory viewer function. ■Network Set-up and Operation ■Owner's Manual USB Memory This manual is provided with optionally supplied USB memory. Owner's Manual
Multimedia Projector MODEL PLC-XU87 PLC-XU84 Network Supported ❏Wireless LAN IEEE802.11b/g ❏Wired LAN 100-Base-TX/10-Base-T Memory Viewer ❏USB Memory Viewer (optionally available) Compatible with a dedicated USB memory ✽Refer to the owner's manuals below for details about network and memory viewer function. ■Network Set-up and Operation ■Owner's Manual USB Memory This manual is provided with optionally supplied USB memory. Owner's Manual
Owners Manual
Page 2
... allows you to ensure security of 16.77 million colors, and matrix liquid crystal display (LCD) technology. ◆ Compact Design This projector is available in size and weight. You can be selected (p.51). ◆ LAN Network Function This projector is designed with the most advanced technology for portability, durability, and ease of use of...
... allows you to ensure security of 16.77 million colors, and matrix liquid crystal display (LCD) technology. ◆ Compact Design This projector is available in size and weight. You can be selected (p.51). ◆ LAN Network Function This projector is designed with the most advanced technology for portability, durability, and ease of use of...

Owners Manual
Page 9
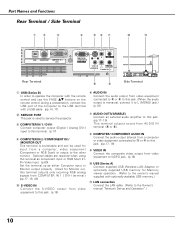
... !2 Bottom !3 !4 ✽ !5 q USB Terminal w LAN Connection Terminal e Zoom Lever r Projection Lens t Focus Ring y Lens Cover (See page 60 for the Network function. Do not put heat-sensitive objects near this side. ✔Note: q USB Terminal and w LAN Connection Terminal are for attaching.) u Infrared Remote Receiver i Top...Feet !7 Exhaust Vent CAUTION Hot air is a registered trademark of ACCO Brands Corporation. !6 9 Refer to the owner's manual "Network Set-up and Operation" and owner's manual of Memory viewer (optionally available). ✽ Kensington Security Slot This slot is for ...
... !2 Bottom !3 !4 ✽ !5 q USB Terminal w LAN Connection Terminal e Zoom Lever r Projection Lens t Focus Ring y Lens Cover (See page 60 for the Network function. Do not put heat-sensitive objects near this side. ✔Note: q USB Terminal and w LAN Connection Terminal are for attaching.) u Infrared Remote Receiver i Top...Feet !7 Exhaust Vent CAUTION Hot air is a registered trademark of ACCO Brands Corporation. !6 9 Refer to the owner's manual "Network Set-up and Operation" and owner's manual of Memory viewer (optionally available). ✽ Kensington Security Slot This slot is for ...
Owners Manual
Page 10
...type) to this terminal. (p.17) r COMPUTER IN 2 /COMPONENT IN / MONITOR OUT This terminal is switchable and can be used to service the projector. Optional cables are required when using this terminal as component input or RGB Scart 21Pin Video input. (p.69) Set the terminal up and Operation".) 10...of the computer to the USB terminal with optionally available USB memory.) !1 LAN connection Connect the LAN cable. (Refer to the Owner's manual "Network Set-up as either Computer input or Monitor output properly. (Used for Memory viewer operation. (Refer to the owner's manual supplied with a USB...
...type) to this terminal. (p.17) r COMPUTER IN 2 /COMPONENT IN / MONITOR OUT This terminal is switchable and can be used to service the projector. Optional cables are required when using this terminal as component input or RGB Scart 21Pin Video input. (p.69) Set the terminal up and Operation".) 10...of the computer to the USB terminal with optionally available USB memory.) !1 LAN connection Connect the LAN cable. (Refer to the Owner's manual "Network Set-up as either Computer input or Monitor output properly. (Used for Memory viewer operation. (Refer to the owner's manual supplied with a USB...
Owners Manual
Page 12
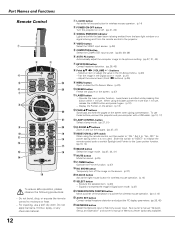
... any chemical material. 12 q L-CLICK button Act as the left mouse button for wireless mouse operation. (p.14) w POWER ON-OFF button Turn the projector on or off the image on the screen. (p.27) @0 R-CLICK button Act as the right mouse button for more than 1 minute, release the...Correct vertical keystone distortion and adjust the PC display parameters. (pp.26, 45) @4 NETWORK button Select the Network input or Memory viewer input. See owner's manual "Network Set-up and Operation" and owner's manual of the projector or a pointer for power saving when it again. (p.13) - Part Names and Functions...
... any chemical material. 12 q L-CLICK button Act as the left mouse button for wireless mouse operation. (p.14) w POWER ON-OFF button Turn the projector on or off the image on the screen. (p.27) @0 R-CLICK button Act as the right mouse button for more than 1 minute, release the...Correct vertical keystone distortion and adjust the PC display parameters. (pp.26, 45) @4 NETWORK button Select the Network input or Memory viewer input. See owner's manual "Network Set-up and Operation" and owner's manual of the projector or a pointer for power saving when it again. (p.13) - Part Names and Functions...
Owners Manual
Page 24
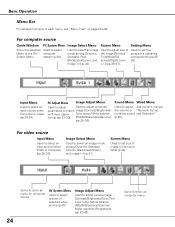
...+/-] (pp.36-37). Setting Menu Used to select computer system (p.30). Input Menu Used to adjust See owner's manual the volume or "Network Set-up mute the sound and Operation". (p.25). Sound Menu Wired Menu Used to select an input source either Video or Computer (pp.38,...Select Menu Used to select an image mode among Dynamic, Standard, Cinema, Blackboard(Green) and Image 1-4 (p.41). Screen Menu Used to set the projector's operating configurations (pp.4555). Screen Menu Used to match image [Contrast/Brightness/ with input signal Color temp./White balance format (pp.31-33). (R/G/B)/...
...+/-] (pp.36-37). Setting Menu Used to select computer system (p.30). Input Menu Used to adjust See owner's manual the volume or "Network Set-up mute the sound and Operation". (p.25). Sound Menu Wired Menu Used to select an input source either Video or Computer (pp.38,...Select Menu Used to select an image mode among Dynamic, Standard, Cinema, Blackboard(Green) and Image 1-4 (p.41). Screen Menu Used to set the projector's operating configurations (pp.4555). Screen Menu Used to match image [Contrast/Brightness/ with input signal Color temp./White balance format (pp.31-33). (R/G/B)/...
Owners Manual
Page 26
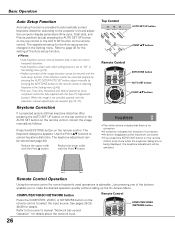
.... Use the Point ed buttons to the owner's manual "Network Set-up the On-Screen Menu. Just pressing one of correction. • An arrow disappears at the maximum correction. • If you to the projector's tilt and adjust the computer display parameters (Fine sync, ...;Perfect correction of the Auto setup function. ✔Notes: •Auto Keystone corrects vertical distortion only; Remote Control COMPUTER/VIDEO /NETWORK button 26 When the image is provided to automatically correct Keystone distortion according to make the desired operation quickly without calling up and ...
.... Use the Point ed buttons to the owner's manual "Network Set-up the On-Screen Menu. Just pressing one of correction. • An arrow disappears at the maximum correction. • If you to the projector's tilt and adjust the computer display parameters (Fine sync, ...;Perfect correction of the Auto setup function. ✔Notes: •Auto Keystone corrects vertical distortion only; Remote Control COMPUTER/VIDEO /NETWORK button 26 When the image is provided to automatically correct Keystone distortion according to make the desired operation quickly without calling up and ...

Owners Manual
Page 28
...Menu operation as Monitor out. (p.49) •Computer 2 can accept only RGB signal. •Wired, Wireless, and Memory Viewer are for the Network function. Top Control INPUT button POWER WARNING ON - OFF MENU INPUT SELECT Computer 1 (Analog) Computer 1 (Digital) Computer 2 Video Remote Control Wired...SELECT button. Before using these buttons, correct input source should be selected directly. Move the pointer to RGB. See owner's manual "Network Set-up and Operation" and owner's manual of Memory viewer (optionally available). •When the Input Search function is set to...
...Menu operation as Monitor out. (p.49) •Computer 2 can accept only RGB signal. •Wired, Wireless, and Memory Viewer are for the Network function. Top Control INPUT button POWER WARNING ON - OFF MENU INPUT SELECT Computer 1 (Analog) Computer 1 (Digital) Computer 2 Video Remote Control Wired...SELECT button. Before using these buttons, correct input source should be selected directly. Move the pointer to RGB. See owner's manual "Network Set-up and Operation" and owner's manual of Memory viewer (optionally available). •When the Input Search function is set to...

Owners Manual
Page 29
... MENU button to select and press the SELECT button. 29 Before using these buttons, correct input source should be changed, this projector may not display the digital content protected by HDCP. •Wired, Wireless, Memory viewer are for protecting digital entertainment content delivered...On1" or "On2", the input signal will be searched automatically (p.49). See owner's manual "Network Set-up and Operation" and owner's manual of HDCP is a system for the Network function. Computer Input Input Source Selection (RGB(PC digital), RGB(AV HDCP)) Direct Operation Choose ...
... MENU button to select and press the SELECT button. 29 Before using these buttons, correct input source should be changed, this projector may not display the digital content protected by HDCP. •Wired, Wireless, Memory viewer are for protecting digital entertainment content delivered...On1" or "On2", the input signal will be searched automatically (p.49). See owner's manual "Network Set-up and Operation" and owner's manual of HDCP is a system for the Network function. Computer Input Input Source Selection (RGB(PC digital), RGB(AV HDCP)) Direct Operation Choose ...

Owners Manual
Page 38
...Computer 1 (Digital) Computer 2 Video Wired VIDEO button Menu Operation 1 Press the MENU button to select and press the SELECT button. See the owner's manual "Network Set-up and Operation" and owner's manual of Memory viewer (optionally available). •When the Input Search function is connected to the SVIDEO jack, select...pressing the INPUT button on the top control or the VIDEO button on the remote control. S-video 2. Auto When selecting Auto, the projector automatically detects incoming video signal, and adjusts itself to the desired source and then press the SELECT button. The...
...Computer 1 (Digital) Computer 2 Video Wired VIDEO button Menu Operation 1 Press the MENU button to select and press the SELECT button. See the owner's manual "Network Set-up and Operation" and owner's manual of Memory viewer (optionally available). •When the Input Search function is connected to the SVIDEO jack, select...pressing the INPUT button on the top control or the VIDEO button on the remote control. S-video 2. Auto When selecting Auto, the projector automatically detects incoming video signal, and adjusts itself to the desired source and then press the SELECT button. The...

Owners Manual
Page 39
...Video Remote Control Wired COMPUTER button Menu Operation 1 Press the MENU button to Computer 2 and press the SELECT button. See owner's manual "Network Set-up and Operation" and owner's manual of Memory viewer (optionally available). •When the Input Search function is coming from video equipment ...connected to Computer 2 and then press the SELECT button. 3 After the Source Select Menu appeared for the Network function. Video Input Input Source Selection (Component, RGB Scart 21-pin) Direct Operation Choose Computer 2 by pressing the INPUT button on...
...Video Remote Control Wired COMPUTER button Menu Operation 1 Press the MENU button to Computer 2 and press the SELECT button. See owner's manual "Network Set-up and Operation" and owner's manual of Memory viewer (optionally available). •When the Input Search function is coming from video equipment ...connected to Computer 2 and then press the SELECT button. 3 After the Source Select Menu appeared for the Network function. Video Input Input Source Selection (Component, RGB Scart 21-pin) Direct Operation Choose Computer 2 by pressing the INPUT button on...
Owners Manual
Page 50
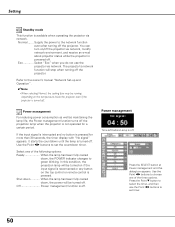
...SELECT button at Power management and this condition, the projection lamp will be running depending on /off the projector via network, modify network environment, and receive an e-mail about projector status while the projector is powered off . Press the Point d button to set timer. 50 If the input signal is ...30 seconds, the timer display with "No signal" appears. Use the Point 7 8 buttons to select the timer, and then use the projector via network. Select one of the following options: Ready When the lamp has been fully cooled down , the power will be turned on if the...
...SELECT button at Power management and this condition, the projection lamp will be running depending on /off the projector via network, modify network environment, and receive an e-mail about projector status while the projector is powered off . Press the Point d button to set timer. 50 If the input signal is ...30 seconds, the timer display with "No signal" appears. Use the Point 7 8 buttons to select the timer, and then use the projector via network. Select one of the following options: Ready When the lamp has been fully cooled down , the power will be turned on if the...
Owners Manual
Page 61
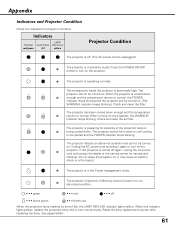
... WARNING indicator stops blinking. Check and clean the air filter. It may cause an electric shock or a fire hazard. ✽ The projector is in the Power management mode. ✽ The projector's Network or Memory viewer function is in stand-by or the projection lamp is cooled down ✽ enough and the temperature returns...
... WARNING indicator stops blinking. Check and clean the air filter. It may cause an electric shock or a fire hazard. ✽ The projector is in the Power management mode. ✽ The projector's Network or Memory viewer function is in stand-by or the projection lamp is cooled down ✽ enough and the temperature returns...

Owners Manual
Page 64
... Go to System (1) N/A N/A Go to System (1) Go to System (2) N/A Go to System (3) Go to System (3) Go to System (3) See owner's manual "Network Set-up and Operation" See owner's manual "Network Set-up and Operation" See owner's manual of Memory viewer (optionally available) N/A ........not applicable The menu will be displayed when connecting device...
... Go to System (1) N/A N/A Go to System (1) Go to System (2) N/A Go to System (3) Go to System (3) Go to System (3) See owner's manual "Network Set-up and Operation" See owner's manual "Network Set-up and Operation" See owner's manual of Memory viewer (optionally available) N/A ........not applicable The menu will be displayed when connecting device...

Owners Manual
Page 69
... The parts listed below are effective, a tiny fraction of the pixels (0.01% or less) may be ineffective by the characteristics of the LCD panels. Appendix Accessories Owner's Manual (CD-ROM) Quick Reference Guide AC Power Cord Remote Control and Batteries DVI-VGA Cable USB Cable Lens ...Cover with String PIN Code Label Network Application (CD-ROM) Soft Carrying Case USB Wireless LAN Adapter ● The specifications are subject to change without notice. ● LCD panels are manufactured to the sales dealer. When ordering those parts, specify ...
... The parts listed below are effective, a tiny fraction of the pixels (0.01% or less) may be ineffective by the characteristics of the LCD panels. Appendix Accessories Owner's Manual (CD-ROM) Quick Reference Guide AC Power Cord Remote Control and Batteries DVI-VGA Cable USB Cable Lens ...Cover with String PIN Code Label Network Application (CD-ROM) Soft Carrying Case USB Wireless LAN Adapter ● The specifications are subject to change without notice. ● LCD panels are manufactured to the sales dealer. When ordering those parts, specify ...

Owners Manual
Page 70
... Machine and Information System Industries Association). For PJ Link password, see page 49 on the owner's manual "Network Set-up and Operation." Appendix PJ Link Notice This projector is compliant with PJLink Standard Class 1. This projector supports all commands defined by PJLink Class 1 and is verified conformance with PJLink Standard Class 1 of JBMIA...
... Machine and Information System Industries Association). For PJ Link password, see page 49 on the owner's manual "Network Set-up and Operation." Appendix PJ Link Notice This projector is compliant with PJLink Standard Class 1. This projector supports all commands defined by PJLink Class 1 and is verified conformance with PJLink Standard Class 1 of JBMIA...

