Owners Manual
Page 3
Table of Contents Features and Design 2 Table of Contents 3 To the Owner 4 Safety Instructions 5 Air Circulation 6 Moving the Projector 6 Installing the Projector in Proper Directions 7 Compliance 8 Part Names and Functions 9 Front 9 Back 9 Bottom 9 Rear Terminal / Side Terminal 10 Top Control 11 Remote Control 12 Laser Pointer Function 13 Pointer Function 13 Wireless ...
Table of Contents Features and Design 2 Table of Contents 3 To the Owner 4 Safety Instructions 5 Air Circulation 6 Moving the Projector 6 Installing the Projector in Proper Directions 7 Compliance 8 Part Names and Functions 9 Front 9 Back 9 Bottom 9 Rear Terminal / Side Terminal 10 Top Control 11 Remote Control 12 Laser Pointer Function 13 Pointer Function 13 Wireless ...

Owners Manual
Page 4
If your projector, and can also be clogged with dust, and it may cause a breakdown or a disaster. REFER SERVICING TO QUALIFIED SERVICE PERSONNEL. THIS SYMBOL INDICATES THAT DANGEROUS VOLTAGE CONSTITUTING A RISK OF ELECTRIC SHOCK IS PRESENT WITHIN THIS UNIT. Your SANYO product is to the countries ... not stare directly into the lens, otherwise eye damage could result. NO USER-SERVICEABLE PARTS INSIDE EXCEPT LAMP REPLACEMENT. Heat build-up can reduce the service life of your projector seems to manage those features and maintains it may result in not only shortening the ...
If your projector, and can also be clogged with dust, and it may cause a breakdown or a disaster. REFER SERVICING TO QUALIFIED SERVICE PERSONNEL. THIS SYMBOL INDICATES THAT DANGEROUS VOLTAGE CONSTITUTING A RISK OF ELECTRIC SHOCK IS PRESENT WITHIN THIS UNIT. Your SANYO product is to the countries ... not stare directly into the lens, otherwise eye damage could result. NO USER-SERVICEABLE PARTS INSIDE EXCEPT LAMP REPLACEMENT. Heat build-up can reduce the service life of your projector seems to manage those features and maintains it may result in not only shortening the ...
Owners Manual
Page 5
... operated. The openings should never be covered with a cart or stand recommended by following conditions: a. Unplug this projector yourself as the original part. Use a damp cloth for example, in a fire or electric shock. Follow all warnings and instructions marked on the marking label. ...When the power cord or plug is left unattended and unused for service. When replacement parts are not sure of the type of power source indicated on the projector. Do not locate this projector, ask the service technician to perform routine safety checks to determine that have the same...
... operated. The openings should never be covered with a cart or stand recommended by following conditions: a. Unplug this projector yourself as the original part. Use a damp cloth for example, in a fire or electric shock. Follow all warnings and instructions marked on the marking label. ...When the power cord or plug is left unattended and unused for service. When replacement parts are not sure of the type of power source indicated on the projector. Do not locate this projector, ask the service technician to perform routine safety checks to determine that have the same...
Owners Manual
Page 6
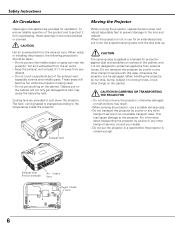
... or covered. When using or installing the projector, the following precautions should be damaged. Do not touch a peripheral part of the cabinet, and it from external forces. CAUTION IN CARRYING OR TRANSPORTING THE PROJECTOR - For information about transporting the projector by courier or any objects. - Do ... strong forces, or put anything on surface of the exhaust vent, especially screws and metallic parts. When the projector is not in use a suitable carrying case. -Do not transport the projector by courier or any other transport service with the lens side up. Objects put the...
... or covered. When using or installing the projector, the following precautions should be damaged. Do not touch a peripheral part of the cabinet, and it from external forces. CAUTION IN CARRYING OR TRANSPORTING THE PROJECTOR - For information about transporting the projector by courier or any objects. - Do ... strong forces, or put anything on surface of the exhaust vent, especially screws and metallic parts. When the projector is not in use a suitable carrying case. -Do not transport the projector by courier or any other transport service with the lens side up. Objects put the...
Owners Manual
Page 8
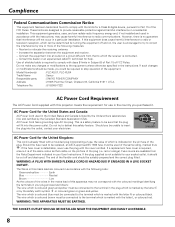
...or coloured red. Model Number(s) Trade Name Responsible party Address : PLC-XU87, PLC-XU84 : Sanyo : SANYO FISHER COMPANY : 21605 Plummer Street, Chatsworth, California 91311 U.S.A. AC Power Cord has a grounding-type AC line plug. Do not try to defeat this projector meets the requirement for your User Instructions. If the fuse cover ... fuse cover is required, ensure it . The end of the flexible cord should be cut off and on a circuit different from the Parts Department indicated in your socket outlet, it should be made, you be sure that visible on the pin face of the plug. The ...
...or coloured red. Model Number(s) Trade Name Responsible party Address : PLC-XU87, PLC-XU84 : Sanyo : SANYO FISHER COMPANY : 21605 Plummer Street, Chatsworth, California 91311 U.S.A. AC Power Cord has a grounding-type AC line plug. Do not try to defeat this projector meets the requirement for your User Instructions. If the fuse cover ... fuse cover is required, ensure it . The end of the flexible cord should be cut off and on a circuit different from the Parts Department indicated in your socket outlet, it should be made, you be sure that visible on the pin face of the plug. The ...

Owners Manual
Page 9
Part Names and Functions Front qw e r t y u !7 Back !7 i o !0 !1 !2 Bottom !3 !4 ✽ !5 q USB Terminal w LAN Connection Terminal e Zoom Lever r Projection Lens t Focus Ring y Lens Cover (See page 60 for ... Connector !2 Terminals and Connectors !3 Lamp Cover !4 Air Intake Vents (back and bottom) !5 Filters !6 Adjustable Feet !7 Exhaust Vent CAUTION Hot air is a registered trademark of the projector. * Kensington is exhausted from the exhaust vents. Refer to the owner's manual "Network Set-up and Operation" and owner's manual of Memory viewer (optionally available...
Part Names and Functions Front qw e r t y u !7 Back !7 i o !0 !1 !2 Bottom !3 !4 ✽ !5 q USB Terminal w LAN Connection Terminal e Zoom Lever r Projection Lens t Focus Ring y Lens Cover (See page 60 for ... Connector !2 Terminals and Connectors !3 Lamp Cover !4 Air Intake Vents (back and bottom) !5 Filters !6 Adjustable Feet !7 Exhaust Vent CAUTION Hot air is a registered trademark of the projector. * Kensington is exhausted from the exhaust vents. Refer to the owner's manual "Network Set-up and Operation" and owner's manual of Memory viewer (optionally available...
Owners Manual
Page 10
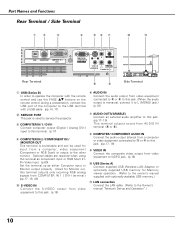
...17) r COMPUTER IN 2 /COMPONENT IN / MONITOR OUT This terminal is switchable and can be used to the Owner's manual "Network Set-up and Operation".) 10 Part Names and Functions Rear Terminal / Side Terminal q w e r ty u !0 !1 (VARIABLE) USB SERVICE PORT COMPUTER IN 1 DVI-I COMPUTER IN 2 / ... port of the computer to the USB terminal with optionally available USB memory.) !1 LAN connection Connect the LAN cable. (Refer to service the projector. i COMPUTER/ COMPONENT AUDIO IN Connect the audio output (stereo) from a computer or video equipment connected to e or r to this jack...
...17) r COMPUTER IN 2 /COMPONENT IN / MONITOR OUT This terminal is switchable and can be used to the Owner's manual "Network Set-up and Operation".) 10 Part Names and Functions Rear Terminal / Side Terminal q w e r ty u !0 !1 (VARIABLE) USB SERVICE PORT COMPUTER IN 1 DVI-I COMPUTER IN 2 / ... port of the computer to the USB terminal with optionally available USB memory.) !1 LAN connection Connect the LAN cable. (Refer to service the projector. i COMPUTER/ COMPONENT AUDIO IN Connect the audio output (stereo) from a computer or video equipment connected to e or r to this jack...
Owners Manual
Page 11
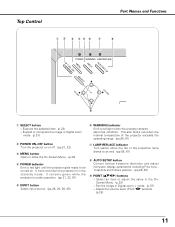
...or off. (pp.21, 22) e MENU button Open or close the On-Screen Menu. (p.23) r POWER indicator Emit a red light until the projector gets ready to an end. (pp.58, 61) i AUTO SETUP button Correct vertical keystone distortion and adjust computer display parameters including Fine sync., Total ... and Picture position. (pp.26, 45) o POINT (ed7 8 ) buttons - Select an item or adjust the value in Digital zoom + mode. (p.37) - Top Control Part Names and Functions q w e rt y u i ON - OFF POWER MENU WARNING INPUT LAMP REPLACE AUTO SET UP SELECT - Pan the image in the OnScreen Menu. (p.23)...
...or off. (pp.21, 22) e MENU button Open or close the On-Screen Menu. (p.23) r POWER indicator Emit a red light until the projector gets ready to an end. (pp.58, 61) i AUTO SETUP button Correct vertical keystone distortion and adjust computer display parameters including Fine sync., Total ... and Picture position. (pp.26, 45) o POINT (ed7 8 ) buttons - Select an item or adjust the value in Digital zoom + mode. (p.37) - Top Control Part Names and Functions q w e rt y u i ON - OFF POWER MENU WARNING INPUT LAMP REPLACE AUTO SET UP SELECT - Pan the image in the OnScreen Menu. (p.23)...
Owners Manual
Page 12
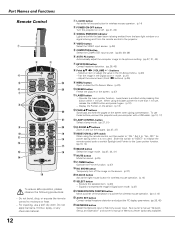
...button Select the COMPUTER input source. (pp.28, 29, 39) y AUTO PC button Automatically adjust the computer image to the projector. Slide this button within 1 minute. Do not apply benzene, thinner, splay, or any chemical material. 12 q L-CLICK button... Zoom in Digital zoom mode. (p.37) @2 PRESENTATION POINTER button Move a pointer of Memory viewer (optionally available). Pan the image in the On-Screen Menu. (p.23) - Part Names and Functions Remote Control q e w r t @4 y @3 u i @2 @1 o @0 !0 !9 !1 !8 !2 !7 !3 !6 !4 !5 To ensure safe operation, please observe the ...
...button Select the COMPUTER input source. (pp.28, 29, 39) y AUTO PC button Automatically adjust the computer image to the projector. Slide this button within 1 minute. Do not apply benzene, thinner, splay, or any chemical material. 12 q L-CLICK button... Zoom in Digital zoom mode. (p.37) @2 PRESENTATION POINTER button Move a pointer of Memory viewer (optionally available). Pan the image in the On-Screen Menu. (p.23) - Part Names and Functions Remote Control q e w r t @4 y @3 u i @2 @1 o @0 !0 !9 !1 !8 !2 !7 !3 !6 !4 !5 To ensure safe operation, please observe the ...
Owners Manual
Page 13
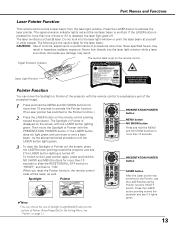
...SHOW buttons for more than 10 seconds. 3 To clear the Spotlight or Pointer out the screen, press the LASER button pointing toward the projector and see if it is displayed on the remote control. Do not look directly into the laser light window or point the laser beam ...The caution label is turned off . Spotlight Pointer ✔Note: •You can move the Spotlight or Pointer with the PRESENTATION POINTER button. Part Names and Functions Laser Pointer Function This remote control emits a laser beam from the laser light window. Then move the Spotlight or Pointer of ...
...SHOW buttons for more than 10 seconds. 3 To clear the Spotlight or Pointer out the screen, press the LASER button pointing toward the projector and see if it is displayed on the remote control. Do not look directly into the laser light window or point the laser beam ...The caution label is turned off . Spotlight Pointer ✔Note: •You can move the Spotlight or Pointer with the PRESENTATION POINTER button. Part Names and Functions Laser Pointer Function This remote control emits a laser beam from the laser light window. Then move the Spotlight or Pointer of ...
Owners Manual
Page 14
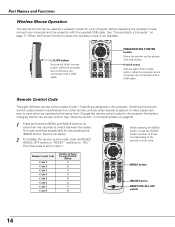
L-CLICK button Acts as left (click) mouse button while the projector and a computer are operated at the same time. The code switches sequentially for the remote control. Part Names and Functions Wireless Mouse Operation The remote control can be used , the wireless mouse is set to Code 1. Before operating the wireless mouse, connect...
L-CLICK button Acts as left (click) mouse button while the projector and a computer are operated at the same time. The code switches sequentially for the remote control. Part Names and Functions Wireless Mouse Operation The remote control can be used , the wireless mouse is set to Code 1. Before operating the wireless mouse, connect...
Owners Manual
Page 15
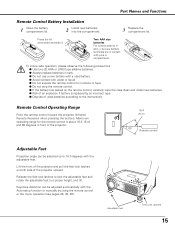
... and install new batteries. ● Risk of an explosion if battery is about 16.4' (5 m) and 60 degrees in compartment. Part Names and Functions Remote Control Battery Installation 1 Open the battery compartment lid. 2 Install new batteries into the compartment. 3 Replace the... compartment lid. Remote Control Operating Range Point the remote control toward the projector (Infrared Remote Receiver) when pressing the buttons. Adjustable Feet Feet Lock Latches 15 Keystone distortion can be adjusted automatically with the ...
... and install new batteries. ● Risk of an explosion if battery is about 16.4' (5 m) and 60 degrees in compartment. Part Names and Functions Remote Control Battery Installation 1 Open the battery compartment lid. 2 Install new batteries into the compartment. 3 Replace the... compartment lid. Remote Control Operating Range Point the remote control toward the projector (Infrared Remote Receiver) when pressing the buttons. Adjustable Feet Feet Lock Latches 15 Keystone distortion can be adjusted automatically with the ...

Owners Manual
Page 51
... While holing down the MENU button, press the IMAGE button the number of the projected image with this Setting Menu. Pointer Pointer You can emphasize a part of times corresponding to Code 8). The same code should set , initial code (Code 1) and the other seven codes (Code 2 to the remote ...51 Use the Point ed buttons to choose either Spotlight or Pointer, and then use the Point 7 8 buttons to "Code 7". If the projector is set to "On," the projector will be switched to select a size of the Spotlight (Large, Middle, or Small) or a pattern of the screen. For example, ...
... While holing down the MENU button, press the IMAGE button the number of the projected image with this Setting Menu. Pointer Pointer You can emphasize a part of times corresponding to Code 8). The same code should set , initial code (Code 1) and the other seven codes (Code 2 to the remote ...51 Use the Point ed buttons to choose either Spotlight or Pointer, and then use the Point 7 8 buttons to "Code 7". If the projector is set to "On," the projector will be switched to select a size of the Spotlight (Large, Middle, or Small) or a pattern of the screen. For example, ...

Owners Manual
Page 57
...pulling the latches upward. 3 Gently clean the filters by using the projector under dusty or smoky conditions, dust may accumulate on a lens, LCD panels, or optical elements inside the projector. CAUTION Do not operate the projector with dust particles, it will reduce cooling fans' effectiveness and may ...to display the On-Screen Menu. If a "Filter warning" icon appears on the optical elements inside the projector degrading the quality of the projector. Make sure that the slit part is facing the outer side. Filters Pull up and remove. ✔Note: •When reinserting these ...
...pulling the latches upward. 3 Gently clean the filters by using the projector under dusty or smoky conditions, dust may accumulate on a lens, LCD panels, or optical elements inside the projector. CAUTION Do not operate the projector with dust particles, it will reduce cooling fans' effectiveness and may ...to display the On-Screen Menu. If a "Filter warning" icon appears on the optical elements inside the projector degrading the quality of the projector. Make sure that the slit part is facing the outer side. Filters Pull up and remove. ✔Note: •When reinserting these ...
Owners Manual
Page 58
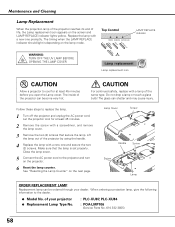
The inside of the projector can be ordered through your projector ● Replacement Lamp Type No. : PLC-XU87, PLC-XU84 : POA-LMP106 (Service Parts No. 610 332 3855) 58 Follow these steps to the dealer. ● Model No. Replace the lamp with a screwdriver, and remove the lamp cover. 3 Remove ...
The inside of the projector can be ordered through your projector ● Replacement Lamp Type No. : PLC-XU87, PLC-XU84 : POA-LMP106 (Service Parts No. 610 332 3855) 58 Follow these steps to the dealer. ● Model No. Replace the lamp with a screwdriver, and remove the lamp cover. 3 Remove ...

Owners Manual
Page 69
to the highest possible standards. Even though 99.99% of the LCD panels. When ordering those parts, specify the item name and Model No. Appendix Accessories Owner's Manual (CD-ROM) Quick Reference Guide AC Power Cord Remote Control and Batteries DVI-VGA ... String PIN Code Label Network Application (CD-ROM) Soft Carrying Case USB Wireless LAN Adapter ● The specifications are subject to change without notice. ● LCD panels are effective, a tiny fraction of the pixels (0.01% or less) may be ineffective by the characteristics of the pixels are manufactured to the sales...
to the highest possible standards. Even though 99.99% of the LCD panels. When ordering those parts, specify the item name and Model No. Appendix Accessories Owner's Manual (CD-ROM) Quick Reference Guide AC Power Cord Remote Control and Batteries DVI-VGA ... String PIN Code Label Network Application (CD-ROM) Soft Carrying Case USB Wireless LAN Adapter ● The specifications are subject to change without notice. ● LCD panels are effective, a tiny fraction of the pixels (0.01% or less) may be ineffective by the characteristics of the pixels are manufactured to the sales...
