
Owners Manual
Page 4
... Your SANYO product is critical for Protection of Electronic Computer/Data Processing Equipment, ANSI/NFPA 75. Please dispose of this equipment at their end-oflife, should be disposed of separately from the ceiling, clean air intake vents, filters, or top of the projector periodically ... it in good condition for many convenient features and functions. To the Owner Before installing and operating this projector, read this manual again, check operations and cable connections and try the solutions in the "Troubleshooting" section in the back of this manual thoroughly. THIS ...
... Your SANYO product is critical for Protection of Electronic Computer/Data Processing Equipment, ANSI/NFPA 75. Please dispose of this equipment at their end-oflife, should be disposed of separately from the ceiling, clean air intake vents, filters, or top of the projector periodically ... it in good condition for many convenient features and functions. To the Owner Before installing and operating this projector, read this manual again, check operations and cable connections and try the solutions in the "Troubleshooting" section in the back of this manual thoroughly. THIS ...
Owners Manual
Page 8
... radiate radio frequency energy and, if not installed and used of FCC Rules. Model Number(s) Trade Name Responsible party Address : PLC-XU87, PLC-XU84 : Sanyo : SANYO FISHER COMPANY : 21605 Plummer Street, Chatsworth, California 91311 U.S.A. GROUND AC Power Cord for the United Kingdom: This cord is already...from the Parts Department indicated in the mains lead of shielded cable is required to comply with class B limits in the United States and Canada is encouraged to try to defeat this projector meets the requirement for help. Increase the separation between the equipment...
... radiate radio frequency energy and, if not installed and used of FCC Rules. Model Number(s) Trade Name Responsible party Address : PLC-XU87, PLC-XU84 : Sanyo : SANYO FISHER COMPANY : 21605 Plummer Street, Chatsworth, California 91311 U.S.A. GROUND AC Power Cord for the United Kingdom: This cord is already...from the Parts Department indicated in the mains lead of shielded cable is required to comply with class B limits in the United States and Canada is encouraged to try to defeat this projector meets the requirement for help. Increase the separation between the equipment...
Owners Manual
Page 10
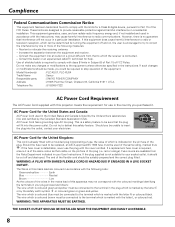
...IN 1 / DVI-I type) to this terminal. (p.17) r COMPUTER IN 2 /COMPONENT IN / MONITOR OUT This terminal is switchable and can be used to service the projector. Part Names and Functions Rear Terminal / Side Terminal q w e r ty u !0 !1 (VARIABLE) USB SERVICE PORT COMPUTER IN 1 DVI-I COMPUTER IN 2 / ... presentation, connect the USB port of the computer to the USB terminal with optionally available USB memory.) !1 LAN connection Connect the LAN cable. (Refer to the Owner's manual "Network Set-up as either Computer input or Monitor output properly. (Used for input from a computer...
...IN 1 / DVI-I type) to this terminal. (p.17) r COMPUTER IN 2 /COMPONENT IN / MONITOR OUT This terminal is switchable and can be used to service the projector. Part Names and Functions Rear Terminal / Side Terminal q w e r ty u !0 !1 (VARIABLE) USB SERVICE PORT COMPUTER IN 1 DVI-I COMPUTER IN 2 / ... presentation, connect the USB port of the computer to the USB terminal with optionally available USB memory.) !1 LAN connection Connect the LAN cable. (Refer to the Owner's manual "Network Set-up as either Computer input or Monitor output properly. (Used for input from a computer...
Owners Manual
Page 12
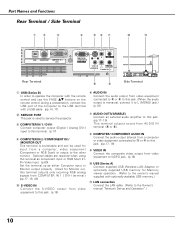
...1 minute. Set it again. (p.13) - See owner's manual "Network Set-up and Operation" and owner's manual of the projector or a pointer for more than 1 minute, release the LASER button and press it to "ON." Execute the selected item. (p.... @3 u i @2 @1 o @0 !0 !9 !1 !8 !2 !7 !3 !6 !4 !5 To ensure safe operation, please observe the following precautions: - For cleaning, use these buttons, connect the projector and your computer with a USB cable. (pp.10, 17) !3 LAMP CONTROL button Select a lamp mode. (pp.27, 51) !4 D.ZOOM ed buttons Zoom in the On-Screen Menu. (p.23) - To...
...1 minute. Set it again. (p.13) - See owner's manual "Network Set-up and Operation" and owner's manual of the projector or a pointer for more than 1 minute, release the LASER button and press it to "ON." Execute the selected item. (p.... @3 u i @2 @1 o @0 !0 !9 !1 !8 !2 !7 !3 !6 !4 !5 To ensure safe operation, please observe the following precautions: - For cleaning, use these buttons, connect the projector and your computer with a USB cable. (pp.10, 17) !3 LAMP CONTROL button Select a lamp mode. (pp.27, 51) !4 D.ZOOM ed buttons Zoom in the On-Screen Menu. (p.23) - To...
Owners Manual
Page 14
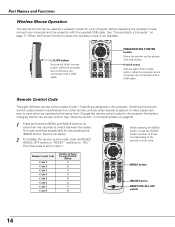
...be used , the wireless mouse is set to Code 1. R-CLICK button Acts as right (click) mouse button while the projector and a computer are connected with the supplied USB cable. The initial code is not available. Switching the remote control codes prevents interference from other remote controls when several...to each other are assigned to a Computer" on page 51. 1 Press and hold the MENU and IMAGE buttons for your computer and the projector with a USB cable. See "Connecting to this button. See the list below. 2 To initialize the remote control code, slide the RESET/ ON/ALL-OFF switch...
...be used , the wireless mouse is set to Code 1. R-CLICK button Acts as right (click) mouse button while the projector and a computer are connected with the supplied USB cable. The initial code is not available. Switching the remote control codes prevents interference from other remote controls when several...to each other are assigned to a Computer" on page 51. 1 Press and hold the MENU and IMAGE buttons for your computer and the projector with a USB cable. See "Connecting to this button. See the list below. 2 To initialize the remote control code, slide the RESET/ ON/ALL-OFF switch...
Owners Manual
Page 17
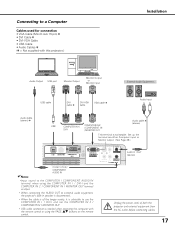
...ON ON • USB cable connection is needed when operating the computer with this projector.) Installation Audio Output USB port Monitor Output Monitor Output or Monitor Input External Audio Equipment USB cable DVI cable ✽ DVI-VGA cable VGA cable ✽ Audio Input Audio cable (stereo) ✽ USB...;Notes: •Input sound to external audio equipment, the projector's built-in speaker is disconnected. • When the cable is of both the projector and external equipment from the AC outlet before connecting cables. 17 Set up the terminal as input. • When...
...ON ON • USB cable connection is needed when operating the computer with this projector.) Installation Audio Output USB port Monitor Output Monitor Output or Monitor Input External Audio Equipment USB cable DVI cable ✽ DVI-VGA cable VGA cable ✽ Audio Input Audio cable (stereo) ✽ USB...;Notes: •Input sound to external audio equipment, the projector's built-in speaker is disconnected. • When the cable is of both the projector and external equipment from the AC outlet before connecting cables. 17 Set up the terminal as input. • When...
Owners Manual
Page 18
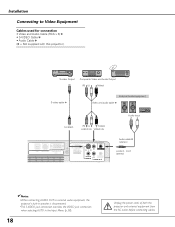
... MONITOR OUT R AUDIO OUT VIDEO IN L (MONO) COMPUTER / COMPONENT S-VIDEO IN AUDIO IN Audio Input Audio cable ✽ (stereo) AUDIO OUT (stereo) ✔Notes: •When connecting AUDIO OUT to external audio equipment, the projector's built-in speaker is disconnected. •The S-VIDEO jack connection overrides the VIDEO jack connection when selecting...
... MONITOR OUT R AUDIO OUT VIDEO IN L (MONO) COMPUTER / COMPONENT S-VIDEO IN AUDIO IN Audio Input Audio cable ✽ (stereo) AUDIO OUT (stereo) ✔Notes: •When connecting AUDIO OUT to external audio equipment, the projector's built-in speaker is disconnected. •The S-VIDEO jack connection overrides the VIDEO jack connection when selecting...
Owners Manual
Page 19
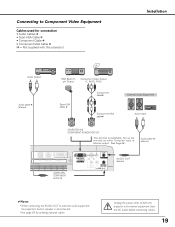
...) ✔Notes: •When connecting the AUDIO OUT to Component Video Equipment Cables used for connection • Audio Cables ✽ • Scart-VGA Cable ✽ • Component Cable ✽ • Component-VGA Cable ✽ (✽ = Not supplied with this projector.) Installation Audio Output Audio cable ✽ (stereo) RGB Scart 21pin Output Component Video Output (Y, Pb/Cb, Pr...
...) ✔Notes: •When connecting the AUDIO OUT to Component Video Equipment Cables used for connection • Audio Cables ✽ • Scart-VGA Cable ✽ • Component Cable ✽ • Component-VGA Cable ✽ (✽ = Not supplied with this projector.) Installation Audio Output Audio cable ✽ (stereo) RGB Scart 21pin Output Component Video Output (Y, Pb/Cb, Pr...

Owners Manual
Page 39
...icon Component When the input source is coming from video equipment connected to the COMPUTER IN 2/COMPONENT IN/MONITOR OUT terminal with a Scart-VGA Cable, select RGB (Scart). Computer 2 Move the pointer (red arrow) to display the On-Screen Menu. Source Select Menu Move the pointer to... the COMPUTER IN 2/COMPONENT IN/MONITOR OUT terminal with a Component-VGA Cable, select Component. RGB (Scart) When the input source is coming from video equipment connected to Component or RGB(Scart) and press the SELECT button...
...icon Component When the input source is coming from video equipment connected to the COMPUTER IN 2/COMPONENT IN/MONITOR OUT terminal with a Scart-VGA Cable, select RGB (Scart). Computer 2 Move the pointer (red arrow) to display the On-Screen Menu. Source Select Menu Move the pointer to... the COMPUTER IN 2/COMPONENT IN/MONITOR OUT terminal with a Component-VGA Cable, select Component. RGB (Scart) When the input source is coming from video equipment connected to Component or RGB(Scart) and press the SELECT button...
Owners Manual
Page 62
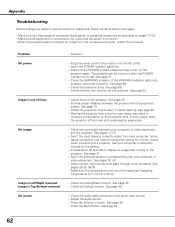
... lights red. - Check the WARNING indicator. Check the projection lamp. Provide proper distance between your computer or video equipment and the projector. See page 60. - See if the input signal is not out of focus. Some laptop computers may result in moisture condensation on ... the connected computer, restart the computer. Check the Ceiling function. Check the audio cable connection from a cool to warm place may need to change the setting for monitor output when connecting to a projector. See page 25. - Appendix Troubleshooting Before calling your dealer or service center for...
... lights red. - Check the WARNING indicator. Check the projection lamp. Provide proper distance between your computer or video equipment and the projector. See page 60. - See if the input signal is not out of focus. Some laptop computers may result in moisture condensation on ... the connected computer, restart the computer. Check the Ceiling function. Check the audio cable connection from a cool to warm place may need to change the setting for monitor output when connecting to a projector. See page 25. - Appendix Troubleshooting Before calling your dealer or service center for...

Owners Manual
Page 69
...those parts, specify the item name and Model No. to the highest possible standards. Model No. Even though 99.99% of the LCD panels. COMPONENT-VGA Cable SCART-VGA Cable VGA-Cable (10 m) : POA-CA-COMPVGA : POA-CA-SCART : KA-MC-DB10 Ceiling Hanger USB Memory : POA-CHS-US01 (for ... Memory viewer operation.) 69 Appendix Accessories Owner's Manual (CD-ROM) Quick Reference Guide AC Power Cord Remote Control and Batteries DVI-VGA Cable USB Cable Lens Cover with String PIN Code Label Network Application (CD-ROM) Soft Carrying Case USB Wireless LAN Adapter ● The specifications are ...
...those parts, specify the item name and Model No. to the highest possible standards. Model No. Even though 99.99% of the LCD panels. COMPONENT-VGA Cable SCART-VGA Cable VGA-Cable (10 m) : POA-CA-COMPVGA : POA-CA-SCART : KA-MC-DB10 Ceiling Hanger USB Memory : POA-CHS-US01 (for ... Memory viewer operation.) 69 Appendix Accessories Owner's Manual (CD-ROM) Quick Reference Guide AC Power Cord Remote Control and Batteries DVI-VGA Cable USB Cable Lens Cover with String PIN Code Label Network Application (CD-ROM) Soft Carrying Case USB Wireless LAN Adapter ● The specifications are ...