Instruction Manual, PLC-XU58
Page 3
... No Show Function 25 P-Timer Function 26 Sound Adjustment 26 Computer Input 27 Input Source Selection 27 Computer System Selection 28 Auto PC Adjustment 29 Manual PC Adjustment 30 Image Level Selection 32 Image Level Adjustment 33 Screen Size Adjustment 34 Video Input 35 Input Source Selection (Video, S-Video) 35 Input...
... No Show Function 25 P-Timer Function 26 Sound Adjustment 26 Computer Input 27 Input Source Selection 27 Computer System Selection 28 Auto PC Adjustment 29 Manual PC Adjustment 30 Image Level Selection 32 Image Level Adjustment 33 Screen Size Adjustment 34 Video Input 35 Input Source Selection (Video, S-Video) 35 Input...
Instruction Manual, PLC-XU58
Page 4
... SHOCK IS PRESENT WITHIN THIS UNIT. If the projector is not to operate improperly, read this booklet. READ AND KEEP THIS OWNER'S MANUAL FOR LATER USE. Improper operation may result in not only shortening the product-life, but also malfunctions, fire hazard, or other accidents....RAIN OR MOISTURE. - Eye damage could result. Minimum clearance must be maintained. To the Owner Before operating this projector, read this manual again, check operations and cable connections and try the solutions in the "Troubleshooting" section in the Standard for the Protection of your ...
... SHOCK IS PRESENT WITHIN THIS UNIT. If the projector is not to operate improperly, read this booklet. READ AND KEEP THIS OWNER'S MANUAL FOR LATER USE. Improper operation may result in not only shortening the product-life, but also malfunctions, fire hazard, or other accidents....RAIN OR MOISTURE. - Eye damage could result. Minimum clearance must be maintained. To the Owner Before operating this projector, read this manual again, check operations and cable connections and try the solutions in the "Troubleshooting" section in the Standard for the Protection of your ...

Instruction Manual, PLC-XU58
Page 15
... 3.3'(1.0m) - 25.3'(7.7m). Zoom 195" Min. It is designed to project on a flat projection surface and can be adjusted automatically with Auto Setup function or manually with the remote control or the menu operation. (p24, 25, and 42) Adjustable Feet Feet Lock Latches 15 Zoom A (Center) B Screen Size (W x H) mm 4 : 3 aspect ratio...
... 3.3'(1.0m) - 25.3'(7.7m). Zoom 195" Min. It is designed to project on a flat projection surface and can be adjusted automatically with Auto Setup function or manually with the remote control or the menu operation. (p24, 25, and 42) Adjustable Feet Feet Lock Latches 15 Zoom A (Center) B Screen Size (W x H) mm 4 : 3 aspect ratio...
Instruction Manual, PLC-XU58
Page 20
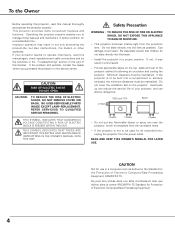
... the projector. The POWER indicator turns green lighting and the cooling fans start to "PIN code". If you can operate the projector. 20 Repeat this manual, and keep it to "Set". Refer to "✳". PIN code Input Dialog Box Pointer After the OK icon disappears, you can start to complete entering...
... the projector. The POWER indicator turns green lighting and the cooling fans start to "PIN code". If you can operate the projector. 20 Repeat this manual, and keep it to "Set". Refer to "✳". PIN code Input Dialog Box Pointer After the OK icon disappears, you can start to complete entering...

Instruction Manual, PLC-XU58
Page 24
... SET button Top Control ON - The operational setup for the Auto Setup can be corrected properly by pressing the AUTO SETUP/ AUTO SET button, adjust manually by just pressing the AUTO SETUP button on the top control or the AUTO SET button on setting of the image distortion cannot be ensured...
... SET button Top Control ON - The operational setup for the Auto Setup can be corrected properly by pressing the AUTO SETUP/ AUTO SET button, adjust manually by just pressing the AUTO SETUP button on the top control or the AUTO SET button on setting of the image distortion cannot be ensured...
Instruction Manual, PLC-XU58
Page 25
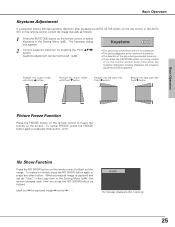
...; normal The message disappears after pressing the AUTO SETUP button on the top control or the AUTO SET on the remote control, correct the image manually as follows: 1 Press the KEYSTONE button on the remote control to normal, press the NO SHOW button again or press any other button. (p11) No...
...; normal The message disappears after pressing the AUTO SETUP button on the top control or the AUTO SET on the remote control, correct the image manually as follows: 1 Press the KEYSTONE button on the remote control to normal, press the NO SHOW button again or press any other button. (p11) No...

Instruction Manual, PLC-XU58
Page 28
... selected. The projector chooses a proper system and displays it. *Mode 1 and SVGA 1 are examples. When the image is not projected properly, manual adjustment is required. (p30, 31) PC System Menu The Auto PC Adjustment function operates to various types of computers based on VGA, SVGA, XGA...on page 59 ) ✔Note: The projector may display one of your computer and the projector. (See " Troubleshooting" p54) Mode 1 User preset system manually adjusted in this dialog box can be selected. Adjustment data can also be stored in Mode 1 - 5. (p30, 31) SVGA 1 PC Systems provided ...
... selected. The projector chooses a proper system and displays it. *Mode 1 and SVGA 1 are examples. When the image is not projected properly, manual adjustment is required. (p30, 31) PC System Menu The Auto PC Adjustment function operates to various types of computers based on VGA, SVGA, XGA...on page 59 ) ✔Note: The projector may display one of your computer and the projector. (See " Troubleshooting" p54) Mode 1 User preset system manually adjusted in this dialog box can be selected. Adjustment data can also be stored in Mode 1 - 5. (p30, 31) SVGA 1 PC Systems provided ...

Instruction Manual, PLC-XU58
Page 29
... sync, Total dots, Horizontal, and Vertical to conform to the Auto PC Adj. Auto PC Adjustment function can not be fully adjusted with this operation, manual adjustments are memorized, the setting can be done just by pressing the Auto PC button on page 31. ✔Note: • Fine sync, Total dots...
... sync, Total dots, Horizontal, and Vertical to conform to the Auto PC Adj. Auto PC Adjustment function can not be fully adjusted with this operation, manual adjustments are memorized, the setting can be done just by pressing the Auto PC button on page 31. ✔Note: • Fine sync, Total dots...

Instruction Manual, PLC-XU58
Page 30
... Free) of total dots in one horizontal period. Press the SELECT button at the Current mode icon to match those parameters manually adjusted. Manual PC Adjustment enables you to precisely adjust several parameters to show H-Freq. PC Adjust Menu PC Adjust Menu icon 2 Press the... Adjusts vertical picture position. of this projector. Current mode Press the SELECT button at this adjustment. and V-Freq. Computer Input Manual PC Adjustment Some computers employ special signal formats which may not be tuned by Multi-scan system of the connected computer. Press ...
... Free) of total dots in one horizontal period. Press the SELECT button at the Current mode icon to match those parameters manually adjusted. Manual PC Adjustment enables you to precisely adjust several parameters to show H-Freq. PC Adjust Menu PC Adjust Menu icon 2 Press the... Adjusts vertical picture position. of this projector. Current mode Press the SELECT button at this adjustment. and V-Freq. Computer Input Manual PC Adjustment Some computers employ special signal formats which may not be tuned by Multi-scan system of the connected computer. Press ...

Instruction Manual, PLC-XU58
Page 33
... level by pressing the Point 7 8 button. level that you want to set and then press the SELECT button. Store To store the image data adjusted manually, move the red frame pointer to the item that you want to select. (XLow, Low, Mid, or High) White balance (Red) Press the Point 7 button...
... level by pressing the Point 7 8 button. level that you want to set and then press the SELECT button. Store To store the image data adjusted manually, move the red frame pointer to the item that you want to select. (XLow, Low, Mid, or High) White balance (Red) Press the Point 7 button...

Instruction Manual, PLC-XU58
Page 37
... is necessary to optimize its performance. COMPONENT VIDEO SIGNAL FORMAT If the projector cannot reproduce proper video image, it is PAL-M or PAL-N, select system manually. AV System Menu (Component) AV System Menu icon This box indicates the system being selected. Video Input ✔Note: The AV System Menu cannot be...
... is necessary to optimize its performance. COMPONENT VIDEO SIGNAL FORMAT If the projector cannot reproduce proper video image, it is PAL-M or PAL-N, select system manually. AV System Menu (Component) AV System Menu icon This box indicates the system being selected. Video Input ✔Note: The AV System Menu cannot be...
Instruction Manual, PLC-XU58
Page 42
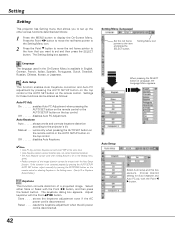
... as follows; 1 Press the MENU button to set "Off" at Language, the Language Menu appears. Auto Setup Select Auto setup and this box appears. Manual . . . .works only when pressing the AUTO SET button on the remote control or the AUTO SETUP button on the top control. Adjust keystone with ...box appears. Language The language used in the On-Screen Menu is not corrected properly by pressing the AUTO SETUP/ AUTO SET button, adjust manually by pressing the AUTO SETUP button on the top control or the AUTO SET button on the remote control or selecting Keystone in English, ...
... as follows; 1 Press the MENU button to set "Off" at Language, the Language Menu appears. Auto Setup Select Auto setup and this box appears. Manual . . . .works only when pressing the AUTO SET button on the remote control or the AUTO SETUP button on the top control. Adjust keystone with ...box appears. Language The language used in the On-Screen Menu is not corrected properly by pressing the AUTO SETUP/ AUTO SET button, adjust manually by pressing the AUTO SETUP button on the top control or the AUTO SET button on the remote control or selecting Keystone in English, ...
Instruction Manual, PLC-XU58
Page 53
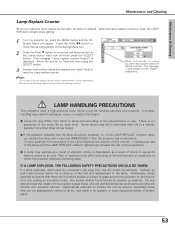
... must be replaced, i.e., if the LAMP REPLACE indicator lights up carefully. Be sure to the environment or conditions in the Lamp Replacement section of this manual. ) Continuous use of the lamp with projector service. There is displayed. When the lamp replace counter is displayed. is no broken shards or pieces of...
... must be replaced, i.e., if the LAMP REPLACE indicator lights up carefully. Be sure to the environment or conditions in the Lamp Replacement section of this manual. ) Continuous use of the lamp with projector service. There is displayed. When the lamp replace counter is displayed. is no broken shards or pieces of...

Instruction Manual, PLC-XU58
Page 54
... setting for assistance, check the items below once again. - In such cases, leave the projector OFF and wait until condensation disappears. - See your computer's instruction manual for the projector in the Setting Menu. (See page 46.) - Adjust the audio source. - Press the Volume (+) button. (See page 26.) - Make sure all equipment...
... setting for assistance, check the items below once again. - In such cases, leave the projector OFF and wait until condensation disappears. - See your computer's instruction manual for the projector in the Setting Menu. (See page 46.) - Adjust the audio source. - Press the Volume (+) button. (See page 26.) - Make sure all equipment...

Instruction Manual, PLC-XU58
Page 60
... (2.8kgs) 0˚ to 11.8˚ Panel Resolution LCD Panel System Panel Resolution Number of Pixels PLC-XU58/PLC-XU56/XU51 0.8" TFT Active Matrix type, 3 panels 1,024 x 768 dots 2,359,296 (1,024 x 768 x 3 panels) PLC-SU51 800 x 600 dots 1,440,000 (800 x 600 x 3 panels) Signal Compatibility Color ...100 KHz, V-sync. 50 ~ 100 Hz PLC-SU51 H-sync. 15 ~ 80 KHz, V-sync. 50 ~ 100 Hz Optical Information Projection Image Size (Diagonal) Projection Lens Throw Distance Projection Lamp Adjustable from 40" to 300" F 1.7 ~ 2.5 lens with f 20.0 mm ~ 30.0 mm with manual zoom and focus 3.3' ~ 25.3' (1.0m ~...
... (2.8kgs) 0˚ to 11.8˚ Panel Resolution LCD Panel System Panel Resolution Number of Pixels PLC-XU58/PLC-XU56/XU51 0.8" TFT Active Matrix type, 3 panels 1,024 x 768 dots 2,359,296 (1,024 x 768 x 3 panels) PLC-SU51 800 x 600 dots 1,440,000 (800 x 600 x 3 panels) Signal Compatibility Color ...100 KHz, V-sync. 50 ~ 100 Hz PLC-SU51 H-sync. 15 ~ 80 KHz, V-sync. 50 ~ 100 Hz Optical Information Projection Image Size (Diagonal) Projection Lens Throw Distance Projection Lamp Adjustable from 40" to 300" F 1.7 ~ 2.5 lens with f 20.0 mm ~ 30.0 mm with manual zoom and focus 3.3' ~ 25.3' (1.0m ~...

Instruction Manual, PLC-XU58
Page 61
Appendix Appendix Accessories Owner's Manual AC Power Cord Remote Control and Batteries DVI-VGA Cable USB Cable Lens Cover with String and Screw Soft Carrying Bag PIN Code Label ● ... Wired LAN Card : POA-WDC20 Wireless LAN Card : POA-WLC20 When using the Wired or Wireless LAN Card, set the following model name in this manual may differ slightly from the product. Model No. DVI Cable : KA-DV20 COMPONENT-VGA Cable : POA-CA-COMPVGA SCART-VGA Cable : POA-CA-SCART (This...
Appendix Appendix Accessories Owner's Manual AC Power Cord Remote Control and Batteries DVI-VGA Cable USB Cable Lens Cover with String and Screw Soft Carrying Bag PIN Code Label ● ... Wired LAN Card : POA-WDC20 Wireless LAN Card : POA-WLC20 When using the Wired or Wireless LAN Card, set the following model name in this manual may differ slightly from the product. Model No. DVI Cable : KA-DV20 COMPONENT-VGA Cable : POA-CA-COMPVGA SCART-VGA Cable : POA-CA-SCART (This...

Instruction Manual, PLC-XU58
Page 63
... the PIN code... Appendix PIN Code Number Memo Write down the PIN code number in a prominent place of the projector's body while it with this manual securely. Factory default set No: 4 3 2 1* *Should the four-digit number be invalid. Put the label below (supplied) on in the column below and keep it...
... the PIN code... Appendix PIN Code Number Memo Write down the PIN code number in a prominent place of the projector's body while it with this manual securely. Factory default set No: 4 3 2 1* *Should the four-digit number be invalid. Put the label below (supplied) on in the column below and keep it...


