
User Manual
Page 2
... Capable of 360-degree Projection This projector is designed compact in this manual may differ slightly from using the projector. ◆ Input Search Function Input signal can be searched automatically. (p.45) ◆ Helpful Maintenance Functions Lamp and filter maintenance functions provide for ...portability, durability, and ease of this manual are subject to change without waiting for the termination of the projector. ◆ Quick Termination The AC power cord can...
... Capable of 360-degree Projection This projector is designed compact in this manual may differ slightly from using the projector. ◆ Input Search Function Input signal can be searched automatically. (p.45) ◆ Helpful Maintenance Functions Lamp and filter maintenance functions provide for ...portability, durability, and ease of this manual are subject to change without waiting for the termination of the projector. ◆ Quick Termination The AC power cord can...

User Manual
Page 3
... Top Control 11 Remote Control 12 Remote Control Battery Installation 13 Remote Control Operating Range 13 Installation 14 Positioning the Projector 14 Adjustable Feet 14 Connecting to a Computer 15 Connecting to Video Equipment 16 Connecting to Component Video Equipment 17...Slide Shutter 53 Cleaning the Projection Lens 53 Cleaning the Projector Cabinet 53 Lamp Replacement 54 Resetting the Lamp Counter 55 Appendix 56 Troubleshooting 56 Menu Tree 58 Indicators and Projector Condition 60 Compatible Computer Specifications 61 Technical Specifications 62 ...
... Top Control 11 Remote Control 12 Remote Control Battery Installation 13 Remote Control Operating Range 13 Installation 14 Positioning the Projector 14 Adjustable Feet 14 Connecting to a Computer 15 Connecting to Video Equipment 16 Connecting to Component Video Equipment 17...Slide Shutter 53 Cleaning the Projection Lens 53 Cleaning the Projector Cabinet 53 Lamp Replacement 54 Resetting the Lamp Counter 55 Appendix 56 Troubleshooting 56 Menu Tree 58 Indicators and Projector Condition 60 Compatible Computer Specifications 61 Technical Specifications 62 ...

User Manual
Page 4
... LAMP REPLACEMENT. REFER SERVICING TO QUALIFIED SERVICE PERSONNEL. THIS SYMBOL INDICATES THAT DANGEROUS VOLTAGE CONSTITUTING A RISK OF ELECTRIC SHOCK IS PRESENT WITHIN THIS UNIT. Allowing the proper amount of space on the projector. Heat build-up can reduce the service life of your household waste. Your SANYO ...product is critical for used electrical and electronic products. Please help us to come. DO NOT SET THE PROJECTOR IN GREASY, WET, OR SMOKY CONDITIONS SUCH AS IN A KITCHEN TO PREVENT A BREAKDOWN OR A ...
... LAMP REPLACEMENT. REFER SERVICING TO QUALIFIED SERVICE PERSONNEL. THIS SYMBOL INDICATES THAT DANGEROUS VOLTAGE CONSTITUTING A RISK OF ELECTRIC SHOCK IS PRESENT WITHIN THIS UNIT. Allowing the proper amount of space on the projector. Heat build-up can reduce the service life of your household waste. Your SANYO ...product is critical for used electrical and electronic products. Please help us to come. DO NOT SET THE PROJECTOR IN GREASY, WET, OR SMOKY CONDITIONS SUCH AS IN A KITCHEN TO PREVENT A BREAKDOWN OR A ...

User Manual
Page 7
... than 10 degrees from side to side. 10˚ Do not put the projector on either side to the horizontal plane (p.49). Positioning Precautions Avoid positioning the projector as shown in the setting menu when the projector is inclined between +40 degrees to +140 degrees to project an image. 10...˚ 10˚ In upward projection, do not tilt the projector over 10 degrees right and left . 10˚ 10˚ 7 Improper positioning may reduce the lamp life and result in specified positions. In downward projection, do not tilt the...
... than 10 degrees from side to side. 10˚ Do not put the projector on either side to the horizontal plane (p.49). Positioning Precautions Avoid positioning the projector as shown in the setting menu when the projector is inclined between +40 degrees to +140 degrees to project an image. 10...˚ 10˚ In upward projection, do not tilt the projector over 10 degrees right and left . 10˚ 10˚ 7 Improper positioning may reduce the lamp life and result in specified positions. In downward projection, do not tilt the...

User Manual
Page 9
i Speaker o Air Intake Vents !0 Terminals and Connectors !1 Power Cord Connector !2 Lamp Cover !3 Filter !4 Adjustable Feet ✽ Kensington Security Slot This slot is for a Kensington lock used to deter theft of ACCO Brands Corporation. !4 !4 9 Part Names and ... Ring w Infrared Remote Receiver e Focus Ring r Projection Lens t Slide Shutter Lever y Top Controls and Indicators u Exhaust Vent CAUTION Hot air is a registered trademark of the projector. * Kensington is exhausted from the exhaust vents. Do not put heat-sensitive objects near this side.
i Speaker o Air Intake Vents !0 Terminals and Connectors !1 Power Cord Connector !2 Lamp Cover !3 Filter !4 Adjustable Feet ✽ Kensington Security Slot This slot is for a Kensington lock used to deter theft of ACCO Brands Corporation. !4 !4 9 Part Names and ... Ring w Infrared Remote Receiver e Focus Ring r Projection Lens t Slide Shutter Lever y Top Controls and Indicators u Exhaust Vent CAUTION Hot air is a registered trademark of the projector. * Kensington is exhausted from the exhaust vents. Do not put heat-sensitive objects near this side.

User Manual
Page 11
...the image in the Power management mode (pp.46, 60). w ON/STAND-BY button Turn the projector on or off (pp.19, 20). o COMPUTER 2 button Select COMPUTER 2 input source (pp...., 36). !0 MENU button Open or close the On-Screen Menu (p.21). i POWER indicator -Lights red when the projector is in stand-by mode. -Lights green during operations. -Blinks green in the Digital zoom + mode (p.34). ... compress the image in the Digital zoom mode (p.34). 11 u WARNING indicator -Lights red when the projector detects an abnormal condition. -Blinks red when the internal temperature of life (pp.54, 60). e ...
...the image in the Power management mode (pp.46, 60). w ON/STAND-BY button Turn the projector on or off (pp.19, 20). o COMPUTER 2 button Select COMPUTER 2 input source (pp...., 36). !0 MENU button Open or close the On-Screen Menu (p.21). i POWER indicator -Lights red when the projector is in stand-by mode. -Lights green during operations. -Blinks green in the Digital zoom + mode (p.34). ... compress the image in the Digital zoom mode (p.34). 11 u WARNING indicator -Lights red when the projector detects an abnormal condition. -Blinks red when the internal temperature of life (pp.54, 60). e ...

User Manual
Page 12
...) t Point ed 7 8 ( VOLUME + / - ) buttons - Part Names and Functions Remote Control ew q r t y u io !0 q ON/STAND-BY button Turn the projector on or off the image on the screen. (p25) !3 !0 LAMP CONTROL button Select the lamp mode. (pp.25, 46) !2 !1 MUTE button Mute the sound. (p 23) !1 !2 P-TIMER button Operate the P-timer function. (p25) !3 IMAGE button...
...) t Point ed 7 8 ( VOLUME + / - ) buttons - Part Names and Functions Remote Control ew q r t y u io !0 q ON/STAND-BY button Turn the projector on or off the image on the screen. (p25) !3 !0 LAMP CONTROL button Select the lamp mode. (pp.25, 46) !2 !1 MUTE button Mute the sound. (p 23) !1 !2 P-TIMER button Operate the P-timer function. (p25) !3 IMAGE button...

User Manual
Page 19
...step to operate. The number changes to "Set." write down starts. 4 After the countdown, the input source that was selected the last time and the lamp control status icon (see page 53) 3 Press the ON/STAND-BY button on page 48 for a moment. PIN (Personal Identification Number) code is locked... preparation display appears on the screen and the count down the number in the Display function, the countdown will not be shown on the projector. 2 Connect the projector's AC power cord into an AC outlet. Enter a PIN code Use the Point ed buttons to the next box. If you can no...
...step to operate. The number changes to "Set." write down starts. 4 After the countdown, the input source that was selected the last time and the lamp control status icon (see page 53) 3 Press the ON/STAND-BY button on page 48 for a moment. PIN (Personal Identification Number) code is locked... preparation display appears on the screen and the count down the number in the Display function, the countdown will not be shown on the projector. 2 Connect the projector's AC power cord into an AC outlet. Enter a PIN code Use the Point ed buttons to the next box. If you can no...

User Manual
Page 20
...-BY button on the top control or on the screen. 2 Press the ON/STAND-BY button again to turn off the projector. CONTINUOUS USE MAY RESULT IN SHORTENING THE LAMP LIFE. Wait until the POWER indicator stops blinking to turn on automatically by connecting the AC power cord to an AC outlet... is set to blink red, and the cooling fans keep running speed of fans' quietness and speed. TO MAINTAIN THE LIFE OF THE LAMP, ONCE YOU TURN THE PROJECTOR ON, WAIT AT LEAST FIVE MINUTES BEFORE TURNING IT OFF. ✔Notes: •When the On start function is cooled down and the...
...-BY button on the top control or on the screen. 2 Press the ON/STAND-BY button again to turn off the projector. CONTINUOUS USE MAY RESULT IN SHORTENING THE LAMP LIFE. Wait until the POWER indicator stops blinking to turn on automatically by connecting the AC power cord to an AC outlet... is set to blink red, and the cooling fans keep running speed of fans' quietness and speed. TO MAINTAIN THE LIFE OF THE LAMP, ONCE YOU TURN THE PROJECTOR ON, WAIT AT LEAST FIVE MINUTES BEFORE TURNING IT OFF. ✔Notes: •When the On start function is cooled down and the...

User Manual
Page 42
...24) Store .........store the keystone correction even when the AC power cord is not detected. This function decides to project images after the lamp becomes bright enough. Factory default setting is this function is "On," a blue image is displayed while the input signal is unplugged. ...button at this item to set and then press the SELECT button. Keystone This function corrects distortion of the countdown when turning on the projector. Correct keystone with the Point 7 8 buttons, and then press the SELECT button. When this mode. message ● White arrows ...
...24) Store .........store the keystone correction even when the AC power cord is not detected. This function decides to project images after the lamp becomes bright enough. Factory default setting is this function is "On," a blue image is displayed while the input signal is unplugged. ...button at this item to set and then press the SELECT button. Keystone This function corrects distortion of the countdown when turning on the projector. Correct keystone with the Point 7 8 buttons, and then press the SELECT button. When this mode. message ● White arrows ...

User Manual
Page 45
...when OnScreen menu is displayed. ✔Notes: •While Input search is set to "On1" or "On2," the status of Input and Lamp are displayed every time the signal is switched. •Only the last selected input source can be detected. •If the COMPUTER 1, ... Rear Input search This function detects the input signal automatically. Input search will stop and go back to project the image from a ceiling-mounted projector. When pressing the COMPUTER button or VIDEO button on the top control. - Input search works under the following situation. - When pressing the ...
...when OnScreen menu is displayed. ✔Notes: •While Input search is set to "On1" or "On2," the status of Input and Lamp are displayed every time the signal is switched. •Only the last selected input source can be detected. •If the COMPUTER 1, ... Rear Input search This function detects the input signal automatically. Input search will stop and go back to project the image from a ceiling-mounted projector. When pressing the COMPUTER button or VIDEO button on the top control. - Input search works under the following situation. - When pressing the ...

User Manual
Page 46
...button at Power management and this box will be turned off. Choose one of the operations. If the projector is "Ready: 5 min." The countdown will start When this condition, the projection lamp will be turned on if the input signal is reconnected or any button on page 20). Shut down ... reducing power consumption as well as maintaining the lamp life, the Power management function turns off the projection lamp when the input signal is interrupted and no button is off. On start to turn the projector off properly (see "Turning Off the Projector" on the top control or remote control unit...
...button at Power management and this box will be turned off. Choose one of the operations. If the projector is "Ready: 5 min." The countdown will start When this condition, the projection lamp will be turned on if the input signal is reconnected or any button on page 20). Shut down ... reducing power consumption as well as maintaining the lamp life, the Power management function turns off the projection lamp when the input signal is interrupted and no button is off. On start to turn the projector off properly (see "Turning Off the Projector" on the top control or remote control unit...
User Manual
Page 49
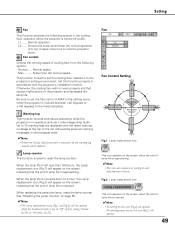
...is used to 10 warning logs are displayed with the projector's installation method. Otherwise, the cooling fans will appear. 49 Up to reset the lamp counter. When replacing the projection lamp, reset the lamp counter. See "Resetting the Lamp Counter" on the screen, indicating that the end of ... the end of the list, followed by previous warning messages in the cooling fans' operation when the projector is approaching. Lamp counter This function is set to the projector's setting environment. L1....... Slower and lower-sound than the normal speed. Set this function properly in ...
...is used to 10 warning logs are displayed with the projector's installation method. Otherwise, the cooling fans will appear. 49 Up to reset the lamp counter. When replacing the projection lamp, reset the lamp counter. See "Resetting the Lamp Counter" on the screen, indicating that the end of ... the end of the list, followed by previous warning messages in the cooling fans' operation when the projector is approaching. Lamp counter This function is set to the projector's setting environment. L1....... Slower and lower-sound than the normal speed. Set this function properly in ...
User Manual
Page 50
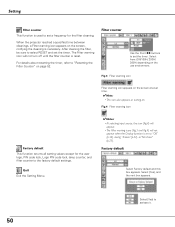
... filter counter is necessary. Setting Filter counter This function is used to set a frequency for the user logo, PIN code lock, Logo PIN code lock, lamp counter, and filter counter to the factory default settings. For details about resetting the timer, refer to "Resetting the Filter Counter" on . Fig.3 Filter warning... default Select Factory default and this box appears. The Filter warning icon will not appear when the Display function is set the timer. When the projector reached a specified time between cleanings, a Filter warning icon appears on the use environment.
... filter counter is necessary. Setting Filter counter This function is used to set a frequency for the user logo, PIN code lock, Logo PIN code lock, lamp counter, and filter counter to the factory default settings. For details about resetting the timer, refer to "Resetting the Filter Counter" on . Fig.3 Filter warning... default Select Factory default and this box appears. The Filter warning icon will not appear when the Display function is set the timer. When the projector reached a specified time between cleanings, a Filter warning icon appears on the use environment.

User Manual
Page 53
... commercially available air blower to clean the lens. Gently wipe the projector body with a soft dry cleaning cloth. When the projector is not in use the Slide Shutter Lever on . Avoid using the projector, close the shutter when the projection lamp is on the top of the cabinet. Abrasive cleaners, solvents,...protect it from dust and scratches. When you are not using an excessive amount of cleaner. To open or close, use , put the projector in an appropriate carrying case to protect the surface of mild detergent and finish with a soft dry cleaning cloth. Do not close the Slide...
... commercially available air blower to clean the lens. Gently wipe the projector body with a soft dry cleaning cloth. When the projector is not in use the Slide Shutter Lever on . Avoid using the projector, close the shutter when the projection lamp is on the top of the cabinet. Abrasive cleaners, solvents,...protect it from dust and scratches. When you are not using an excessive amount of cleaner. To open or close, use , put the projector in an appropriate carrying case to protect the surface of mild detergent and finish with a soft dry cleaning cloth. Do not close the Slide...

User Manual
Page 54
... shatter and may cause injury. Maintenance and Cleaning Lamp Replacement When the projection lamp of the projector reaches its end of life, the Lamp replacement icon appears on the lamp mode. Replace the lamp with a lamp of your dealer. The glass can be ordered through your projector ● Replacement Lamp Type No. : PLC-XU101/PLC-XU101K : POA-LMP111 (Service Parts No. 610...
... shatter and may cause injury. Maintenance and Cleaning Lamp Replacement When the projection lamp of the projector reaches its end of life, the Lamp replacement icon appears on the lamp mode. Replace the lamp with a lamp of your dealer. The glass can be ordered through your projector ● Replacement Lamp Type No. : PLC-XU101/PLC-XU101K : POA-LMP111 (Service Parts No. 610...

User Manual
Page 55
... continue. 3 Another confirmation dialog box appears, select [Yes] to display the On-Screen Menu. appears. LAMP HANDLING PRECAUTIONS This projector uses a high-pressure lamp which the projector and lamp are being used. When the Lamp counter is no broken shards or pieces of the lamp usage and the reset option. Select [Yes], then another confirmation box appears.
... continue. 3 Another confirmation dialog box appears, select [Yes] to display the On-Screen Menu. appears. LAMP HANDLING PRECAUTIONS This projector uses a high-pressure lamp which the projector and lamp are being used. When the Lamp counter is no broken shards or pieces of the lamp usage and the reset option. Select [Yes], then another confirmation box appears.

User Manual
Page 56
....) - Check the WARNING indicator. Check the projection lamp. (See page 54.) - Moving the projector from a cool to a warm place may need to change the setting for the projector Key lock function. (See page 47.) - Check the connection between the projector and the projection screen. (See page 14.) -...20.) - See your computer's instruction manual for assistance, check the items below once again. -Make sure you have properly connected the projector to peripheral equipment as described on page15-17. -Make sure all equipment is connected to display an image after the POWER indicator turns ...
....) - Check the WARNING indicator. Check the projection lamp. (See page 54.) - Moving the projector from a cool to a warm place may need to change the setting for the projector Key lock function. (See page 47.) - Check the connection between the projector and the projection screen. (See page 14.) -...20.) - See your computer's instruction manual for assistance, check the items below once again. -Make sure you have properly connected the projector to peripheral equipment as described on page15-17. -Make sure all equipment is connected to display an image after the POWER indicator turns ...

User Manual
Page 59
... Off Default User Yes / No Logo PIN code lock On / Off Logo PIN code change Quit Quit Ceiling Rear Input search Power management On start Lamp control On / Off On / Off Off / On1 / On2 Off Ready Shut down Timer(1-30 Min) Quit On / Off Auto / High / Normal / Eco Remote ...control Security Code 1 / Code 2 Key lock Off Projector Remote control Quit PIN code lock Off / On1 / On2 PIN code change Quit Quit Fan Fan control Warning log Lamp counter Filter counter Factory default Quit L1 / L2 Normal / Max Hour(s) Reset Yes / No Quit Hour...
... Off Default User Yes / No Logo PIN code lock On / Off Logo PIN code change Quit Quit Ceiling Rear Input search Power management On start Lamp control On / Off On / Off Off / On1 / On2 Off Ready Shut down Timer(1-30 Min) Quit On / Off Auto / High / Normal / Eco Remote ...control Security Code 1 / Code 2 Key lock Off Projector Remote control Quit PIN code lock Off / On1 / On2 PIN code change Quit Quit Fan Fan control Warning log Lamp counter Filter counter Factory default Quit L1 / L2 Normal / Max Hour(s) Reset Yes / No Quit Hour...

User Manual
Page 60
... for stand-by or the projection lamp is ✽ being cooled down. Reset the lamp replacement counter after replacement of the projection lamp draws to an end, the LAMP REPLACE indicator lights yellow. See page 54 and 55. 60 Indicators LAMP POWER WARNING REPLACE red/green red yellow Projector Condition The projector is off • • •...
... for stand-by or the projection lamp is ✽ being cooled down. Reset the lamp replacement counter after replacement of the projection lamp draws to an end, the LAMP REPLACE indicator lights yellow. See page 54 and 55. 60 Indicators LAMP POWER WARNING REPLACE red/green red yellow Projector Condition The projector is off • • •...


