User Manual
Page 2
...; The contents of this manual are subject to focus on the projector and the remote control. Useful Interface; ● 2 Inputs for RGB (D-sub 15pin) ● Monitor Output for RGB (D-sub 15pin) ● Audio Output (Mini jack stereo, variable) ◆ Multilanguage Menu Display Operation menu is designed compact in 16 languages; Blackboards* can be used as a projection screen. *The board color is limited to Green (pp.31, 38...
...; The contents of this manual are subject to focus on the projector and the remote control. Useful Interface; ● 2 Inputs for RGB (D-sub 15pin) ● Monitor Output for RGB (D-sub 15pin) ● Audio Output (Mini jack stereo, variable) ◆ Multilanguage Menu Display Operation menu is designed compact in 16 languages; Blackboards* can be used as a projection screen. *The board color is limited to Green (pp.31, 38...

User Manual
Page 3
... Mode Selection 38 Image Adjustment 39 Screen Size Adjustment 41 Setting 42 Setting 42 Maintenance and Cleaning 51 Warning Indicator 51 Cleaning the Filter 52 Resetting the Filter Counter 52 Slide Shutter 53 Cleaning the Projection Lens 53 Cleaning the Projector Cabinet 53 Lamp Replacement 54 Resetting the Lamp Counter 55 Appendix 56 Troubleshooting 56 Menu Tree 58 Indicators and Projector Condition 60 Compatible Computer Specifications 61 Technical Specifications 62 Optional Parts 63 Configurations of Terminals 64 Dimensions 64 PIN Code Number...
... Mode Selection 38 Image Adjustment 39 Screen Size Adjustment 41 Setting 42 Setting 42 Maintenance and Cleaning 51 Warning Indicator 51 Cleaning the Filter 52 Resetting the Filter Counter 52 Slide Shutter 53 Cleaning the Projection Lens 53 Cleaning the Projector Cabinet 53 Lamp Replacement 54 Resetting the Lamp Counter 55 Appendix 56 Troubleshooting 56 Menu Tree 58 Indicators and Projector Condition 60 Compatible Computer Specifications 61 Technical Specifications 62 Optional Parts 63 Configurations of Terminals 64 Dimensions 64 PIN Code Number...

User Manual
Page 4
... DO NOT OPEN CAUTION: TO REDUCE THE RISK OF ELECTRIC SHOCK, DO NOT REMOVE COVER (OR BACK). Install the projector in ! This symbol means that children do not stare directly into the beam. - READ AND KEEP THIS OWNER'S MANUAL FOR LATER USE. To the Owner Before installing and operating this projector, read this manual again, check operations and cable connections and try the solutions in the "Troubleshooting" section in...
... DO NOT OPEN CAUTION: TO REDUCE THE RISK OF ELECTRIC SHOCK, DO NOT REMOVE COVER (OR BACK). Install the projector in ! This symbol means that children do not stare directly into the beam. - READ AND KEEP THIS OWNER'S MANUAL FOR LATER USE. To the Owner Before installing and operating this projector, read this manual again, check operations and cable connections and try the solutions in the "Troubleshooting" section in...

User Manual
Page 5
... duct of time, unplug it . If you to lightning and power line surges. Refer all of power source indicated on the projector. Safety Instructions All the safety and operating instructions should be read before cleaning. Do not locate this indicates a need for cleaning. The openings should never be covered with cloth or other materials, and the bottom opening or removing covers may cause hazards. Do not use a mounting kit approved...
... duct of time, unplug it . If you to lightning and power line surges. Refer all of power source indicated on the projector. Safety Instructions All the safety and operating instructions should be read before cleaning. Do not locate this indicates a need for cleaning. The openings should never be covered with cloth or other materials, and the bottom opening or removing covers may cause hazards. Do not use a mounting kit approved...

User Manual
Page 8
... which is coloured green-and-yellow must be used of the same rating, marked thus ASA . However, there is listed by the Underwriters Laboratories (UL) and certified by turning the equipment off and destroyed. Model Number(s) Trade Name Responsible party Address : PLC-XU101 : Sanyo : SANYO FISHER COMPANY : 21605 Plummer Street, Chatsworth, California 91311 U.S.A. AC Power Cord for your electrician. AC Power Cord has a grounding-type...
... which is coloured green-and-yellow must be used of the same rating, marked thus ASA . However, there is listed by the Underwriters Laboratories (UL) and certified by turning the equipment off and destroyed. Model Number(s) Trade Name Responsible party Address : PLC-XU101 : Sanyo : SANYO FISHER COMPANY : 21605 Plummer Street, Chatsworth, California 91311 U.S.A. AC Power Cord for your electrician. AC Power Cord has a grounding-type...

User Manual
Page 11
Top Control Part Names and Functions q u w i e o r !0 t y q LAMP REPLACE indicator Lights yellow when the projection lamp reaches its end of the projector exceeds the operating range (pp.51, 60). r VIDEO button Select VIDEO input source (p.35). i POWER indicator -Lights red when the projector is in stand-by mode. -Lights green during operations. -Blinks green in the Digital zoom + mode (p.34). -Adjust the volume level (Point 7 8 buttons) (p.23). o COMPUTER 2 button Select COMPUTER 2 input source (pp.26, 36). !0 MENU button Open or close the On-Screen Menu (p.21). ...
Top Control Part Names and Functions q u w i e o r !0 t y q LAMP REPLACE indicator Lights yellow when the projection lamp reaches its end of the projector exceeds the operating range (pp.51, 60). r VIDEO button Select VIDEO input source (p.35). i POWER indicator -Lights red when the projector is in stand-by mode. -Lights green during operations. -Blinks green in the Digital zoom + mode (p.34). -Adjust the volume level (Point 7 8 buttons) (p.23). o COMPUTER 2 button Select COMPUTER 2 input source (pp.26, 36). !0 MENU button Open or close the On-Screen Menu (p.21). ...

User Manual
Page 19
... the projector. Take a special care in the Display function, the countdown will turn red for Lamp control status.) ✔Note: •The Filter warning and Lamp replacement icons may appear on the screen depending on the screen (p.43). •When the "Countdown off automatically. •The "1234" is set as instructed below. Selected Input Source and Lamp Control Lamp control status (See page 46 for a moment. The POWER indicator lights red. If the projector is a security code that...
... the projector. Take a special care in the Display function, the countdown will turn red for Lamp control status.) ✔Note: •The Filter warning and Lamp replacement icons may appear on the screen depending on the screen (p.43). •When the "Countdown off automatically. •The "1234" is set as instructed below. Selected Input Source and Lamp Control Lamp control status (See page 46 for a moment. The POWER indicator lights red. If the projector is a security code that...

User Manual
Page 20
... the projector is turned off ?" CONTINUOUS USE MAY RESULT IN SHORTENING THE LAMP LIFE. Wait until the POWER indicator stops blinking to turn on the projector again. •The fan rotation will be turned on automatically by connecting the AC power cord to an AC outlet (p.46). •DO NOT OPERATE THE PROJECTOR CONTINUOUSLY WITHOUT REST. The POWER indicator starts to blink red, and the cooling fans keep running. (You can be turned on. The message will...
... the projector is turned off ?" CONTINUOUS USE MAY RESULT IN SHORTENING THE LAMP LIFE. Wait until the POWER indicator stops blinking to turn on the projector again. •The fan rotation will be turned on automatically by connecting the AC power cord to an AC outlet (p.46). •DO NOT OPERATE THE PROJECTOR CONTINUOUSLY WITHOUT REST. The POWER indicator starts to blink red, and the cooling fans keep running. (You can be turned on. The message will...

User Manual
Page 22
...Real, Blackboard(Green), and Image 1 ~ 4. (p.31) Screen Menu Used to adjust size of image. [Normal / True / Wide / Full screen / Custom / Digital zoom +/-] (pp.33, 34) Setting Menu Used to set the projector's operating configurations. (pp.42-50) Input Menu Used to select input source either Computer or Video. (p.26) For video source PC Adjust Menu Used to adjust parameters to match with input signal format. (pp.28-30) Image Adjust Menu Used to adjust computer image. [Contrast / Brightness / Color temp. / White balance (R/G/B) / Sharpness / Gamma] (pp.32, 33) Sound Menu Used to adjust the...
...Real, Blackboard(Green), and Image 1 ~ 4. (p.31) Screen Menu Used to adjust size of image. [Normal / True / Wide / Full screen / Custom / Digital zoom +/-] (pp.33, 34) Setting Menu Used to set the projector's operating configurations. (pp.42-50) Input Menu Used to select input source either Computer or Video. (p.26) For video source PC Adjust Menu Used to adjust parameters to match with input signal format. (pp.28-30) Image Adjust Menu Used to adjust computer image. [Contrast / Brightness / Color temp. / White balance (R/G/B) / Sharpness / Gamma] (pp.32, 33) Sound Menu Used to adjust the...

User Manual
Page 24
... direction of the arrow being displayed, the keystone adjustment will appear. KEYSTONE button POINT ed buttons FREEZE button KEYSTONE button If a projected picture has keystone distortion, correct the image with Point d button. • The arrows are white when there is advisable. The keystone dialog box will be canceled. • The adjustable range can be limited depending on the remote control. Basic Operation Remote Control Operation For some frequently used operations, using the remote control is no need for...
... direction of the arrow being displayed, the keystone adjustment will appear. KEYSTONE button POINT ed buttons FREEZE button KEYSTONE button If a projected picture has keystone distortion, correct the image with Point d button. • The arrows are white when there is advisable. The keystone dialog box will be canceled. • The adjustable range can be limited depending on the remote control. Basic Operation Remote Control Operation For some frequently used operations, using the remote control is no need for...

User Manual
Page 33
... projector. •The image data other than the screen size (1024 x 768), the projector enters panning mode automatically. Full screen Provide the full screen image. ✔Notes: • The Screen Menu, except for providing a squeezed video signal at 16 : 9. Computer Input Store To store the adjusted data, select Store and press the SELECT button. Quit Exit the Image Adjust Menu. Press the Point 7 8 buttons to move the red frame pointer to the Screen Menu icon. 2 Use...
... projector. •The image data other than the screen size (1024 x 768), the projector enters panning mode automatically. Full screen Provide the full screen image. ✔Notes: • The Screen Menu, except for providing a squeezed video signal at 16 : 9. Computer Input Store To store the adjusted data, select Store and press the SELECT button. Quit Exit the Image Adjust Menu. Press the Point 7 8 buttons to move the red frame pointer to the Screen Menu icon. 2 Use...
User Manual
Page 44
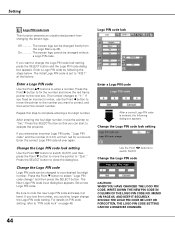
... Logo Menu (p.43). Enter a Logo PIN code Use the Point ed buttons to switch On/Off. If you can start to "4321" at hand. Enter the correct Logo PIN code all over again. Set a new Logo PIN code. If you lost the number, you entered an incorrect Logo PIN code, "Logo PIN code" and the number will turn red for a moment. If you could no longer change...
... Logo Menu (p.43). Enter a Logo PIN code Use the Point ed buttons to switch On/Off. If you can start to "4321" at hand. Enter the correct Logo PIN code all over again. Set a new Logo PIN code. If you lost the number, you entered an incorrect Logo PIN code, "Logo PIN code" and the number will turn red for a moment. If you could no longer change...

User Manual
Page 45
... options. This function is used to project the image from rear of Input and Lamp are displayed every time the signal is switched. •Only the last selected input source can be left /right reversed. When pressing the COMPUTER button or VIDEO button on the top control. - This function is used to project the image from a ceiling-mounted projector. Ceiling Rear When this function is set to "On," the picture will be top/bottom...
... options. This function is used to project the image from rear of Input and Lamp are displayed every time the signal is switched. •Only the last selected input source can be left /right reversed. When pressing the COMPUTER button or VIDEO button on the top control. - This function is used to project the image from a ceiling-mounted projector. Ceiling Rear When this function is set to "On," the picture will be top/bottom...

User Manual
Page 46
... (see "Turning Off the Projector" on just by connecting the AC power cord to a wall outlet. ✔Note: Be sure to the timer with the Point ed buttons and set the countdown timer with the Point 7 8 buttons. ✔Note: Factory default is pressed. Normal brightness Eco Lower brightness reduces the lamp power consumption and extends the lamp life. 46 The countdown will start to green blinking. Off Power management function...
... (see "Turning Off the Projector" on just by connecting the AC power cord to a wall outlet. ✔Note: Be sure to the timer with the Point ed buttons and set the countdown timer with the Point 7 8 buttons. ✔Note: Factory default is pressed. Normal brightness Eco Lower brightness reduces the lamp power consumption and extends the lamp life. 46 The countdown will start to green blinking. Off Power management function...
User Manual
Page 49
... Lamp replacement icon (Fig.2) will appear on the screen, indicating that causes malfunctions of cooling fans from the following options in the cooling fans' operation when the projector is set the cooling fans' operation to 10 warning logs are displayed with the projector's installation method. Otherwise, the cooling fans will not work properly and that the end of lamp life is reached. ✔Note: •At turning on and selecting input source. Warning...
... Lamp replacement icon (Fig.2) will appear on the screen, indicating that causes malfunctions of cooling fans from the following options in the cooling fans' operation when the projector is set the cooling fans' operation to 10 warning logs are displayed with the projector's installation method. Otherwise, the cooling fans will not work properly and that the end of lamp life is reached. ✔Note: •At turning on and selecting input source. Warning...

User Manual
Page 54
... minutes. 2 Remove the screw and open the Lamp cover. Press here and pull upward. Handle Screw Screw Lamp ORDER REPLACEMENT LAMP Replacement lamp can be ordered through your projector ● Replacement Lamp Type No. : PLC-XU101/PLC-XU101K : POA-LMP111 (Service Parts No. 610 333 9740) 54 The timing when the LAMP REPLACE indicator should light is set properly. Follow these steps to the dealer. ● Model No. Close the lamp cover and secure the screw. 5 Connect the AC power cord to "Off...
... minutes. 2 Remove the screw and open the Lamp cover. Press here and pull upward. Handle Screw Screw Lamp ORDER REPLACEMENT LAMP Replacement lamp can be ordered through your projector ● Replacement Lamp Type No. : PLC-XU101/PLC-XU101K : POA-LMP111 (Service Parts No. 610 333 9740) 54 The timing when the LAMP REPLACE indicator should light is set properly. Follow these steps to the dealer. ● Model No. Close the lamp cover and secure the screw. 5 Connect the AC power cord to "Off...

User Manual
Page 55
... an authorized service station for each lamp. Select Reset and the "Lamp replacement counter Reset?" Use the Point 7 8 buttons to move the red frame pointer to the Setting Menu icon. 2 Use the Point ed buttons to move the red frame pointer to reset the Lamp counter. Some lamps may explode as a result of broken glass. 55 No one IMMEDIATELY after the projector has cooled down. (Follow carefully the instructions in an...
... an authorized service station for each lamp. Select Reset and the "Lamp replacement counter Reset?" Use the Point 7 8 buttons to move the red frame pointer to the Setting Menu icon. 2 Use the Point ed buttons to move the red frame pointer to reset the Lamp counter. Some lamps may explode as a result of broken glass. 55 No one IMMEDIATELY after the projector has cooled down. (Follow carefully the instructions in an...

User Manual
Page 56
...) - Adjust the audio source. - Is the image projected? Image is correctly output from audio input source. - See if the input signal is Top/Bottom reversed. Check the Ceiling function. (See page 45.) - No image Image is out of the specified Operating Temperature {41 ˚F ~ 95 ˚F (5 ˚C ~ 35 ˚C)} . - See if the POWER indicator lights red. - Provide proper distance between your computer or video equipment and the projector. (See pages 15-17) - Check the connection between...
...) - Adjust the audio source. - Is the image projected? Image is correctly output from audio input source. - See if the input signal is Top/Bottom reversed. Check the Ceiling function. (See page 45.) - No image Image is out of the specified Operating Temperature {41 ˚F ~ 95 ˚F (5 ˚C ~ 35 ˚C)} . - See if the POWER indicator lights red. - Provide proper distance between your computer or video equipment and the projector. (See pages 15-17) - Check the connection between...

User Manual
Page 59
... Off Default User Yes / No Logo PIN code lock On / Off Logo PIN code change Quit Quit Ceiling Rear Input search Power management On start Lamp control On / Off On / Off Off / On1 / On2 Off Ready Shut down Timer(1-30 Min) Quit On / Off Auto / High / Normal / Eco Remote control Security Code 1 / Code 2 Key lock Off Projector Remote control Quit PIN code lock Off / On1 / On2 PIN code change Quit Quit Fan Fan control Warning log Lamp counter Filter counter Factory default Quit L1 / L2 Normal / Max Hour(s) Reset Yes...
... Off Default User Yes / No Logo PIN code lock On / Off Logo PIN code change Quit Quit Ceiling Rear Input search Power management On start Lamp control On / Off On / Off Off / On1 / On2 Off Ready Shut down Timer(1-30 Min) Quit On / Off Auto / High / Normal / Eco Remote control Security Code 1 / Code 2 Key lock Off Projector Remote control Quit PIN code lock Off / On1 / On2 PIN code change Quit Quit Fan Fan control Warning log Lamp counter Filter counter Factory default Quit L1 / L2 Normal / Max Hour(s) Reset Yes...

User Manual
Page 60
... be turned on . (The WARNING indicator keeps blinking.) Check and clean the air filters. It may cause an electric shock or a fire hazard. • • • green. • • • red • • • off again, disconnect the AC power cord and contact the dealer or the service center for service and checkup. When this indicator lights yellow, replace the projection lamp with the ON/STAND-BY button. ✽ The projector is operating normally...
... be turned on . (The WARNING indicator keeps blinking.) Check and clean the air filters. It may cause an electric shock or a fire hazard. • • • green. • • • red • • • off again, disconnect the AC power cord and contact the dealer or the service center for service and checkup. When this indicator lights yellow, replace the projection lamp with the ON/STAND-BY button. ✽ The projector is operating normally...


