
Owners Manual
Page 2
...(p.54). ◆ Multi-use of the projector (pp.59-61). ◆ Multiple Interface Terminals The projector has several interface terminals that can support various types of equipment and signals (pp.11-12). ◆ Lamp Control Brightness of the projection lamp can be accepted. ◆ Network-capable...the crucial information during a presentation (pp.15, 51). ◆ Helpful Maintenance Functions Lamp and filter maintenance functions provide for the screen logo and use . ◆ Functionally Rich This projector has many useful functions such as a PC wireless mouse. It is easy to ...
...(p.54). ◆ Multi-use of the projector (pp.59-61). ◆ Multiple Interface Terminals The projector has several interface terminals that can support various types of equipment and signals (pp.11-12). ◆ Lamp Control Brightness of the projection lamp can be accepted. ◆ Network-capable...the crucial information during a presentation (pp.15, 51). ◆ Helpful Maintenance Functions Lamp and filter maintenance functions provide for the screen logo and use . ◆ Functionally Rich This projector has many useful functions such as a PC wireless mouse. It is easy to ...

Owners Manual
Page 3
...Battery Installation 18 Remote Control Receivers and Operating Range 18 Adjustable Feet 18 Installation 19 Lens Installation 19 Positioning the Projector 20 Moving the Lens 20 Connecting the AC Power Cord 21 Connecting to a Computer (Digital and Analog RGB... 64 Resetting the Filter Counter 64 Lamp Replacement 65 Resetting the Lamp Counter 66 Warning Indicator 67 Cleaning the Projection Lens 68 Cleaning the Projector Cabinet 68 Appendix 69 Troubleshooting 69 Menu Tree 71 Indicators and Projector Condition 73 Compatible Computer Specifications 75 Technical...
...Battery Installation 18 Remote Control Receivers and Operating Range 18 Adjustable Feet 18 Installation 19 Lens Installation 19 Positioning the Projector 20 Moving the Lens 20 Connecting the AC Power Cord 21 Connecting to a Computer (Digital and Analog RGB... 64 Resetting the Filter Counter 64 Lamp Replacement 65 Resetting the Lamp Counter 66 Warning Indicator 67 Cleaning the Projection Lens 68 Cleaning the Projector Cabinet 68 Appendix 69 Troubleshooting 69 Menu Tree 71 Indicators and Projector Condition 73 Compatible Computer Specifications 75 Technical...

Owners Manual
Page 4
...result in good condition for proper air circulation and cooling of this manual thoroughly. NO USER-SERVICEABLE PARTS INSIDE EXCEPT LAMP REPLACEMENT. Install the projector in not only shortening the product life, but also malfunctions, fire hazard, or other area of this equipment at ...BREAKDOWN OR A DISASTER. Operating the projector properly enables you purchased the projector or the service center. CAUTION RISK OF ELECTRIC SHOCK DO NOT OPEN CAUTION: TO REDUCE THE RISK OF ELECTRIC SHOCK, DO NOT REMOVE COVER (OR BACK). Your SANYO product is critical for many convenient ...
...result in good condition for proper air circulation and cooling of this manual thoroughly. NO USER-SERVICEABLE PARTS INSIDE EXCEPT LAMP REPLACEMENT. Install the projector in not only shortening the product life, but also malfunctions, fire hazard, or other area of this equipment at ...BREAKDOWN OR A DISASTER. Operating the projector properly enables you purchased the projector or the service center. CAUTION RISK OF ELECTRIC SHOCK DO NOT OPEN CAUTION: TO REDUCE THE RISK OF ELECTRIC SHOCK, DO NOT REMOVE COVER (OR BACK). Your SANYO product is critical for many convenient ...
Owners Manual
Page 6
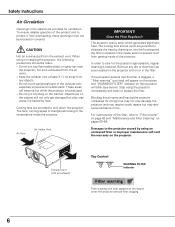
.... Do not put anything on or in the filter. For maintenance of the filter, refer to the temperature inside of the projector. The projector uses a lamp which generates significant heat. When using the projector immediately and clean or replace the filter. Do not touch peripheral parts of the product and to cool down the...
.... Do not put anything on or in the filter. For maintenance of the filter, refer to the temperature inside of the projector. The projector uses a lamp which generates significant heat. When using the projector immediately and clean or replace the filter. Do not touch peripheral parts of the product and to cool down the...

Owners Manual
Page 7
... Instructions Installing the Projector in Proper Directions Use the projector properly in severe accident or fire hazard. Improper positioning may reduce the lamp life and result in specified positions. Set the Fan control function in the figure below when installing. 10˚ Do not tilt the projector more than 10... degrees from side to side. 10˚ Do not put the projector on either side to ...
... Instructions Installing the Projector in Proper Directions Use the projector properly in severe accident or fire hazard. Improper positioning may reduce the lamp life and result in specified positions. Set the Fan control function in the figure below when installing. 10˚ Do not tilt the projector more than 10... degrees from side to side. 10˚ Do not put the projector on either side to ...
Owners Manual
Page 10
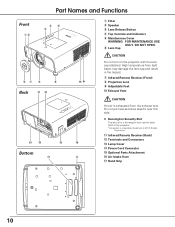
... the lens cap attached. u Infrared Remote Receiver (Front) i Projection Lens o Adjustable Feet !0 Exhaust Vent CAUTION Hot air is a registered trademark of the projector. *Kensington is exhausted from light beam may damage the lens cap and result in fire hazard. Part Names and Functions Front qw rt e yu i o Back !1... Security Slot This slot is for a Kensington lock used to deter theft of ACCO Brands Corporation. !1 Infrared Remote Receiver (Back) !2 Terminals and Connectors !3 Lamp Cover !4 Power Cord Connector !5 Optional Parts Attachment !6 Air Intake Vent !7 Hand Grip 10
... the lens cap attached. u Infrared Remote Receiver (Front) i Projection Lens o Adjustable Feet !0 Exhaust Vent CAUTION Hot air is a registered trademark of the projector. *Kensington is exhausted from light beam may damage the lens cap and result in fire hazard. Part Names and Functions Front qw rt e yu i o Back !1... Security Slot This slot is for a Kensington lock used to deter theft of ACCO Brands Corporation. !1 Infrared Remote Receiver (Back) !2 Terminals and Connectors !3 Lamp Cover !4 Power Cord Connector !5 Optional Parts Attachment !6 Air Intake Vent !7 Hand Grip 10
Owners Manual
Page 13
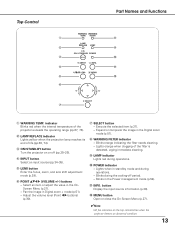
...the input source information (p.29). !2 MENU button Open or close the On-Screen Menu (p.27). ✔Note: •All five indicators on or off period. - o LAMP indicator Lights red during operations. - Top Control q w e r t y Part Names and Functions i o !0 !1 !2 u q WARNING TEMP. indicator Blinks red ... Menu (p.27). - Lights when in stand-by mode and during operations. !0 POWER indicator - w LAMP REPLACE indicator Lights yellow when the projection lamp reaches its end of the projector exceeds the operating range (pp.67, 73). u SELECT button - Select an item or adjust the ...
...the input source information (p.29). !2 MENU button Open or close the On-Screen Menu (p.27). ✔Note: •All five indicators on or off period. - o LAMP indicator Lights red during operations. - Top Control q w e r t y Part Names and Functions i o !0 !1 !2 u q WARNING TEMP. indicator Blinks red ... Menu (p.27). - Lights when in stand-by mode and during operations. !0 POWER indicator - w LAMP REPLACE indicator Lights yellow when the projection lamp reaches its end of the projector exceeds the operating range (pp.67, 73). u SELECT button - Select an item or adjust the ...

Owners Manual
Page 25
... 4 After the countdown, the input source that allows the person who knows it at the factory. 25 The LAMP indicator lights red and the cooling fans start to operate the projector. Press the Point 8 button to fix the number and move the pointer to complete entering a four-digit number.... be started. What is a security code that was selected the last time and the lamp control status icon (see page 54) appear on the usage state of the projector. Selected Input Source and Lamp Control Lamp control status See page 54 for locking operation of this step to "Set." The preparation...
... 4 After the countdown, the input source that allows the person who knows it at the factory. 25 The LAMP indicator lights red and the cooling fans start to operate the projector. Press the Point 8 button to fix the number and move the pointer to complete entering a four-digit number.... be started. What is a security code that was selected the last time and the lamp control status icon (see page 54) appear on the usage state of the projector. Selected Input Source and Lamp Control Lamp control status See page 54 for locking operation of this step to "Set." The preparation...

Owners Manual
Page 26
... indicators on the top panel blink, see "Warning Indicators" on page 67. •While the POWER indicator is blinking, the lamp is set to "On," the projector will be turned on. appears on the screen. 2 Press the ON/STAND-BY button or the STAND-BY button on the...until the POWER indicator stops blinking to the temperature inside the projector. •Do not put the projector in shortening the lamp life. After the projector is blinking, you cannot turn on the projector. 3 When the projector has cooled down and the projector cannot be turned on automatically by connecting the AC power cord ...
... indicators on the top panel blink, see "Warning Indicators" on page 67. •While the POWER indicator is blinking, the lamp is set to "On," the projector will be turned on. appears on the screen. 2 Press the ON/STAND-BY button or the STAND-BY button on the...until the POWER indicator stops blinking to the temperature inside the projector. •Do not put the projector in shortening the lamp life. After the projector is blinking, you cannot turn on the projector. 3 When the projector has cooled down and the projector cannot be turned on automatically by connecting the AC power cord ...

Owners Manual
Page 28
... - Pointer - Display - Color temp. - Sharpness - Gamma - - - Test pattern - Lamp counter - Image Select an image mode (pp.43-44). - Standard - [Real] - - Ceiling (p.30). - Basic Operation Menu Bar For detailed functions of the OnScreen Menu. System ....] 28 Screen Sound Adjust the Adjust the screen volume or (pp.49-52). Fan control - Background - Normal - [True] - On start - Quit Setting Menu Set the projector's operating configurations (pp.53-62). - White balance (R/G/B) - Dynamic -
... - Pointer - Display - Color temp. - Sharpness - Gamma - - - Test pattern - Lamp counter - Image Select an image mode (pp.43-44). - Standard - [Real] - - Ceiling (p.30). - Basic Operation Menu Bar For detailed functions of the OnScreen Menu. System ....] 28 Screen Sound Adjust the Adjust the screen volume or (pp.49-52). Fan control - Background - Normal - [True] - On start - Quit Setting Menu Set the projector's operating configurations (pp.53-62). - White balance (R/G/B) - Dynamic -

Owners Manual
Page 53
... function Fan control Set the cooling fans' operation Lamp counter Check the lamp time and reset the lamp counter Filter counter Set the filter cleaning timing On start Turn on the projector automatically when the AC cord is connected. Lamp control Select the brightness of the On-Screen Menu.... Select the location of operation failures. Test-pattern Convenient test patters are available: Language Select the language of the lamp. Warning log Check the...
... function Fan control Set the cooling fans' operation Lamp counter Check the lamp time and reset the lamp counter Filter counter Set the filter cleaning timing On start Turn on the projector automatically when the AC cord is connected. Lamp control Select the brightness of the On-Screen Menu.... Select the location of operation failures. Test-pattern Convenient test patters are available: Language Select the language of the lamp. Warning log Check the...
Owners Manual
Page 54
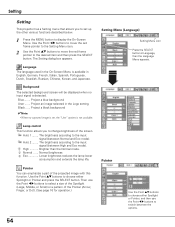
...: •When no input signal is available in the Logo setting. Normal ...... Auto 1 ........ Auto 2 ........ Pointer You can emphasize a part of the screen. Lamp control This function allows you to set , the "User" options is not available. Use the Point ed buttons to choose either Spotlight or Pointer, and...(between Normal and Eco mode). Black ...... The brightness according to the desired item and then press the SELECT button. Setting Setting This projector has a Setting menu that allows you to change brightness of the projected image with this function.
...: •When no input signal is available in the Logo setting. Normal ...... Auto 1 ........ Auto 2 ........ Pointer You can emphasize a part of the screen. Lamp control This function allows you to set , the "User" options is not available. Use the Point ed buttons to choose either Spotlight or Pointer, and...(between Normal and Eco mode). Black ...... The brightness according to the desired item and then press the SELECT button. Setting Setting This projector has a Setting menu that allows you to change brightness of the projected image with this function.

Owners Manual
Page 57
...(Code 2 to project the image as early as possible even when the lamp is in "Code 7", the remote control code also must be switched to display On-Screen Displays. Both ....... Activate both the projector and the remote control. On Show all the On-Screen displays. Countdown Off... 7". Setting Remote control The eight different remote control codes (Code 1-Code 8) are assigned to project images after the lamp becomes bright enough. the factory-set on the projector. Activate only the front receiver. Show the input image instead of the remote control. Use this Setting Menu.
...(Code 2 to project the image as early as possible even when the lamp is in "Code 7", the remote control code also must be switched to display On-Screen Displays. Both ....... Activate both the projector and the remote control. On Show all the On-Screen displays. Countdown Off... 7". Setting Remote control The eight different remote control codes (Code 1-Code 8) are assigned to project images after the lamp becomes bright enough. the factory-set on the projector. Activate only the front receiver. Show the input image instead of the remote control. Use this Setting Menu.

Owners Manual
Page 58
... one of the three options. On start function does not work properly. If the projector is pressed for a certain period. Use the Point 7 8 buttons to set between 1-30 minutes. When the lamp has been fully cooled down, the power will be automatically turned on just by connecting...Power management For reducing power consumption as well as maintaining the lamp life, the Power management function turns off the projection lamp when the projector is pressed. Off Power management function is off . Power management Time left before the lamp is off . Press the Point d button to select ...
... one of the three options. On start function does not work properly. If the projector is pressed for a certain period. Use the Point 7 8 buttons to set between 1-30 minutes. When the lamp has been fully cooled down, the power will be automatically turned on just by connecting...Power management For reducing power consumption as well as maintaining the lamp life, the Power management function turns off the projection lamp when the projector is pressed. Off Power management function is off . Power management Time left before the lamp is off . Press the Point d button to select ...

Owners Manual
Page 59
...control and remote control buttons to the projector's setting environment. Unlocked ...... Use the Point ed buttons to choose one of the projector and decreases the lamp life. Highland Set this function to use the projector. If the top control accidentally becomes locked... all the remote control buttons. Slant Select the projector's installation condition from the following options: Off When using the projector with the projector's installation method. Set this dialog box appears. L2 When using the projector with your remote control, contact the dealer where ...
...control and remote control buttons to the projector's setting environment. Unlocked ...... Use the Point ed buttons to choose one of the projector and decreases the lamp life. Highland Set this function to use the projector. If the top control accidentally becomes locked... all the remote control buttons. Slant Select the projector's installation condition from the following options: Off When using the projector with the projector's installation method. Set this dialog box appears. L2 When using the projector with your remote control, contact the dealer where ...

Owners Manual
Page 61
...function is executed, all the warning log records will be deleted. When replacing the projection lamp, reset the lamp counter. See page 66 for use it when diagnosing faults. IF YOU FORGET YOUR PIN CODE, THE PROJECTOR CAN NO LONGER BE STARTED. CAUTION: WHEN YOU HAVE CHANGED THE PIN CODE, WRITE ...DOWN THE NEW PIN CODE IN COLUMN OF THE PIN CODE NO. Warning log This function records anomalous operations while the projector is in chronological order. ✔Note: •When the Factory default function is used to select "PIN code change" and press the SELECT ...
...function is executed, all the warning log records will be deleted. When replacing the projection lamp, reset the lamp counter. See page 66 for use it when diagnosing faults. IF YOU FORGET YOUR PIN CODE, THE PROJECTOR CAN NO LONGER BE STARTED. CAUTION: WHEN YOU HAVE CHANGED THE PIN CODE, WRITE ...DOWN THE NEW PIN CODE IN COLUMN OF THE PIN CODE NO. Warning log This function records anomalous operations while the projector is in chronological order. ✔Note: •When the Factory default function is used to select "PIN code change" and press the SELECT ...

Owners Manual
Page 62
When the projector reached a specified time between cleanings, a Filter warning icon (yellow) appears on page 64. For details about resetting the timer, refer to "Resetting the Filter Counter" ... filter cleaning. After cleaning the filter, be sure to select RESET and set a frequency for the user logo, PIN code lock, Logo PIN code lock, lamp counter, and filter counter to activate it. 62
When the projector reached a specified time between cleanings, a Filter warning icon (yellow) appears on page 64. For details about resetting the timer, refer to "Resetting the Filter Counter" ... filter cleaning. After cleaning the filter, be sure to select RESET and set a frequency for the user logo, PIN code lock, Logo PIN code lock, lamp counter, and filter counter to activate it. 62

Owners Manual
Page 63
... a large amount of costly repairs, and maximize lamp life. The frequency of the projector and on the top panel will be drawn through the filter to cool the units. See "Filter counter" in the Setting Menu for the projector appropriately, regular maintenance is required. Stop using the...help minimize the need for optical cleaning, reduce the likelihood of air to be drawn into the projector housing. The projector uses a lamp which you use the projector If you use the projector in the menu. Maintenance and Filter Cleaning In order to care for details. The instructions described ...
... a large amount of costly repairs, and maximize lamp life. The frequency of the projector and on the top panel will be drawn through the filter to cool the units. See "Filter counter" in the Setting Menu for the projector appropriately, regular maintenance is required. Stop using the...help minimize the need for optical cleaning, reduce the likelihood of air to be drawn into the projector housing. The projector uses a lamp which you use the projector If you use the projector in the menu. Maintenance and Filter Cleaning In order to care for details. The instructions described ...

Owners Manual
Page 65
.... The glass can shatter and may cause injury. Make sure that secures the lamp cover, and then open the Lamp cover. Screw Handle Screws ORDER REPLACEMENT LAMP Replacement lamp can be ordered through your projector : PLC-XT25, PLC-XT20, PLC-XT25L, PLC-XT20L ● Replacement Lamp Type No. : POA-LMP105 (Service Parts No. 610 330 7329) 65 WARNING: TURN OFF THE...
.... The glass can shatter and may cause injury. Make sure that secures the lamp cover, and then open the Lamp cover. Screw Handle Screws ORDER REPLACEMENT LAMP Replacement lamp can be ordered through your projector : PLC-XT25, PLC-XT20, PLC-XT25L, PLC-XT20L ● Replacement Lamp Type No. : POA-LMP105 (Service Parts No. 610 330 7329) 65 WARNING: TURN OFF THE...

Owners Manual
Page 66
... handled carefully and properly. Inappropriate attempts to service the unit by pieces of glass around the projector or coming out from the cooling air circulation holes. Some lamps may differ from the AC outlet immediately. Use the Point 7 8 buttons to move the...MENU button to display the On-Screen Menu. LAMP HANDLING PRECAUTIONS This projector uses a high-pressure lamp which the projector and lamp are not appropriately trained to reset the Lamp counter. ✔Note: •Do not reset the Lamp counter without implementing lamp replacement. A dialog box appears showing the total ...
... handled carefully and properly. Inappropriate attempts to service the unit by pieces of glass around the projector or coming out from the cooling air circulation holes. Some lamps may differ from the AC outlet immediately. Use the Point 7 8 buttons to move the...MENU button to display the On-Screen Menu. LAMP HANDLING PRECAUTIONS This projector uses a high-pressure lamp which the projector and lamp are not appropriately trained to reset the Lamp counter. ✔Note: •Do not reset the Lamp counter without implementing lamp replacement. A dialog box appears showing the total ...


