Owners Manual
Page 2
... manage those features and maintains it may result. G Take appropriate space on the top, sides and rear of your projector seems to be built into the lens as the laser pointer function from Laser Light Window while pressing LASER button (for 1 minute / LASER POINTER INDICATOR lights... Be especially careful that children do not stare directly into Laser Light Window or shine the laser beam on the projector. If the projector is exhausted from the projection lens. Do not look into the beam. Heat build-up can also be taken. REFER SERVICING TO QUALIFIED SERVICE PERSONNEL....
... manage those features and maintains it may result. G Take appropriate space on the top, sides and rear of your projector seems to be built into the lens as the laser pointer function from Laser Light Window while pressing LASER button (for 1 minute / LASER POINTER INDICATOR lights... Be especially careful that children do not stare directly into Laser Light Window or shine the laser beam on the projector. If the projector is exhausted from the projection lens. Do not look into the beam. Heat build-up can also be taken. REFER SERVICING TO QUALIFIED SERVICE PERSONNEL....
Owners Manual
Page 5
...REPLACE COUNTER 45 21 TROUBLESHOOTING 46 21 INDICATORS AND PROJECTOR CONDITION 48 22 22 COMPATIBLE COMPUTER SPECIFICATION 49 22 MENU TREE 50 22 TECHNICAL SPECIFICATIONS 52 CONFIGURATIONS OF TERMINALS 53 OPTIONAL PARTS 54 LENS REPLACEMENT 54 TRADEMARKS G Apple, Macintosh, and ...OF ON-SCREEN MENU OPERATION 18 MENU BAR 19 APPENDIX 41 BASIC OPERATION TURNING ON / OFF PROJECTOR ADJUSTING SCREEN ZOOM ADJUSTMENT FOCUS ADJUSTMENT LENS SHIFT ADJUSTMENT KEYSTONE ADJUSTMENT PICTURE FREEZE FUNCTION NO SHOW FUNCTION P-TIMER FUNCTION SOUND ADJUSTMENT 20 OPERATING WIRELESS...
...REPLACE COUNTER 45 21 TROUBLESHOOTING 46 21 INDICATORS AND PROJECTOR CONDITION 48 22 22 COMPATIBLE COMPUTER SPECIFICATION 49 22 MENU TREE 50 22 TECHNICAL SPECIFICATIONS 52 CONFIGURATIONS OF TERMINALS 53 OPTIONAL PARTS 54 LENS REPLACEMENT 54 TRADEMARKS G Apple, Macintosh, and ...OF ON-SCREEN MENU OPERATION 18 MENU BAR 19 APPENDIX 41 BASIC OPERATION TURNING ON / OFF PROJECTOR ADJUSTING SCREEN ZOOM ADJUSTMENT FOCUS ADJUSTMENT LENS SHIFT ADJUSTMENT KEYSTONE ADJUSTMENT PICTURE FREEZE FUNCTION NO SHOW FUNCTION P-TIMER FUNCTION SOUND ADJUSTMENT 20 OPERATING WIRELESS...
Owners Manual
Page 6
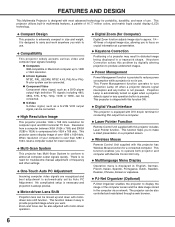
...for lower resolution. N Motor-driven Lens Shift Projection lens can be also controlled and maintained through a web browser. 6 Keystone Correction solves this projector has Wireless Mouse function for a ... connected. N Digital Visual Interface This projector is equipped with DVI 24-pin terminal for connecting DVI output from a computer between XGA (1024 x 768) and SXGA (...liquid crystal display (LCD) technology. This function makes it easy to reduce power consumption while a projector is shipped with motor-driven operation. N Compatibility This projector widely accepts various ...
...for lower resolution. N Motor-driven Lens Shift Projection lens can be also controlled and maintained through a web browser. 6 Keystone Correction solves this projector has Wireless Mouse function for a ... connected. N Digital Visual Interface This projector is equipped with DVI 24-pin terminal for connecting DVI output from a computer between XGA (1024 x 768) and SXGA (...liquid crystal display (LCD) technology. This function makes it easy to reduce power consumption while a projector is shipped with motor-driven operation. N Compatibility This projector widely accepts various ...

Owners Manual
Page 7
... organizer (optional part) to the owner's manual in the optional PJ-Net organizer. PREPARATION NAME OF EACH PART OF PROJECTOR FRONT OF CABINET TOP CONTROLS AND INDICATORS PROJECTION LENS AIR INTAKE VENT LENS COVER SPEAKERS INFRARED REMOTE RECEIVER BACK OF CABINET EXHAUST VENT POWER CORD CONNECTOR TERMINALS AND CONNECTORS INFRARED REMOTE RECEIVER HOT...
... organizer (optional part) to the owner's manual in the optional PJ-Net organizer. PREPARATION NAME OF EACH PART OF PROJECTOR FRONT OF CABINET TOP CONTROLS AND INDICATORS PROJECTION LENS AIR INTAKE VENT LENS COVER SPEAKERS INFRARED REMOTE RECEIVER BACK OF CABINET EXHAUST VENT POWER CORD CONNECTOR TERMINALS AND CONNECTORS INFRARED REMOTE RECEIVER HOT...

Owners Manual
Page 9
... 300" 400" 192" 231" 308" 30.2' (9.2m) 36.1' (11.0m) 48.3' (14.7m) LENS SHIFT ADJUSTMENT Projection lens can be moved up and down with Model PLC-XP55L. G This projector is designed to provide best image. 11.8'(3.6m) 4.6'(1.4m) 100" 40" 77" 31" 24.0'(7.3m) 200...to limit ambient lighting in room has a great influence on a flat projection surface. PREPARATION POSITIONING PROJECTOR NOTE: The figures below to P 21 for Model PLC-XP55. It is not provided with motor-driven lens shift function. This function makes it easy to figure below.). U/D ratio can be adjusted 10...
... 300" 400" 192" 231" 308" 30.2' (9.2m) 36.1' (11.0m) 48.3' (14.7m) LENS SHIFT ADJUSTMENT Projection lens can be moved up and down with Model PLC-XP55L. G This projector is designed to provide best image. 11.8'(3.6m) 4.6'(1.4m) 100" 40" 77" 31" 24.0'(7.3m) 200...to limit ambient lighting in room has a great influence on a flat projection surface. PREPARATION POSITIONING PROJECTOR NOTE: The figures below to P 21 for Model PLC-XP55. It is not provided with motor-driven lens shift function. This function makes it easy to figure below.). U/D ratio can be adjusted 10...

Owners Manual
Page 11
... into case (dust cover) supplied with this projector is not in an unsuitable transport case. When moving a Projector. This may result. When this projector. G Do not transport a projector by using a courier or transport service in use a suitable carrying case. MOVING PROJECTOR Use Carry Handle when moving a projector, replace lens cover and retract feet to prevent damage to...
... into case (dust cover) supplied with this projector is not in an unsuitable transport case. When moving a Projector. This may result. When this projector. G Do not transport a projector by using a courier or transport service in use a suitable carrying case. MOVING PROJECTOR Use Carry Handle when moving a projector, replace lens cover and retract feet to prevent damage to...
Owners Manual
Page 15
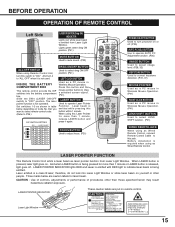
... is being pressed for more than 1 minute, release LASER button and press it is not used. When using Remote Control Unit, turn projector on or off . LASER POINTER INDICATOR These caution labels are caution labels for more than those specified herein may result hazardous radiation exposure. ... while laser beam is emitted from Laser Light Window. SELECT VOLUME+ MENU KEYSTONE LASER P-TIMER INPUT 1 ZOOM COLOR.M INPUT 2 INPUT 3 FOCUS LENS NETWORK POWER ON-OFF BUTTON Used to this switch to adjust focus. (P21) LOCK AUTO PC ON-OFF D.ZOOM FREEZE NO SHOW MUTE IMAGE ...
... is being pressed for more than 1 minute, release LASER button and press it is not used. When using Remote Control Unit, turn projector on or off . LASER POINTER INDICATOR These caution labels are caution labels for more than those specified herein may result hazardous radiation exposure. ... while laser beam is emitted from Laser Light Window. SELECT VOLUME+ MENU KEYSTONE LASER P-TIMER INPUT 1 ZOOM COLOR.M INPUT 2 INPUT 3 FOCUS LENS NETWORK POWER ON-OFF BUTTON Used to this switch to adjust focus. (P21) LOCK AUTO PC ON-OFF D.ZOOM FREEZE NO SHOW MUTE IMAGE ...
Owners Manual
Page 16
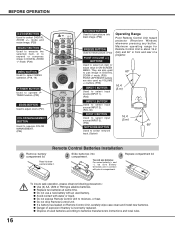
...Control Unit. mode. (P29) MENU BUTTON Used to select input source (INPUT 1). (P23) Operating Range Point Remote Control Unit toward projector (Receiver Window) whenever pressing any button. BEFORE OPERATION D.ZOOM BUTTON Used to expand or compress image in DIGITAL ZOOM +/- Maximum operating.... (P21) COLOR MANAGEMENT BUTTON Used to operate COLOR MANAGEMENT. (P34) LASER P-TIMER INPUT 1 ZOOM COLOR.M INPUT 2 INPUT 3 FOCUS LENS NETWORK NO SHOW BUTTON Used to select network input. (Option) Remote Control Batteries Installation 1 Remove battery compartment lid. Two AA size batteries ...
...Control Unit. mode. (P29) MENU BUTTON Used to select input source (INPUT 1). (P23) Operating Range Point Remote Control Unit toward projector (Receiver Window) whenever pressing any button. BEFORE OPERATION D.ZOOM BUTTON Used to expand or compress image in DIGITAL ZOOM +/- Maximum operating.... (P21) COLOR MANAGEMENT BUTTON Used to operate COLOR MANAGEMENT. (P34) LASER P-TIMER INPUT 1 ZOOM COLOR.M INPUT 2 INPUT 3 FOCUS LENS NETWORK NO SHOW BUTTON Used to select network input. (Option) Remote Control Batteries Installation 1 Remove battery compartment lid. Two AA size batteries ...
Owners Manual
Page 17
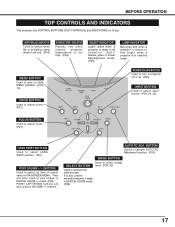
... is too high. (P42) READY INDICATOR Lights green when a projector is turned on or off. (P20) INPUT BUTTON Used to select input source. (P23, 24, 30) FOCUS BUTTON Used to adjust focus. (P21) LENS SHIFT BUTTON Used to select LENS SHIFT function. (P21) POINT (VOLUME + / - ) BUTTONS Used... to select an item or adjust value in Power Management mode. (P39) LAMP INDICATOR Becomes dim when a projector is ready to expand/compress image in DIGITAL ZOOM mode...
... is too high. (P42) READY INDICATOR Lights green when a projector is turned on or off. (P20) INPUT BUTTON Used to select input source. (P23, 24, 30) FOCUS BUTTON Used to adjust focus. (P21) LENS SHIFT BUTTON Used to select LENS SHIFT function. (P21) POINT (VOLUME + / - ) BUTTONS Used... to select an item or adjust value in Power Management mode. (P39) LAMP INDICATOR Becomes dim when a projector is ready to expand/compress image in DIGITAL ZOOM mode...
Owners Manual
Page 18
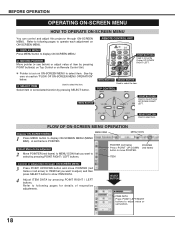
...TOP CONTROL MENU BUTTON LASER POINT BUTTONS Used to display ON-SCREEN MENU (MENU BAR). Refer to select by pressing POINT RIGHT / LEFT buttons. FOCUS LENS FLOW OF ON-SCREEN MENU OPERATION Display ON-SCREEN MENU MENU BAR MENU ICON 1 Press MENU button to move Pointer UP/ DOWN/ RIGHT/ LEFT. ...move the Pointer UP/ DOWN/ RIGHT/ LEFT. BEFORE OPERATION OPERATING ON-SCREEN MENU HOW TO OPERATE ON-SCREEN MENU You can control and adjust this projector through ON-SCREEN MENU 3 Press POINT UP/DOWN button and move POINTER (red frame or red arrow) to ITEM that you want to following ...
...TOP CONTROL MENU BUTTON LASER POINT BUTTONS Used to display ON-SCREEN MENU (MENU BAR). Refer to select by pressing POINT RIGHT / LEFT buttons. FOCUS LENS FLOW OF ON-SCREEN MENU OPERATION Display ON-SCREEN MENU MENU BAR MENU ICON 1 Press MENU button to move Pointer UP/ DOWN/ RIGHT/ LEFT. ...move the Pointer UP/ DOWN/ RIGHT/ LEFT. BEFORE OPERATION OPERATING ON-SCREEN MENU HOW TO OPERATE ON-SCREEN MENU You can control and adjust this projector through ON-SCREEN MENU 3 Press POINT UP/DOWN button and move POINTER (red frame or red arrow) to ITEM that you want to following ...

Owners Manual
Page 21
...being displayed, the keystone adjustment will be canceled. Message "Focus" is displayed. 2 Press POINT UP button or LENS SHIFT L button to move image down. Message "Lens shift" is displayed. 2 Adjust focus of the image, and press POINT DOWN button to move image up, ... button(s) . FOCUS ADJUSTMENT 1 Press FOCUS button on Top Control or FOCUS L/M button on Remote Control Unit. LENS SHIFT ADJUSTMENT 1 Press LENS SHIFT button on Top Control or LENS SHIFT L/M button on Remote Control Unit. KEYSTONE ADJUSTMENT If a projected picture has keystone distortion, correct the image with...
...being displayed, the keystone adjustment will be canceled. Message "Focus" is displayed. 2 Press POINT UP button or LENS SHIFT L button to move image down. Message "Lens shift" is displayed. 2 Adjust focus of the image, and press POINT DOWN button to move image up, ... button(s) . FOCUS ADJUSTMENT 1 Press FOCUS button on Top Control or FOCUS L/M button on Remote Control Unit. LENS SHIFT ADJUSTMENT 1 Press LENS SHIFT button on Top Control or LENS SHIFT L/M button on Remote Control Unit. KEYSTONE ADJUSTMENT If a projected picture has keystone distortion, correct the image with...
Owners Manual
Page 41
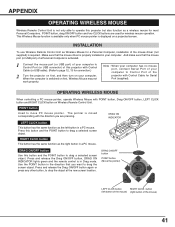
...(or USB port) of your computer to Control Port (or USB connector) of the mouse) P-TIMERCOMPUTER 1 ZOOM COMPUTER 2 VIDEO FOCUS LENS 41 Press and release the Drag ON/OFF button, DRAG ON INDICATOR lights green and the remote control is properly installed in your computer. ... To use Wireless Remote Control Unit as a wireless mouse for Serial Port (supplied). MENU KEYSTONE DRAG ON/OFF button Use this projector but also function as Wireless Mouse for wireless mouse operation. OPERATING WIRELESS MOUSE When controlling a PC mouse pointer, operate Wireless Mouse with...
...(or USB port) of your computer to Control Port (or USB connector) of the mouse) P-TIMERCOMPUTER 1 ZOOM COMPUTER 2 VIDEO FOCUS LENS 41 Press and release the Drag ON/OFF button, DRAG ON INDICATOR lights green and the remote control is properly installed in your computer. ... To use Wireless Remote Control Unit as a wireless mouse for Serial Port (supplied). MENU KEYSTONE DRAG ON/OFF button Use this projector but also function as Wireless Mouse for wireless mouse operation. OPERATING WIRELESS MOUSE When controlling a PC mouse pointer, operate Wireless Mouse with...
Owners Manual
Page 43
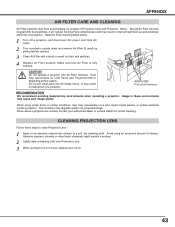
...dust may cause poor image quality. CAUTION Do not operate a projector with Air Filter removed. AIR FILTER Pull up and adversely affect life of a projector. This condition may accumulate on LCD Panel and Projection Mirror degrading picture quality. APPENDIX AIR FILTER CARE...2 Lightly wipe a cleaning cloth over Projection Lens. 3 When a projector is fully inserted. Clean Air Filter following steps below: 1 Turn off a projector, and disconnect AC power cord from accumulating on a lens, liquid crystal panels, or optical elements inside a projector. Do not put small parts into Air ...
...dust may cause poor image quality. CAUTION Do not operate a projector with Air Filter removed. AIR FILTER Pull up and adversely affect life of a projector. This condition may accumulate on LCD Panel and Projection Mirror degrading picture quality. APPENDIX AIR FILTER CARE...2 Lightly wipe a cleaning cloth over Projection Lens. 3 When a projector is fully inserted. Clean Air Filter following steps below: 1 Turn off a projector, and disconnect AC power cord from accumulating on a lens, liquid crystal panels, or optical elements inside a projector. Do not put small parts into Air ...
Owners Manual
Page 46
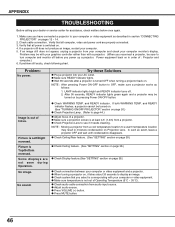
..., video and power cord are not seen during Operation. G Press VOLUME (+) button. No image. and READY indicator flashes, a projector cannot be turned on Projection Lens. Problem: No power. Some displays are properly connected. 3. G When turning a projector on . 4. G Adjust audio source. G Make sure temperature is switched on , it needs cleaning. Check cable connection. Power...
..., video and power cord are not seen during Operation. G Press VOLUME (+) button. No image. and READY indicator flashes, a projector cannot be turned on Projection Lens. Problem: No power. Some displays are properly connected. 3. G When turning a projector on . 4. G Adjust audio source. G Make sure temperature is switched on , it needs cleaning. Check cable connection. Power...

Owners Manual
Page 52
... Motorized Lens Shift Projection Image Size (Diagonal) Horizontal Resolution Projection Lamp Input 1/Monitor Output Jacks Input 2 Jacks Input 3 Jacks Other Jacks Built-in Speakers Feet Adjustment Voltage and Power Consumption Operating Temperature Storage Temperature Remote Control Transmitter Accessories Multi-media Projector 12.6" x 6.6" x 18.5" (319 mm x 168 mm x 470 mm) 20.3 lbs (9.2 kg) PLC-XP55...
... Motorized Lens Shift Projection Image Size (Diagonal) Horizontal Resolution Projection Lamp Input 1/Monitor Output Jacks Input 2 Jacks Input 3 Jacks Other Jacks Built-in Speakers Feet Adjustment Voltage and Power Consumption Operating Temperature Storage Temperature Remote Control Transmitter Accessories Multi-media Projector 12.6" x 6.6" x 18.5" (319 mm x 168 mm x 470 mm) 20.3 lbs (9.2 kg) PLC-XP55...

Owners Manual
Page 54
... LNS-W32 Type No. : POA-PN02 LENS REPLACEMENT The lens of this projector can be installed or replaced by yourself as it may cause serious damage to the lens when setting up the projector. The projector lens must be replaced with other optional lens which are optionally supplied. To the sales and... of uses. Referring to the sales dealer. to the attached lens replacement and installation manual, replace or install the lens properly. This feature enables you to use the projector for wide variety of the lens, always contact the sales dealer. When ordering those parts, give...
... LNS-W32 Type No. : POA-PN02 LENS REPLACEMENT The lens of this projector can be installed or replaced by yourself as it may cause serious damage to the lens when setting up the projector. The projector lens must be replaced with other optional lens which are optionally supplied. To the sales and... of uses. Referring to the sales dealer. to the attached lens replacement and installation manual, replace or install the lens properly. This feature enables you to use the projector for wide variety of the lens, always contact the sales dealer. When ordering those parts, give...


