
Owners Manual
Page 9
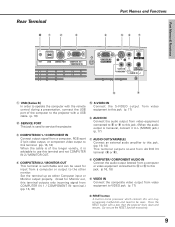
.... (pp. 16- 18) This terminal outputs sound from a computer or output to this unit may occasionally malfunction and need to service the projector. Part Names & Functions Rear Terminal ✽q w e RESET USB SERVICE PORT COMPUTER IN 1 / COMPONENT IN Part Names and Functions r ty u (VARIABLE) COMPUTER IN 2 / MONITOR OUT R AUDIO OUT VIDEO IN L (MONO...
.... (pp. 16- 18) This terminal outputs sound from a computer or output to this unit may occasionally malfunction and need to service the projector. Part Names & Functions Rear Terminal ✽q w e RESET USB SERVICE PORT COMPUTER IN 1 / COMPONENT IN Part Names and Functions r ty u (VARIABLE) COMPUTER IN 2 / MONITOR OUT R AUDIO OUT VIDEO IN L (MONO...

Owners Manual
Page 16
... used for ordering optional parts. 16 Unplug the power cords of the longer variety, it OiNs aOdN visable to external audio equipment, the projector's built-in speaker is disconnected. • When the cable is switchable. Set up the terminal as either Computer input or Monitor output.... (See p. 45.) Audio cable (stereo) RESET USB SERVICE PORT COMPUTER IN 1 / COMPONENT IN COMPUTER/ COMPONENT AUDIO IN (VARIABLE) COMPUTER IN 2 / MONITOR OUT R AUDIO OUT VIDEO IN L (MONO...
... used for ordering optional parts. 16 Unplug the power cords of the longer variety, it OiNs aOdN visable to external audio equipment, the projector's built-in speaker is disconnected. • When the cable is switchable. Set up the terminal as either Computer input or Monitor output.... (See p. 45.) Audio cable (stereo) RESET USB SERVICE PORT COMPUTER IN 1 / COMPONENT IN COMPUTER/ COMPONENT AUDIO IN (VARIABLE) COMPUTER IN 2 / MONITOR OUT R AUDIO OUT VIDEO IN L (MONO...

Owners Manual
Page 17
...Cable (RCA x 3) • S-VIDEO Cable • Audio Cable (Mini Plug: stereo) (Not all the cables are suppled with this projector.) Installation Installation S-Video Output Composite Video and Audio Output (R) (L) (Video) S-Video cable External Audio Equipment Video and audio cable S-VIDEO (R) (L)... (Video) AUDIO IN VIDEO RESET USB SERVICE PORT COMPUTER IN 1 / COMPONENT IN (VARIABLE) COMPUTER IN 2 / MONITOR OUT R AUDIO OUT VIDEO IN L (MONO) COMPUTER ...
...Cable (RCA x 3) • S-VIDEO Cable • Audio Cable (Mini Plug: stereo) (Not all the cables are suppled with this projector.) Installation Installation S-Video Output Composite Video and Audio Output (R) (L) (Video) S-Video cable External Audio Equipment Video and audio cable S-VIDEO (R) (L)... (Video) AUDIO IN VIDEO RESET USB SERVICE PORT COMPUTER IN 1 / COMPONENT IN (VARIABLE) COMPUTER IN 2 / MONITOR OUT R AUDIO OUT VIDEO IN L (MONO) COMPUTER ...

Owners Manual
Page 18
...projector and external equipment from the AC outlet before connecting the cables. AUDIO OUT (stereo) 18 Audio cable (stereo) Component Video Output pin Output (Y, Pb/Cb, Pr/Cr) Audio cable (stereo) Scart-VGA cable Component cable Component-VGA cable External Audio Equipment Audio Input COMPUTER IN 1/ COMPONENT IN RESET...connecting AUDIO OUT to Component Video Equipment Cables used for ordering optional parts. Installation Connecting to external audio equipment, the projector's built-in speaker is disconnected. • See p. 65 for connection • Audio Cables (Mini Plug :stereo...
...projector and external equipment from the AC outlet before connecting the cables. AUDIO OUT (stereo) 18 Audio cable (stereo) Component Video Output pin Output (Y, Pb/Cb, Pr/Cr) Audio cable (stereo) Scart-VGA cable Component cable Component-VGA cable External Audio Equipment Audio Input COMPUTER IN 1/ COMPONENT IN RESET...connecting AUDIO OUT to Component Video Equipment Cables used for ordering optional parts. Installation Connecting to external audio equipment, the projector's built-in speaker is disconnected. • See p. 65 for connection • Audio Cables (Mini Plug :stereo...

Owners Manual
Page 30
... dots," "Horizontal," "Vertical," "Display area H," and "Display area V." To clear adjusted data This Mode has stored parameters . To store adjusted data Close this projector. Move the red arrow pointer to the Mode that you want to store and then press the SELECT button. Move the red framed pointer to... Mode Values of Mode 1 to 5 in the PC System Menu (p. 27). Press the Point 7 8 buttons to decrease/increase the value. Reset To reset the adjusted data, select Reset and press the SELECT button. Mode free To clear the stored data, move the red framed pointer to the "Mode free" and then...
... dots," "Horizontal," "Vertical," "Display area H," and "Display area V." To clear adjusted data This Mode has stored parameters . To store adjusted data Close this projector. Move the red arrow pointer to the Mode that you want to store and then press the SELECT button. Move the red framed pointer to... Mode Values of Mode 1 to 5 in the PC System Menu (p. 27). Press the Point 7 8 buttons to decrease/increase the value. Reset To reset the adjusted data, select Reset and press the SELECT button. Mode free To clear the stored data, move the red framed pointer to the "Mode free" and then...

Owners Manual
Page 32
.... ✔Note: • After adjusting any of each level by pressing the Point 7 8 buttons. Computer Input Image Level Adjustment 1 Press the MENU button to 15.) Reset To reset the adjusted data, select Reset and press the SELECT button. Press the Point 7 button or the Point 8 button for Color temp.
.... ✔Note: • After adjusting any of each level by pressing the Point 7 8 buttons. Computer Input Image Level Adjustment 1 Press the MENU button to 15.) Reset To reset the adjusted data, select Reset and press the SELECT button. Press the Point 7 button or the Point 8 button for Color temp.

Owners Manual
Page 33
...larger than 1024 x 768 is modified to any resolution higher than 1600 X 1200. When reached to fit the screen size. Screen Size Adjustment This projector has the picture screen resize function, which enables you want to store the adjusted data. cannot be used for providing a squeezed video signal at ... data, select Store and press the SELECT button. Stored data can be selected when 480i, 575i, 480p, or 575p is higher than it, reset the resolution to the lower before connecting to the function and press the SELECT button. Pan the image with the Point ed buttons and press...
...larger than 1024 x 768 is modified to any resolution higher than 1600 X 1200. When reached to fit the screen size. Screen Size Adjustment This projector has the picture screen resize function, which enables you want to store the adjusted data. cannot be used for providing a squeezed video signal at ... data, select Store and press the SELECT button. Stored data can be selected when 480i, 575i, 480p, or 575p is higher than it, reset the resolution to the lower before connecting to the function and press the SELECT button. Pan the image with the Point ed buttons and press...
Owners Manual
Page 34
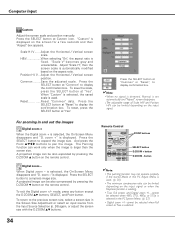
...480p, or 575p is automatically modified based on the screen for a few seconds and then "Aspect" box appears. Press the SELECT button at "Reset" to display confirmation box. ✔Note: •When no signal is detected, Normal is set automatically and "Aspect" screen disappears. •...function can be limited depending on the remote control. To exit the Digital zoom +/- cannot be selected when Full screen or True is used . Reset Reset "Common" data. zoom -"is larger than the screen size. mode, press any button except the D.ZOOM ▲▼ buttons, SELECT, and...
...480p, or 575p is automatically modified based on the screen for a few seconds and then "Aspect" box appears. Press the SELECT button at "Reset" to display confirmation box. ✔Note: •When no signal is detected, Normal is set automatically and "Aspect" screen disappears. •...function can be limited depending on the remote control. To exit the Digital zoom +/- cannot be selected when Full screen or True is used . Reset Reset "Common" data. zoom -"is larger than the screen size. mode, press any button except the D.ZOOM ▲▼ buttons, SELECT, and...

Owners Manual
Page 40
... 0 to 15.) Gamma Press the Point 7 8 buttons to get smoother images. With this function, the projector reproduces pictures faithful to 4 with the Point ed buttons and press the SELECT button. Reset To reset the adjusted data, select "Reset" and press the SELECT button. L2............Select "L2" for a still picture. Store To store the adjusted...
... 0 to 15.) Gamma Press the Point 7 8 buttons to get smoother images. With this function, the projector reproduces pictures faithful to 4 with the Point ed buttons and press the SELECT button. Reset To reset the adjusted data, select "Reset" and press the SELECT button. L2............Select "L2" for a still picture. Store To store the adjusted...

Owners Manual
Page 41
...Horizontal / Vertical screen position. Custom Adjust the screen scale and position manually. Press the SELECT button at "Reset" to display the confirmation box. Video Input Screen Size Adjustment This projector has the picture screen resize function, which enables you want to a function and press the SELECT button. ...When "Custom" is selected, the saved scale is fixed. Normal Provide the image at "Common" or "Reset", to display the On...
...Horizontal / Vertical screen position. Custom Adjust the screen scale and position manually. Press the SELECT button at "Reset" to display the confirmation box. Video Input Screen Size Adjustment This projector has the picture screen resize function, which enables you want to a function and press the SELECT button. ...When "Custom" is selected, the saved scale is fixed. Normal Provide the image at "Common" or "Reset", to display the On...
Owners Manual
Page 42
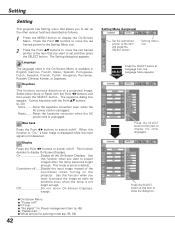
......" ● White arrows for panning mode (pp. 33, 34) Setting Menu (Language) Set the red framed pointer to display On-Screen Displays. Reset........Reset the keystone correction when the AC power cord is not detected. Use this function when you want to set and then press the SELECT button... press the SELECT button. Press the SELECT button at this item to display the other various functions described as a default.. Setting Setting This projector has Setting menu that you want to project images after the lamp becomes bright enough. Blue back Press the Point 7 8 buttons to switch...
......" ● White arrows for panning mode (pp. 33, 34) Setting Menu (Language) Set the red framed pointer to display On-Screen Displays. Reset........Reset the keystone correction when the AC power cord is not detected. Use this function when you want to set and then press the SELECT button... press the SELECT button. Press the SELECT button at this item to display the other various functions described as a default.. Setting Setting This projector has Setting menu that you want to project images after the lamp becomes bright enough. Blue back Press the Point 7 8 buttons to switch...

Owners Manual
Page 43
...720p, 1035i, and 1080i. • When capturing the image that has been adjusted by the Keystone function, the adjusted data is automatically reset and the projector captures an image without keystone adjustment. • When the Logo PIN code lock function is "On", Capture menu cannot be selected. •... the captured image is cleared even if you cancel the capturing. A signal from a computer can be captured except for a start-up to XGA(1024 x 768). Setting Setting Logo (Logo and Logo PIN code lock settings) This function allows you to customize the screen logo with Logo ...
...720p, 1035i, and 1080i. • When capturing the image that has been adjusted by the Keystone function, the adjusted data is automatically reset and the projector captures an image without keystone adjustment. • When the Logo PIN code lock function is "On", Capture menu cannot be selected. •... the captured image is cleared even if you cancel the capturing. A signal from a computer can be captured except for a start-up to XGA(1024 x 768). Setting Setting Logo (Logo and Logo PIN code lock settings) This function allows you to customize the screen logo with Logo ...

Owners Manual
Page 49
.... Factory default Select Factory default and this function. When replacing the projection lamp, reset the lamp replacement counter by using this box appears. Select "Yes" to cool the projector down. Quit Exit the Setting Menu. Setting Setting Fan This function provides the following... alternatives in the cooling fans' operation after turning off the projector. (p. 20) L1 Normal operation L2 . . . . .Slower...
.... Factory default Select Factory default and this function. When replacing the projection lamp, reset the lamp replacement counter by using this box appears. Select "Yes" to cool the projector down. Quit Exit the Setting Menu. Setting Setting Fan This function provides the following... alternatives in the cooling fans' operation after turning off the projector. (p. 20) L1 Normal operation L2 . . . . .Slower...

Owners Manual
Page 51
... settings. (p. 48) CAUTION: WHEN YOU HAVE CHANGED THE PIN CODE, WRITE DOWN THE NEW PIN CODE AND KEEP IT SECURELY. Reset the settings Select Factory default in the Setting menu to reset the settings for a few seconds and high-pitched confirmation sound is made. 2 While the indicator is blinking, enter new PIN...
... settings. (p. 48) CAUTION: WHEN YOU HAVE CHANGED THE PIN CODE, WRITE DOWN THE NEW PIN CODE AND KEEP IT SECURELY. Reset the settings Select Factory default in the Setting menu to reset the settings for a few seconds and high-pitched confirmation sound is made. 2 While the indicator is blinking, enter new PIN...
Owners Manual
Page 56
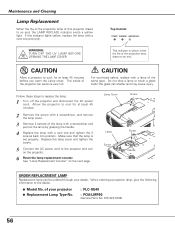
... lights yellow, replace the lamp with a lamp of the same type. When ordering a projection lamp, give the following information to the projector and turn on the next page . Make sure that the lamp is yellow when the life of the projection lamp draws to cool for...projector ● Replacement Lamp Type No. : PLC-XE40 : POA-LMP90 (Service Parts No. 610 323 0726) 56 If this projector draws to an end, the LAMP REPLACE indicator emits a yellow light. Allow the projector to an end. Do not drop a lamp or touch a glass bulb! See "Lamp Replacement Counter" on the projector. 6 Reset...
... lights yellow, replace the lamp with a lamp of the same type. When ordering a projection lamp, give the following information to the projector and turn on the next page . Make sure that the lamp is yellow when the life of the projection lamp draws to cool for...projector ● Replacement Lamp Type No. : PLC-XE40 : POA-LMP90 (Service Parts No. 610 323 0726) 56 If this projector draws to an end, the LAMP REPLACE indicator emits a yellow light. Allow the projector to an end. Do not drop a lamp or touch a glass bulb! See "Lamp Replacement Counter" on the projector. 6 Reset...

Owners Manual
Page 57
...to continue. 3 Another confirmation dialog box appears, select "Yes" to reset the Lamp replacement counter only after replacing the lamp. dialog box is reset, the LAMP REPLACE indicator stops lighting. 1 Turn the projector on, press the MENU button to display the On-Screen Menu. Maintenance...be handled carefully and properly. appears. There is replaced. If a lamp explodes, disconnect the projector's AC plug from the AC outlet immediately. Select "Yes" again to reset the lamp counter. When the Lamp replacement counter is displayed. Maintenance and Cleaning Lamp Replacement Counter...
...to continue. 3 Another confirmation dialog box appears, select "Yes" to reset the Lamp replacement counter only after replacing the lamp. dialog box is reset, the LAMP REPLACE indicator stops lighting. 1 Turn the projector on, press the MENU button to display the On-Screen Menu. Maintenance...be handled carefully and properly. appears. There is replaced. If a lamp explodes, disconnect the projector's AC plug from the AC outlet immediately. Select "Yes" again to reset the lamp counter. When the Lamp replacement counter is displayed. Maintenance and Cleaning Lamp Replacement Counter...

Owners Manual
Page 60
Total dots Horizontal Vertical Current mode Clamp 0 - 31 H-sync freq. Quit Display area H Display area V Reset Mode free Store Quit Yes / No Mode 1 Mode 2 Mode 3 Mode 4 Mode 5 Quit Mode 1 Mode 2 Mode 3 Mode 4 Mode 5 Quit Dynamic Standard Real Blackboard(Green) Image 1 Image... Quit Go to System (1) Go to System (2) N/A Go to System (3) Go to System (3) Go to System (3) ✽N/A - - - Auto PC Adj. Red Green Blue Sharpness Gamma Reset Store Quit 0 - 63 0 - 63 High Mid Low XLow Adj. 0 - 63 0 - 63 0 - 63 0 - 15 0 - 15 Yes / No Image 1 Image 2 Image 3 Image 4 Quit Normal True ...
Total dots Horizontal Vertical Current mode Clamp 0 - 31 H-sync freq. Quit Display area H Display area V Reset Mode free Store Quit Yes / No Mode 1 Mode 2 Mode 3 Mode 4 Mode 5 Quit Mode 1 Mode 2 Mode 3 Mode 4 Mode 5 Quit Dynamic Standard Real Blackboard(Green) Image 1 Image... Quit Go to System (1) Go to System (2) N/A Go to System (3) Go to System (3) Go to System (3) ✽N/A - - - Auto PC Adj. Red Green Blue Sharpness Gamma Reset Store Quit 0 - 63 0 - 63 High Mid Low XLow Adj. 0 - 63 0 - 63 0 - 63 0 - 15 0 - 15 Yes / No Image 1 Image 2 Image 3 Image 4 Quit Normal True ...

Owners Manual
Page 61
...Blackboard(Green) Image 1 Image 2 Image 3 Image 4 Setting Setting Image Adjust Screen Contrast Brightness Color Tint Color temp. Red Green Blue Sharpness Gamma Noise reduction Progressive Reset Store Quit Normal Wide Custom 0 - 63 0 - 63 0 - 63 0 - 63 High Mid Low XLow Adj. 0 - 63 0 - 63 0... 15 0 - 15 Off L1 L2 Off L1 L2 Film Yes / No Image 1 Image 2 Image 3 Image 4 Quit Scale H / V H&V Position H / V Common Reset Quit On / Off Yes / No Yes / No Language English German French Italian Spanish Portuguese Dutch Swedish Finnish Polish Hungarian Romanian Russian Chinese Korean Japanese Quit...
...Blackboard(Green) Image 1 Image 2 Image 3 Image 4 Setting Setting Image Adjust Screen Contrast Brightness Color Tint Color temp. Red Green Blue Sharpness Gamma Noise reduction Progressive Reset Store Quit Normal Wide Custom 0 - 63 0 - 63 0 - 63 0 - 63 High Mid Low XLow Adj. 0 - 63 0 - 63 0... 15 0 - 15 Off L1 L2 Off L1 L2 Film Yes / No Image 1 Image 2 Image 3 Image 4 Quit Scale H / V H&V Position H / V Common Reset Quit On / Off Yes / No Yes / No Language English German French Italian Spanish Portuguese Dutch Swedish Finnish Polish Hungarian Romanian Russian Chinese Korean Japanese Quit...

Owners Manual
Page 62
... The projector is off again, disconnect the AC power cord and contact the dealer or the service center for stand-by or the projection lamp is ✽ being cooled down enough and the temperature ✽ returns to be turned on . Reset the lamp replacement counter after ...replacement of the projection lamp draws to an end, the LAMP REPLACE indicator lights yellow. The temperature inside the projector is preparing for service and checkup. If the projector is turned off . (The AC power cord...
... The projector is off again, disconnect the AC power cord and contact the dealer or the service center for stand-by or the projection lamp is ✽ being cooled down enough and the temperature ✽ returns to be turned on . Reset the lamp replacement counter after ...replacement of the projection lamp draws to an end, the LAMP REPLACE indicator lights yellow. The temperature inside the projector is preparing for service and checkup. If the projector is turned off . (The AC power cord...


