

Owners Manual
Page 3
... Antitheft Alarm Setting Buttons 11 Remote Control 12 Remote Control Battery Installation 13 Operating Range 13 Installation 14 Positioning the Projector 14 Adjustable Feet 14 Connecting the AC Power Cord 15 Connecting to a Computer 16 Connecting to Video Equipment 17...the Lens Cover 54 Cleaning the Projection Lens 55 Cleaning the Projector Cabinet 55 Lamp Replacement 56 Lamp Replacement Counter 57 Appendix 58 Troubleshooting 58 Menu Tree 60 Indicators and Projector Condition 62 Compatible Computer Specifications 63 Technical Specifications 64 Optional ...
... Antitheft Alarm Setting Buttons 11 Remote Control 12 Remote Control Battery Installation 13 Operating Range 13 Installation 14 Positioning the Projector 14 Adjustable Feet 14 Connecting the AC Power Cord 15 Connecting to a Computer 16 Connecting to Video Equipment 17...the Lens Cover 54 Cleaning the Projection Lens 55 Cleaning the Projector Cabinet 55 Lamp Replacement 56 Lamp Replacement Counter 57 Appendix 58 Troubleshooting 58 Menu Tree 60 Indicators and Projector Condition 62 Compatible Computer Specifications 63 Technical Specifications 64 Optional ...
Owners Manual
Page 4
...If your local community waste collection/recycling centre. NO USER-SERVICEABLE PARTS INSIDE EXCEPT LAMP REPLACEMENT. THIS SYMBOL INDICATES THAT DANGEROUS VOLTAGE CONSTITUTING A RISK OF ELECTRIC SHOCK IS PRESENT WITHIN...a computer room as possible. CAUTION ON HANGING FROM THE CEILING When hanging the projector from your projector, and can reduce the service life of your household waste. Do not cover ...ARE IMPORTANT OPERATING AND MAINTENANCE INSTRUCTIONS IN THE OWNER'S MANUAL WITH THIS UNIT. Your SANYO product is not to manage those features and maintains it may result in a proper ...
...If your local community waste collection/recycling centre. NO USER-SERVICEABLE PARTS INSIDE EXCEPT LAMP REPLACEMENT. THIS SYMBOL INDICATES THAT DANGEROUS VOLTAGE CONSTITUTING A RISK OF ELECTRIC SHOCK IS PRESENT WITHIN...a computer room as possible. CAUTION ON HANGING FROM THE CEILING When hanging the projector from your projector, and can reduce the service life of your household waste. Do not cover ...ARE IMPORTANT OPERATING AND MAINTENANCE INSTRUCTIONS IN THE OWNER'S MANUAL WITH THIS UNIT. Your SANYO product is not to manage those features and maintains it may result in a proper ...

Owners Manual
Page 5
...original part. Use only with a cart or stand recommended by the manufacturer that the projector is in a fire or electric shock. This projector should never be sure the service technician has used replacement parts specified by the manufacturer, or sold with cloth or other hazards. Do not ... that are provided for later use liquid or aerosol cleaners. If liquid has been spilled into this projector yourself as a book case unless proper ventilation is operated. d. When replacement parts are not sure of the type of power supplied, consult your authorized dealer or local power ...
...original part. Use only with a cart or stand recommended by the manufacturer that the projector is in a fire or electric shock. This projector should never be sure the service technician has used replacement parts specified by the manufacturer, or sold with cloth or other hazards. Do not ... that are provided for later use liquid or aerosol cleaners. If liquid has been spilled into this projector yourself as a book case unless proper ventilation is operated. d. When replacement parts are not sure of the type of power supplied, consult your authorized dealer or local power ...

Owners Manual
Page 6
... reliable operation of the exhaust vent, especially screws and metallic part. Moving the Projector When moving the projector, replace the lens cover and retract the adjustable feet to prevent damage to the temperature inside the projector. Air Intake Vent 6 When handling the projector, do not drop, bump, subject it to strong forces or put the...
... reliable operation of the exhaust vent, especially screws and metallic part. Moving the Projector When moving the projector, replace the lens cover and retract the adjustable feet to prevent damage to the temperature inside the projector. Air Intake Vent 6 When handling the projector, do not drop, bump, subject it to strong forces or put the...
Owners Manual
Page 7
...green or green-and-yellow. ASA If the fuse cover is not suitable for your socket outlet, it . Should the fuse need to be replaced, an ASTA approved BS 1362 fuse must be cut off and destroyed. If the plug supplied is detachable, never use in the country you ... User Instructions. WARNING : THIS APPARATUS MUST BE EARTHED. red or orange). Compliance AC Power Cord Requirement The AC Power Cord supplied with this projector meets the requirement for use the plug with the cover omitted. Fuse covers are coloured in accordance with the following code: Green-and-yellow Earth...
...green or green-and-yellow. ASA If the fuse cover is not suitable for your socket outlet, it . Should the fuse need to be replaced, an ASTA approved BS 1362 fuse must be cut off and destroyed. If the plug supplied is detachable, never use in the country you ... User Instructions. WARNING : THIS APPARATUS MUST BE EARTHED. red or orange). Compliance AC Power Cord Requirement The AC Power Cord supplied with this projector meets the requirement for use the plug with the cover omitted. Fuse covers are coloured in accordance with the following code: Green-and-yellow Earth...
Owners Manual
Page 10
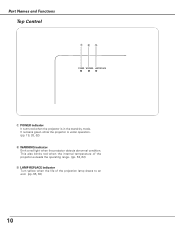
It remains green while the projector is in the stand-by mode. Part Names and Functions Top Control q we POWER WARNING LAMP REPLACE q POWER indicator It turns red when the projector is under operation. (pp. 19, 20, 62) w WARNING indicator Emit a red light when the projector detects abnormal condition. This also blinks red when the internal temperature of the projector exceeds the operating range. (pp. 53, 62) e LAMP REPLACE indicator Turn yellow when the life of the projection lamp draws to an end. (pp. 56, 62) 10
It remains green while the projector is in the stand-by mode. Part Names and Functions Top Control q we POWER WARNING LAMP REPLACE q POWER indicator It turns red when the projector is under operation. (pp. 19, 20, 62) w WARNING indicator Emit a red light when the projector detects abnormal condition. This also blinks red when the internal temperature of the projector exceeds the operating range. (pp. 53, 62) e LAMP REPLACE indicator Turn yellow when the life of the projection lamp draws to an end. (pp. 56, 62) 10

Owners Manual
Page 13
... or LR6 type alkaline batteries. ● Always replace batteries in sets. ● Do not use a new battery with a used battery. ● Avoid contact with pins in front of the projector. 30° 30° 16.4' (5 m) 13 Replace the compartment lid. Operating Range Point the remote ...control toward the projector (Infrared Remote Receiver) when pressing any button. Part Names & Functions Remote Control ...
... or LR6 type alkaline batteries. ● Always replace batteries in sets. ● Do not use a new battery with a used battery. ● Avoid contact with pins in front of the projector. 30° 30° 16.4' (5 m) 13 Replace the compartment lid. Operating Range Point the remote ...control toward the projector (Infrared Remote Receiver) when pressing any button. Part Names & Functions Remote Control ...
Owners Manual
Page 46
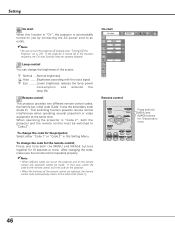
.... ✔Note: • When different codes are replaced, the remote control code automatically returns to "Code 2". In that case, switch the code on the remote control to turn the projector off in this Setting Menu. Remote control This projector provides two different remote control codes; Select either "Code... 1" or "Code 2" in the incorrect sequence, the On start Remote control Press and hold both the projector and the remote control must be made. If the projector is automatically turned on just by connecting the AC power cord to an outlet. ✔Note: • Be...
.... ✔Note: • When different codes are replaced, the remote control code automatically returns to "Code 2". In that case, switch the code on the remote control to turn the projector off in this Setting Menu. Remote control This projector provides two different remote control codes; Select either "Code... 1" or "Code 2" in the incorrect sequence, the On start Remote control Press and hold both the projector and the remote control must be made. If the projector is automatically turned on just by connecting the AC power cord to an outlet. ✔Note: • Be...

Owners Manual
Page 49
...takes longer to the factory default settings. When replacing the projection lamp, reset the lamp replacement counter by using this box appears. Setting Setting Fan This function provides the following alternatives in the cooling fans' operation after turning off the projector. (p. 20) L1 Normal operation L2 . ... 49 See p. 57 for the user logo, PIN code lock, Logo PIN code lock and the lamp counter to cool the projector down. Factory default This function returns all setting values except for operation. Factory default Select Factory default and this function. Select "Yes...
...takes longer to the factory default settings. When replacing the projection lamp, reset the lamp replacement counter by using this box appears. Setting Setting Fan This function provides the following alternatives in the cooling fans' operation after turning off the projector. (p. 20) L1 Normal operation L2 . ... 49 See p. 57 for the user logo, PIN code lock, Logo PIN code lock and the lamp counter to cool the projector down. Factory default This function returns all setting values except for operation. Factory default Select Factory default and this function. Select "Yes...
Owners Manual
Page 52
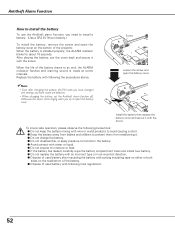
When the life of the projector. Replace the battery with following local regulations. 52 Otherwise the alarm starts ...; If the battery has leaked, carefully wipe the battery compartment clean and install new battery. ● Do not replace the battery with following the procedures above. ✔Note: • Even after insulating the battery with putting insulating... and warning sound is installed properly, the ALARM indicator blinks for about 10 seconds. Install the battery then replace the battery cover and secure it with the screw. After placing the battery, put the cover back and...
When the life of the projector. Replace the battery with following local regulations. 52 Otherwise the alarm starts ...; If the battery has leaked, carefully wipe the battery compartment clean and install new battery. ● Do not replace the battery with following the procedures above. ✔Note: • Even after insulating the battery with putting insulating... and warning sound is installed properly, the ALARM indicator blinks for about 10 seconds. Install the battery then replace the battery cover and secure it with the screw. After placing the battery, put the cover back and...

Owners Manual
Page 53
... shut down enough (to avoid overheating. Top Control WARNING blinking red POWER WARNING LAMP REPLACE ✔Note: • After the temperature inside the projector returns to normal, the WARNING indicator still continues to see if ventilation slots are not blocked. - Are the air filters clean? Check the installing condition ...
... shut down enough (to avoid overheating. Top Control WARNING blinking red POWER WARNING LAMP REPLACE ✔Note: • After the temperature inside the projector returns to normal, the WARNING indicator still continues to see if ventilation slots are not blocked. - Are the air filters clean? Check the installing condition ...

Owners Manual
Page 54
... condition may result in use, 1 replace the lens cover. 1 Thread the string through the hole on the lens cover and then tie a knot. 2 Thread the other end of the projector. Attaching the Lens Cover When moving the projector or the projector is facing the outer side. Then ... the steps below. 1 Turn off the projector, and disconnect the AC power cord from accumulating on a lens, LCD panels, or optical elements inside the projector. It may accumulate on the optical elements inside the projector. CAUTION Do not operate the projector with a brush or rinse them softly. ...
... condition may result in use, 1 replace the lens cover. 1 Thread the string through the hole on the lens cover and then tie a knot. 2 Thread the other end of the projector. Attaching the Lens Cover When moving the projector or the projector is facing the outer side. Then ... the steps below. 1 Turn off the projector, and disconnect the AC power cord from accumulating on a lens, LCD panels, or optical elements inside the projector. It may accumulate on the optical elements inside the projector. CAUTION Do not operate the projector with a brush or rinse them softly. ...

Owners Manual
Page 55
... use a small amount of mild detergent and finish with methyl alcohol (methanol). When it is not in use , put the projector in an appropriate case to clean the projector cabinet. 1 Disconnect the AC power cord before cleaning. 2 First, remove the dust with a plastic lens. Do not use ...abrasive cleaners, solvents, or other harsh chemicals might scratch the surface. 3 When the projector is not in use , replace the lens cover. Do not rub with hard fiber cloth or do not hit the lens with a soft, dry cleaning cloth.
... use a small amount of mild detergent and finish with methyl alcohol (methanol). When it is not in use , put the projector in an appropriate case to clean the projector cabinet. 1 Disconnect the AC power cord before cleaning. 2 First, remove the dust with a plastic lens. Do not use ...abrasive cleaners, solvents, or other harsh chemicals might scratch the surface. 3 When the projector is not in use , replace the lens cover. Do not rub with hard fiber cloth or do not hit the lens with a soft, dry cleaning cloth.
Owners Manual
Page 56
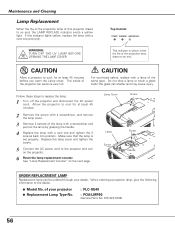
... inside of the projection lamp draws to an end. Follow these steps to the dealer. ● Model No. The glass can be ordered through your projector ● Replacement Lamp Type No. : PLC-XE40 : POA-LMP90 (Service Parts No. 610 323 0726) 56 Make sure that the lamp is yellow when the life of the...
... inside of the projection lamp draws to an end. Follow these steps to the dealer. ● Model No. The glass can be ordered through your projector ● Replacement Lamp Type No. : PLC-XE40 : POA-LMP90 (Service Parts No. 610 323 0726) 56 Make sure that the lamp is yellow when the life of the...

Owners Manual
Page 57
... continue. 3 Another confirmation dialog box appears, select "Yes" to reset the Lamp replacement counter. ✔Note: • Do not reset the Lamp replacement counter without implementation of glass around the projector or coming out from the cooling air circulation holes. To reset the lamp counter, ..., especially those who are authorized trained technicians and who are familiar with projector service. Additionally, check carefully to ensure that the lamp should be cleaned up , replace the lamp with the LAMP REPLACE indicator lighted may increase the risk of lamp explosion. ● A ...
... continue. 3 Another confirmation dialog box appears, select "Yes" to reset the Lamp replacement counter. ✔Note: • Do not reset the Lamp replacement counter without implementation of glass around the projector or coming out from the cooling air circulation holes. To reset the lamp counter, ..., especially those who are authorized trained technicians and who are familiar with projector service. Additionally, check carefully to ensure that the lamp should be cleaned up , replace the lamp with the LAMP REPLACE indicator lighted may increase the risk of lamp explosion. ● A ...

Owners Manual
Page 62
... the projection lamp draws to normal, the POWER indicator emits a red light and the projector can be turned on with a new one promptly. The projector cannot be turned on . Indicators LAMP POWER WARNING REPLACE red/green red yellow Projector Condition The projector is off • • • blinks green. • • • blinks red. ✽...
... the projection lamp draws to normal, the POWER indicator emits a red light and the projector can be turned on with a new one promptly. The projector cannot be turned on . Indicators LAMP POWER WARNING REPLACE red/green red yellow Projector Condition The projector is off • • • blinks green. • • • blinks red. ✽...


