Print Specs
Page 1
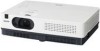
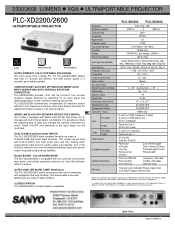
... LUMENS z XGA z ULTRAPORTABLE PROJECTOR PLC-XD2200/2600 ULTRAPORTABLE PROJECTOR 3LCD Built-in Network Closed Caption ULTRA-COMPACT, FULLY PORTABLE XGA DESIGN Not much larger than a laptop PC, the PLC-XD2200/2600 weighs less than 5.7 pounds and delivers true XGA picture quality in common) Stereo mini jack x 1 RJ-45 (LAN) Dsub 9pin (RS232C) Power cord VGA cable Lens Cap Remote control w.Battery...
... LUMENS z XGA z ULTRAPORTABLE PROJECTOR PLC-XD2200/2600 ULTRAPORTABLE PROJECTOR 3LCD Built-in Network Closed Caption ULTRA-COMPACT, FULLY PORTABLE XGA DESIGN Not much larger than a laptop PC, the PLC-XD2200/2600 weighs less than 5.7 pounds and delivers true XGA picture quality in common) Stereo mini jack x 1 RJ-45 (LAN) Dsub 9pin (RS232C) Power cord VGA cable Lens Cap Remote control w.Battery...

Owner's Manual
Page 2
... get the close color image to Green (pp.32, 39). Features and Design This Multimedia Projector is designed with the Wired LAN network function. The projector has the Multi-scan system to conform to focus on the top control or remote control (p.54). Blackboards* can be accepted. For details, refer to the wall color from the...
... get the close color image to Green (pp.32, 39). Features and Design This Multimedia Projector is designed with the Wired LAN network function. The projector has the Multi-scan system to conform to focus on the top control or remote control (p.54). Blackboards* can be accepted. For details, refer to the wall color from the...

Owner's Manual
Page 3
... Contents 3 To the Owner 4 Safety Instructions 5 Air Circulation 6 Installing the Projector in Proper Position 6 Moving the Projector 6 Compliance 7 Part Names and Functions 8 Front 8 Back 8 Bottom 8 Rear Terminal 9 Top Control 10 Remote Control 11 Remote Control Battery Installation 12 Remote Control Operating Range 12 Remote Control Code 12 Installation 13 Positioning the Projector 13 Adjustable Foot 13 Connecting to a Computer 14 Connecting to...
... Contents 3 To the Owner 4 Safety Instructions 5 Air Circulation 6 Installing the Projector in Proper Position 6 Moving the Projector 6 Compliance 7 Part Names and Functions 8 Front 8 Back 8 Bottom 8 Rear Terminal 9 Top Control 10 Remote Control 11 Remote Control Battery Installation 12 Remote Control Operating Range 12 Remote Control Code 12 Installation 13 Positioning the Projector 13 Adjustable Foot 13 Connecting to a Computer 14 Connecting to...

Owner's Manual
Page 11
... Operate the P-timer function. (pp.26, 51) ⑯ LAMP button Select a lamp mode. (pp.25, 53) ⑰ INFO. Part Names and Functions Remote Control ① ON/STAND-BY button Turn the projector on the screen. (p.26) ⑮ ⑩ ⑭ ⑪ D.ZOOM ▲▼ buttons Zoom in and out the images. (pp.25, 35... not apply benzene, thinner, spray, or any chemical material. 11 and Auto Keystone functions) in the Digital zoom +/- Do not bend, drop or expose the remote control to moisture or heat. -
... Operate the P-timer function. (pp.26, 51) ⑯ LAMP button Select a lamp mode. (pp.25, 53) ⑰ INFO. Part Names and Functions Remote Control ① ON/STAND-BY button Turn the projector on the screen. (p.26) ⑮ ⑩ ⑭ ⑪ D.ZOOM ▲▼ buttons Zoom in and out the images. (pp.25, 35... not apply benzene, thinner, spray, or any chemical material. 11 and Auto Keystone functions) in the Digital zoom +/- Do not bend, drop or expose the remote control to moisture or heat. -

Owner's Manual
Page 12
... by an incorrect type. ● Dispose of the projector. 16.4' (5 m) 30° 30° Remote control Remote Control Code The 2 different remote control codes (Code 1-Code 2) are assigned to Code 1. Remote Control Battery Installation 2 Install new batteries into the compartment. 3 Replace the compartment lid. Remote Control Operating Range Point the remote control toward the projector (Infrared Remote Receiver) when pressing the buttons. Maximum operating range...
... by an incorrect type. ● Dispose of the projector. 16.4' (5 m) 30° 30° Remote control Remote Control Code The 2 different remote control codes (Code 1-Code 2) are assigned to Code 1. Remote Control Battery Installation 2 Install new batteries into the compartment. 3 Replace the compartment lid. Remote Control Operating Range Point the remote control toward the projector (Infrared Remote Receiver) when pressing the buttons. Maximum operating range...

Owner's Manual
Page 18
... press the SELECT button. Selected Input Source and Lamp Control Video Lamp control status (See page 53 for Lamp control status.) ✔Note: The Filter warning and Lamp replacement icons may appear on the screen depending on the remote control. Enter the PIN code as instructed on the next... Project Computer Input signal guidance window No signal Current Input setting:RGB Is signal processed correctly? The POWER indicator lights red. If the projector is locked with a computer, VCR, etc.) before turning on the screen (p.45). • When the Input Search function is set...
... press the SELECT button. Selected Input Source and Lamp Control Video Lamp control status (See page 53 for Lamp control status.) ✔Note: The Filter warning and Lamp replacement icons may appear on the screen depending on the remote control. Enter the PIN code as instructed on the next... Project Computer Input signal guidance window No signal Current Input setting:RGB Is signal processed correctly? The POWER indicator lights red. If the projector is locked with a computer, VCR, etc.) before turning on the screen (p.45). • When the Input Search function is set...

Owner's Manual
Page 20
... being cooled down enough, the POWER indicator stops blinking and you can be turned on the remote control, and Power off? Power off the projector. CONTINUOUS USE MAY RESULT IN SHORTENING THE LAMP LIFE. disappears after the poweroff. 20 ✔Note: • When using the Direct OFF ...AC power cord even if the fans are still running. 3 When the projector has cooled down and the projector cannot be turned on the projector. Basic Operation Turning Off the Projector 1 Press the ON/STAND-BY button on the top control or on . appears on the screen. 2 Press the ON/STAND-BY...
... being cooled down enough, the POWER indicator stops blinking and you can be turned on the remote control, and Power off? Power off the projector. CONTINUOUS USE MAY RESULT IN SHORTENING THE LAMP LIFE. disappears after the poweroff. 20 ✔Note: • When using the Direct OFF ...AC power cord even if the fans are still running. 3 When the projector has cooled down and the projector cannot be turned on the projector. Basic Operation Turning Off the Projector 1 Press the ON/STAND-BY button on the top control or on . appears on the screen. 2 Press the ON/STAND-BY...

Owner's Manual
Page 21
... the MENU button on the top control or the remote control to display the On-Screen Menu. 2 Use the Point ▲▼ buttons to exit the On-Screen Menu. On-Screen Menu Dynamic Standard Real ► ...; button to return to the submenu. Basic Operation How to Operate the On-Screen Menu The projector can be adjusted or set or access the selected item. The selected item is highlighted in orange.) MENU button Remote Control 3 Use the Point ▲▼ buttons to select the desired submenu item and press the...
... the MENU button on the top control or the remote control to display the On-Screen Menu. 2 Use the Point ▲▼ buttons to exit the On-Screen Menu. On-Screen Menu Dynamic Standard Real ► ...; button to return to the submenu. Basic Operation How to Operate the On-Screen Menu The projector can be adjusted or set or access the selected item. The selected item is highlighted in orange.) MENU button Remote Control 3 Use the Point ▲▼ buttons to select the desired submenu item and press the...

Owner's Manual
Page 22
...-41). ⑤ Screen For computer source, used to set the projector's operating configurations (pp.43-57). ⑧ Information Display the input source information: Input , H-sync freq., V-sync freq., Screen, Language, Lamp status, Lamp counter , Power management, Key lock, PIN code lock and Remote control (p.58). ⑨ Network See the owner's manual of "Network...
...-41). ⑤ Screen For computer source, used to set the projector's operating configurations (pp.43-57). ⑧ Information Display the input source information: Input , H-sync freq., V-sync freq., Screen, Language, Lamp status, Lamp counter , Power management, Key lock, PIN code lock and Remote control (p.58). ⑨ Network See the owner's manual of "Network...

Owner's Manual
Page 23
...44 for the setting of correction. • An arrow disappears at the maximum correction. • If you press the KEYSTONE button on the remote control once more while the keystone dialog box is being displayed, the keystone adjustment will be canceled. • The adjustable range is set to ... be stored (see page 45). it does not correct horizontal distortion. • Auto Keystone cannot work when Ceiling feature is limited depending on the remote control or selecting Keystone in and out. Use the Point ▲▼ buttons to zoom in the Setting menu (p.45). • Fine sync, Total...
...44 for the setting of correction. • An arrow disappears at the maximum correction. • If you press the KEYSTONE button on the remote control once more while the keystone dialog box is being displayed, the keystone adjustment will be canceled. • The adjustable range is set to ... be stored (see page 45). it does not correct horizontal distortion. • Auto Keystone cannot work when Ceiling feature is limited depending on the remote control or selecting Keystone in and out. Use the Point ▲▼ buttons to zoom in the Setting menu (p.45). • Fine sync, Total...

Owner's Manual
Page 24
...the Point ◄ button to access the selected item. buttons. When the sound is turned off the sound. Remote Control Menu Operation 1 Press the MENU button to turn the sound back on the remote control to select Off or press the VOLUME +/- buttons again to turn up the volume; buttons on the top... control or on . Top Control VOLUME+/buttons Mute Press the MUTE button on , press the MUTE button again to ...
...the Point ◄ button to access the selected item. buttons. When the sound is turned off the sound. Remote Control Menu Operation 1 Press the MENU button to turn the sound back on the remote control to select Off or press the VOLUME +/- buttons again to turn up the volume; buttons on the top... control or on . Top Control VOLUME+/buttons Mute Press the MUTE button on , press the MUTE button again to ...

Owner's Manual
Page 25
... button LAMP button INFO. mode. Fig.1 VIDEO button FREEZE button D.ZOOM buttons COMPONENT button INFO. Basic Operation Remote Control Operation Using the remote control for details. See pages 27, 36-37 for some frequently used operations is advisable. Fig.1 will appear on... COMPONENT buttons Press the COMPUTER 1/2, VIDEO, S-VIDEO and COMPONENT buttons on the remote control to select the lamp mode for changing the brightness on the remote control to select the input source. Remote Control COMPUTER 1/2 buttons S-VIDEO button FREEZE button Press the FREEZE button on the screen...
... button LAMP button INFO. mode. Fig.1 VIDEO button FREEZE button D.ZOOM buttons COMPONENT button INFO. Basic Operation Remote Control Operation Using the remote control for details. See pages 27, 36-37 for some frequently used operations is advisable. Fig.1 will appear on... COMPONENT buttons Press the COMPUTER 1/2, VIDEO, S-VIDEO and COMPONENT buttons on the remote control to select the lamp mode for changing the brightness on the remote control to select the input source. Remote Control COMPUTER 1/2 buttons S-VIDEO button FREEZE button Press the FREEZE button on the screen...

Owner's Manual
Page 26
Basic Operation NO SHOW button Press the NO SHOW button on the remote control to release the No Show function, the mute function can not be operated at the ...size (See pages 34-35, 42 for details. P-TIMER button Press the P-TIMER button on the remote control to normal, press the NO SHOW button again or press any other buttons. 26 IMAGE button Press the IMAGE button on... the remote control to p.51 for detail of Setting for the description of the screen. No show disappears after 4 seconds. ...
Basic Operation NO SHOW button Press the NO SHOW button on the remote control to release the No Show function, the mute function can not be operated at the ...size (See pages 34-35, 42 for details. P-TIMER button Press the P-TIMER button on the remote control to normal, press the NO SHOW button again or press any other buttons. 26 IMAGE button Press the IMAGE button on... the remote control to p.51 for detail of Setting for the description of the screen. No show disappears after 4 seconds. ...

Owner's Manual
Page 27
Remote Control COMPUTER 1 button Computer 1(RGB) Computer 1(Scart) COMPUTER 2 button Computer 2 (RGB) Input Menu Menu Operation 1 Press the MENU button to On1 or On2 in the Auto ... Input Input Source Selection (RGB: Computer 1/Computer 2) Direct Operation Choose either Computer 1(RGB) or Computer 2(RGB) by pressing the COMPUTER 1 or COMPUTER 2 button on the remote control. Before using these buttons, correct input source should be searched automatically (p.44). Computer 1 ► Computer 1 RGB Component RGB(Scart) S-video 27
Remote Control COMPUTER 1 button Computer 1(RGB) Computer 1(Scart) COMPUTER 2 button Computer 2 (RGB) Input Menu Menu Operation 1 Press the MENU button to On1 or On2 in the Auto ... Input Input Source Selection (RGB: Computer 1/Computer 2) Direct Operation Choose either Computer 1(RGB) or Computer 2(RGB) by pressing the COMPUTER 1 or COMPUTER 2 button on the remote control. Before using these buttons, correct input source should be searched automatically (p.44). Computer 1 ► Computer 1 RGB Component RGB(Scart) S-video 27

Owner's Manual
Page 32
...1-4 For viewing with improved halftone for graphics. This Image memory is mainly effective on a green colored board, not truly effective on the projector. Blackboard (Green) For the image projected on a blackboard. Use the Point ▲▼ buttons to select Image select and then press ...At the time of simple projection on the colored wall, you can get the close color image to the color image projected on the remote control. Computer Input Image Mode Selection Direct Operation Select the desired image mode among Dynamic, Standard, Real, Blackboard (Green), Colorboard, Image 1, ...
...1-4 For viewing with improved halftone for graphics. This Image memory is mainly effective on a green colored board, not truly effective on the projector. Blackboard (Green) For the image projected on a blackboard. Use the Point ▲▼ buttons to select Image select and then press ...At the time of simple projection on the colored wall, you can get the close color image to the color image projected on the remote control. Computer Input Image Mode Selection Direct Operation Select the desired image mode among Dynamic, Standard, Real, Blackboard (Green), Colorboard, Image 1, ...

Owner's Manual
Page 35
...System Menu (p.28). • Digital zoom +/- The Panning function can be also compressed by pressing the D.ZOOM ▲ or the SELECT button on the remote control. adj. ► ✔Note: • When no signal is detected, Normal is displayed on the aspect ratio. The On-Screen Menu disappears and...or select an input source from the Input Source Selection Menu (see page 27) again, or adjust the screen size with this function. Remote Control POINT buttons SELECT button D.ZOOM + button D.ZOOM - To return to all adjusted values. and the Custom adjustment menu is set to ...
...System Menu (p.28). • Digital zoom +/- The Panning function can be also compressed by pressing the D.ZOOM ▲ or the SELECT button on the remote control. adj. ► ✔Note: • When no signal is detected, Normal is displayed on the aspect ratio. The On-Screen Menu disappears and...or select an input source from the Input Source Selection Menu (see page 27) again, or adjust the screen size with this function. Remote Control POINT buttons SELECT button D.ZOOM + button D.ZOOM - To return to all adjusted values. and the Custom adjustment menu is set to ...

Owner's Manual
Page 36
... automatically (p.44). Video Input Input Source Selection (Video, S-video) Direct Operation Choose Video or S-video by pressing the VIDEO or the SVIDEO button on the remote control. Remote Control VIDEO button Video S-VIDEO button S-video Menu Operation 1 Press the MENU button to the VIDEO jack, select Video. Video When video input signal is set...
... automatically (p.44). Video Input Input Source Selection (Video, S-video) Direct Operation Choose Video or S-video by pressing the VIDEO or the SVIDEO button on the remote control. Remote Control VIDEO button Video S-VIDEO button S-video Menu Operation 1 Press the MENU button to the VIDEO jack, select Video. Video When video input signal is set...

Owner's Manual
Page 37
... Source Selection (Component, RGB Scart 21-pin) Direct Operation Choose Computer 1(Component) or Computer 1(Scart) by pressing the COMPONENT or the COMPUTER 1 button on the remote control. Remote Control COMPUTER 1 button Computer 1(RGB) Computer 1(Scart) COMPONENT button Computer 1(Component) Menu Operation 1 Press the MENU button to select Component or RGB(Scart) and then press...
... Source Selection (Component, RGB Scart 21-pin) Direct Operation Choose Computer 1(Component) or Computer 1(Scart) by pressing the COMPONENT or the COMPUTER 1 button on the remote control. Remote Control COMPUTER 1 button Computer 1(RGB) Computer 1(Scart) COMPONENT button Computer 1(Component) Menu Operation 1 Press the MENU button to select Component or RGB(Scart) and then press...

Owner's Manual
Page 39
... the colored wall, you can get the close color image to the color image projected on a white screen by pressing the IMAGE button on the projector. Remote Control Menu Operation 1 Press the MENU button to select the desired item and then press the SELECT button . Standard Normal picture mode preset on the...
... the colored wall, you can get the close color image to the color image projected on a white screen by pressing the IMAGE button on the projector. Remote Control Menu Operation 1 Press the MENU button to select the desired item and then press the SELECT button . Standard Normal picture mode preset on the...

Owner's Manual
Page 44
...Input search will stop and go back to the projector's tilt. Setting Auto setup This function enables Input search, Auto Keystone correction and Auto PC adjustment by pressing the ON/STAND-BY button on the top control or the remote control. - Settings for those functions can be altered ...as follows: Input search This function detects the input signal automatically. When turning on the projector by pressing the AUTO SETUP button on the top control or the AUTO SET button on the remote control. Input ...
...Input search will stop and go back to the projector's tilt. Setting Auto setup This function enables Input search, Auto Keystone correction and Auto PC adjustment by pressing the ON/STAND-BY button on the top control or the remote control. - Settings for those functions can be altered ...as follows: Input search This function detects the input signal automatically. When turning on the projector by pressing the AUTO SETUP button on the top control or the AUTO SET button on the remote control. Input ...


