Owners Manual
Page 4
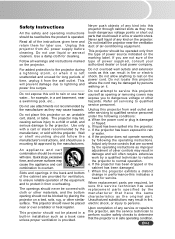
... combination should be sure the service technician has used replacement parts specified by the manufacturer that could result in a fire or electric shock. Never spill liquid of any service or repairs to this projector where the cord may be operated only from wall outlet ... substitutions may touch dangerous voltage points or short out parts that have the same characteristics as opening should not be read before cleaning. for ventilation, to ensure reliable operation of any kind into the projector. The projector may cause the appliance and cart combination to dangerous voltage...
... combination should be sure the service technician has used replacement parts specified by the manufacturer that could result in a fire or electric shock. Never spill liquid of any service or repairs to this projector where the cord may be operated only from wall outlet ... substitutions may touch dangerous voltage points or short out parts that have the same characteristics as opening should not be read before cleaning. for ventilation, to ensure reliable operation of any kind into the projector. The projector may cause the appliance and cart combination to dangerous voltage...
Owners Manual
Page 5
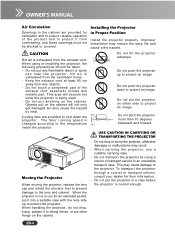
...reliable operation of the exhaust vent, especially screws and metallic part. Do not tilt the projector sideways. Do not point the projector down to cool down the projector. Do not put on the cabinet. Moving the Projector When moving the projector, replace the lens cap and retract the elevator feet ...CAUTION Hot air is exhausted from any flammable object or spray can near the projector, hot air is being used. - Do not touch a peripheral part of the product and to protect the projector. When handling the projector, do not drop, bump, subject it into a suitable case with the ...
...reliable operation of the exhaust vent, especially screws and metallic part. Do not tilt the projector sideways. Do not point the projector down to cool down the projector. Do not put on the cabinet. Moving the Projector When moving the projector, replace the lens cap and retract the elevator feet ...CAUTION Hot air is exhausted from any flammable object or spray can near the projector, hot air is being used. - Do not touch a peripheral part of the product and to protect the projector. When handling the projector, do not drop, bump, subject it into a suitable case with the ...

Owners Manual
Page 6
...correct plug fitted. Model Number : PLC-WXU10N Trade Name : Sanyo Responsible party : SANYO FISHER COMPANY Address : 21605 Plummer Street, Chatsworth, California 91311 Telephone No. : (818)998-7322 AC Power Cord Requirement The AC Power Cord supplied with this projector meets the requirement for the United ...: THIS APPARATUS MUST BE EARTHED. Reorient or relocate the receiving antenna. - Should you could be used in Subpart B of Part 15 of the equipment. The end of the plug. These limits are coloured in this equipment does cause harmful interference to radio...
...correct plug fitted. Model Number : PLC-WXU10N Trade Name : Sanyo Responsible party : SANYO FISHER COMPANY Address : 21605 Plummer Street, Chatsworth, California 91311 Telephone No. : (818)998-7322 AC Power Cord Requirement The AC Power Cord supplied with this projector meets the requirement for the United ...: THIS APPARATUS MUST BE EARTHED. Reorient or relocate the receiving antenna. - Should you could be used in Subpart B of Part 15 of the equipment. The end of the plug. These limits are coloured in this equipment does cause harmful interference to radio...
Owners Manual
Page 8
...Panel ...12 Connection Ports ...13 Remote Control ...14 Installing the Batteries 15 Remote Control Operation 16 Installation ...17 Connecting the Projector 17 Powering On/Off the Projector 18 Adjusting the Projected Image 19 Menu Operation ...22 Picture (Computer Mode 24 Picture (Video Mode) ...25 Image (...Mode 30 Advanced (Computer / Video Mode 30 Language (Computer / Video Mode 30 Maintenance ...31 Cleaning the Lens ...31 Cleaning the Projector Housing 31 Cleaning the Air Filter 32 Replacing the Lamp ...33 Specifications ...35 Appendix ...36 LED Indicator Messages 36 Optional...
...Panel ...12 Connection Ports ...13 Remote Control ...14 Installing the Batteries 15 Remote Control Operation 16 Installation ...17 Connecting the Projector 17 Powering On/Off the Projector 18 Adjusting the Projected Image 19 Menu Operation ...22 Picture (Computer Mode 24 Picture (Video Mode) ...25 Image (...Mode 30 Advanced (Computer / Video Mode 30 Language (Computer / Video Mode 30 Maintenance ...31 Cleaning the Lens ...31 Cleaning the Projector Housing 31 Cleaning the Air Filter 32 Replacing the Lamp ...33 Specifications ...35 Appendix ...36 LED Indicator Messages 36 Optional...
Owners Manual
Page 22
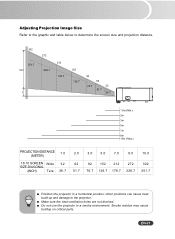
Adjusting Projection Image Size Refer to the graphic and table below to the projector. Make sure the heat ventilation holes are not blocked. Do not use the projector in a horizontal position; Smoke residue may cause buildup on critical parts. other positions can cause heat build-up and damage to determine the screen size and...) 1.0 16:10 SCREEN Wide SIZE-DIAGONAL (INCH) Te l e 32 26.7 2.0 62 51.7 3.0 5.0 7.0 9.0 10.0 92 76.7 152 126.7 212 176.7 272 226.7 302 251.7 Position the projector in a smoky environment. EN-21
Adjusting Projection Image Size Refer to the graphic and table below to the projector. Make sure the heat ventilation holes are not blocked. Do not use the projector in a horizontal position; Smoke residue may cause buildup on critical parts. other positions can cause heat build-up and damage to determine the screen size and...) 1.0 16:10 SCREEN Wide SIZE-DIAGONAL (INCH) Te l e 32 26.7 2.0 62 51.7 3.0 5.0 7.0 9.0 10.0 92 76.7 152 126.7 212 176.7 272 226.7 302 251.7 Position the projector in a smoky environment. EN-21
Owners Manual
Page 32
... proper maintenance. You should keep the lens clean as dust, dirt or spots will project on the projector. Cleaning the Lens Gently wipe the lens with a soft cloth. Warning: Never open any part of the covers on the screen and diminish image quality. Do not touch the lens with a soft, ...dry cloth. Dangerous electrical voltages inside the projector can cause severe injury. If dirt and stains are not easily removed, ...
... proper maintenance. You should keep the lens clean as dust, dirt or spots will project on the projector. Cleaning the Lens Gently wipe the lens with a soft cloth. Warning: Never open any part of the covers on the screen and diminish image quality. Do not touch the lens with a soft, ...dry cloth. Dangerous electrical voltages inside the projector can cause severe injury. If dirt and stains are not easily removed, ...
Owners Manual
Page 33
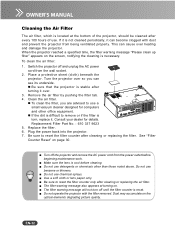
...the air filter. Clean the air filter. „ To clean the filter, you can see its underside. „ Be sure that the projector is necessary. Replacement Filter Part No. : 610 337 9623 5. Replace the filter. 6. Use a soft cloth or lens paper only. Dust may accumulate on . Remove ...the air filter by pushing the filter tab. 4. Plug the power back into the projector. 7. The filter warning message also appears at the bottom ...
...the air filter. Clean the air filter. „ To clean the filter, you can see its underside. „ Be sure that the projector is necessary. Replacement Filter Part No. : 610 337 9623 5. Replace the filter. 6. Use a soft cloth or lens paper only. Dust may accumulate on . Remove ...the air filter by pushing the filter tab. 4. Plug the power back into the projector. 7. The filter warning message also appears at the bottom ...

Owners Manual
Page 35
Place a protective sheet (cloth) beneath the projector. Turn the projector over so you can be ordered through your projector: Replacement Lamp Type No.: PLC-WXU10N/ WXU10E/ WXU10B POA-LMP113 (Service Parts No. 610 336 0362) EN-34 Grasp the lamp handle and pull the lamp assembly directly out of the used lamp according to local regulations. ...
Place a protective sheet (cloth) beneath the projector. Turn the projector over so you can be ordered through your projector: Replacement Lamp Type No.: PLC-WXU10N/ WXU10E/ WXU10B POA-LMP113 (Service Parts No. 610 336 0362) EN-34 Grasp the lamp handle and pull the lamp assembly directly out of the used lamp according to local regulations. ...
Owners Manual
Page 37
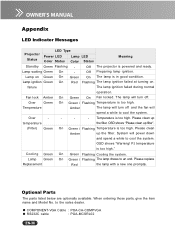
.... Cooling Green Lamp Green Replacement On Green Flashing Cooling the system. When ordering those parts, give the item name and Model No. Lamp waiting Green On - OSD shows "Warning! Optional Parts The parts listed below are optionally available. to an end. Q COMPONENT-VGA Cable : POA...and spend a while to cool the system. Please clean up the filter. Off Preparing lamp ignition. Appendix LED Indicator Messages Projector Status LED Type Power LED Color Status Lamp LED Color Status Meaning Standby Green Flashing - Temperature is too high. Please ...
.... Cooling Green Lamp Green Replacement On Green Flashing Cooling the system. When ordering those parts, give the item name and Model No. Lamp waiting Green On - OSD shows "Warning! Optional Parts The parts listed below are optionally available. to an end. Q COMPONENT-VGA Cable : POA...and spend a while to cool the system. Please clean up the filter. Off Preparing lamp ignition. Appendix LED Indicator Messages Projector Status LED Type Power LED Color Status Lamp LED Color Status Meaning Standby Green Flashing - Temperature is too high. Please ...

Owners Manual
Page 42
EN-41 Printed in China Part No. 1AA6P1P5446-(KJ3A) SANYO Electric Co., Ltd.
EN-41 Printed in China Part No. 1AA6P1P5446-(KJ3A) SANYO Electric Co., Ltd.
