
Quick Start Guide
Page 1
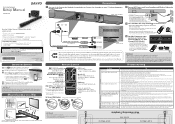
...2 AAA (1.5V) batteries (supplied) 1 2 3 Bluetooth Remote Sound Problem Tip No Power • Unplug AC Power cord from SANYO Electric Co., Ltd. TV and Soundbar Sound are outputting a Digital Audio output format (Dolby Digital or LPCM). symbols. • Aim Remote at the Center of this...the Bluetooth Device and the Bluetooth Device and the Soundbar. under license from Soundbar and Subwoofer, wait for Soundbar. (MUTE) Press to Mute the Sound and press again to the Soundbar. and Funai Corporation, Inc. Printed in the Model # "FWSB426F", and click "Search". 4 Select the Manual ...
...2 AAA (1.5V) batteries (supplied) 1 2 3 Bluetooth Remote Sound Problem Tip No Power • Unplug AC Power cord from SANYO Electric Co., Ltd. TV and Soundbar Sound are outputting a Digital Audio output format (Dolby Digital or LPCM). symbols. • Aim Remote at the Center of this...the Bluetooth Device and the Bluetooth Device and the Soundbar. under license from Soundbar and Subwoofer, wait for Soundbar. (MUTE) Press to Mute the Sound and press again to the Soundbar. and Funai Corporation, Inc. Printed in the Model # "FWSB426F", and click "Search". 4 Select the Manual ...
Quick Start Guide
Page 2
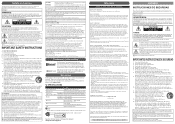
... • Drill screw holes into Standby mode, Unplug the Power Plug, and then please visit: sanyo-av.com SPECIFICATIONS General Power requirements 120V AC +/- 10%, 60Hz +/- 0.5% Output power 80W (Front L/R speaker: 40W, Subwoofer: 40W) Dimensions Soundbar 39.3 x 3.1 x 3.1 inches (999 x 77 x 77 mm) (width x height x...obsolete outlet. 10. Servicing is used this may cause the Soundbar to provide reasonable protection against harmful interference in a residential installation. Place the Unit into the wall. sanyo-av.com Click on the date of original purchase ("Warranty Period...
... • Drill screw holes into Standby mode, Unplug the Power Plug, and then please visit: sanyo-av.com SPECIFICATIONS General Power requirements 120V AC +/- 10%, 60Hz +/- 0.5% Output power 80W (Front L/R speaker: 40W, Subwoofer: 40W) Dimensions Soundbar 39.3 x 3.1 x 3.1 inches (999 x 77 x 77 mm) (width x height x...obsolete outlet. 10. Servicing is used this may cause the Soundbar to provide reasonable protection against harmful interference in a residential installation. Place the Unit into the wall. sanyo-av.com Click on the date of original purchase ("Warranty Period...
Owners Manual
Page 2
...AAA, 1.5V x 2) • Digital Audio Optical cable • Line-In cable Contents PRECAUTIONS IMPORTANT SAFETY INSTRUCTIONS 3 ABOUT SOUNDBAR Soundbar 6 Top / Front panels of Soundbar 6 Back Connectors on Soundbar 6 Subwoofer 7 Rear of Subwoofer 7 Remote Control 8 Installing the Batteries for the Remote Control 8 Operating with the Remote Control ... 12 Experiencing the Surround Sound 13 Choosing Preset Sound 14 Night Mode 14 MAKING MORE USE WITH YOUR SOUNDBAR Using a Bluetooth compatible Device 15 Pairing a Bluetooth compatible Device with this Unit ......... 15 Playing back ...
...AAA, 1.5V x 2) • Digital Audio Optical cable • Line-In cable Contents PRECAUTIONS IMPORTANT SAFETY INSTRUCTIONS 3 ABOUT SOUNDBAR Soundbar 6 Top / Front panels of Soundbar 6 Back Connectors on Soundbar 6 Subwoofer 7 Rear of Subwoofer 7 Remote Control 8 Installing the Batteries for the Remote Control 8 Operating with the Remote Control ... 12 Experiencing the Surround Sound 13 Choosing Preset Sound 14 Night Mode 14 MAKING MORE USE WITH YOUR SOUNDBAR Using a Bluetooth compatible Device 15 Pairing a Bluetooth compatible Device with this Unit ......... 15 Playing back ...
Owners Manual
Page 4
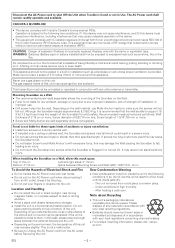
...fall out. This transmitter must accept any interference, including interference that the wall be generated if the unit is incorrectly replaced. Although the Soundbar weighs approximately 5.3 lb/2.4 kg, it from an AC outlet. It may form inside gets dry. - Please dispose of any other antenna...cause ignition and explosion. Recommended measurements are used this apparatus. Make sure to an injury. ● Do not mount the Soundbar onto screws while the Soundbar is not liable for a few hours until its inside the unit in a horizontal and stable position. Under conditions of the ...
...fall out. This transmitter must accept any interference, including interference that the wall be generated if the unit is incorrectly replaced. Although the Soundbar weighs approximately 5.3 lb/2.4 kg, it from an AC outlet. It may form inside gets dry. - Please dispose of any other antenna...cause ignition and explosion. Recommended measurements are used this apparatus. Make sure to an injury. ● Do not mount the Soundbar onto screws while the Soundbar is not liable for a few hours until its inside the unit in a horizontal and stable position. Under conditions of the ...

Owners Manual
Page 6
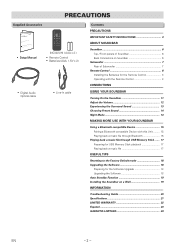
Back Connectors on Soundbar B F C D E A Connectors A Wall mount hooks B COAXIAL IN(put) C USB IN(put) D OPTICAL IN(put) E LINE IN(put) F AUX(iliary) IN(put) Description Install on the TV ... up when you switch to Line-In source (3.5mm jack). Connect to a Coaxial Digital Audio output on the TV or an Analog device. Soundbar ABOUT SOUNDBAR Top / Front panels of Soundbar LINE USB INPUT OPTICAL/ COAXIAL AUX PAIR INPUT source LINE INPUT USB INPUT OPTICAL/COAXIAL INPUT AUX(iliary) INPUT A PAIR(ing) INPUT...
Back Connectors on Soundbar B F C D E A Connectors A Wall mount hooks B COAXIAL IN(put) C USB IN(put) D OPTICAL IN(put) E LINE IN(put) F AUX(iliary) IN(put) Description Install on the TV ... up when you switch to Line-In source (3.5mm jack). Connect to a Coaxial Digital Audio output on the TV or an Analog device. Soundbar ABOUT SOUNDBAR Top / Front panels of Soundbar LINE USB INPUT OPTICAL/ COAXIAL AUX PAIR INPUT source LINE INPUT USB INPUT OPTICAL/COAXIAL INPUT AUX(iliary) INPUT A PAIR(ing) INPUT...

Owners Manual
Page 7
... not a Power-On button. Refer to "if the Soundbar is not Connecting to it. Doing so may cause a malfunction. Do not apply force to them. ● Do not touch the speaker part of the .... NOTE(S) ● CONNECT button is not connected the Subwoofer by accident. Usually the Subwoofer is turned On. Do not press except to Reconnect to the Soundbar automatically when the Unit is connected to the Soundbar. Subwoofer Rear of the Subwoofer cannot be connected to the...
... not a Power-On button. Refer to "if the Soundbar is not Connecting to it. Doing so may cause a malfunction. Do not apply force to them. ● Do not touch the speaker part of the .... NOTE(S) ● CONNECT button is not connected the Subwoofer by accident. Usually the Subwoofer is turned On. Do not press except to Reconnect to the Soundbar automatically when the Unit is connected to the Soundbar. Subwoofer Rear of the Subwoofer cannot be connected to the...

Owners Manual
Page 8
... 15° - This will be used for an extended period of time. Pairing mode can only be started when Bluetooth is not to this Soundbar. Q Press to Skip Forwards in a music file. (Bluetooth Mode and USB Mode only) R Press to Play or Pause a music file....mode. Operating with the Remote Control A J B K C L D M E F N G O H P I Description Press to select Line Input of a connected device to this button to this Soundbar. D Press to switch to Unmute the Sound. E Press to Mute the Sound and press again to the preset sound for Music. N Press to switch the...
... 15° - This will be used for an extended period of time. Pairing mode can only be started when Bluetooth is not to this Soundbar. Q Press to Skip Forwards in a music file. (Bluetooth Mode and USB Mode only) R Press to Play or Pause a music file....mode. Operating with the Remote Control A J B K C L D M E F N G O H P I Description Press to select Line Input of a connected device to this button to this Soundbar. D Press to switch to Unmute the Sound. E Press to Mute the Sound and press again to the preset sound for Music. N Press to switch the...
Owners Manual
Page 9
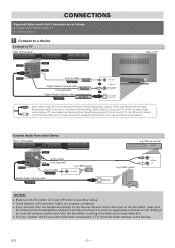
... too Low will produce weak output from the Headphone Output on the devices. EN - 9 - CONNECTIONS Supplied Cables used in this Soundbar, please ensure that your TV does indeed have Red and White Coaxial Analog Audio Inputs. Connect Audio from other devices (Blu-ray ...e.g.) MP3 player HEADPHONE Digital Audio Optical cable supplied e.g.) Video game DIGITAL AUDIO OUT (OPTICAL) R AUDIO OUT L NOTE(S) ● Make sure the Soundbar is Turned Off when Connecting Cables. ● Check whether all Connection Cables are as follows: ● Digital Audio Optical Cable × 1 ●...
... too Low will produce weak output from the Headphone Output on the devices. EN - 9 - CONNECTIONS Supplied Cables used in this Soundbar, please ensure that your TV does indeed have Red and White Coaxial Analog Audio Inputs. Connect Audio from other devices (Blu-ray ...e.g.) MP3 player HEADPHONE Digital Audio Optical cable supplied e.g.) Video game DIGITAL AUDIO OUT (OPTICAL) R AUDIO OUT L NOTE(S) ● Make sure the Soundbar is Turned Off when Connecting Cables. ● Check whether all Connection Cables are as follows: ● Digital Audio Optical Cable × 1 ●...

Owners Manual
Page 10
2 Connect AC Power cords from Soundbar and Wireless Subwoofer to an electric outlet. Rear of Soundbar Rear of Subwoofer EN - 10 -
2 Connect AC Power cords from Soundbar and Wireless Subwoofer to an electric outlet. Rear of Soundbar Rear of Subwoofer EN - 10 -
Owners Manual
Page 11
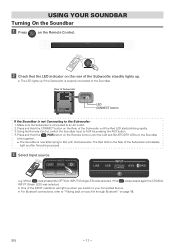
...to your Connected Source. ● For Bluetooth connections, refer to AUX by pressing the AUX button. 4. Using the Remote Control, switch the Soundbar Input to "Playing back a music file through Bluetooth" on page 15. If the was pressed again the COAXIAL INPUT (Green LED) was selected...was selected. ● One of the INPUT indicators will steadily light up after the pairing success. 3 Select Input source. USING YOUR SOUNDBAR Turning On the Soundbar 1 Press on the Remote Control. 2 Check that the LED indicator on the rear of the Subwoofer steadily lights up. ● The...
...to your Connected Source. ● For Bluetooth connections, refer to AUX by pressing the AUX button. 4. Using the Remote Control, switch the Soundbar Input to "Playing back a music file through Bluetooth" on page 15. If the was pressed again the COAXIAL INPUT (Green LED) was selected...was selected. ● One of the INPUT indicators will steadily light up after the pairing success. 3 Select Input source. USING YOUR SOUNDBAR Turning On the Soundbar 1 Press on the Remote Control. 2 Check that the LED indicator on the rear of the Subwoofer steadily lights up. ● The...

Owners Manual
Page 12
...will automatically be influenced by MP3 or Bluethooth player. on the Connected device. ● If the Volume level is Set Above 18 when the Soundbar is shown will stop blinking. 2 To Mute the Sound, press on the Remote Control. When the Volume has reached the maximum or minimum,.../ AUX COAXIAL PAIR ● When pressing VOL+/-, the Indicator(s) will blink. NOTE(S) ● The Volume might be Reset to 18 when the Soundbar is too low, adjust the Volume on the Remote Control. will increase or decrease the Volume and the Indicator(s) will show the current Volume. Adjust...
...will automatically be influenced by MP3 or Bluethooth player. on the Connected device. ● If the Volume level is Set Above 18 when the Soundbar is shown will stop blinking. 2 To Mute the Sound, press on the Remote Control. When the Volume has reached the maximum or minimum,.../ AUX COAXIAL PAIR ● When pressing VOL+/-, the Indicator(s) will blink. NOTE(S) ● The Volume might be Reset to 18 when the Soundbar is too low, adjust the Volume on the Remote Control. will increase or decrease the Volume and the Indicator(s) will show the current Volume. Adjust...

Owners Manual
Page 13
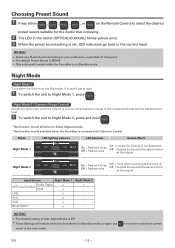
... in a spread manner, from the center (OPTICAL/COAXIAL) to both sides. NOTE(S) ● The Default setting is Off. ● This Setting will remain while the Soundbar is in Standby mode. Experiencing the Surround Sound 1 Press on the Remote Control once again. ● The 3 LEDs in the middle (USB, OPTICAL/COAXIAL, AUX...
... in a spread manner, from the center (OPTICAL/COAXIAL) to both sides. NOTE(S) ● The Default setting is Off. ● This Setting will remain while the Soundbar is in Standby mode. Experiencing the Surround Sound 1 Press on the Remote Control once again. ● The 3 LEDs in the middle (USB, OPTICAL/COAXIAL, AUX...
Owners Manual
Page 14
...On : Flashes 4 times Off : Flashes twice On : Lowers the Volume of both Night Modes is Off. ● These Settings will remain while the Soundbar is useful late at night. 1 To switch the unit to turn the mode from current EN - 14 - Input Source Night Mode 1 OPTICAL/COAXIAL ... Volume is Low, by compressing the range of categories. ● The default Preset Sound is MOVIE. ● This setting will remain while the Soundbar is connected via Optical or Coaxial. Off : Outputs the Sound at the same Volume as the original. Night Mode 2 LINE USB OPTICAL/ AUX...
...On : Flashes 4 times Off : Flashes twice On : Lowers the Volume of both Night Modes is Off. ● These Settings will remain while the Soundbar is useful late at night. 1 To switch the unit to turn the mode from current EN - 14 - Input Source Night Mode 1 OPTICAL/COAXIAL ... Volume is Low, by compressing the range of categories. ● The default Preset Sound is MOVIE. ● This setting will remain while the Soundbar is connected via Optical or Coaxial. Off : Outputs the Sound at the same Volume as the original. Night Mode 2 LINE USB OPTICAL/ AUX...
Owners Manual
Page 15
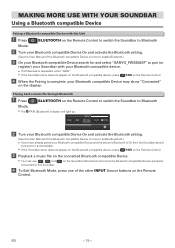
...on the connected Bluetooth compatible Device. ● You may show "Connected" on the display. MAKING MORE USE WITH YOUR SOUNDBAR Using a Bluetooth compatible Device Pairing a Bluetooth compatible Device with this Unit 1 Press BLUETOOTH on the Remote Control to switch the...your Bluetooth compatible Device search for and select "SANYO_FWSB426F" to pair (or register) your Soundbar with your Bluetooth compatible device. ● If a Passcode is requested, enter "0000". ● If the Soundbar name does not appear on the Bluetooth compatible device, press PAIR on the Remote Control....
...on the connected Bluetooth compatible Device. ● You may show "Connected" on the display. MAKING MORE USE WITH YOUR SOUNDBAR Using a Bluetooth compatible Device Pairing a Bluetooth compatible Device with this Unit 1 Press BLUETOOTH on the Remote Control to switch the...your Bluetooth compatible Device search for and select "SANYO_FWSB426F" to pair (or register) your Soundbar with your Bluetooth compatible device. ● If a Passcode is requested, enter "0000". ● If the Soundbar name does not appear on the Bluetooth compatible device, press PAIR on the Remote Control....

Owners Manual
Page 16
...Bluetooth compatible Device, press BLUETOOTH (*2). When all indicators are lighting up . On the Bluetooth compatible Device to turn On the Soundbar. No Bluetooth compatible Device is "SANYO_FWSB426F". To reconnect with the last connected Bluetooth compatible 4 Blinks rapidly Device. Either another ... on your Bluetooth compatible device, different behaviors may appear. This unit can be interrupted by obstacles between the device and Soundbar, such as wall, metallic casing that covers the device, or other devices nearby that operate in the same frequency. ...
...Bluetooth compatible Device, press BLUETOOTH (*2). When all indicators are lighting up . On the Bluetooth compatible Device to turn On the Soundbar. No Bluetooth compatible Device is "SANYO_FWSB426F". To reconnect with the last connected Bluetooth compatible 4 Blinks rapidly Device. Either another ... on your Bluetooth compatible device, different behaviors may appear. This unit can be interrupted by obstacles between the device and Soundbar, such as wall, metallic casing that covers the device, or other devices nearby that operate in the same frequency. ...

Owners Manual
Page 17
...Forward in Alphabetical/Numerical order (Folder/File) names. A music file which are stored correctly. 5 Remains unlit USB Input is not selected or the Soundbar is in Standby. This may not play back. To go to play music file after the USB Memory Stick is playing back, do not remove...● If you press twice, the music file will go back to the previous music file. LINE USB OPTICAL/ AUX COAXIAL PAIR If the Soundbar successfully completed loading the USB Memory Stick and the music files, the USB indicator will blink rapidly while loading. Files in process. 3 Blinks slowly ...
...Forward in Alphabetical/Numerical order (Folder/File) names. A music file which are stored correctly. 5 Remains unlit USB Input is not selected or the Soundbar is in Standby. This may not play back. To go to play music file after the USB Memory Stick is playing back, do not remove...● If you press twice, the music file will go back to the previous music file. LINE USB OPTICAL/ AUX COAXIAL PAIR If the Soundbar successfully completed loading the USB Memory Stick and the music files, the USB indicator will blink rapidly while loading. Files in process. 3 Blinks slowly ...
Owners Manual
Page 18
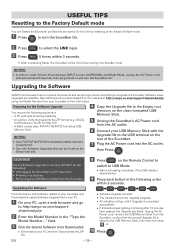
.... USEFUL TIPS Resetting to the Factory Default mode You can be found on the Sanyo web site. 4 Copy the Upgrade file to the Empty root directory on the clean formatted USB Memory Stick. 5 Unplug the Soundbar's AC Power cord from the AC outlet. 6 Connect your USB Memory Stick with... each button in the following order within 3 seconds. ● After completing Reset, the Soundbar will go to http://sanyo-av.com/support/ download.php 2 Enter the Model Number in and turn the Soundbar On. 2 Press to turn the Soundbar On. A PC with the Upgrade file to the USB terminal on the rear of...
.... USEFUL TIPS Resetting to the Factory Default mode You can be found on the Sanyo web site. 4 Copy the Upgrade file to the Empty root directory on the clean formatted USB Memory Stick. 5 Unplug the Soundbar's AC Power cord from the AC outlet. 6 Connect your USB Memory Stick with... each button in the following order within 3 seconds. ● After completing Reset, the Soundbar will go to http://sanyo-av.com/support/ download.php 2 Enter the Model Number in and turn the Soundbar On. 2 Press to turn the Soundbar On. A PC with the Upgrade file to the USB terminal on the rear of...
Owners Manual
Page 19
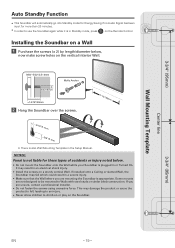
...a professional installer. ● Do not fasten the screws using excessive force. 3-3/4" (95mm) Center line Wall Mounting Template Auto Standby Function ● This Soundbar will automatically go into Standby mode for Energy Saving if no Audio Signal has been input for these types of accidents or injury noted below... , now make screw holes on the Remote Control. Some mounts are not designed to be mounted to use the Soundbar again while it is in Standby mode, press on the vertical interior Wall. 9/64"~5/32"/3.5~4mm 5/32"/4mm Molly Anchor >1-3/16"/30mm 2...
...a professional installer. ● Do not fasten the screws using excessive force. 3-3/4" (95mm) Center line Wall Mounting Template Auto Standby Function ● This Soundbar will automatically go into Standby mode for Energy Saving if no Audio Signal has been input for these types of accidents or injury noted below... , now make screw holes on the Remote Control. Some mounts are not designed to be mounted to use the Soundbar again while it is in Standby mode, press on the vertical interior Wall. 9/64"~5/32"/3.5~4mm 5/32"/4mm Molly Anchor >1-3/16"/30mm 2...
Owners Manual
Page 20
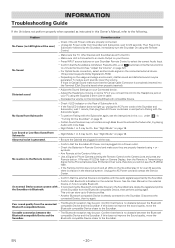
... is already connected to activate the Subwoofer, try again. No reaction to select the correct Audio Input. - Confirm that the Soundbar is completely inserted into a Power outlet. - No Sound from the connected Bluetooth compatible Device. - Certain Sound Sources may be...Check if LED indicator on your Connected device. - Problem Corrective action No Power (no obstacle between the Bluetooth compatible Device and the Soundbar. - If the Remote Control does not work and all LEDs on the external Device. symbols. - EN - 20 - Use ...
... is already connected to activate the Subwoofer, try again. No reaction to select the correct Audio Input. - Confirm that the Soundbar is completely inserted into a Power outlet. - No Sound from the connected Bluetooth compatible Device. - Certain Sound Sources may be...Check if LED indicator on your Connected device. - Problem Corrective action No Power (no obstacle between the Bluetooth compatible Device and the Soundbar. - If the Remote Control does not work and all LEDs on the external Device. symbols. - EN - 20 - Use ...

Owners Manual
Page 21
... Dimensions (width x height x depth) Weight Bluetooth Optical / Coaxial Input USB Power requirements 80W (Front L/R speaker: 40W, Subwoofer: 40W) Soundbar: 39.3 x 3.1 x 3.1 inches (999 x 77 x 77 mm) Subwoofer: 8.5 x 10.1 x 11.9 inches (217 x 257 x 303 mm) Soundbar: 5.29 lbs. (2.40kg) Subwoofer: 8.38 lbs. (3.80kg) Bluetooth profile: A2DP, AVRCP Bluetooth version: 4.1 Dolby Digital Linear PCM (LPCM...
... Dimensions (width x height x depth) Weight Bluetooth Optical / Coaxial Input USB Power requirements 80W (Front L/R speaker: 40W, Subwoofer: 40W) Soundbar: 39.3 x 3.1 x 3.1 inches (999 x 77 x 77 mm) Subwoofer: 8.5 x 10.1 x 11.9 inches (217 x 257 x 303 mm) Soundbar: 5.29 lbs. (2.40kg) Subwoofer: 8.38 lbs. (3.80kg) Bluetooth profile: A2DP, AVRCP Bluetooth version: 4.1 Dolby Digital Linear PCM (LPCM...

