Instruction Manual
Page 2
... 3: Connecting the Audio Cables E12 Step 4: Connecting the Power Cord E14 Connecting a VCR or Similar Recording Equipment to This Unit E15 Connecting to a Satellite Receiver or a Cable Box ....... E17 Setting the Clock E18 Preparations E18 To Set the Clock E18 Tuner Setting E19 Setting "Channel Setup E19 Before Initial Setting E22 Common Procedure E22 Initial Settings E23 Recording Setup E23 Preparations E23 Setting "Record Mode E23 Setting "Auto Chapter E24 DVD Control E25 Preparations E25 Setting "Disc Menu E25 Setting "Angle Mark E26 Setting "Audio E26 Setting "Subtitle...
... 3: Connecting the Audio Cables E12 Step 4: Connecting the Power Cord E14 Connecting a VCR or Similar Recording Equipment to This Unit E15 Connecting to a Satellite Receiver or a Cable Box ....... E17 Setting the Clock E18 Preparations E18 To Set the Clock E18 Tuner Setting E19 Setting "Channel Setup E19 Before Initial Setting E22 Common Procedure E22 Initial Settings E23 Recording Setup E23 Preparations E23 Setting "Record Mode E23 Setting "Auto Chapter E24 DVD Control E25 Preparations E25 Setting "Disc Menu E25 Setting "Angle Mark E26 Setting "Audio E26 Setting "Subtitle...

Instruction Manual
Page 4
... ANTENNA LEAD IN WIRE product. f. Replacement Parts - When installing an outside antenna system should be sure the service technician has used replacement parts S2898A NEC - NATIONAL ELECTRICAL CODE (Figure 2) specified by the operating instructions as radiators, heat registers, stoves, or other hazards. 16. The product should not be sure the antenna or cable system is connected to determine that are required, be...
... ANTENNA LEAD IN WIRE product. f. Replacement Parts - When installing an outside antenna system should be sure the service technician has used replacement parts S2898A NEC - NATIONAL ELECTRICAL CODE (Figure 2) specified by the operating instructions as radiators, heat registers, stoves, or other hazards. 16. The product should not be sure the antenna or cable system is connected to determine that are required, be...
Instruction Manual
Page 7
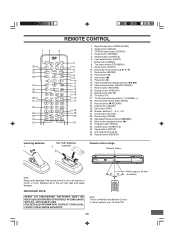
... 22 REMOTE CONTROL 1. Fast forward/Fast reverse buttons (d, c) 12 13 16. Input select button (INPUT) 4 7. Return button (RETURN) 18. CHANNEL +) 17 22. Program button (PROG) 32. Repeat button (REPEAT) Inserting batteries 1 Two "AA" batteries 2 (supplied) Remote control range Remote sensor Note: Remove the batteries if the remote control is not Multi-brand Remote Control. It cannot operate your TV and VCR. -E6- Stop button (n) 10 14. Power button (POWER) 5. Record mode button (REC MODE) 23. Slow motion playback button (Ia) 31. Setup button (SETUP) 34. Play...
... 22 REMOTE CONTROL 1. Fast forward/Fast reverse buttons (d, c) 12 13 16. Input select button (INPUT) 4 7. Return button (RETURN) 18. CHANNEL +) 17 22. Program button (PROG) 32. Repeat button (REPEAT) Inserting batteries 1 Two "AA" batteries 2 (supplied) Remote control range Remote sensor Note: Remove the batteries if the remote control is not Multi-brand Remote Control. It cannot operate your TV and VCR. -E6- Stop button (n) 10 14. Power button (POWER) 5. Record mode button (REC MODE) 23. Slow motion playback button (Ia) 31. Setup button (SETUP) 34. Play...
Instruction Manual
Page 8
... remote control. Carrying the unit with a disc inside may be unable to your nearest Sanyo Authorized Service Facility. Do not place any way. • Do not use , disconnect the power cord from the AC outlet after 10 seconds. Press [q OPEN/CLOSE] (or [OPEN/CLOSE] on the top of the unit warms up when it is used for a long time, however it may produce an excessively high output...
... remote control. Carrying the unit with a disc inside may be unable to your nearest Sanyo Authorized Service Facility. Do not place any way. • Do not use , disconnect the power cord from the AC outlet after 10 seconds. Press [q OPEN/CLOSE] (or [OPEN/CLOSE] on the top of the unit warms up when it is used for a long time, however it may produce an excessively high output...

Instruction Manual
Page 9
... remote control (See page E6). • Do not connect the power cord to a 120VAC 60Hz outlet until all connections have been made. CAUTION: Do not connect the antenna and VCR as practical. Your VCR doesn't work. Need help you are not sure about the connection, please consult your audio/video dealer. If you use Antenna only (no cable TV), or cable without cable box Cable box with a few or many scrambled channels...
... remote control (See page E6). • Do not connect the power cord to a 120VAC 60Hz outlet until all connections have been made. CAUTION: Do not connect the antenna and VCR as practical. Your VCR doesn't work. Need help you are not sure about the connection, please consult your audio/video dealer. If you use Antenna only (no cable TV), or cable without cable box Cable box with a few or many scrambled channels...

Instruction Manual
Page 11
... unit first. Cable box (not supplied) CATV 75-ohm coaxial antenna cable (not supplied) DVD recorder (Partial back panel) 3 4 ANTENNA IN OUT VIDEO AV 1 IN L S-VIDEO R AUDIO RF OUTPUT CHANNEL RF OUTPUT CHANNEL DVD recorder (Partial back panel) CATV 75-ohm coaxial antenna cable (not supplied) 3 4 ANTENNA IN OUT VIDEO AV 1 IN L S-VIDEO R AUDIO Cable box (not supplied) 75-ohm coaxial antenna cable (supplied) TO TV ANT. Example: Connecting a cable box with many scrambled channels Use this connection if your cable system scrambles only a few scrambled channels Use...
... unit first. Cable box (not supplied) CATV 75-ohm coaxial antenna cable (not supplied) DVD recorder (Partial back panel) 3 4 ANTENNA IN OUT VIDEO AV 1 IN L S-VIDEO R AUDIO RF OUTPUT CHANNEL RF OUTPUT CHANNEL DVD recorder (Partial back panel) CATV 75-ohm coaxial antenna cable (not supplied) 3 4 ANTENNA IN OUT VIDEO AV 1 IN L S-VIDEO R AUDIO Cable box (not supplied) 75-ohm coaxial antenna cable (supplied) TO TV ANT. Example: Connecting a cable box with many scrambled channels Use this connection if your cable system scrambles only a few scrambled channels Use...

Instruction Manual
Page 13
... the unit to a Y-cable adaptor (not supplied), then connect it to the TV's audio input jack. Example: Connecting to your TV will sound. Call 1-800-813-3435 Need help? Notes: • If your system. (If the TV has an antenna input jack only, skip this step.) Note: For VIDEO connection, see page E11. L AUDIO INPUT R To audio input jacks Audio System -E12- DVD recorder (Partial back panel) COMPONENT VIDEO OUT VIDEO OUT L S-VIDEO R DIGITAL AUDIO AUDIO...
... the unit to a Y-cable adaptor (not supplied), then connect it to the TV's audio input jack. Example: Connecting to your TV will sound. Call 1-800-813-3435 Need help? Notes: • If your system. (If the TV has an antenna input jack only, skip this step.) Note: For VIDEO connection, see page E11. L AUDIO INPUT R To audio input jacks Audio System -E12- DVD recorder (Partial back panel) COMPONENT VIDEO OUT VIDEO OUT L S-VIDEO R DIGITAL AUDIO AUDIO...

Instruction Manual
Page 14
... speaker Note: Please refer to your amplifier instruction manual. *Please consult your local audio/video dealer. To enjoy Dolby Digital or DTS sound Set "Digital Out" to an Amplifier with Dolby Pro Logic Decoder To AUDIO INPUT jacks Amplifier with Dolby Pro Logic Decoder *Audio cable (not supplied) DVD recorder (Partial back panel) To AUDIO OUT jacks COMPONENT VIDEO OUT VIDEO OUT L S-VIDEO R DIGITAL AUDIO AUDIO Front left speaker Surround left speaker Center...
... speaker Note: Please refer to your amplifier instruction manual. *Please consult your local audio/video dealer. To enjoy Dolby Digital or DTS sound Set "Digital Out" to an Amplifier with Dolby Pro Logic Decoder To AUDIO INPUT jacks Amplifier with Dolby Pro Logic Decoder *Audio cable (not supplied) DVD recorder (Partial back panel) To AUDIO OUT jacks COMPONENT VIDEO OUT VIDEO OUT L S-VIDEO R DIGITAL AUDIO AUDIO Front left speaker Surround left speaker Center...

Instruction Manual
Page 16
... RF OUTPUT CHANNEL VIDEO AV 1 IN L S-VIDEO R AUDIO COMPONENT VIDEO OUT DVD recorder (Partial back panel) DVD recorder Open the lid. Need help? You cannot record them using an S-video cable (not supplied). See "AV Select" on sale have a copyprotection. Connecting a VCR or Similar Recording Equipment to the AV1 IN or AV2 IN jacks. Video Games cannot be recorded. See also the owner's manual supplied with the connected equipment. Example: Connection for recording from an AC outlet. First, disconnect the AC power cord...
... RF OUTPUT CHANNEL VIDEO AV 1 IN L S-VIDEO R AUDIO COMPONENT VIDEO OUT DVD recorder (Partial back panel) DVD recorder Open the lid. Need help? You cannot record them using an S-video cable (not supplied). See "AV Select" on sale have a copyprotection. Connecting a VCR or Similar Recording Equipment to the AV1 IN or AV2 IN jacks. Video Games cannot be recorded. See also the owner's manual supplied with the connected equipment. Example: Connection for recording from an AC outlet. First, disconnect the AC power cord...
Instruction Manual
Page 19
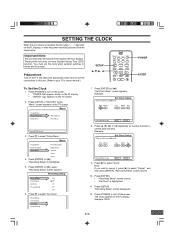
...Press [ENTER] (or [a]). SETTING THE CLOCK When the unit is first connected to the AC outlet ("-- : --" may brink on the FL display. Important Note: This unit uses the International Time System (24-hour display). Press [p] to select "Cancel", and then press [ENTER]. Menu Play/Edit Disc Recording Setup Record Program Setup Menu DVD Control 4 a General Video Audio 4. Record Mode Auto Chapter 4 Set Clock 5 Channel Setup 7. Example: Set Clock Setup Select a field then use 4 5 to edit. The clock appears on the FL display), or after the power has failed, please...
...Press [ENTER] (or [a]). SETTING THE CLOCK When the unit is first connected to the AC outlet ("-- : --" may brink on the FL display. Important Note: This unit uses the International Time System (24-hour display). Press [p] to select "Cancel", and then press [ENTER]. Menu Play/Edit Disc Recording Setup Record Program Setup Menu DVD Control 4 a General Video Audio 4. Record Mode Auto Chapter 4 Set Clock 5 Channel Setup 7. Example: Set Clock Setup Select a field then use 4 5 to edit. The clock appears on the FL display), or after the power has failed, please...

Instruction Manual
Page 21
A message screen appears. Auto Chapter b Auto CH Scan 5 Set CloPcrekss Yes to continue AutCohSacnannel List Channperel sSsetNuopto exit Modify Channel Yes NTouner Select MTS Select "Yes" is highlighted. Auto Chapter b Auto CH Scan Total Channels Found: 001 5 Set Clock Channel List Channel Setup Modify Channel Tuner Select Please wait until the confirmation screen appears. The confirmation screen appears. Recording Setup Record Mode Auto Chapter Set Clock Channel Setup b Auto CH Scan 5 Channel List Modify Channel Tuner Select MTS Select Press SETUP to memorize all ...
A message screen appears. Auto Chapter b Auto CH Scan 5 Set CloPcrekss Yes to continue AutCohSacnannel List Channperel sSsetNuopto exit Modify Channel Yes NTouner Select MTS Select "Yes" is highlighted. Auto Chapter b Auto CH Scan Total Channels Found: 001 5 Set Clock Channel List Channel Setup Modify Channel Tuner Select Please wait until the confirmation screen appears. The confirmation screen appears. Recording Setup Record Mode Auto Chapter Set Clock Channel Setup b Auto CH Scan 5 Channel List Modify Channel Tuner Select MTS Select Press SETUP to memorize all ...
Instruction Manual
Page 23
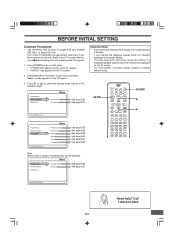
... help? SETUP POWER 4 5 Press SETUP to exit Menu Play/Edit Disc Record Program Setup Menu Recording Setup DVD Control 4 a General Video Audio AV Select Press SETUP to turn on the power. • "POWER ON" appears briefly on the FL display. • "SANYO" logo appears on the TV screen. 2. BEFORE INITIAL SETTING Common Procedure • See "SETTING THE CLOCK" on pages E18 and "TUNER SETTING" on pages E19 first. • Turn on the TV and select the appropriate video input to suit the connections to this instruction manual, the language...
... help? SETUP POWER 4 5 Press SETUP to exit Menu Play/Edit Disc Record Program Setup Menu Recording Setup DVD Control 4 a General Video Audio AV Select Press SETUP to turn on the power. • "POWER ON" appears briefly on the FL display. • "SANYO" logo appears on the TV screen. 2. BEFORE INITIAL SETTING Common Procedure • See "SETTING THE CLOCK" on pages E18 and "TUNER SETTING" on pages E19 first. • Turn on the TV and select the appropriate video input to suit the connections to this instruction manual, the language...
Instruction Manual
Page 39
... product incorporates copyright protection technology that has no movie data cannot be played back. • The DVD-RW (Video mode) can be played back. Please take proper care of your discs. • In some (finalized) DVD+Rs cannot be played back depending on the recording conditions. • This unit is protected by Macrovision Corporation. When the unit receives a copy guard signal while recording, the unit cannot record correctly. However, some...
... product incorporates copyright protection technology that has no movie data cannot be played back. • The DVD-RW (Video mode) can be played back. Please take proper care of your discs. • In some (finalized) DVD+Rs cannot be played back depending on the recording conditions. • This unit is protected by Macrovision Corporation. When the unit receives a copy guard signal while recording, the unit cannot record correctly. However, some...
Instruction Manual
Page 41
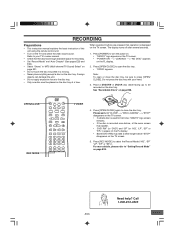
... [OPEN/CLOSE] again to close the disc tray, be sure to open or close the disc tray . Need help? OPEN/CLOSE REC MODE POWER 4. RECORDING Preparations • This instruction manual explains the basic instruction of this unit using the remote control unit. • Turn on page E38. For more details, please refer to select the Record Mode ("HQ", "SP" "LP", "EP" or "EP+"). Press [OPEN/CLOSE] to press [OPEN/ CLOSE]. Do not press the disc tray with your TV's owner manual. • Check that operation is recorded once before, a title menu screen...
... [OPEN/CLOSE] again to close the disc tray, be sure to open or close the disc tray . Need help? OPEN/CLOSE REC MODE POWER 4. RECORDING Preparations • This instruction manual explains the basic instruction of this unit using the remote control unit. • Turn on page E38. For more details, please refer to select the Record Mode ("HQ", "SP" "LP", "EP" or "EP+"). Press [OPEN/CLOSE] to press [OPEN/ CLOSE]. Do not press the disc tray with your TV's owner manual. • Check that operation is recorded once before, a title menu screen...
Instruction Manual
Page 42
... on the unit) to complete closing . Number buttons k (Pause) n (Stop) DISPLAY TV - "MONITOR" appears briefly on the disc. Examples: To select Channel 6: Press [6]. To select Channel 12: Press [1] and [2]. To play back the disc, see page "DISC PLAYBACK" on the left column. Need help? To record TV program again, repeat steps 1 ~ 3 on page E44. The clock appears on the FL display. 3. Press [TV] to restart recording. The channel number appears on the FL display. Data will...
... on the unit) to complete closing . Number buttons k (Pause) n (Stop) DISPLAY TV - "MONITOR" appears briefly on the disc. Examples: To select Channel 6: Press [6]. To select Channel 12: Press [1] and [2]. To play back the disc, see page "DISC PLAYBACK" on the left column. Need help? To record TV program again, repeat steps 1 ~ 3 on page E44. The clock appears on the FL display. 3. Press [TV] to restart recording. The channel number appears on the FL display. Data will...

Instruction Manual
Page 45
.... Progressive scanning can reproduce sharper picture with 525p (progressive) system. DISC PLAYBACK Important Note: • This instruction manual explains the basic instruction of this unit using the remote control unit. • Some DVD-Video discs have different functions that may not be changed to improve operability or other picture containing long texts or horizontal lines. When a part of the product specification must select the PROGRESSIVE mode. (For more details, please refer to play back a DVD disc while the unit...
.... Progressive scanning can reproduce sharper picture with 525p (progressive) system. DISC PLAYBACK Important Note: • This instruction manual explains the basic instruction of this unit using the remote control unit. • Some DVD-Video discs have different functions that may not be changed to improve operability or other picture containing long texts or horizontal lines. When a part of the product specification must select the PROGRESSIVE mode. (For more details, please refer to play back a DVD disc while the unit...

Instruction Manual
Page 58
...]. A message appears. Protect Disc Yes No Press SETUP to exit 3) Press [b] to select "Yes". Press [ENTER]. All titles will not be permanently deleted. Note: If it is not necessary, select "No", and then press [ENTER]. 4) Press [ENTER] to start to format. Format Disc [DVD+RW] You can be played even if the discs are finalized. -E57- CAUTION: After you finalize a DVD+R disc, you start to finalize. Select "Edit Disc" in "Menu" screen. (See page E55.) Menu Play/Edit Disc Record Program Setup Menu Play/Edit Titles 4 b Edit Disc Press SETUP...
...]. A message appears. Protect Disc Yes No Press SETUP to exit 3) Press [b] to select "Yes". Press [ENTER]. All titles will not be permanently deleted. Note: If it is not necessary, select "No", and then press [ENTER]. 4) Press [ENTER] to start to format. Format Disc [DVD+RW] You can be played even if the discs are finalized. -E57- CAUTION: After you finalize a DVD+R disc, you start to finalize. Select "Edit Disc" in "Menu" screen. (See page E55.) Menu Play/Edit Disc Record Program Setup Menu Play/Edit Titles 4 b Edit Disc Press SETUP...
Instruction Manual
Page 60
... aspect ratio setup on the TV The antenna cable is distorted. Select "INTERLACE" mode. The program contains copy protection signals that restricts copying. See page E30. TV channel is not connected. POSSIBLE CAUSE The power cord is not normal. Operation SYMPTOM POSSIBLE CAUSE The operation or display is not connected. The playback picture or TV program from the unit. CORRECTIVE ACTION Insert the power plug into the jack. Clean the disc or replace it directly to your DVD Connect the video cable...
... aspect ratio setup on the TV The antenna cable is distorted. Select "INTERLACE" mode. The program contains copy protection signals that restricts copying. See page E30. TV channel is not connected. POSSIBLE CAUSE The power cord is not normal. Operation SYMPTOM POSSIBLE CAUSE The operation or display is not connected. The playback picture or TV program from the unit. CORRECTIVE ACTION Insert the power plug into the jack. Clean the disc or replace it directly to your DVD Connect the video cable...

Instruction Manual
Page 61
... a convenient SANYO service station nearby, contact the SANYO dealer where you how to "Protect Disc". Be sure to the SANYO AUDIO/ VIDEO limited warranty. Call 1-800-813-3435 POSSIBLE CAUSE No disc is not enough. "Parental" is turned off . Load the disc with the audio cables. The disc space is loaded. The clock setting is loaded. Set the Record Time correctly. SERVICING: Should this product require service, refer to give the model number and...
... a convenient SANYO service station nearby, contact the SANYO dealer where you how to "Protect Disc". Be sure to the SANYO AUDIO/ VIDEO limited warranty. Call 1-800-813-3435 POSSIBLE CAUSE No disc is not enough. "Parental" is turned off . Load the disc with the audio cables. The disc space is loaded. The clock setting is loaded. Set the Record Time correctly. SERVICING: Should this product require service, refer to give the model number and...

Instruction Manual
Page 63
... transit accidents, modification or repair by user or any malfunction, defect or failure caused by any cause beyond the control of LABOR and PARTS specified above. Date of sale, or sales slip from a Wal-Mart Store. This warranty does not cover (A) the adjustment of customer-operated controls as explained in the appropriate model's instruction manual, or (B) the repair of any of God, or...
... transit accidents, modification or repair by user or any malfunction, defect or failure caused by any cause beyond the control of LABOR and PARTS specified above. Date of sale, or sales slip from a Wal-Mart Store. This warranty does not cover (A) the adjustment of customer-operated controls as explained in the appropriate model's instruction manual, or (B) the repair of any of God, or...
