Sanyo Slim-1400 Support and Manuals
Get Help and Manuals for this Sanyo item
View All Support Options Below
Free Sanyo Slim-1400 manuals!
Problems with Sanyo Slim-1400?
Ask a Question
Free Sanyo Slim-1400 manuals!
Problems with Sanyo Slim-1400?
Ask a Question
Most Recent Sanyo Slim-1400 Questions

I Need A Manual For Fisher Model Slim 1400bl
(Posted by tomdog80 9 years ago)
Popular Sanyo Slim-1400 Manual Pages
User Guide - Page 2
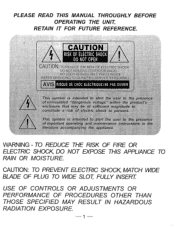
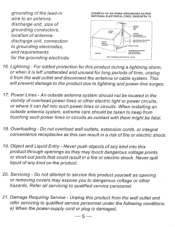
... NO:LISERSERVICEPBLE:PART&INSIDE REFER SERVICING TO QOALIFIED:SERVICE.PERSONNEL AVIS ...MANUAL THROUGHLY BEFORE OPERATING THE UNIT. This symbol is intended to alert the user to the presence of uninsulated "dangerous voltage" within the product's enclosure that may be of sufficient magnitude to constitute a risk of electric shock to the presence of important operating and maintenance instructions...
User Guide - Page 4
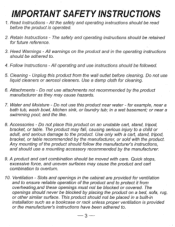
... followed.
5. Quick stops, excessive force, and uneven surfaces may cause hazards.
7. Retain Instructions - Use a damp cloth for example, near a swimming pool,- Accessories - Use only with a cart, stand, tripod, bracket, or table recommended by the manufacturer.
9. Slots and openings in installation such as they may cause the product and cart combination to protect...
User Guide - Page 5
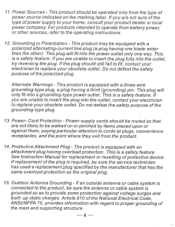
... the product.
14. For products intended to proper grounding of the National Electrical Code, ANSI/NFPA 70, provides information with a three-wire grounding-type plug, ...unable to the operating instructions.
12. The product is equipped with a polarized alternating-current line plug (a plug having a third (grounding) pin. See Instruction Manual for replacement or resetting ofprotective ...
User Guide - Page 6
.... EXAMPLE OF ANTENNA GROUNDING AS PER NATIONAL ELECTRICAL CODE, ANSI/NFPA 70
GROUND CLAMP
ELECTRIC SERVICE EQUIPMENT
ANTENNA LEAD IN WIRE
ANTENNA DISCHARGE UNIT (NEC SECTION 810-20)
GROUNDING CONDUCTORS (NEC SECTION 810-21)
GROUND CLAMPS
S2898A
POWER SERVICE GROUNDING ELECTRODE SYSTEM (NEC ART 250, PART H)
NEC-NATIONAL ELECTRICAL CODE
16. Power Lines - Damage Requiring...
User Guide - Page 7

... replacement parts are required, be sure the service technician has used replacement parts specified by the manufacturer or have fallen into the product, c) If the product has been exposed to rain or water, d) If the product does not operate normally by following the operating
instructions.Adjust only those controls that are covered by the operating instructions as...
User Guide - Page 8
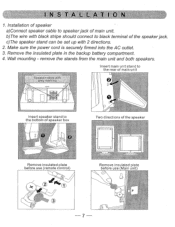
...insulated plate before use (remote control)
->c
Remove insulated plate before use (Main unit)
7
I NSTALLATION
1. Installation of speaker a)Connect speaker cable to black terminal of main unit. Make sure the power cord is securely firmed ... jack. c) The speaker stand can be set up with 2 directions.
2. Remove the insulated plate in the backup battery compartment. 4. Wall mounting -
User Guide - Page 10

...PHONES JACK - mount the unit on /off the unit 2. RADIO / BAND button - enter setting mode 7. SNOOZE /LIGHT button - VOLUME button - REMOTE SENSOR 16. SPEAKER JACK - RADIO... off 3. RESET button - EXT. enter snooze mode /turn on display
backlight/ exit the setting mode 9. PLAY MODE button - connect a headphone for private listening 15. CHANNEL button - STOP...
User Guide - Page 11
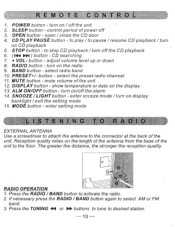
... - SNOOZE /LIGHT button - enter snooze mode /turn on display
backlight/ exit the setting mode
15. Reception quality relies on the display
13.
Press the TUNING 41 or II+ ... mute volume of the unit. OPEN button - adjust volume level up or down
8. DISPLAY button - enter setting mode
L I STEN I NG TO RAD I O
EXTERNAL ANTENNA Use a screwdriver to attach the antenna to ...
User Guide - Page 12
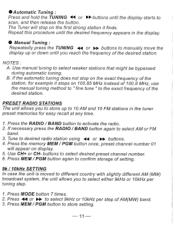
...SETTING In case the unit is moved to different country with slightly different AM (MW) broadcast system, the unit allows you to store up to 10 AM and 10 FM stations in the display.
• Manual Tuning : Repeatedly press the TUNING 44 or 0+ buttons to manually...3. If necessary press the RADIO / BAND button again to store setting.
11 to select either 9kHz or 10kHz per step of the ...
User Guide - Page 14
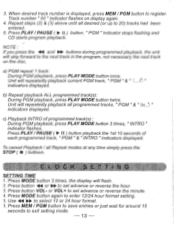
... programmed track(s): During PGM playback, press PLAY MODE button twice. Use 44 to set advance or reverse the hour. 3. Unit will repeatedly playback allprogrammed tracks, "PGM ...the 1st 10 seconds of each programmed track, " PGM " & " INTRO " indicators displayed. CLOCK SETTI NG
SETTING TIME 1. or VOL+ to select 12 or 24 hour format. 3. 3.
Unit will repeatedly playback current PGM ...
User Guide - Page 15

... alarm shuts off until the next day.
• You may also activate the Snooze function manually after the
alarm sounds by pressing the SNOOZE button or SNZ button on the display. Press button... button to save entries or just wait for around 15
seconds to set advance or reverse the month. 3.
ALARM CLOCK SETTING
SETTING ALARM 1. It stops for around 9 minutes and then comes on ...
User Guide - Page 16
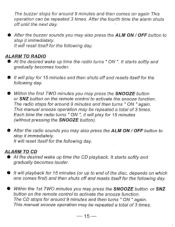
This manual snooze operation may be repeated a total of 3 times.
15
It will reset itself for around 9 minutes and then turns "... button to stop it will play for around 9 minutes and then comes on again This operation can be repeated 3 times. This manual snooze operation may press the SNOOZE button or SNZ button on which one comes first) and then shuts off and resets itself for...
User Guide - Page 18
... the system memory and all
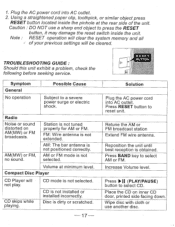
• of the unit. TROUBLESHOOTING GUIDE : Should this unit exhibit a problem, check the following before seeking service.
AM(MW) or FM, no sound. AM or FM... DO NOT use another disc.
FM: Wire antenna is not installed or installed incorrectly.
Volume at the rear side of your previous settings will not play.
CD mode is dirty or scratched.
17
...
User Guide - Page 19
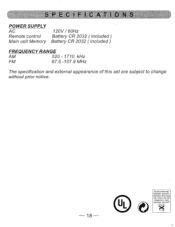
... control Main unit Memory
120V/ 60Hz Battery CR 2032 ( included) Battery CR 2032 ( included)
FREQUENCY RANGE
AM
520 - 1710 kHz
FM
87.5 -107.9 MHz
The specification and external appearance of this set are subject to change without prior notice.
18
Bij dit produkt zijn batterijen geleverd.
User Guide - Page 20
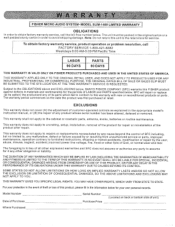
... at its option) the productand any of its parts which fail to conform to uncrating, setup, installation, removal of the product for service. SFC will repair or replace (at retail. WARRANTY
FISHER MICRO AUDIO SYSTEM•MODEL SLIM-1400 LIMITED WARRANTY
OBLIGATIONS
In order to furnished instructions, shipping or transit accidents, modification or repair by the user, abuse, misuse, neglect...
Sanyo Slim-1400 Reviews
We have not received any reviews for Sanyo yet.