User Guide
Page 2
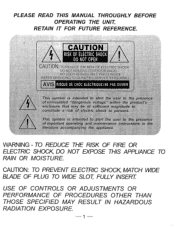
... SHOCK DO NOT OPEN CAUTION. RETAIN IT FOR FUTURE REFERENCE. NO:LISERSERVICEPBLE:PART&INSIDE REFER SERVICING TO QOALIFIED:SERVICE.PERSONNEL AVIS RISQUE DE CHOC ELECTRIQUEINE PAS OUVRIR This symbol is intended to alert the user to persons. PLEASE READ THIS MANUAL THROUGHLY BEFORE OPERATING THE UNIT. TO REDUCE THE RISK OF:ELECTRIC SHOCK, DO NOT REMOVE COVER (OR...
... SHOCK DO NOT OPEN CAUTION. RETAIN IT FOR FUTURE REFERENCE. NO:LISERSERVICEPBLE:PART&INSIDE REFER SERVICING TO QOALIFIED:SERVICE.PERSONNEL AVIS RISQUE DE CHOC ELECTRIQUEINE PAS OUVRIR This symbol is intended to alert the user to persons. PLEASE READ THIS MANUAL THROUGHLY BEFORE OPERATING THE UNIT. TO REDUCE THE RISK OF:ELECTRIC SHOCK, DO NOT REMOVE COVER (OR...

User Guide
Page 3
.... This device complies with same or equivalent type. Operation is incorrectly replaced. CLASS I LASER PRODUCT CAUTION INVISIBLE LASER RADIATION WHEN OPEN AND INTERLOCKS DEFEATED AVOID EXPOSURE TO BEAM CARE AND MAINTENANCE 1. Replace only with part 15 of electrical noise such as fluorescent lamps or motors. Avoid leaving unit in direct sunlight or in the AC jack to be used. 3. NOTE...
.... This device complies with same or equivalent type. Operation is incorrectly replaced. CLASS I LASER PRODUCT CAUTION INVISIBLE LASER RADIATION WHEN OPEN AND INTERLOCKS DEFEATED AVOID EXPOSURE TO BEAM CARE AND MAINTENANCE 1. Replace only with part 15 of electrical noise such as fluorescent lamps or motors. Avoid leaving unit in direct sunlight or in the AC jack to be used. 3. NOTE...
User Guide
Page 4
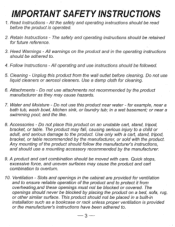
..., or laundry tub; Do not use instructions should never be followed. 5. Do not place this product near a swimming pool,- Slots and openings in the operating instructions should be retained for ventilation and to ensure reliable operation of the product should follow the manufacturer's instructions, and should be read before cleaning. The safety and operating instructions should use liquid cleaners or aerosol cleaners...
..., or laundry tub; Do not use instructions should never be followed. 5. Do not place this product near a swimming pool,- Slots and openings in the operating instructions should be retained for ventilation and to ensure reliable operation of the product should follow the manufacturer's instructions, and should be read before cleaning. The safety and operating instructions should use liquid cleaners or aerosol cleaners...
User Guide
Page 5
... way. If an outside antenna or cable system is connected to replace your obsolete outlet. If you are not likely to cords at plugs, convenience receptacles, and the point where they exit from battery power, or other ). This is grounded so as the original plug. 15. See Instruction Manual for replacement or resetting ofprotective device. up static charges. Protective Attachment Plug - This plug will only fit into...
... way. If an outside antenna or cable system is connected to replace your obsolete outlet. If you are not likely to cords at plugs, convenience receptacles, and the point where they exit from battery power, or other ). This is grounded so as the original plug. 15. See Instruction Manual for replacement or resetting ofprotective device. up static charges. Protective Attachment Plug - This plug will only fit into...
User Guide
Page 6
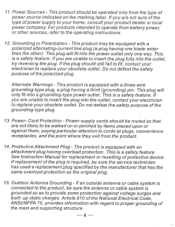
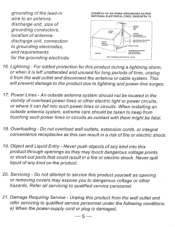
... CLAMP ELECTRIC SERVICE EQUIPMENT ANTENNA LEAD IN WIRE ANTENNA DISCHARGE UNIT (NEC SECTION 810-20) GROUNDING CONDUCTORS (NEC SECTION 810-21) GROUND CLAMPS S2898A POWER SERVICE GROUNDING ELECTRODE SYSTEM (NEC ART 250, PART H) NEC-NATIONAL ELECTRICAL CODE 16. Object and Liquid Entry - Never spill liquid of antennadischqrge unit, connection to qualified service personnel under the following conditions: a) When the power-supply cord or plug is...
... CLAMP ELECTRIC SERVICE EQUIPMENT ANTENNA LEAD IN WIRE ANTENNA DISCHARGE UNIT (NEC SECTION 810-20) GROUNDING CONDUCTORS (NEC SECTION 810-21) GROUND CLAMPS S2898A POWER SERVICE GROUNDING ELECTRODE SYSTEM (NEC ART 250, PART H) NEC-NATIONAL ELECTRICAL CODE 16. Object and Liquid Entry - Never spill liquid of antennadischqrge unit, connection to qualified service personnel under the following conditions: a) When the power-supply cord or plug is...

User Guide
Page 7
... rain or water, d) If the product does not operate normally by following the operating instructions.Adjust only those controls that are required, be mounted to a wall or ceiling only as the original part. When replacement parts are covered by the operating instructions as radiators, heat registers, stoves, or other products (including amplifiers) that the product is in any service or repairs to this indicates a need for...
... rain or water, d) If the product does not operate normally by following the operating instructions.Adjust only those controls that are required, be mounted to a wall or ceiling only as the original part. When replacement parts are covered by the operating instructions as radiators, heat registers, stoves, or other products (including amplifiers) that the product is in any service or repairs to this indicates a need for...
User Guide
Page 8
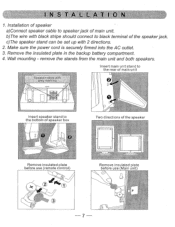
... the speaker jack. Insert main unit stand to the rear of main unit Speaker:cable with grey marking 0 0 0 Insert speaker stand to speaker jack of the speaker Remove insulated plate before use (remote control) ->c Remove insulated plate before use (Main unit) 7 remove the stands from the main unit and both speakers. Installation of speaker a)Connect speaker cable to the bottom of speaker box Two directions of main unit. b)The wire with 2 directions. 2. Wall mounting - Make sure the power cord...
... the speaker jack. Insert main unit stand to the rear of main unit Speaker:cable with grey marking 0 0 0 Insert speaker stand to speaker jack of the speaker Remove insulated plate before use (remote control) ->c Remove insulated plate before use (Main unit) 7 remove the stands from the main unit and both speakers. Installation of speaker a)Connect speaker cable to the bottom of speaker box Two directions of main unit. b)The wire with 2 directions. 2. Wall mounting - Make sure the power cord...

User Guide
Page 10
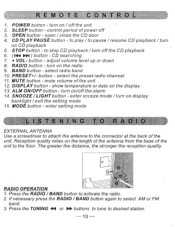
save radio preset station / enter CD program mode /save setting 6. SNOOZE /LIGHT button - to play mode setting 12. PLAY MODE button - RADIO TUNNING, CD SKIP / SEARCH button - BACKUP BATTERY COMPARTMENT - RESET button - EXT. control period of power off CD playback 11. MODE button - CD PLAY PAUSE button - to pause / resume CD playback / turn on /off the alarm 8. CD DOOR - connect the speaker wire 21. CHANNEL button - STOP button - PHONES JACK - reset the unit 19. FM ANTENNA CONNECTION TERMINAL - power on wall 9 VOLUME button - REMOTE SENSOR ...
save radio preset station / enter CD program mode /save setting 6. SNOOZE /LIGHT button - to play mode setting 12. PLAY MODE button - RADIO TUNNING, CD SKIP / SEARCH button - BACKUP BATTERY COMPARTMENT - RESET button - EXT. control period of power off CD playback 11. MODE button - CD PLAY PAUSE button - to pause / resume CD playback / turn on /off the alarm 8. CD DOOR - connect the speaker wire 21. CHANNEL button - STOP button - PHONES JACK - reset the unit 19. FM ANTENNA CONNECTION TERMINAL - power on wall 9 VOLUME button - REMOTE SENSOR ...
User Guide
Page 11
... the setting mode 15. Press the RADIO / BAND button to select AM or FM band. 3. REMOTE CONTROL 1. adjust volume level up or down 8. PRESET+/- turn off the unit 2. enter setting mode L I STEN I NG TO RAD I O EXTERNAL ANTENNA Use a screwdriver to attach the antenna to the connector at the back of the unit to desired station. 10 If necessary press the RADIO / BAND button again to activate the radio. 2. open / close the CD door 4. MODE button - turn...
... the setting mode 15. Press the RADIO / BAND button to select AM or FM band. 3. REMOTE CONTROL 1. adjust volume level up or down 8. PRESET+/- turn off the unit 2. enter setting mode L I STEN I NG TO RAD I O EXTERNAL ANTENNA Use a screwdriver to attach the antenna to the connector at the back of the unit to desired station. 10 If necessary press the RADIO / BAND button again to activate the radio. 2. open / close the CD door 4. MODE button - turn...
User Guide
Page 12
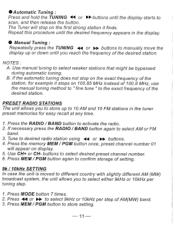
... station. Use manual tuning to select AM or FM band. 3. Press MODE button 7 times. 2. If necessary press the RADIO / BAND button again to select weaker stations that might be bypassed during automatic tuning. Use CH+ or CH- buttons to activate the radio. 2. Press the RADIO /BAND button to select desired preset channel number. 6. Press 41 or 010- If the automatic tuning does not stop on the first strong station it stops on display...
... station. Use manual tuning to select AM or FM band. 3. Press MODE button 7 times. 2. If necessary press the RADIO / BAND button again to select weaker stations that might be bypassed during automatic tuning. Use CH+ or CH- buttons to activate the radio. 2. Press the RADIO /BAND button to select desired preset channel number. 6. Press 41 or 010- If the automatic tuning does not stop on the first strong station it stops on display...

User Guide
Page 13
... the POWER button. 2. Touch the OPEN button to select track number. 12 Press PLAY/PAUSE button to desired CD track. Press STOP button to stop playback, press MEM / PGM button once. SKIP / SEARCH FUNCTION Press 44 or to*to skip to start playback. 2. Touch the OPEN button, the CD door will appear for repeat playback of the whole disc. Adjust the sound level using VOLUME button. Press PLAY/PAUSE button, then starts INTRO play...
... the POWER button. 2. Touch the OPEN button to select track number. 12 Press PLAY/PAUSE button to desired CD track. Press STOP button to stop playback, press MEM / PGM button once. SKIP / SEARCH FUNCTION Press 44 or to*to skip to start playback. 2. Touch the OPEN button, the CD door will appear for repeat playback of the whole disc. Adjust the sound level using VOLUME button. Press PLAY/PAUSE button, then starts INTRO play...
User Guide
Page 14
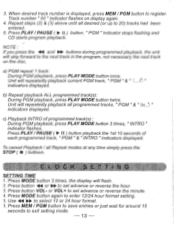
... " & " (ALL fr indicators displayed. Track number " 00 "indicator flashes on the disc. " PGM "indicator stops flashing and CD starts program playback. Press PLAY/PAUSE ( ► I I ) button playback the 1st 10 seconds of each programmed track, " PGM " & " INTRO " indicators displayed. or VOL+ to register. c) Playback INTRO ofprogrammed track(s) : During PGM playback, press PLAY MODE button 3 times, " INTRO " indicator flashes. Press MODE button 3 time, the display will skip forward to set advance or reverse...
... " & " (ALL fr indicators displayed. Track number " 00 "indicator flashes on the disc. " PGM "indicator stops flashing and CD starts program playback. Press PLAY/PAUSE ( ► I I ) button playback the 1st 10 seconds of each programmed track, " PGM " & " INTRO " indicators displayed. or VOL+ to register. c) Playback INTRO ofprogrammed track(s) : During PGM playback, press PLAY MODE button 3 times, " INTRO " indicator flashes. Press MODE button 3 time, the display will skip forward to set advance or reverse...

User Guide
Page 15
...- ALARM CLOCK SETTING SETTING ALARM 1. Press button VOL- buttons to set advance or reverse the minute. 4. After the fourth time the alarm shuts off until the next day. • You may also activate the Snooze function manually after the alarm sounds by pressing the SNOOZE button or SNZ button on again. Press MODE button 5 times, the year & temp display will alarm for around 15 seconds to select the alarm sound, source( BUZZER, RADIO or CD). Press button...
...- ALARM CLOCK SETTING SETTING ALARM 1. Press button VOL- buttons to set advance or reverse the minute. 4. After the fourth time the alarm shuts off until the next day. • You may also activate the Snooze function manually after the alarm sounds by pressing the SNOOZE button or SNZ button on again. Press MODE button 5 times, the year & temp display will alarm for around 15 seconds to select the alarm sound, source( BUZZER, RADIO or CD). Press button...
User Guide
Page 16
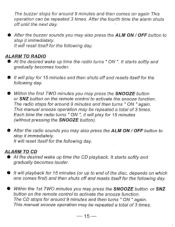
... the buzzer sounds you may be repeated a total of 3 times. 15 This manual snooze operation may also press the ALM ON / OFF button to activate the snooze function. It will playback for 15 minutes (or up to end of the disc, depends on the remote control to stop it immediately. After the fourth time the alarm shuts off and resets itself for...
... the buzzer sounds you may be repeated a total of 3 times. 15 This manual snooze operation may also press the ALM ON / OFF button to activate the snooze function. It will playback for 15 minutes (or up to end of the disc, depends on the remote control to stop it immediately. After the fourth time the alarm shuts off and resets itself for...
User Guide
Page 17
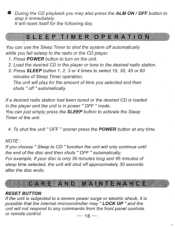
... of Sleep Timer operation. It will reset itself for the amount of sleep time selected, the unit will play for the following day. Load the desired CD in power " OFF " mode. You can use the Sleep Timer to shut the system off " automatically. To shut the unit " OFF " sooner press the POWER button at any commands from the front panel controls or remote control. 16 Press POWER button to...
... of Sleep Timer operation. It will reset itself for the amount of sleep time selected, the unit will play for the following day. Load the desired CD in power " OFF " mode. You can use the Sleep Timer to shut the system off " automatically. To shut the unit " OFF " sooner press the POWER button at any commands from the front panel controls or remote control. 16 Press POWER button to...
User Guide
Page 18
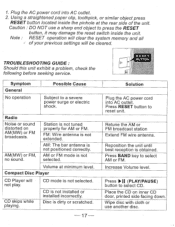
...; Solution Plug the AC power cord into AC outlet. 2. 1. Using a straightened paper clip, toothpick, or similar object press RESET button located inside the unit. Caution : DO NOT use another disc. Note : RESET operation will clear the system memory and all • of the unit. Volume at the rear side of your previous settings will not play. CD skips while playing. Disc is not installed or installed incorrectly. Press RESET button to reset unit.
...; Solution Plug the AC power cord into AC outlet. 2. 1. Using a straightened paper clip, toothpick, or similar object press RESET button located inside the unit. Caution : DO NOT use another disc. Note : RESET operation will clear the system memory and all • of the unit. Volume at the rear side of your previous settings will not play. CD skips while playing. Disc is not installed or installed incorrectly. Press RESET button to reset unit.
User Guide
Page 19
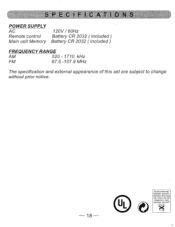
SPECI F ICATIONS POWER SUPPLY AC Remote control Main unit Memory 120V/ 60Hz Battery CR 2032 ( included) Battery CR 2032 ( included) FREQUENCY RANGE AM 520 - 1710 kHz FM 87.5 -107.9 MHz The specification and external appearance of this set are subject to change without prior notice. 18 Bij dit produkt zijn batterijen geleverd. Wanneer deze leeg zijn, moet u ze niet weggooien, maar inleveren als KCA' a
SPECI F ICATIONS POWER SUPPLY AC Remote control Main unit Memory 120V/ 60Hz Battery CR 2032 ( included) Battery CR 2032 ( included) FREQUENCY RANGE AM 520 - 1710 kHz FM 87.5 -107.9 MHz The specification and external appearance of this set are subject to change without prior notice. 18 Bij dit produkt zijn batterijen geleverd. Wanneer deze leeg zijn, moet u ze niet weggooien, maar inleveren als KCA' a
User Guide
Page 20
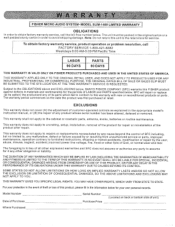
... obtain factory warranty service, product operation or problem resolution, call the toll-free number below . THIS WARRANTY APPLIES ONLY TO THE ORIGINAL RETAIL USER, AND DOES NOT APPLY TO PRODUCTS USED FOR ANY INDUSTRIAL, PROFESSIONAL OR COMMERCIAL PURPOSE, THE ORIGINAL DATED BILL OF SALE OR SALES SLIP MUST BE SUBMITTED TO THE SFS LOCATION AT THE TIME WARRANTY SERVICE IS REQUESTED. SFC will repair or replace...
... obtain factory warranty service, product operation or problem resolution, call the toll-free number below . THIS WARRANTY APPLIES ONLY TO THE ORIGINAL RETAIL USER, AND DOES NOT APPLY TO PRODUCTS USED FOR ANY INDUSTRIAL, PROFESSIONAL OR COMMERCIAL PURPOSE, THE ORIGINAL DATED BILL OF SALE OR SALES SLIP MUST BE SUBMITTED TO THE SFS LOCATION AT THE TIME WARRANTY SERVICE IS REQUESTED. SFC will repair or replace...


