Owner's Manual
Page 4
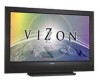
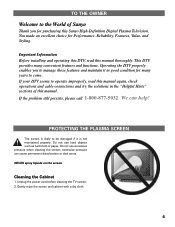
... you to manage those features and maintain it is not maintained properly. You made an excellent choice for purchasing this Sanyo High-Definition Digital Plasma Television. Operating the DTV properly enables you for Performance, Reliability, Features, Value, and Styling. We can cause permanent discoloration ...the Cabinet 1. This DTV provides many years to come. If your DTV seems to operate improperly, read this manual. PROTECTING THE PLASMA SCREEN The screen is likely to be damaged if it in good condition for many convenient features and functions. Unplug the power cord ...
... you to manage those features and maintain it is not maintained properly. You made an excellent choice for purchasing this Sanyo High-Definition Digital Plasma Television. Operating the DTV properly enables you for Performance, Reliability, Features, Value, and Styling. We can cause permanent discoloration ...the Cabinet 1. This DTV provides many years to come. If your DTV seems to operate improperly, read this manual. PROTECTING THE PLASMA SCREEN The screen is likely to be damaged if it in good condition for many convenient features and functions. Unplug the power cord ...
Owner's Manual
Page 5
... 4 TO THE OWNER 2 FEATURES 6 SPECIFICATIONS 7 HANDLING PRECAUTIONS 8 POSITIONING PRECAUTIONS 8 REMOVING THE PLASMA STAND (OPTIONAL 9 WALL MOUNTING (OPTIONAL 9 HDTV BACK RIGHT SIDE PANEL-JACKS LOCATIONS & FUNCTIONS 10 HDTV BACK SIDE PANEL-JACKS LOCATIONS & ...TV Rating 42 TV Ratings (Age and Content-Based) Symbol Explanation 43 MPAA Movie Ratings (Age-Based) Symbol Explanation 43 Picture/Sound Adjustment 44 ~ 45 Helpful Hints for Picture/Sound 45 Menu Language 46 Energy (Power) Saver 47 Picture Rotation (Screen Saver 48 White Pattern (Panel Repair 49 GLOSSARY OF TERMS 50...
... 4 TO THE OWNER 2 FEATURES 6 SPECIFICATIONS 7 HANDLING PRECAUTIONS 8 POSITIONING PRECAUTIONS 8 REMOVING THE PLASMA STAND (OPTIONAL 9 WALL MOUNTING (OPTIONAL 9 HDTV BACK RIGHT SIDE PANEL-JACKS LOCATIONS & FUNCTIONS 10 HDTV BACK SIDE PANEL-JACKS LOCATIONS & ...TV Rating 42 TV Ratings (Age and Content-Based) Symbol Explanation 43 MPAA Movie Ratings (Age-Based) Symbol Explanation 43 Picture/Sound Adjustment 44 ~ 45 Helpful Hints for Picture/Sound 45 Menu Language 46 Energy (Power) Saver 47 Picture Rotation (Screen Saver 48 White Pattern (Panel Repair 49 GLOSSARY OF TERMS 50...
Owner's Manual
Page 6
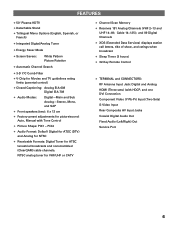
... ATSC terrestrial broadcasts and nonscrambled (ClearQAM) cable channels. FEATURES N 50" Plasma HDTV N Detachable Stand N Trilingual Menu Options (English, Spanish, or French) N Integrated Digital/Analog Tuner N Energy Saver Mode N Screen Savers: White Pattern Picture Rotation N Automatic Channel Search N 3-D Y/C Comb Filter N V-Chip for Movies and TV guidelines rating limits (parental control) N Closed-Captioning: Analog EIA...
... ATSC terrestrial broadcasts and nonscrambled (ClearQAM) cable channels. FEATURES N 50" Plasma HDTV N Detachable Stand N Trilingual Menu Options (English, Spanish, or French) N Integrated Digital/Analog Tuner N Energy Saver Mode N Screen Savers: White Pattern Picture Rotation N Automatic Channel Search N 3-D Y/C Comb Filter N V-Chip for Movies and TV guidelines rating limits (parental control) N Closed-Captioning: Analog EIA...
Owner's Manual
Page 23
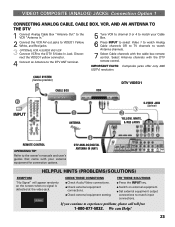
.... Disconnect the VIDEO1 yellow connector. 4 Connect an Antenna to the DTV ANT terminal. 6 Press INPUT to select Video 1 to watch Analog Cable channels OR to TV channels to watch Antenna channels. 7 Select Cable channels with the cable box remote control. G Check external equipment connections. VIDEO1 COMPOSITE (ANALOG) JACKS: Connection Option 1 CONNECTING...
.... Disconnect the VIDEO1 yellow connector. 4 Connect an Antenna to the DTV ANT terminal. 6 Press INPUT to select Video 1 to watch Analog Cable channels OR to TV channels to watch Antenna channels. 7 Select Cable channels with the cable box remote control. G Check external equipment connections. VIDEO1 COMPOSITE (ANALOG) JACKS: Connection Option 1 CONNECTING...
Owner's Manual
Page 24
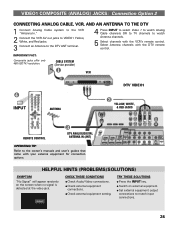
... Yellow, White, and Red jacks. 3 Connect an Antenna to the DTV ANT terminal. 4 Press INPUT to select Video 1 to watch Analog Cable channels OR to TV channels to watch Antenna channels. 5 Select channels with the DTV remote control. G Switch on the screen when no signal is detected at the video jack...
... Yellow, White, and Red jacks. 3 Connect an Antenna to the DTV ANT terminal. 4 Press INPUT to select Video 1 to watch Analog Cable channels OR to TV channels to watch Antenna channels. 5 Select channels with the DTV remote control. G Switch on the screen when no signal is detected at the video jack...
Owner's Manual
Page 25
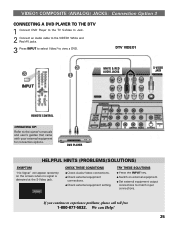
... "No Signal" will appear randomly on external equipment. VIDEO1 COMPOSITE (ANALOG) JACKS: Connection Option 3 CONNECTING A DVD PLAYER TO THE DTV 1 Connect DVD Player to the TV S-Video In Jack. 2 Connect an Audio cable to the VIDEO1 White and Red AV jacks. 3 Press INPUT to select Video1 to the owner's manuals and...
... "No Signal" will appear randomly on external equipment. VIDEO1 COMPOSITE (ANALOG) JACKS: Connection Option 3 CONNECTING A DVD PLAYER TO THE DTV 1 Connect DVD Player to the TV S-Video In Jack. 2 Connect an Audio cable to the VIDEO1 White and Red AV jacks. 3 Press INPUT to select Video1 to the owner's manuals and...
Owner's Manual
Page 27
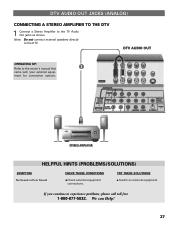
... external equipment. If you continue to the owner's manual that ‚ came with your external equip- Note: Do not connect external speakers directly to the TV Audio Out jacks as shown. ment for connection options. We can Help! 27 STEREO AMPLIFIER HELPFUL HINTS (PROBLEMS/SOLUTIONS) SYMPTOM No Sound or Poor Sound...
... external equipment. If you continue to the owner's manual that ‚ came with your external equip- Note: Do not connect external speakers directly to the TV Audio Out jacks as shown. ment for connection options. We can Help! 27 STEREO AMPLIFIER HELPFUL HINTS (PROBLEMS/SOLUTIONS) SYMPTOM No Sound or Poor Sound...
Owner's Manual
Page 28
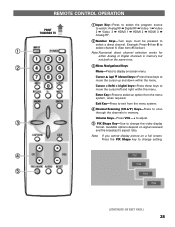
.... Cursor L (up) M (down) keys-Press these keys to change the video display format. Exit Key-Press to select a direct channel. REMOTE CONTROL OPERATION POINT TOWARDS TV Œ Ž « ŒInput Key-Press to select the program source to watch: Analog RF ¬ Digital RF ¬ Video 1 ¬ Video 2 ¬...
.... Cursor L (up) M (down) keys-Press these keys to change the video display format. Exit Key-Press to select a direct channel. REMOTE CONTROL OPERATION POINT TOWARDS TV Œ Ž « ŒInput Key-Press to select the program source to watch: Analog RF ¬ Digital RF ¬ Video 1 ¬ Video 2 ¬...
Owner's Manual
Page 29
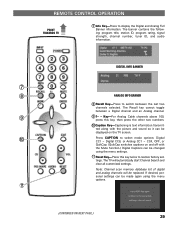
... memory database list of digital and analog channels will automatically start Channel Search and clear all customized settings. REMOTE CONTROL OPERATION « POINT TOWARDS TV ’ Info Key-Press to switch between a Digital channel and an Analog channel. ” ” 1- - Key-For Analog Cable ... CC1 ~ CC4, OFF, or QuikCap. (QuikCap switches captions on and off with the Mute function.) Digital Captions can be displayed on the TV screen. • Press CAPTION to restore factory set- If desired, personal settings can be changed using the menu options. 11 (CONTINUED ON...
... memory database list of digital and analog channels will automatically start Channel Search and clear all customized settings. REMOTE CONTROL OPERATION « POINT TOWARDS TV ’ Info Key-Press to switch between a Digital channel and an Analog channel. ” ” 1- - Key-For Analog Cable ... CC1 ~ CC4, OFF, or QuikCap. (QuikCap switches captions on and off with the Mute function.) Digital Captions can be displayed on the TV screen. • Press CAPTION to restore factory set- If desired, personal settings can be changed using the menu options. 11 (CONTINUED ON...
Owner's Manual
Page 30
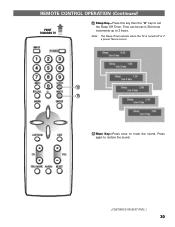
Press again to mute the sound. Time can be set the Sleep Off Timer. REMOTE CONTROL OPERATION (Continued) POINT TOWARDS TV « 12 Sleep Key-Press this key then the "0" key to set in 30-minute increments up to 3 hours. Note: The Sleep Timer cancels when the TV is turned off or if a power failure occurs. 12 13 13 Mute Key-Press once to restore the sound. (CONTINUED ON NEXT PAGE.) 30
Press again to mute the sound. Time can be set the Sleep Off Timer. REMOTE CONTROL OPERATION (Continued) POINT TOWARDS TV « 12 Sleep Key-Press this key then the "0" key to set in 30-minute increments up to 3 hours. Note: The Sleep Timer cancels when the TV is turned off or if a power failure occurs. 12 13 13 Mute Key-Press once to restore the sound. (CONTINUED ON NEXT PAGE.) 30
Owner's Manual
Page 31
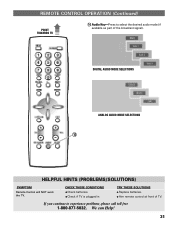
REMOTE CONTROL OPERATION (Continued) POINT TOWARDS TV 14 Audio Key-Press to experience problems, please call toll free 1-800-877-5032. CHECK THESE CONDITIONS G Check batteries. G Aim remote control at front of the broadcast signal). « DIGITAL AUDIO MODE SELECTIONS ANALOG AUDIO MODE SELECTIONS 14 HELPFUL HINTS (PROBLEMS/SOLUTIONS) SYMPTOM Remote Control will NOT work the T V. If you continue to select the desired audio mode (if available as part of TV. We can Help! 31 G Check if T V is plugged in TRY THESE SOLUTIONS G Replace batteries.
REMOTE CONTROL OPERATION (Continued) POINT TOWARDS TV 14 Audio Key-Press to experience problems, please call toll free 1-800-877-5032. CHECK THESE CONDITIONS G Check batteries. G Aim remote control at front of the broadcast signal). « DIGITAL AUDIO MODE SELECTIONS ANALOG AUDIO MODE SELECTIONS 14 HELPFUL HINTS (PROBLEMS/SOLUTIONS) SYMPTOM Remote Control will NOT work the T V. If you continue to select the desired audio mode (if available as part of TV. We can Help! 31 G Check if T V is plugged in TRY THESE SOLUTIONS G Replace batteries.
Owner's Manual
Page 32
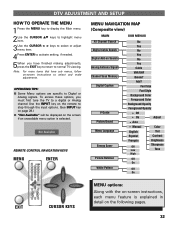
... on-screen instructions, each menu feature is selected. Note: For menu items that have finished making adjustments, press the EXIT key to return to normal TV viewing. DTV ADJUSTMENT AND SETUP HOW TO OPERATE THE MENU 1 Press the MENU key to display the Main menu. 2Use the CURSOR LM keys to... menu item. 3Use the CURSOR < > keys to select or adjust menu item. 4Press ENTER to activate setting, if needed. 5When you must first tune the TV to a digital or Analog channel Use the INPUT key on the remote to step through the input options. (See INPUT key on page 28.) I Some...
... on-screen instructions, each menu feature is selected. Note: For menu items that have finished making adjustments, press the EXIT key to return to normal TV viewing. DTV ADJUSTMENT AND SETUP HOW TO OPERATE THE MENU 1 Press the MENU key to display the Main menu. 2Use the CURSOR LM keys to... menu item. 3Use the CURSOR < > keys to select or adjust menu item. 4Press ENTER to activate setting, if needed. 5When you must first tune the TV to a digital or Analog channel Use the INPUT key on the remote to step through the input options. (See INPUT key on page 28.) I Some...
Owner's Manual
Page 36
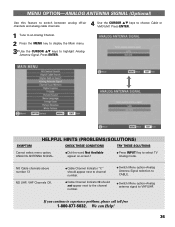
... can Help! 36 G Did the word Not Available appear on-screen? G Press INPUT Key to CABLE. G Switch Menu option-Analog Antenna Signal selection to select TV Analog mode. G Cable Channel Indicator "C" should not appear next to the channel number. G Switch Menu option-Analog antenna signal to choose Cable or VHF/ UHF...
... can Help! 36 G Did the word Not Available appear on-screen? G Press INPUT Key to CABLE. G Switch Menu option-Analog Antenna Signal selection to select TV Analog mode. G Cable Channel Indicator "C" should not appear next to the channel number. G Switch Menu option-Analog antenna signal to choose Cable or VHF/ UHF...
Owner's Manual
Page 37
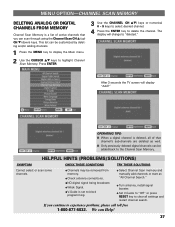
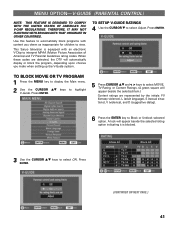
Press ENTER. 3 Use the CHANNEL (CH LM) keys or numerical 0 ~ 9 keys to select desired channel. 4 Press the ENTER key to block programming. After 3 seconds the TV screen will change to experience problems, please call toll free 1-800-877-5032. G Channels may be added back to the Channel Scan Memory. G V-Guide is ...
Press ENTER. 3 Use the CHANNEL (CH LM) keys or numerical 0 ~ 9 keys to select desired channel. 4 Press the ENTER key to block programming. After 3 seconds the TV screen will change to experience problems, please call toll free 1-800-877-5032. G Channels may be added back to the Channel Scan Memory. G V-Guide is ...
Owner's Manual
Page 38
After 3 seconds the TV screen will change to "added." G Check antenna connections. If you can scan through using the Channel Scan CH L (up) CH M (down) keys. MENU OPTION-CHANNEL ...
After 3 seconds the TV screen will change to "added." G Check antenna connections. If you can scan through using the Channel Scan CH L (up) CH M (down) keys. MENU OPTION-CHANNEL ...
Owner's Manual
Page 39
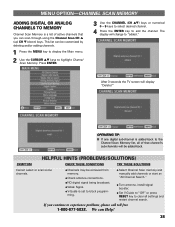
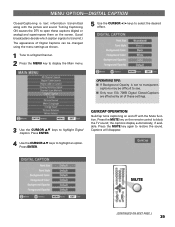
... the menu settings as shown. 1 Tune to a Digital Channel. 2 Press the MENU key to display the Main menu. 5 Use the CURSOR < > keys to block the TV sound; Press the MUTE key on the screen. (Local broadcasters decide which caption signals to transmit.) The appearance of these captions (digital or analog) and...
... the menu settings as shown. 1 Tune to a Digital Channel. 2 Press the MENU key to display the Main menu. 5 Use the CURSOR < > keys to block the TV sound; Press the MUTE key on the screen. (Local broadcasters decide which caption signals to transmit.) The appearance of these captions (digital or analog) and...
Owner's Manual
Page 41
... V-CHIP REGULATIONS. TO SETUP V-GUIDE RATINGS 4 Use the CURSOR M to interpret MPAA (Motion Picture Association of America) and TV Parental Guidelines rating codes. Press ENTER. (CONTINUED ON NEXT PAGE.) 41 This Sanyo television is blocked. 3 Use the CURSOR LM keys to Block or Unblock selected option. When these codes are represented... with an electronic V-Chip to select Adjust. THEREFORE, IT MAY NOT FUNCTION WITH BROADCASTS THAT ORIGINATE IN OTHER COUNTRIES. TO BLOCK MOVIE OR TV PROGRAM 1 Press the MENU key to display the Main menu. 2 Use the CURSOR LM keys to view.
... V-CHIP REGULATIONS. TO SETUP V-GUIDE RATINGS 4 Use the CURSOR M to interpret MPAA (Motion Picture Association of America) and TV Parental Guidelines rating codes. Press ENTER. (CONTINUED ON NEXT PAGE.) 41 This Sanyo television is blocked. 3 Use the CURSOR LM keys to Block or Unblock selected option. When these codes are represented... with an electronic V-Chip to select Adjust. THEREFORE, IT MAY NOT FUNCTION WITH BROADCASTS THAT ORIGINATE IN OTHER COUNTRIES. TO BLOCK MOVIE OR TV PROGRAM 1 Press the MENU key to display the Main menu. 2 Use the CURSOR LM keys to view.
Owner's Manual
Page 42
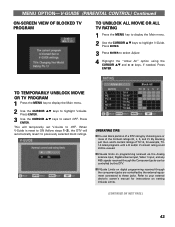
...and/or V content rating could still be controlled by the external equipment connected to previously selected block ratings. Press ENTER. TO TEMPORARILY UNBLOCK MOVIE OR TV PROGRAM 1 Press the MENU key to display the Main menu. 2 Use the CURSOR LM keys to highlight V-Guide. OPERATING TIPS: I V-Guide ... programming received through the Component jacks can be viewed. MENU OPTION-V-GUIDE (PARENTAL CONTROL) Continued ON-SCREEN VIEW OF BLOCKED TV PROGRAM TO UNBLOCK ALL MOVIE OR ALL TV RATING 1 Press the MENU key to display the Main menu. 2 Use the CURSOR LM keys to highlight V-Guide. ...
...and/or V content rating could still be controlled by the external equipment connected to previously selected block ratings. Press ENTER. TO TEMPORARILY UNBLOCK MOVIE OR TV PROGRAM 1 Press the MENU key to display the Main menu. 2 Use the CURSOR LM keys to highlight V-Guide. OPERATING TIPS: I V-Guide ... programming received through the Component jacks can be viewed. MENU OPTION-V-GUIDE (PARENTAL CONTROL) Continued ON-SCREEN VIEW OF BLOCKED TV PROGRAM TO UNBLOCK ALL MOVIE OR ALL TV RATING 1 Press the MENU key to display the Main menu. 2 Use the CURSOR LM keys to highlight V-Guide. ...

Owner's Manual
Page 43
MENU OPTION-V-GUIDE (PARENTAL CONTROL) Continued TV RATINGS (AGE/CONTENT-BASED) ALL CHILDREN-Program is designed to be appropriate for younger children. Contain little or no violence, no strong language or sexual ...
MENU OPTION-V-GUIDE (PARENTAL CONTROL) Continued TV RATINGS (AGE/CONTENT-BASED) ALL CHILDREN-Program is designed to be appropriate for younger children. Contain little or no violence, no strong language or sexual ...

Owner's Manual
Page 50
...fields of video then combining (interlacing) them to make one frame of S-Video and Composite video jacks are often slightly wider. 50 MPEG2-A compression scheme for televisions. NTSC-National Television Systems Committee Pillar Boxing-This term is used to describe a 16:9 ratio image...this input exceeds that accepts separated luminance and chroma signals from a Satellite to a dish and receiver, or between existing pixels to the TV (Input). A pure digital video interface that accepts uncompressed video signals for digital television. Set-Top Box (STB)-A device that accept 480i,...
...fields of video then combining (interlacing) them to make one frame of S-Video and Composite video jacks are often slightly wider. 50 MPEG2-A compression scheme for televisions. NTSC-National Television Systems Committee Pillar Boxing-This term is used to describe a 16:9 ratio image...this input exceeds that accepts separated luminance and chroma signals from a Satellite to a dish and receiver, or between existing pixels to the TV (Input). A pure digital video interface that accepts uncompressed video signals for digital television. Set-Top Box (STB)-A device that accept 480i,...


