
Instruction Manual
Page 2
... following Toll Free Number: DIAL TOLL FREE: 1-800-813-3435 Weekdays: 7:30 AM - 4:00 PM Central Time Also, you may write to uncrating, setup, installation, removal of the product for the periods of Purchase Purchase Price Where Purchased -E1- OBLIGATIONS In order to obtain warranty service, the product must be delivered to the cabinet or cosmetic parts, broken or damaged video heads, batteries or...
... following Toll Free Number: DIAL TOLL FREE: 1-800-813-3435 Weekdays: 7:30 AM - 4:00 PM Central Time Also, you may write to uncrating, setup, installation, removal of the product for the periods of Purchase Purchase Price Where Purchased -E1- OBLIGATIONS In order to obtain warranty service, the product must be delivered to the cabinet or cosmetic parts, broken or damaged video heads, batteries or...
Instruction Manual
Page 3
... and complies with safety performance standards of Health and Human Services. CAUTION - NO USER-SERVICEABLE PARTS INSIDE. USE OF CONTROLS OR ADJUSTMENTS OR PERFORMANCE OF PROCEDURES OTHER THAN THOSE SPECIFIED HEREIN MAY RESULT IN HAZARDOUS RADIATION EXPOSURE. THIS UNIT SHOULD NOT BE ADJUSTED OR REPAIRED BY ANYONE EXCEPT PROPERLY QUALIFIED SERVICE PERSONNEL. WARNING: UNAUTHORIZED RECORDING OF COPYRIGHTED MATERIAL MAY VIOLATE...
... and complies with safety performance standards of Health and Human Services. CAUTION - NO USER-SERVICEABLE PARTS INSIDE. USE OF CONTROLS OR ADJUSTMENTS OR PERFORMANCE OF PROCEDURES OTHER THAN THOSE SPECIFIED HEREIN MAY RESULT IN HAZARDOUS RADIATION EXPOSURE. THIS UNIT SHOULD NOT BE ADJUSTED OR REPAIRED BY ANYONE EXCEPT PROPERLY QUALIFIED SERVICE PERSONNEL. WARNING: UNAUTHORIZED RECORDING OF COPYRIGHTED MATERIAL MAY VIOLATE...
Instruction Manual
Page 4
.... • Sudden changes in accordance with the limits for help. Grasp the plug, not the cord, when disconnecting the unit. • If water should occur, remove the disc and allow the player to adjust to form on the amplifier higher than necessary. This equipment generates, uses and can radiate radio frequency energy and, if not installed and used in the surrounding temperature can cause...
.... • Sudden changes in accordance with the limits for help. Grasp the plug, not the cord, when disconnecting the unit. • If water should occur, remove the disc and allow the player to adjust to form on the amplifier higher than necessary. This equipment generates, uses and can radiate radio frequency energy and, if not installed and used in the surrounding temperature can cause...
Instruction Manual
Page 6
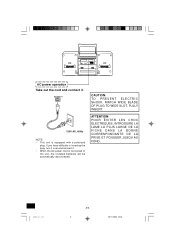
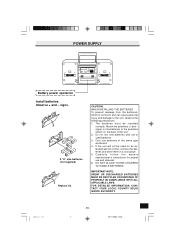
... the cord and connect it . • When the AC power cord is equipped with a polarized plug. CAUTION: TO PREVENT ELECTRIC SHOCK, MATCH WIDE BLADE OF PLUG TO WIDE SLOT, FULLY INSERT. If you have difficulty in inserting the plug, turn it over and reinsert it . 120V AC, 60Hz NOTE: • This unit is connected to the unit, the installed batteries will...
... the cord and connect it . • When the AC power cord is equipped with a polarized plug. CAUTION: TO PREVENT ELECTRIC SHOCK, MATCH WIDE BLADE OF PLUG TO WIDE SLOT, FULLY INSERT. If you have difficulty in inserting the plug, turn it over and reinsert it . 120V AC, 60Hz NOTE: • This unit is connected to the unit, the installed batteries will...
Instruction Manual
Page 7
... batteries (not supplied) Replace lid. The batteries must be used batteries. 3. DO NOT ALLOW YOUNG CHILDREN TO HANDLE BATTERIES. Match the polarities (+ and - signs) on the back of the same type and brand. 4. C a r e f u l l y f o l l o w t h e b a t t e r y manufacturer's instructions for an extended period of time, remove the batteries and store them in a cool place. 5. If the unit will not be installed correctly. CAUTION: WHEN INSTALLING THE BATTERIES To...
... batteries (not supplied) Replace lid. The batteries must be used batteries. 3. DO NOT ALLOW YOUNG CHILDREN TO HANDLE BATTERIES. Match the polarities (+ and - signs) on the back of the same type and brand. 4. C a r e f u l l y f o l l o w t h e b a t t e r y manufacturer's instructions for an extended period of time, remove the batteries and store them in a cool place. 5. If the unit will not be installed correctly. CAUTION: WHEN INSTALLING THE BATTERIES To...

Instruction Manual
Page 8
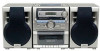
... a disc. Play/Pause button (i) 6. Memory button (MEMORY) 8. To select No. 10, press 1, then 0. Remote control range Remote sensor (IR) Within approx. 20 feet CWM-460/US -E7- 8 28/11/2002, 16:28 Preset button (PRESET) Number buttons (1-9, 0) If the function is "TUNER", the buttons select preset radio stations. With any other function, the buttons will not function. • Two buttons must always be pressed. Number buttons (1-9, 0) 2. Inserting batteries 1. Controls 1 2 2. 8 3 7 4 6 5 Two "AA" batteries (not supplied) 1. Tuning/Skip/Search buttons...
... a disc. Play/Pause button (i) 6. Memory button (MEMORY) 8. To select No. 10, press 1, then 0. Remote control range Remote sensor (IR) Within approx. 20 feet CWM-460/US -E7- 8 28/11/2002, 16:28 Preset button (PRESET) Number buttons (1-9, 0) If the function is "TUNER", the buttons select preset radio stations. With any other function, the buttons will not function. • Two buttons must always be pressed. Number buttons (1-9, 0) 2. Inserting batteries 1. Controls 1 2 2. 8 3 7 4 6 5 Two "AA" batteries (not supplied) 1. Tuning/Skip/Search buttons...
Instruction Manual
Page 9
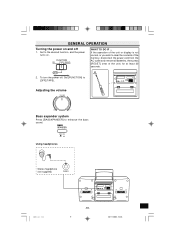
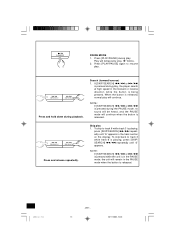
... power cord from the AC outlet and remove all batteries, then press [RESET] (rear of the unit or display is not normal, or you wish to the desired function, and the power turns on and off . To turn the power off 1. WHAT TO DO IF ... If the operation of the unit) for at least 20 seconds. 2. Adjusting the volume Bass expander system Press [BASSXPANDER] to [OFF](TAPE). Set...
... power cord from the AC outlet and remove all batteries, then press [RESET] (rear of the unit or display is not normal, or you wish to the desired function, and the power turns on and off . To turn the power off 1. WHAT TO DO IF ... If the operation of the unit) for at least 20 seconds. 2. Adjusting the volume Bass expander system Press [BASSXPANDER] to [OFF](TAPE). Set...
Instruction Manual
Page 10
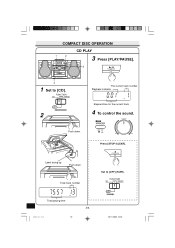
Label facing up Push down . n Set to [CD]. 2 The current track number Playback indicator Elapsed time for the current track 4 To control the sound. Total track number Press [STOP/CLEAR]. Push down . COMPACT DISC OPERATION 1 2 CD PLAY 3 Press [PLAY/PAUSE]. 3 4 1 Set to [OFF] (TAPE). Total playing time CWM-460/US 10 -E9- 28/11/2002, 16:28
Label facing up Push down . n Set to [CD]. 2 The current track number Playback indicator Elapsed time for the current track 4 To control the sound. Total track number Press [STOP/CLEAR]. Push down . COMPACT DISC OPERATION 1 2 CD PLAY 3 Press [PLAY/PAUSE]. 3 4 1 Set to [OFF] (TAPE). Total playing time CWM-460/US 10 -E9- 28/11/2002, 16:28
Instruction Manual
Page 11
... before opening the CD compartment lid. • Always place the compact disc in this unit. If this unit. Sharp writing instruments, or the inks used for phonograph records. Compact discs • Both 3-inch and 5-inch discs can be played in the CD compartment with the label facing upward, or replace the damaged disc. • Opening the CD compartment lid while a CD is loaded, "Cd" appears. CWM-460...
... before opening the CD compartment lid. • Always place the compact disc in this unit. If this unit. Sharp writing instruments, or the inks used for phonograph records. Compact discs • Both 3-inch and 5-inch discs can be played in the CD compartment with the label facing upward, or replace the damaged disc. • Opening the CD compartment lid while a CD is loaded, "Cd" appears. CWM-460...
Instruction Manual
Page 12
... button is released. To skip to track 6 while track 3 is playing, press [SKIP/SEARCH] g repeatedly until "3" appears. Press and hold down during play. NOTE: If [SKIP/SEARCH] h or g is pressed during play will remain in the track section on the display. Skip play . CWM-... 1. PAUSE MODE 1. To skip back to resume play 1. "a" blinks. 2. NOTE: If [SKIP/SEARCH] h or g is pressed while the unit is released. Play will continue when the button is released, normal play , the player search at high speed in the forward or reverse direction while the button is playing, press [...
... button is released. To skip to track 6 while track 3 is playing, press [SKIP/SEARCH] g repeatedly until "3" appears. Press and hold down during play. NOTE: If [SKIP/SEARCH] h or g is pressed during play will remain in the track section on the display. Skip play . CWM-... 1. PAUSE MODE 1. To skip back to resume play 1. "a" blinks. 2. NOTE: If [SKIP/SEARCH] h or g is pressed while the unit is released. Play will continue when the button is released, normal play , the player search at high speed in the forward or reverse direction while the button is playing, press [...
Instruction Manual
Page 13
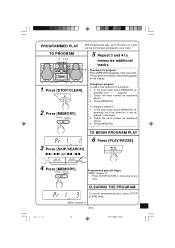
... on a disc can be replaced is displayed. 2. Select the track number as explained above . 3. In the stop mode. Select the track number as explained above . 3. "MEM" remains lit. -E12- Press [MEMORY]. 2 Press [MEMORY]. CWM-460/US 13 28/11/2002, 16:29 In the stop play at any order. n Changing a program To add a new selection to a program: 1. TO BEGIN PROGRAM PLAY 6 Press [PLAY/PAUSE]. 4 Press...
... on a disc can be replaced is displayed. 2. Select the track number as explained above . 3. In the stop mode. Select the track number as explained above . 3. "MEM" remains lit. -E12- Press [MEMORY]. 2 Press [MEMORY]. CWM-460/US 13 28/11/2002, 16:29 In the stop play at any order. n Changing a program To add a new selection to a program: 1. TO BEGIN PROGRAM PLAY 6 Press [PLAY/PAUSE]. 4 Press...
Instruction Manual
Page 15
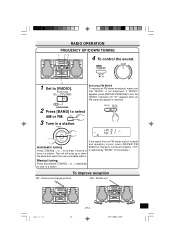
... a station. If "MONO" appears, press [REPEAT/FM MODE] to tune in a station. To improve reception FM - Rotate unit. "ST" appears when an FM stereo broadcast is replaced by "MONO" in the display.) Manual tuning Press and release [TUNING] t or u repeatedly to [RADIO]. Selecting FM MODE To receive an FM stereo broadcast, make sure that "MONO" is not displayed. RADIO OPERATION FRQUENCY UP/DOWN TUNING 1 23 4 To control the sound. 4 1 Set to tune in a station.
... a station. If "MONO" appears, press [REPEAT/FM MODE] to tune in a station. To improve reception FM - Rotate unit. "ST" appears when an FM stereo broadcast is replaced by "MONO" in the display.) Manual tuning Press and release [TUNING] t or u repeatedly to [RADIO]. Selecting FM MODE To receive an FM stereo broadcast, make sure that "MONO" is not displayed. RADIO OPERATION FRQUENCY UP/DOWN TUNING 1 23 4 To control the sound. 4 1 Set to tune in a station.
Instruction Manual
Page 16
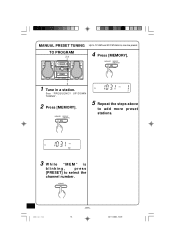
TO PROGRAM 2,4 4 Press [MEMORY]. 3 1 Tune in a station. MANUAL PRESET TUNING Up to select the channel number. PRESET CWM-460/US -E15- 16 28/11/2002, 16:29 See "FREQUENCY UP/DOWN TUNING". 2 Press [MEMORY]. 5 Repeat the steps above to add more preset stations. 3 While "MEM" is blinking, press [PRESET] to 12 AM and 20 FM stations can be preset.
TO PROGRAM 2,4 4 Press [MEMORY]. 3 1 Tune in a station. MANUAL PRESET TUNING Up to select the channel number. PRESET CWM-460/US -E15- 16 28/11/2002, 16:29 See "FREQUENCY UP/DOWN TUNING". 2 Press [MEMORY]. 5 Repeat the steps above to add more preset stations. 3 While "MEM" is blinking, press [PRESET] to 12 AM and 20 FM stations can be preset.
Instruction Manual
Page 17
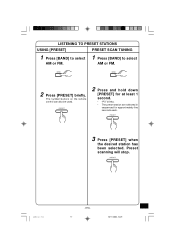
PRESET 3 Press [PRESET] when the desired station has been selected. PRESET 2 Press and hold down [PRESET] for at least 1 second. • "PS" blinks. • The preset station are selected in sequenced for approximately five seconds each. PRESET CWM-460/US -E16- 17 28/11/2002, 16:29 LISTENING TO PRESET STATIONS USING [PRESET] PRESET SCAN TUNING 1 Press [BAND] to select AM or FM. 1 Press [BAND] to select AM or FM. BAND BAND 2 Press [PRESET] briefly. Preset scanning will stop. The number buttons on the remote control can also be used.
PRESET 3 Press [PRESET] when the desired station has been selected. PRESET 2 Press and hold down [PRESET] for at least 1 second. • "PS" blinks. • The preset station are selected in sequenced for approximately five seconds each. PRESET CWM-460/US -E16- 17 28/11/2002, 16:29 LISTENING TO PRESET STATIONS USING [PRESET] PRESET SCAN TUNING 1 Press [BAND] to select AM or FM. 1 Press [BAND] to select AM or FM. BAND BAND 2 Press [PRESET] briefly. Preset scanning will stop. The number buttons on the remote control can also be used.
Instruction Manual
Page 18
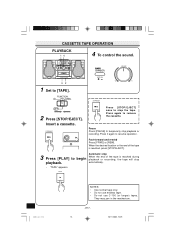
...: • Use normal tape only. • Do not use endless tape. • Do not use C-100 (or longer) tapes. Press again to [TAPE]. 2 Press [STOP/EJECT]. Fast forward and rewind Press [FFWD] or [REW]. Insert a cassette. They may jam in the mechanism. -E17- 18 28/11/2002, 16:29 CASSETTE TAPE OPERATION PLAYBACK 14 4 To control the sound. 32 1 Set to remove the...
...: • Use normal tape only. • Do not use endless tape. • Do not use C-100 (or longer) tapes. Press again to [TAPE]. 2 Press [STOP/EJECT]. Fast forward and rewind Press [FFWD] or [REW]. Insert a cassette. They may jam in the mechanism. -E17- 18 28/11/2002, 16:29 CASSETTE TAPE OPERATION PLAYBACK 14 4 To control the sound. 32 1 Set to remove the...

Instruction Manual
Page 19
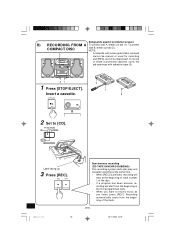
... a station. 3 Press [REC]. BAND Tune in the position that gives the best results. 31 1 Press [STOP/EJECT]. Automatic Level Control (ALC) recording RECORDING The ALC circuit adjusts the recording input level automatically. tion. Press [BAND] to remove the cassette. CWM-460/US -E18- 19 28/11/2002, 16:29 A) RECORDING FROM THE BUILT-IN RADIO BEAT CANCEL switch When recording a radio program...
... a station. 3 Press [REC]. BAND Tune in the position that gives the best results. 31 1 Press [STOP/EJECT]. Automatic Level Control (ALC) recording RECORDING The ALC circuit adjusts the recording input level automatically. tion. Press [BAND] to remove the cassette. CWM-460/US -E18- 19 28/11/2002, 16:29 A) RECORDING FROM THE BUILT-IN RADIO BEAT CANCEL switch When recording a radio program...
Instruction Manual
Page 20
... openings with erase guard tabs removed cannot be erased or used for recording and [REC] cannot be depressed. NOTE: 2 A cassette with adhesive tape (3). CWM-460/US 20 Synchronous recording (CD-TAPE SYNCHRO DUBBING) This recording system starts disc play and cassette recording at the same time. • When [REC] is pressed, recording will start at the beginning of track number 1 of the disc. • If a program...
... openings with erase guard tabs removed cannot be erased or used for recording and [REC] cannot be depressed. NOTE: 2 A cassette with adhesive tape (3). CWM-460/US 20 Synchronous recording (CD-TAPE SYNCHRO DUBBING) This recording system starts disc play and cassette recording at the same time. • When [REC] is pressed, recording will start at the beginning of track number 1 of the disc. • If a program...
Instruction Manual
Page 21
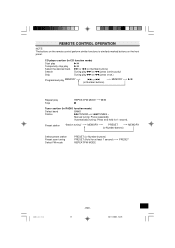
... 1 second. REMOTE CONTROL OPERATION NOTE: The buttons on the remote control perform similar functions to similarly marked buttons on the front panel. CD player section (In CD function mode) Start play i Temporarily stop play i Select the desired track e or f (or Number buttons) Search During play e or f (press continuously) Skip During play e or f (press once.) Programmed play MEMORY v e or f v MEMORY v i (or Number buttons) v v Repeat play Stop REPEAT/FM MODE v i n Tuner section (In RADIO function mode) Select band BAND Station e/TUNING +or f/TUNING -
... 1 second. REMOTE CONTROL OPERATION NOTE: The buttons on the remote control perform similar functions to similarly marked buttons on the front panel. CD player section (In CD function mode) Start play i Temporarily stop play i Select the desired track e or f (or Number buttons) Search During play e or f (press continuously) Skip During play e or f (press once.) Programmed play MEMORY v e or f v MEMORY v i (or Number buttons) v v Repeat play Stop REPEAT/FM MODE v i n Tuner section (In RADIO function mode) Select band BAND Station e/TUNING +or f/TUNING -
Instruction Manual
Page 22
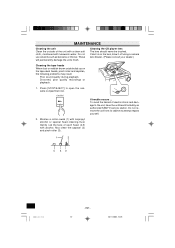
...using a camera lens blower. (Please consult your dealer.) Cleaning the tape heads When dust or reddish-brown oxide builds up on the tape deck heads, pinch roller and capstan, the following problems may result: Poor sound quality during playback. Press [STOP/EJECT] to attempt repairs yourself. If trouble occurs ... Cleaning the CD player...have the unit bench tested by an authorized SANYO service station. These will permanently damage the units finish. Do not use solvents such as benzene or thinner. Also clean the capstan (2) and pinch roller (3). CWM-460/US -E21- 22 28/11/2002...
...using a camera lens blower. (Please consult your dealer.) Cleaning the tape heads When dust or reddish-brown oxide builds up on the tape deck heads, pinch roller and capstan, the following problems may result: Poor sound quality during playback. Press [STOP/EJECT] to attempt repairs yourself. If trouble occurs ... Cleaning the CD player...have the unit bench tested by an authorized SANYO service station. These will permanently damage the units finish. Do not use solvents such as benzene or thinner. Also clean the capstan (2) and pinch roller (3). CWM-460/US -E21- 22 28/11/2002...
Instruction Manual
Page 23
... CD or display opera- tion with the la- Connect the power cord and resume operation. (See page E8) Poor sound quality during play- back. The guard tabs have followed the instructions and are having difficulty operating the unit, locate the SYMPTOM in the CD Load a disc. Weak signal. Press [REPEAT/FM MODE] to locate and remedy the problem. SERVICING: Should this product require service, refer to Turn up...
... CD or display opera- tion with the la- Connect the power cord and resume operation. (See page E8) Poor sound quality during play- back. The guard tabs have followed the instructions and are having difficulty operating the unit, locate the SYMPTOM in the CD Load a disc. Weak signal. Press [REPEAT/FM MODE] to locate and remedy the problem. SERVICING: Should this product require service, refer to Turn up...


