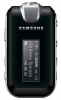
Quick Guide (easy Manual) (ver.1.0) (English)
Page 2
... volume or stop using the earphone or headphone. For your hearing. To avoid hearing damage Do not disassemble, repair or modify this manual carefully to your hearing may be (an ordinary conversation is 50 to heed the product instructions may cause serious injury. Contact a Service Center. Do not use the earphone while you may rise up to sound...
Quick Guide (easy Manual) (ver.1.0) (English)
Page 4
... 8 Screen Display Information 10 Button Functions 11 Charging the battery 12 Basic Use 13 Chapter 2. Importing Music Files Importing Music Files 18 Connecting to your PC 18 Installing Windows Media Player10...........19 Transferring Music to FM Radio 33 Setting a Frequency 34 To Delete Presets 36 Setting FM Radio 37 4 Listening to Music/FM Radio Listening to Music 23 Listening to Music 23 Transferring Playlists from WMP10 ...........25 To Play a Playlist 27 User Button Custom Function 28 Listening to FM Radio 33 Listening to your Player...
Quick Guide (easy Manual) (ver.1.0) (English)
Page 5
Settings Settings 40 Setting Music 40 Setting Time 42 Setting the Display 43 Setting Language 44 Setting the System 45 Chapter 5. Troubleshooting System Reset 48 To Upgrade Firmware 49 Troubleshooting 51 Chapter 6. Appendix Menu Tree 55 Product Specifications 56 License 57 Safety Information 58 Warranty 60 5 Chapter 4.
Quick Guide (easy Manual) (ver.1.0) (English)
Page 20
... on the My Computer icon located on the Desktop. 5 Locate the folder on the Desktop. 3 Select [Sync] at the top of the screen and the Sync window will be automatically saved in the Navigation. 1 Connect the player to the left [Sync List] window. 20 s Select [Start] ¡ [Programs] ¡ [Windows Media Player] on your PC where your Player You can download MP3, WMA and secure WMA files using Windows Media Player 10.
Quick Guide (easy Manual) (ver.1.0) (English)
Page 21
The downloaded files will appear on the + icon next to Music. 21 s [Synchronized to download are checked, and then press [Start Sync] at the top of the screen. Chapter 2. Importing Music Files Transferring Music to your Player 7 Make sure the music files you want to Device] message will appear in the right window under Music folder. 8 You can check the transferred files in the right window by clicking on the left window.
Quick Guide (easy Manual) (ver.1.0) (English)
Page 22
Listening to Music/FM Radio Listening to Music 23 Listening to Music 23 Transferring Playlists from your choice from WMP10 ...........25 To Play a Playlist 27 User Button Custom Function 28 Listening to FM Radio 33 Listening to the player. Transfer the music file of your PC to FM Radio 33 Setting a Frequency 34 To Delete Presets 36 Setting FM Radio 37 s Before you start! Chapter 3.
Quick Guide (easy Manual) (ver.1.0) (English)
Page 23
s The music files compatible with the player are MP3, WMA, NOTE Secure WMA. Listening to Music/FM Radio Listening to Music Chapter 3. s Power is playing. s The music playback will play . To Pause 1 Press the [ ] button while the music is automatically turned off when none of time (Default: 10 seconds) in the pause mode. √ Page 42 23 s Music starts to select . 3 Press the [ USER/ MENU] button. s MP1 or MP2 files which only have been...
Quick Guide (easy Manual) (ver.1.0) (English)
Page 25
Listening to Music/FM Radio Listening to Music/ Transferring Playlists from WMP10 Listening to Music Transferring Playlists from WMP10 1 To transfer playlists from WMP10, click on "Sync Settings" in the WMP10 menu on your PC. 2 Select . 3 Select the playlists you want to sync (transfer) to your player. 25 Chapter 3.
Quick Guide (easy Manual) (ver.1.0) (English)
Page 28
... select the desired user button mode and then press the [ USER/ MENU] button. s : Selects the sound mode. To set to select and then Press the [ USER/ MENU] button. Custom Function The user button enables you to Music User Button - s : Selects the repeat playback mode. 28 Listening to select from one of preset custom settings. s : You can set desired User Button Mode Use the [ USER/ MENU] button during playback for simple mode change. 1 Press and hold the [ USER/ MENU] button to move to the menu screen. 2 Press the [ + , - ] button to show the navigation file list.
Quick Guide (easy Manual) (ver.1.0) (English)
Page 32
... To use the DNSe button For a description of DNSe, see page 41. s Playback mode changes in the following order each time the button is pressed . Custom Function (Continued) To use the Play Speed button Set the User Button Mode to and press the [ USER/ MENU] button. Listening to and press the [ USER/ MENU] button. s DNSe mode changes in the following order each time the button is .) To use the Play Mode button Set the User Button Mode to and press the [ USER/ MENU] button. Set the User Button Mode to Music User Button -
Quick Guide (easy Manual) (ver.1.0) (English)
Page 41
... a suitable sound for MP3 players developed by Samsung and adds a 3D surround sound effect to the music. 41 Setting Music s : Select playback mode such as repeat settings. Select either or . s : Set the search speed when you set between 00~05 levels, and Bass Enhance between 00~03 levels. NOTE s What is a sound effect function for each music genre. To use User EQ, select from , the beginning of music/voice recording. Select...
Quick Guide (easy Manual) (ver.1.0) (English)
Page 42
... time setup is complete, move to the menu screen. 2 Press the [ + , - ] button to select and then press the [ USER/ MENU] button. Settings Setting Time You can set necessary functions. s The Time menu appears. 4 Use the [ + , - ] and [ USER/ MENU] buttons to select and then press the [ USER/ MENU] button. s : Turns off when there is no button operation after the preset time. s The Settings menu appears. 3 Press the [ + , - ] button to set current date and time. s : Automatically turns power off power automatically after the preset time in the pause mode...
Quick Guide (easy Manual) (ver.1.0) (English)
Page 44
... setting, turn off the product and restart it so the 44 change can be applied. Select from and . s The supported languages can be changed or added. NOTE s What is attached to an MP3 to carry information relevant to select and then press the [ USER/ MENU] button. s The Language menu appears. 4 Use the [ + , - ] and [ USER/ MENU] buttons to select and then press the [ USER/ MENU] button. s : Set the menu...
Quick Guide (easy Manual) (ver.1.0) (English)
Page 46
... beep sound for button operations to on again after the music you are listening to is stopped. If the power is turned on again after the volume was set from the beginning. s : Initializes all settings to default. s : Checks the firmware version, number of the memory. Settings Setting the System (Continued) s : Specifies the starting point to restart playback after adjusting the volume above the default volume, music is played at the previously played volume...
Quick Guide (easy Manual) (ver.1.0) (English)
Page 49
... drive. When the driver is installed, YP-F2J Updater icon is created on the Desktop. s If previous version of firmware updater has been installed on your product. 2 When the product page appears, select [Firmware] below the model name to download the latest firmware. 3 Uncompress the downloaded file in a folder. 4 Run Setup.exe and follow the instructions on the screen for this player to enhance performance and compatibility. 1 Connect to http://www.samsung.com, select [SUPPORT...
Quick Guide (easy Manual) (ver.1.0) (English)
Page 51
... [HOLD] switch is fully discharged. The power is automatically turned off when the battery is experienced, check the following. Chapter 5. If the problem persists, contact a Samsung Service Center near you pressed the right button, then press again. Recharge the battery and turn on if the battery is in the direction of EQ and LCD. s Press the Reset hole. s Press the Reset hole. The screen will not turn...
Quick Guide (easy Manual) (ver.1.0) (English)
Page 52
... the Menu screen and set an appropriate language. 52 s Check if the available file has been saved in VBR (Variable Bit Rate) format. Abnormal Play Time Display during file or data transmission. Move to be extra cautious as Samsung cannot be held responsible for data loss. s Check if the music file is in the memory. Check if the file is damaged. Check if the USB cable has been...
Quick Guide (easy Manual) (ver.1.0) (English)
Page 55
Menu Tree You can quickly view the menu structure. Menu Select Screen Music Navigation FM Radio Settings Chapter 6. Appendix Menu Tree Music User Button Mode FM Radio Time Display Language DNSe Navigation Auto Preset 3D User Set Repeat AB FM Region Time Set Sleep Scroll Speed Backlight Time Menu ID3-Tag User EQ Set Play Mode Play Speed Skip Interval DNSe FM Search Level Auto Power Off Contrast Play Speed Tag Play Mode Display Time Screen Saver Term Search Speed Intro Time System Resume Beep Default Vol Default Set About 55
Quick Guide (easy Manual) (ver.1.0) (English)
Page 56
Product Specifications Model Name YP-F2J Power 3.7V (Li-Polymer Rechargeable) Built-in Battery Power 250mAh File Compatibility MPEG1/2/2.5 Layer3(8kbps~320kbps, 8kHz~48kHz) WMA(48kbps~192kbps,8kHz~48kHz) Supported Number of folders and Files Folder: Max. 200 File: Max. 2000 Earphone Output 20mW(16Ω) Output Frequency Range 20Hz~20KHz Noise Ratio 90dB with 20KHz LPF(based on 1KHz 0dB) Play Time Temperature Range for Operation Case Weight...
Quick Guide (easy Manual) (ver.1.0) (English)
Page 60
... Repair or direct replacement under the terms of this warranty does not give right to extension to or a new starting of the period of warranty. Return of the product for a period of twelve(12) months from the original date of purchase. and product number. Samsung reserves the right to refuse warranty service if this information has been removed or changed...