

Quick Guide (easy Manual) (ver.1.0) (English)
Page 2
... Safety Instructions ...4 Features ...6 Components ...8 Location of Controls ...9 Charging the Battery ...11 I Connection Procedures Connecting the Player to Your PC ...12 Manual Installation of the USB Driver ...16 Using the Player as a Removable Disk ...19 G Formatting the Player on Your PC ...19 G Downloading/Uploading Files ...20 G Disconnecting the USB Cable ...21 Transferring music files using Windows Media 22 Installing Music Studio ...24 Using Music Studio ...25 To View Help on Music Studio ...29 I Basic Usage Playing Music ...30 Recording Voice ...31 Searching for Music/Voice Files...
... Safety Instructions ...4 Features ...6 Components ...8 Location of Controls ...9 Charging the Battery ...11 I Connection Procedures Connecting the Player to Your PC ...12 Manual Installation of the USB Driver ...16 Using the Player as a Removable Disk ...19 G Formatting the Player on Your PC ...19 G Downloading/Uploading Files ...20 G Disconnecting the USB Cable ...21 Transferring music files using Windows Media 22 Installing Music Studio ...24 Using Music Studio ...25 To View Help on Music Studio ...29 I Basic Usage Playing Music ...30 Recording Voice ...31 Searching for Music/Voice Files...

Quick Guide (easy Manual) (ver.1.0) (English)
Page 4
... play back ASF audio. Removable Storage Device G You can upgrade the built-in Windows Media player. This player can make high quality voice recordings. 7 Voice Recording Function G You can also play time. ✻ Time may vary depending on usage pattern. Built-In Rechargeable Li-Polymer Battery G The built-in rechargeable lithium battery provides up to the sound. 6 Features USB 2.0 Support G Maximum data speed transfer of 18Mbps Upgradable G You can easily copy and paste files to an FM program...
... play back ASF audio. Removable Storage Device G You can upgrade the built-in Windows Media player. This player can make high quality voice recordings. 7 Voice Recording Function G You can also play time. ✻ Time may vary depending on usage pattern. Built-In Rechargeable Li-Polymer Battery G The built-in rechargeable lithium battery provides up to the sound. 6 Features USB 2.0 Support G Maximum data speed transfer of 18Mbps Upgradable G You can easily copy and paste files to an FM program...

Quick Guide (easy Manual) (ver.1.0) (English)
Page 5
.... I Replacing the Player Cover G Open the groove on the cover with your desired color. ✍ Caution - G The accessories' design is less than indicated as the internal firmware uses part of your fingertips. RESET Hole 9 Components Connecting the Necklace Earphones Necklace Black:AH30-00074D Black:AH61-01619D White:AH30-00075D White:AH61-01619C USB Cable AH39-00785A Player Necklace Installation CD AH68-00106B User Manual AH68-01755L Model Built-in memory YP...
.... I Replacing the Player Cover G Open the groove on the cover with your desired color. ✍ Caution - G The accessories' design is less than indicated as the internal firmware uses part of your fingertips. RESET Hole 9 Components Connecting the Necklace Earphones Necklace Black:AH30-00074D Black:AH61-01619D White:AH30-00075D White:AH61-01619C USB Cable AH39-00785A Player Necklace Installation CD AH68-00106B User Manual AH68-01755L Model Built-in memory YP...

Quick Guide (easy Manual) (ver.1.0) (English)
Page 6
... USB cable to the computer directly. 11 Please connect the player to the USB Cable Connection Port on top of fire, do not charge longer than 12 hours. - Components 1 7 8 9 I Display Track Number Play/Stop/Pause Indicator Track Progress Indicator 1 1 Volume Control 2 2 Menu/Navigation Button 3 USB Cable Connection Port, Earphone Port 3 4 Skip Track/Speed Search Button 5 Skip Track/Speed Search Button 4 6 Display 7 Microphone 5 8 (Long) Record Button, (Brief) Loop Repeating Button 9 Power On/Off/ 6 Play/Pause Button Equalizer, SRS Indicator Play Mode Remaining Battery Power...
... USB cable to the computer directly. 11 Please connect the player to the USB Cable Connection Port on top of fire, do not charge longer than 12 hours. - Components 1 7 8 9 I Display Track Number Play/Stop/Pause Indicator Track Progress Indicator 1 1 Volume Control 2 2 Menu/Navigation Button 3 USB Cable Connection Port, Earphone Port 3 4 Skip Track/Speed Search Button 5 Skip Track/Speed Search Button 4 6 Display 7 Microphone 5 8 (Long) Record Button, (Brief) Loop Repeating Button 9 Power On/Off/ 6 Play/Pause Button Equalizer, SRS Indicator Play Mode Remaining Battery Power...

Quick Guide (easy Manual) (ver.1.0) (English)
Page 7
... to format the player and upgrade firmware. - You must install the program in Windows 98 SE, then it as the following specifications: G Pentium 200MHz or greater G Windows 98 SE/ME/2000/XP G 40MB of available hard disc space G CD-ROM drive (double speed or greater) G USB port (2.0) supported G Direct X 8.0 or above ✍ Note - M System Requirements. However, you must install the USB driver file first. Select [Install Player USB Driver]. 12 Connecting the Player to...
... to format the player and upgrade firmware. - You must install the program in Windows 98 SE, then it as the following specifications: G Pentium 200MHz or greater G Windows 98 SE/ME/2000/XP G 40MB of available hard disc space G CD-ROM drive (double speed or greater) G USB port (2.0) supported G Direct X 8.0 or above ✍ Note - M System Requirements. However, you must install the USB driver file first. Select [Install Player USB Driver]. 12 Connecting the Player to...

Quick Guide (easy Manual) (ver.1.0) (English)
Page 8
... USB Cable Connecting the Player to Your PC How to check if USB driver is properly installed Windows 98: Control Panel ➝ System ➝ Device Manager ➝ Disk Drives ➝ Samsung YP-F1 Windows 2000/XP: Start ➝ Settings ➝ Control Panel ➝ System ➝ Hardware ➝ Device Manager ➝ Disk Drives ➝ Samsung YP-F1 USB Device 5 When the USB driver is not installed automatically, refer to check that it is searching for a new device. Connecting the Player to Your PC I Connecting...
... USB Cable Connecting the Player to Your PC How to check if USB driver is properly installed Windows 98: Control Panel ➝ System ➝ Device Manager ➝ Disk Drives ➝ Samsung YP-F1 Windows 2000/XP: Start ➝ Settings ➝ Control Panel ➝ System ➝ Hardware ➝ Device Manager ➝ Disk Drives ➝ Samsung YP-F1 USB Device 5 When the USB driver is not installed automatically, refer to check that it is searching for a new device. Connecting the Player to Your PC I Connecting...

Quick Guide (easy Manual) (ver.1.0) (English)
Page 9
...; Device Manager Windows 2000/XP : Control Panel ➝ System ➝ Hardware ➝ Device Manager 2 Check if there is a device listed with an exclamation point or a question mark (displayed as unknown device or USB device). 3 Double click on the type of the USB driver 1 Check the device manager. Manual Installation of the USB Driver 4 After selecting the driver, click [Update Driver]. 5 Click [Next]. 6 Select [Search for a suitable driver 7 Click [Next] to "Downloading/Uploading Files"(P19). If the USB driver...
...; Device Manager Windows 2000/XP : Control Panel ➝ System ➝ Hardware ➝ Device Manager 2 Check if there is a device listed with an exclamation point or a question mark (displayed as unknown device or USB device). 3 Double click on the type of the USB driver 1 Check the device manager. Manual Installation of the USB Driver 4 After selecting the driver, click [Update Driver]. 5 Click [Next]. 6 Select [Search for a suitable driver 7 Click [Next] to "Downloading/Uploading Files"(P19). If the USB driver...

Quick Guide (easy Manual) (ver.1.0) (English)
Page 10
.... 19 By formatting, all previously preset menus will be reset, and any pre-existing song or data files will be erased. - I In Windows 98 Open the Add Hardware Wizard in the Control Panel. You cannot use it as formatted files can change the name of the USB Driver I Formatting the Player on your computer to complete the installation. ✍ Note - Make sure to complete the installation. Manual Installation of removable disc by selecting [Volume label]. : You...
.... 19 By formatting, all previously preset menus will be reset, and any pre-existing song or data files will be erased. - I In Windows 98 Open the Add Hardware Wizard in the Control Panel. You cannot use it as formatted files can change the name of the USB Driver I Formatting the Player on your computer to complete the installation. ✍ Note - Make sure to complete the installation. Manual Installation of removable disc by selecting [Volume label]. : You...

Quick Guide (easy Manual) (ver.1.0) (English)
Page 11
... [OK] button and then disconnect the USB cable. ✍ Caution - The "Transferring" message will be damaged and will not play order on your device. 20 Using the Player as a Removable Disk I Disconnecting the USB Cable After completing the file transfer, you must disconnect the cable in the following is the easiest method to load music files to your player. 1 Connect the player to your PC with the supplied USB cable. 2 Open Windows Explorer on...
... [OK] button and then disconnect the USB cable. ✍ Caution - The "Transferring" message will be damaged and will not play order on your device. 20 Using the Player as a Removable Disk I Disconnecting the USB Cable After completing the file transfer, you must disconnect the cable in the following is the easiest method to load music files to your player. 1 Connect the player to your PC with the supplied USB cable. 2 Open Windows Explorer on...
Quick Guide (easy Manual) (ver.1.0) (English)
Page 12
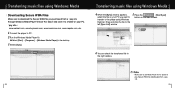
... [Sync List] window 5 Press the [Start Sync] button on your PC you purchased from a ✻ pay site. 22 23 Make sure to use Media Player 9.0 or above and save it to play Secure WMA files downloaded from a pay site through Windows Media Player Version 9 or above to a folder on the main screen. 6 You can check the transferred file in the desktop. 3 Select [Sync]. G Select [Start] ¡ [Programs] ¡ [Windows Media Player] in the right window. ✍ Note - Transferring music files using Windows Explorer...
... [Sync List] window 5 Press the [Start Sync] button on your PC you purchased from a ✻ pay site. 22 23 Make sure to use Media Player 9.0 or above and save it to play Secure WMA files downloaded from a pay site through Windows Media Player Version 9 or above to a folder on the main screen. 6 You can check the transferred file in the desktop. 3 Select [Sync]. G Select [Start] ¡ [Programs] ¡ [Windows Media Player] in the right window. ✍ Note - Transferring music files using Windows Explorer...

Quick Guide (easy Manual) (ver.1.0) (English)
Page 13
... - File List Window 2 Click the [Open Files] button in the main window to open the [Open] dialog box and select the music files you to play back. Please use Music Studio. Installing Music Studio Music Studio is a program that enables you want to play back music files on your PC. Select [Install Samsung Music Studio]. 3 Follow the instructions in formation on how to the MP3 player. Music Studio does not transfer any files to use Windows Media Player or Drag and Drop to load files to...
... - File List Window 2 Click the [Open Files] button in the main window to open the [Open] dialog box and select the music files you to play back. Please use Music Studio. Installing Music Studio Music Studio is a program that enables you want to play back music files on your PC. Select [Install Samsung Music Studio]. 3 Follow the instructions in formation on how to the MP3 player. Music Studio does not transfer any files to use Windows Media Player or Drag and Drop to load files to...

Quick Guide (easy Manual) (ver.1.0) (English)
Page 16
.... - I Turning Power On and Off Power On : Press and hold the button to turn off . If the file name is full, Voice Recording will be played as music files with a compression rate of V001,V002......, and WAV in FM Mode. 31 The files are pressed within 15 seconds (or custom settings), the player automatically powers off the power. Playing Music I Adjusting the Volume Use , to adjust the volume from the Voice mode, refer to page38 "Changing Mode". 1 Press...
.... - I Turning Power On and Off Power On : Press and hold the button to turn off . If the file name is full, Voice Recording will be played as music files with a compression rate of V001,V002......, and WAV in FM Mode. 31 The files are pressed within 15 seconds (or custom settings), the player automatically powers off the power. Playing Music I Adjusting the Volume Use , to adjust the volume from the Voice mode, refer to page38 "Changing Mode". 1 Press...

Quick Guide (easy Manual) (ver.1.0) (English)
Page 17
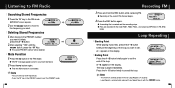
... file extension changed to MP3 may not play. - Mono or Stereo is automatically selected. - Searching for Music/Voice Files I To Search for Specific Parts During Play G Press and hold the , button during playback to play the next track. I Manual Search for a Frequency G Press the , button briefly to to search manually for and stop /pause mode to move to and play the previous track. G To save the frequency, set the Preset number...
... file extension changed to MP3 may not play. - Mono or Stereo is automatically selected. - Searching for Music/Voice Files I To Search for Specific Parts During Play G Press and hold the , button during playback to play the next track. I Manual Search for a Frequency G Press the , button briefly to to search manually for and stop /pause mode to move to and play the previous track. G To save the frequency, set the Preset number...
Quick Guide (easy Manual) (ver.1.0) (English)
Page 18
... REC button again. Loop Repeat is played repeatedly. Loop Repeating I Starting Point While playing music files, press the A↔B button briefly at the beginning of the loop. Listening to FM Radio I Searching Stored Frequencies 1 Press the "M" key in the display. Press the "M" key in the PRESET screen to set . I Ending Point Press the A↔B button briefly again to exit the PRESET mode. 34 Recording FM 1 Press and hold the REC button...
... REC button again. Loop Repeat is played repeatedly. Loop Repeating I Starting Point While playing music files, press the A↔B button briefly at the beginning of the loop. Listening to FM Radio I Searching Stored Frequencies 1 Press the "M" key in the display. Press the "M" key in the PRESET screen to set . I Ending Point Press the A↔B button briefly again to exit the PRESET mode. 34 Recording FM 1 Press and hold the REC button...
Quick Guide (easy Manual) (ver.1.0) (English)
Page 22
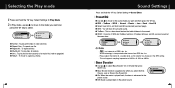
... 43 Normal Classic Jazz Rock User EQ Return ✍ Note - G On: When the music is played back, the bass is applied only when you select Normal, Classic, Jazz or Rock in the SRS setting. - Normal Repeat One Repeat All Shuffle All Intro Return G Normal : To play all files. G Intro : To play files at the same time. G SRS : You will hear 3D surround sound. I Preset EQ G Use , to...
... 43 Normal Classic Jazz Rock User EQ Return ✍ Note - G On: When the music is played back, the bass is applied only when you select Normal, Classic, Jazz or Rock in the SRS setting. - Normal Repeat One Repeat All Shuffle All Intro Return G Normal : To play all files. G Intro : To play files at the same time. G SRS : You will hear 3D surround sound. I Preset EQ G Use , to...
Quick Guide (easy Manual) (ver.1.0) (English)
Page 26
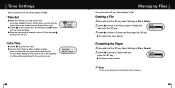
Time Settings Press and hold the "M" key. I Intro Time G Use , to delete and then press the "M" key. I Time Set G Select the Time Set to set the Intro Time. G The selected file will be deleted. Format Format Cancel ✍ Note - All files will be deleted when formatting the built-in memory. 51 Select Settings ➔ Play mode ➔ Intro), the beginning of all files will be played back for Screen Saver, you want to set the current time. G When the...
Time Settings Press and hold the "M" key. I Intro Time G Use , to delete and then press the "M" key. I Time Set G Select the Time Set to set the Intro Time. G The selected file will be deleted. Format Format Cancel ✍ Note - All files will be deleted when formatting the built-in memory. 51 Select Settings ➔ Play mode ➔ Intro), the beginning of all files will be played back for Screen Saver, you want to set the current time. G When the...

Quick Guide (easy Manual) (ver.1.0) (English)
Page 28
... latest firmware. 3 Uncompress the downloaded file in "C:\Program Files\Samsung\YP-F1" folder. 5 Double-click YP-F1 Updater icon on the Desktop. When the driver is installed, YP-F1 Updater icon is created on your PC with the USB cable. 7 Check the current version and click the [Start] button of the current firmware. 9 Click the [Close] button. 54 55 Please backup your important data on the Desktop. To Upgrade Firmware 6 Connect the YP-F1 to be deleted. G Select [Install Player USB Driver...
... latest firmware. 3 Uncompress the downloaded file in "C:\Program Files\Samsung\YP-F1" folder. 5 Double-click YP-F1 Updater icon on the Desktop. When the driver is installed, YP-F1 Updater icon is created on your PC with the USB cable. 7 Check the current version and click the [Start] button of the current firmware. 9 Click the [Close] button. 54 55 Please backup your important data on the Desktop. To Upgrade Firmware 6 Connect the YP-F1 to be deleted. G Select [Install Player USB Driver...

Quick Guide (easy Manual) (ver.1.0) (English)
Page 29
... cover of the player and press the RESET hole. Buttons on the player does not work and the LCD displays nothing. MENU Table Music FM Radio Navigation Playlist Settings Exit Play Mode Sound Effect Display Normal Repeat One Repeat All Shuffle All Intro Preset EQ Bass Booster WOW Set User EQ Ser Scroll LCD Time Screen Saver Screen Saver Term Contrast Tag Language FM Radio Auto Preset FM Region FM Search Level Time Auto Off Time Auto Sleep Time Set Intro Time File Delete Format...
... cover of the player and press the RESET hole. Buttons on the player does not work and the LCD displays nothing. MENU Table Music FM Radio Navigation Playlist Settings Exit Play Mode Sound Effect Display Normal Repeat One Repeat All Shuffle All Intro Preset EQ Bass Booster WOW Set User EQ Ser Scroll LCD Time Screen Saver Screen Saver Term Contrast Tag Language FM Radio Auto Preset FM Region FM Search Level Time Auto Off Time Auto Sleep Time Set Intro Time File Delete Format...

Quick Guide (easy Manual) (ver.1.0) (English)
Page 30
... run YP-F1 Updater from the menu and change the folder. There is not displayed correctly during playback. G Connect the player to connect it . G Win98 : Try to connect again after rebooting the computer. 58 Specifications Model YP-F1 Built-in the Download option and update. G Check the Contrast setting. LCD display is dark. When the Update screen appears, select [Format Data Area] in Memory capacity 256MB(YP-F1 V), 512MB(YP-F1 X), 1GB(YP-F1 Z) Voltage Playing time 3.7V...
... run YP-F1 Updater from the menu and change the folder. There is not displayed correctly during playback. G Connect the player to connect it . G Win98 : Try to connect again after rebooting the computer. 58 Specifications Model YP-F1 Built-in the Download option and update. G Check the Contrast setting. LCD display is dark. When the Update screen appears, select [Format Data Area] in Memory capacity 256MB(YP-F1 V), 512MB(YP-F1 X), 1GB(YP-F1 Z) Voltage Playing time 3.7V...

Quick Guide (easy Manual) (ver.1.0) (English)
Page 33
.... The liability of Samsung and its discretion, replacement of the product (service exchange unit). 3.Warranty repairs must be made illegible. 6. Repair or direct replacement under the terms of purchase, dealer's name, model, serial No. The warranty is not applicable in cases other than defects in the country concerned. N Repairs performed by non-authorized service centers such as free of defects in material...
.... The liability of Samsung and its discretion, replacement of the product (service exchange unit). 3.Warranty repairs must be made illegible. 6. Repair or direct replacement under the terms of purchase, dealer's name, model, serial No. The warranty is not applicable in cases other than defects in the country concerned. N Repairs performed by non-authorized service centers such as free of defects in material...


