User Manual
Page 2
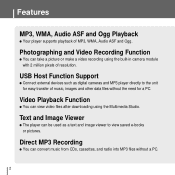
... q The player can take a picture or make a video recording using the Multimedia Studio. Direct MP3 Recording q You can view video files after downloading using the built-in camera module with 2 million pixels of resolution. Video Playback Function q You can convert music from CDs, cassettes, and radio into MP3 files without the need for a PC. Photographing and Video Recording Function q You can be used as digital cameras and MP3 player directly to view saved e-books or pictures. USB Host Function Support q Connect external devices such as...
... q The player can take a picture or make a video recording using the Multimedia Studio. Direct MP3 Recording q You can view video files after downloading using the built-in camera module with 2 million pixels of resolution. Video Playback Function q You can convert music from CDs, cassettes, and radio into MP3 files without the need for a PC. Photographing and Video Recording Function q You can be used as digital cameras and MP3 player directly to view saved e-books or pictures. USB Host Function Support q Connect external devices such as...
User Manual
Page 4
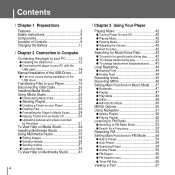
Contents I Chapter 1 Preparations Features 2 Safety Instructions 6 Components 8 Location of Controls 9 Charging the Battery 11 I Chapter 2 Connection to Computer Connecting the player to your PC 12 q Installing the USB Driver 12 q Connecting the player to your PC with the USB cable 14 Manual Installation of the USB Driver ........16 q If an error occurs during installation of the USB driver 16 Transferring Files to your Player 18 Disconnecting USB Cable 20 Installing Media Studio 21 Using Media Studio 23 q Downloading Music Files 23 q Sending Playlist 25...
Contents I Chapter 1 Preparations Features 2 Safety Instructions 6 Components 8 Location of Controls 9 Charging the Battery 11 I Chapter 2 Connection to Computer Connecting the player to your PC 12 q Installing the USB Driver 12 q Connecting the player to your PC with the USB cable 14 Manual Installation of the USB Driver ........16 q If an error occurs during installation of the USB driver 16 Transferring Files to your Player 18 Disconnecting USB Cable 20 Installing Media Studio 21 Using Media Studio 23 q Downloading Music Files 23 q Sending Playlist 25...
User Manual
Page 5
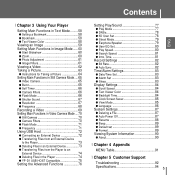
... Recording a Video 69 Setting Main Functions in Video Camera Mode....70 q Still Camera 70 q Camera Filters 70 q Flash Mode 71 q Frequency 71 Using USB Host 72 q Connecting an External Device 72 q Transferring Files from an External Device to the Player 73 q Deleting Files in an External Device 73 q Transferring Files from the Player to an External Device 74 q Deleting Files in the Player 74 q YP-D1 USB HOST Compatible 75 Setting the Advanced Functions 76 Setting Play/Sound 77 q Play Mode 77 q DNSe 78 q 3D User Set...
... Recording a Video 69 Setting Main Functions in Video Camera Mode....70 q Still Camera 70 q Camera Filters 70 q Flash Mode 71 q Frequency 71 Using USB Host 72 q Connecting an External Device 72 q Transferring Files from an External Device to the Player 73 q Deleting Files in an External Device 73 q Transferring Files from the Player to an External Device 74 q Deleting Files in the Player 74 q YP-D1 USB HOST Compatible 75 Setting the Advanced Functions 76 Setting Play/Sound 77 q Play Mode 77 q DNSe 78 q 3D User Set...

User Manual
Page 9
Location of Controls Camera Lens Earphone Jack MIC Neck strap Hook ENG Record button HOLD switch External Speaker [REAR VIEW] ENC Jack Display Photographing/Video Recording button MENU button Power On/Off Play/Pause button Move to Track Speed Search button Navigation/Volume Control button RESET Hole USB Cable Connection Port 9
Location of Controls Camera Lens Earphone Jack MIC Neck strap Hook ENG Record button HOLD switch External Speaker [REAR VIEW] ENC Jack Display Photographing/Video Recording button MENU button Power On/Off Play/Pause button Move to Track Speed Search button Navigation/Volume Control button RESET Hole USB Cable Connection Port 9

User Manual
Page 12
..., USB driver installation is not required. Select your PC (Page 14)". 1 Insert the Installation CD into CD-ROM drive. The PC system must meet the following specifications: q Pentium 200MHz or greater q Windows 98 SE/ME/2000/XP q 100MB of available hard disk space q CD-ROM drive(double speed or greater) q USB port (2.0) supported q DirectX 9.0 or above I Installing the USB Driver For Windows 98SE, install the USB driver before connecting the player to...
..., USB driver installation is not required. Select your PC (Page 14)". 1 Insert the Installation CD into CD-ROM drive. The PC system must meet the following specifications: q Pentium 200MHz or greater q Windows 98 SE/ME/2000/XP q 100MB of available hard disk space q CD-ROM drive(double speed or greater) q USB port (2.0) supported q DirectX 9.0 or above I Installing the USB Driver For Windows 98SE, install the USB driver before connecting the player to...
User Manual
Page 14
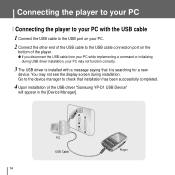
... the display screen during USB driver installation, your PC may not function correctly. 3 The USB driver is searching for a new device. Go to the device manager to check that it is installed with the USB cable 1 Connect the USB cable to the USB port on the bottom of the USB driver "Samsung YP-D1 USB Device" will appear in the [Device Manager]. Connecting the player to your PC I Connecting the player to your PC. 2 Connect the other end of the USB cable to the USB cable connection port on...
... the display screen during USB driver installation, your PC may not function correctly. 3 The USB driver is searching for a new device. Go to the device manager to check that it is installed with the USB cable 1 Connect the USB cable to the USB port on the bottom of the USB driver "Samsung YP-D1 USB Device" will appear in the [Device Manager]. Connecting the player to your PC I Connecting the player to your PC. 2 Connect the other end of the USB cable to the USB cable connection port on...
User Manual
Page 15
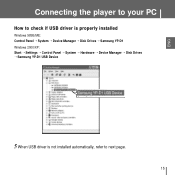
ENG Connecting the player to your PC How to check if USB driver is properly installed Windows 98SE/ME: Control Panel ¡ System ¡ Device Manager ¡ Disk Drives ¡ Samsung YP-D1 Windows 2000/XP: Start ¡ Settings ¡ Control Panel ¡ System ¡ Hardware ¡ Device Manager ¡ Disk Drives ¡ Samsung YP-D1 USB Device 5 When USB driver is not installed automatically, refer to next page. 15
ENG Connecting the player to your PC How to check if USB driver is properly installed Windows 98SE/ME: Control Panel ¡ System ¡ Device Manager ¡ Disk Drives ¡ Samsung YP-D1 Windows 2000/XP: Start ¡ Settings ¡ Control Panel ¡ System ¡ Hardware ¡ Device Manager ¡ Disk Drives ¡ Samsung YP-D1 USB Device 5 When USB driver is not installed automatically, refer to next page. 15

User Manual
Page 16
... PC or operating system. Windows 98SE: Control Panel ➝ System ➝ Device Manager 2 Check to install the USB driver manually. If errors occur continuously when you install the USB driver, reconnect the USB cable after rebooting your PC dealer or service center for installation information. - The installation method may vary depending on the type of the USB driver 1 Check the device manager. Manual Installation of the USB Driver If the driver does not install automatically, follow the instructions below to...
... PC or operating system. Windows 98SE: Control Panel ➝ System ➝ Device Manager 2 Check to install the USB driver manually. If errors occur continuously when you install the USB driver, reconnect the USB cable after rebooting your PC dealer or service center for installation information. - The installation method may vary depending on the type of the USB driver 1 Check the device manager. Manual Installation of the USB Driver If the driver does not install automatically, follow the instructions below to...

User Manual
Page 17
USB driver location [CD-ROM]\Win98USB\Drivers 17 ENG Manual Installation of the USB Driver Follow the instructions below to install the USB driver manually.
USB driver location [CD-ROM]\Win98USB\Drivers 17 ENG Manual Installation of the USB Driver Follow the instructions below to install the USB driver manually.

User Manual
Page 23
q The music files within the folder appear in the center of the screen if device connection window does not automatically appear. 2 Select the folder with the file(s) you want to your PC q A device connection window will appear on the Desktop. Library window Device connection window Continued... 23 ENG Using Media Studio q Double-click the Media Studio icon on the right side of the screen. I Downloading Music Files 1 Connect the player to transfer from the [Library] window. Select [Device] ¡ [Show device Window] at the top of the screen.
q The music files within the folder appear in the center of the screen if device connection window does not automatically appear. 2 Select the folder with the file(s) you want to your PC q A device connection window will appear on the Desktop. Library window Device connection window Continued... 23 ENG Using Media Studio q Double-click the Media Studio icon on the right side of the screen. I Downloading Music Files 1 Connect the player to transfer from the [Library] window. Select [Device] ¡ [Show device Window] at the top of the screen.

User Manual
Page 25
q The music files within the folder appear on the center of the screen. Continued... 25 ENG Using Media Studio I Sending Playlist 1 Connect the player to transfer from the [Library] window. q Enter the name of Playlist folder when input screen appears. 3 Select the folder with the file(s) you want to PC. 2 Press the [File] ¡ [Add Playlist] at the top of the screen.
q The music files within the folder appear on the center of the screen. Continued... 25 ENG Using Media Studio I Sending Playlist 1 Connect the player to transfer from the [Library] window. q Enter the name of Playlist folder when input screen appears. 3 Select the folder with the file(s) you want to PC. 2 Press the [File] ¡ [Add Playlist] at the top of the screen.

User Manual
Page 26
A selected Playlist is deleted when [Delete] button is pressed. Refer to the player. A new Playlist is created when [Add] button on the Playlist window is pressed. - Press the MENU button briefly in the Playlist window after selecting the Playlist. Using Media Studio 4 Drag & drop the desired files into the created Playlist. 5 Press the [Transmit] button in the MUSIC mode and select [Playlist] to view the transmitted Playlist. ✍ Note - q Files within the Playlist are transferred to [Help] for more detailed information 26
A selected Playlist is deleted when [Delete] button is pressed. Refer to the player. A new Playlist is created when [Add] button on the Playlist window is pressed. - Press the MENU button briefly in the Playlist window after selecting the Playlist. Using Media Studio 4 Drag & drop the desired files into the created Playlist. 5 Press the [Transmit] button in the MUSIC mode and select [Playlist] to view the transmitted Playlist. ✍ Note - q Files within the Playlist are transferred to [Help] for more detailed information 26

User Manual
Page 28
q A selected folder or file is deleted. ✍ Note - Using Media Studio I Deleting Files 1 Connect the player to [Help] for more detailed information. 28 Refer to your PC. 2 Press the [Delete] button at the bottom of the connection windows after selecting required files or folders from the device connection windows. 3 Press the [Confirm] button when an Confirm Deletion screen appears.
q A selected folder or file is deleted. ✍ Note - Using Media Studio I Deleting Files 1 Connect the player to [Help] for more detailed information. 28 Refer to your PC. 2 Press the [Delete] button at the bottom of the connection windows after selecting required files or folders from the device connection windows. 3 Press the [Confirm] button when an Confirm Deletion screen appears.

User Manual
Page 29
I Formattimg the Player in Media Studio 1 Connect the player to [Help] for new file storage. ENG Using Media Studio q Formatting deletes all files on the MP3 player so maximum memory is formatted and all the saved files will be deleted. ✍ Note - Refer to your PC. 2 Press the [Device] ¡ [Format] at a time. q The memory of the screen. 3 Press the [Start] button when the Format screen appears. It saves you the trouble of deleting unwanted files one at the top of the player is available for more detailed information. 29
I Formattimg the Player in Media Studio 1 Connect the player to [Help] for new file storage. ENG Using Media Studio q Formatting deletes all files on the MP3 player so maximum memory is formatted and all the saved files will be deleted. ✍ Note - Refer to your PC. 2 Press the [Device] ¡ [Format] at a time. q The memory of the screen. 3 Press the [Start] button when the Format screen appears. It saves you the trouble of deleting unwanted files one at the top of the player is available for more detailed information. 29

User Manual
Page 30
Using Media Studio q Using the audio format conversion function, you can lip tracks from an Audio CD 1 Insert the Audio CD into an MP3 file. Change format Save path ✍ Note - I Ripping Tracks from an audio CD as MP3 files. q The selected file is converted into the CD-ROM drive of your PC. 2 Press the [Search Audio CD] button on the lower part of the screen to change rip settings. Refer to be...
Using Media Studio q Using the audio format conversion function, you can lip tracks from an Audio CD 1 Insert the Audio CD into an MP3 file. Change format Save path ✍ Note - I Ripping Tracks from an audio CD as MP3 files. q The selected file is converted into the CD-ROM drive of your PC. 2 Press the [Search Audio CD] button on the lower part of the screen to change rip settings. Refer to be...
User Manual
Page 31
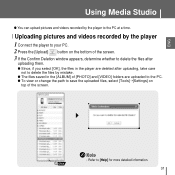
I Uploading pictures and videos recorded by the player 1 Connect the player to your PC. 2 Press the [Upload] button on top of the screen. ✍ Note - q The files saved in the player are uploaded to delete the files after uploading, take care not to [Help] for more detailed information. 31 q To view or change the path to the PC at a time. ENG Using Media Studio q You can upload pictures and videos recorded by...
I Uploading pictures and videos recorded by the player 1 Connect the player to your PC. 2 Press the [Upload] button on top of the screen. ✍ Note - q The files saved in the player are uploaded to delete the files after uploading, take care not to [Help] for more detailed information. 31 q To view or change the path to the PC at a time. ENG Using Media Studio q You can upload pictures and videos recorded by...
User Manual
Page 39
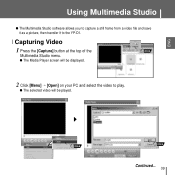
I Capturing Video 1 Press the [Capture] button at the top of the Multimedia Studio menu. q The selected video will be played. q The Media Player screen will be displayed. 2 Click [Menu] ¡ [Open] on your PC and select the video to the YP-D1. Continued... 39 ENG Using Multimedia Studio q The Multimedia Studio software allows you to capture a still frame from a video file and save it as a picture, then transfer it to play.
I Capturing Video 1 Press the [Capture] button at the top of the Multimedia Studio menu. q The selected video will be played. q The Media Player screen will be displayed. 2 Click [Menu] ¡ [Open] on your PC and select the video to the YP-D1. Continued... 39 ENG Using Multimedia Studio q The Multimedia Studio software allows you to capture a still frame from a video file and save it as a picture, then transfer it to play.

User Manual
Page 64
... background for sharper picture. q This equipment does not support high-definition visual quality. q Clean the camera lens only with a soft cloth. q When you take pictures or recording videos, the number of saved files and the recording time may not clear if it takes some time for the camera sensor to detect lighting and determines necessary exposure. Taking a Picture I Instructions for Taking a Picture q The target...
... background for sharper picture. q This equipment does not support high-definition visual quality. q Clean the camera lens only with a soft cloth. q When you take pictures or recording videos, the number of saved files and the recording time may not clear if it takes some time for the camera sensor to detect lighting and determines necessary exposure. Taking a Picture I Instructions for Taking a Picture q The target...

User Manual
Page 78
... stereophonic sound effect to menu and select [Settings] ¡ [Music]. Setting Play/Sound Press and hold the MENU button to move to the music, the Bass Enhance reinforces the bass and the Street mode provides automatic volume control function that amplifies small sound in noisy street. I 3D User Set 3D-User Set is applied only when 3D sound mode is a sound effect function for easier listening in noisy environment for MP3 player developed by Samsung...
... stereophonic sound effect to menu and select [Settings] ¡ [Music]. Setting Play/Sound Press and hold the MENU button to move to the music, the Bass Enhance reinforces the bass and the Street mode provides automatic volume control function that amplifies small sound in noisy street. I 3D User Set 3D-User Set is applied only when 3D sound mode is a sound effect function for easier listening in noisy environment for MP3 player developed by Samsung...

User Manual
Page 91
MENU Table MENU Music Navigation Playlist FM Radio Text Photo Video Camera USB Host Settings Still Camera Video Camera ENG Music Play Mode DNSe 3D-User Set Street Mode Earphone/Speaker User EQ Set Play Speed Search Speed Intro Time Record Bit Rate Auto Sync Time/Alarm Display Language Date/Time Set Scroll Speed Alarm Set Text Viewer Color Sleep Backlight Time Clock Screen Saver View Mode System About Delete File Auto Power Off Resume Beep Default set Format Firmware Version Memory Files q Use the button to move and select. 91
MENU Table MENU Music Navigation Playlist FM Radio Text Photo Video Camera USB Host Settings Still Camera Video Camera ENG Music Play Mode DNSe 3D-User Set Street Mode Earphone/Speaker User EQ Set Play Speed Search Speed Intro Time Record Bit Rate Auto Sync Time/Alarm Display Language Date/Time Set Scroll Speed Alarm Set Text Viewer Color Sleep Backlight Time Clock Screen Saver View Mode System About Delete File Auto Power Off Resume Beep Default set Format Firmware Version Memory Files q Use the button to move and select. 91


