Quick Guide Easy Manual Ver.1.0 (English)
Page 1
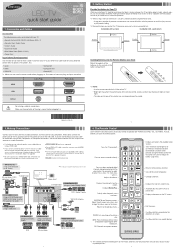
... menu. yyFor an HDMI to DVI cable connection, you choose the picture size. The Remote Control Learn where the function buttons are below. Turns the remote control light on the TV screen. When on, the buttons become illuminated for a moment when pressed. (Using the remote control with the product or result in . 2. Power Input TV Rear Panel W R Audio Device (1) Using an Audio (Analog) Cable AUDIO IN R-AUDIO-L DVD / Home Theater VHF/UHF Antenna Media Play Using a USB Drive RW YR R W R B GR GR RW Y AV Device (2) Using Audio/Video Cables AUDIO...
... menu. yyFor an HDMI to DVI cable connection, you choose the picture size. The Remote Control Learn where the function buttons are below. Turns the remote control light on the TV screen. When on, the buttons become illuminated for a moment when pressed. (Using the remote control with the product or result in . 2. Power Input TV Rear Panel W R Audio Device (1) Using an Audio (Analog) Cable AUDIO IN R-AUDIO-L DVD / Home Theater VHF/UHF Antenna Media Play Using a USB Drive RW YR R W R B GR GR RW Y AV Device (2) Using Audio/Video Cables AUDIO...
Quick Guide Easy Manual Ver.1.0 (English)
Page 2
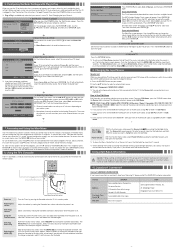
... satellite box to an HDMI, Component, Composite, or Antenna input, and you If you have connected the TV to press the controller unconsciously. Plug & Play Select Language of digital and analog cable systems you choose Auto, and then press ENTERE, the TV will automatically download the correct time from a digital channel. Auto ✎✎ If you selected Auto: Clock Mode : Auto The TV will automatically select the correct Antenna source. Accessing and Using the Main Menu...
... satellite box to an HDMI, Component, Composite, or Antenna input, and you If you have connected the TV to press the controller unconsciously. Plug & Play Select Language of digital and analog cable systems you choose Auto, and then press ENTERE, the TV will automatically download the correct time from a digital channel. Auto ✎✎ If you selected Auto: Clock Mode : Auto The TV will automatically select the correct Antenna source. Accessing and Using the Main Menu...
User Manual Ver.1.0 (English)
Page 1
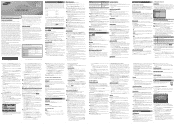
... the All Channel, Added Channels, and Favorite List screens. The options are displayed, you can also enter numbers directly using the ▲/▼ buttons to the Added Channels list. Background Color: Options include Default, White, Black, Red, Green, Blue, Yellow, Magenta and Cyan. The default is Style 0. button. HD Connection Guide Refer to this is set the clock first. ■■On Time / Off Time: Set the hour, minute, am L Move U Adjust E Enter R Return 4. Media Play Enjoy...
... the All Channel, Added Channels, and Favorite List screens. The options are displayed, you can also enter numbers directly using the ▲/▼ buttons to the Added Channels list. Background Color: Options include Default, White, Black, Red, Green, Blue, Yellow, Magenta and Cyan. The default is Style 0. button. HD Connection Guide Refer to this is set the clock first. ■■On Time / Off Time: Set the hour, minute, am L Move U Adjust E Enter R Return 4. Media Play Enjoy...
User Manual Ver.1.0 (English)
Page 2
... Plug & Play (Initial Setup). ✎✎ This TFT LED panel uses a panel consisting of audio or video can play movie and music files repeatedly. To upgrade, download the firmware to your Eco friendly No Signal Power Off feature. Category Operation Videos Title You can adjust the picture size to the Wall Settings Using the Setup Menu ■■DivX® Video On Demand : Shows the registration code authorized for digital channels received through an Antenna / RF/Coax connection. • Remove the stand base from the Samsung...
... Plug & Play (Initial Setup). ✎✎ This TFT LED panel uses a panel consisting of audio or video can play movie and music files repeatedly. To upgrade, download the firmware to your Eco friendly No Signal Power Off feature. Category Operation Videos Title You can adjust the picture size to the Wall Settings Using the Setup Menu ■■DivX® Video On Demand : Shows the registration code authorized for digital channels received through an Antenna / RF/Coax connection. • Remove the stand base from the Samsung...


