User Manual Ver.1.0 (English)
Page 1
E-MANUAL Thank you for purchasing this Samsung product. To receive more complete service, please register your product at www.samsung.com/register Model Serial No
E-MANUAL Thank you for purchasing this Samsung product. To receive more complete service, please register your product at www.samsung.com/register Model Serial No
User Manual Ver.1.0 (English)
Page 2
...Output Connection Connecting to a Computer 7 Connecting Through the HDMI Port 8 Connecting With a DVI to HDMI Cable 9 Connecting Through Samsung Link 9 Connecting Through DLNA Using Your Home Network Connecting To a Mobile Device 11 Screen Mirroring 13 Connecting Mobile Devices without a... Internet Network Automatically 26 Connecting to a Wired Internet Network Manually Establishing a Wireless Internet Connection 28 Connecting to a Wireless Internet Network Automatically 29 Connecting to a Wireless Internet Network Manually 30 Connecting to a Wireless Internet Network with WPS Troubleshooting ...
...Output Connection Connecting to a Computer 7 Connecting Through the HDMI Port 8 Connecting With a DVI to HDMI Cable 9 Connecting Through Samsung Link 9 Connecting Through DLNA Using Your Home Network Connecting To a Mobile Device 11 Screen Mirroring 13 Connecting Mobile Devices without a... Internet Network Automatically 26 Connecting to a Wired Internet Network Manually Establishing a Wireless Internet Connection 28 Connecting to a Wireless Internet Network Automatically 29 Connecting to a Wireless Internet Network Manually 30 Connecting to a Wireless Internet Network with WPS Troubleshooting ...
User Manual Ver.1.0 (English)
Page 4
...Saving Features 99 Preventing Screen Burn 99 Using Energy Saving Features Using the e-Manual 100 Launching the e-Manual 100 Additional e-Manual Features 101 Accessing the Menu from the e-Manual 101 Loading Reference Pages 101 Updating the e-Manual to the Latest Version Updating the TV's Software 102 Update now 102 ...Text on Black Background (High Contrast) 107 Expanding the Smart Hub's Focus Area 107 Locking/Unlocking the Panel Keys 107 Showing/Hiding the Samsung Logo while Booting 107 Enabling Game Mode 108 Enjoying Rich Colors and Superior Picture Quality (BD Wise) 108 Registering the TV as a...
...Saving Features 99 Preventing Screen Burn 99 Using Energy Saving Features Using the e-Manual 100 Launching the e-Manual 100 Additional e-Manual Features 101 Accessing the Menu from the e-Manual 101 Loading Reference Pages 101 Updating the e-Manual to the Latest Version Updating the TV's Software 102 Update now 102 ...Text on Black Background (High Contrast) 107 Expanding the Smart Hub's Focus Area 107 Locking/Unlocking the Panel Keys 107 Showing/Hiding the Samsung Logo while Booting 107 Enabling Game Mode 108 Enjoying Rich Colors and Superior Picture Quality (BD Wise) 108 Registering the TV as a...
User Manual Ver.1.0 (English)
Page 6
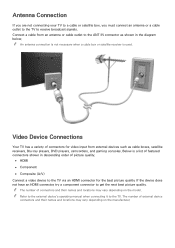
... broadcast signals. "" The number of external device connectors and their names and locations may vary depending on the model. "" Refer to the external device's operating manual when connecting it to get the next best picture quality. Below is used. The number of connectors and their names and locations may vary depending...
... broadcast signals. "" The number of external device connectors and their names and locations may vary depending on the model. "" Refer to the external device's operating manual when connecting it to get the next best picture quality. Below is used. The number of connectors and their names and locations may vary depending...
User Manual Ver.1.0 (English)
Page 10
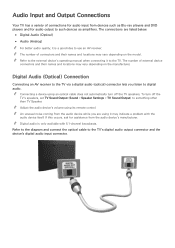
... device itself. "" Adjust the audio device's volume using an optical cable does not automatically turn off the TV speakers. "" Refer to the external device's operating manual when connecting it may vary depending on the manufacturer. Audio Input and Output Connections Your TV has a variety of connections for audio input from devices...
... device itself. "" Adjust the audio device's volume using an optical cable does not automatically turn off the TV speakers. "" Refer to the external device's operating manual when connecting it may vary depending on the manufacturer. Audio Input and Output Connections Your TV has a variety of connections for audio input from devices...
User Manual Ver.1.0 (English)
Page 19
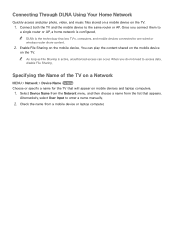
... wired or wireless router share content. 222 Enable File Sharing on the TV. 111 Connect both the TV and the mobile device to enter a name manually. 222 Check the name from the list that appears. "" As long as File Sharing is configured. Connecting Through DLNA Using Your Home Network Quickly access...
... wired or wireless router share content. 222 Enable File Sharing on the TV. 111 Connect both the TV and the mobile device to enter a name manually. 222 Check the name from the list that appears. "" As long as File Sharing is configured. Connecting Through DLNA Using Your Home Network Quickly access...
User Manual Ver.1.0 (English)
Page 21
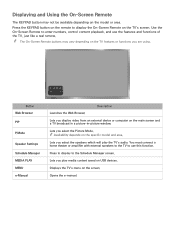
Button Web Browser PIP P.Mode Speaker Settings Schedule Manager MEDIA PLAY MENU e-Manual Launches the Web Browser. Lets you play the TV's audio. Lets you select the Picture Mode. Displaying and Using the On-Screen Remote The KEYPAD ... on the TV's screen. ""Availability depends on the screen. Press to display to display the On-Screen Remote on the model or area. Opens the e-manual. You must connect a home theater or amplifier with external speakers to the TV to enter numbers, control content playback, and use this function. Displays the...
Button Web Browser PIP P.Mode Speaker Settings Schedule Manager MEDIA PLAY MENU e-Manual Launches the Web Browser. Lets you play the TV's audio. Lets you select the Picture Mode. Displaying and Using the On-Screen Remote The KEYPAD ... on the TV's screen. ""Availability depends on the screen. Press to display to display the On-Screen Remote on the model or area. Opens the e-manual. You must connect a home theater or amplifier with external speakers to the TV to enter numbers, control content playback, and use this function. Displays the...
User Manual Ver.1.0 (English)
Page 30
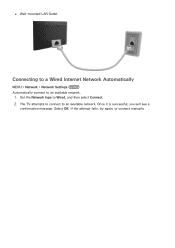
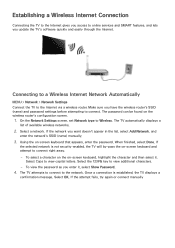
Select OK. If the attempt fails, try again, or connect manually. Once it is successful, you will see a confirmation message. ●● Wall-mounted LAN Outlet Connecting to a Wired Internet Network Automatically MENU > Network > Network Settings Try Now Automatically connect to an available network. 111 Set the Network type to Wired, and then select Connect. 222 The TV attempts to connect to an available network.
Select OK. If the attempt fails, try again, or connect manually. Once it is successful, you will see a confirmation message. ●● Wall-mounted LAN Outlet Connecting to a Wired Internet Network Automatically MENU > Network > Network Settings Try Now Automatically connect to an available network. 111 Set the Network type to Wired, and then select Connect. 222 The TV attempts to connect to an available network.
User Manual Ver.1.0 (English)
Page 31
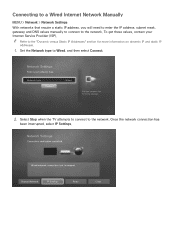
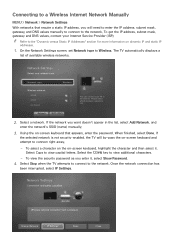
.... Network type Connect Wired You can connect your network type. Once the network connection has been interrupted, select IP Settings. Connecting to a Wired Internet Network Manually MENU > Network > Network Settings With networks that require a static IP address, you will need to enter the IP address, subnet mask, gateway, and DNS values...
.... Network type Connect Wired You can connect your network type. Once the network connection has been interrupted, select IP Settings. Connecting to a Wired Internet Network Manually MENU > Network > Network Settings With networks that require a static IP address, you will need to enter the IP address, subnet mask, gateway, and DNS values...
User Manual Ver.1.0 (English)
Page 32
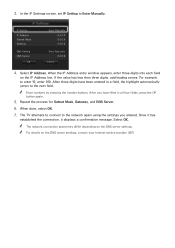
... details on the DNS server settings. "" Enter numbers by pressing the number buttons. For example, to Enter Manually. IP Settings IP Setting IP Address Subnet Mask Gateway Enter Manually 0.0.0.0 0.0.0.0 0.0.0.0 DNS Setting DNS Server OK Enter Manually 0.0.0.0 Cancel 444 Select IP Address. When the IP Address entry window appears, enter three digits into each...
... details on the DNS server settings. "" Enter numbers by pressing the number buttons. For example, to Enter Manually. IP Settings IP Setting IP Address Subnet Mask Gateway Enter Manually 0.0.0.0 0.0.0.0 0.0.0.0 DNS Setting DNS Server OK Enter Manually 0.0.0.0 Cancel 444 Select IP Address. When the IP Address entry window appears, enter three digits into each...
User Manual Ver.1.0 (English)
Page 33
... that appears, enter the password. Make sure you want doesn't appear in the list, select Add Network, and enter the network's SSID (name) manually. 333 Using the on -screen keyboard and attempt to Wireless. Select the 123#& key to view capital letters. Select OK. When finished, select Done... then select it , select Show Password. 444 The TV attempts to connect to the network. If the attempt fails, try again or connect manually If the network you have the wireless router's SSID (name) and password settings before attempting to the Internet via a wireless router. Select Caps...
... that appears, enter the password. Make sure you want doesn't appear in the list, select Add Network, and enter the network's SSID (name) manually. 333 Using the on -screen keyboard and attempt to Wireless. Select the 123#& key to view capital letters. Select OK. When finished, select Done... then select it , select Show Password. 444 The TV attempts to connect to the network. If the attempt fails, try again or connect manually If the network you have the wireless router's SSID (name) and password settings before attempting to the Internet via a wireless router. Select Caps...
User Manual Ver.1.0 (English)
Page 34
.... To view the security password as you want doesn't appear in the list, select Add Network, and enter the network's SSID (name) manually. 333 Using the on -screen keyboard and attempt to connect right away. -- Once the network connection has been interrupted, select IP Settings.... Connecting to a Wireless Internet Network Manually MENU > Network > Network Settings With networks that appears, enter the password. To get the IP address, subnet mask, gateway and DNS values...
.... To view the security password as you want doesn't appear in the list, select Add Network, and enter the network's SSID (name) manually. 333 Using the on -screen keyboard and attempt to connect right away. -- Once the network connection has been interrupted, select IP Settings.... Connecting to a Wireless Internet Network Manually MENU > Network > Network Settings With networks that appears, enter the password. To get the IP address, subnet mask, gateway and DNS values...
User Manual Ver.1.0 (English)
Page 35
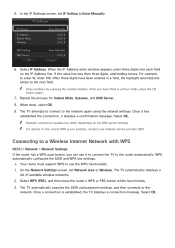
IP Settings IP Setting IP Address Subnet Mask Gateway Enter Manually 0.0.0.0 0.0.0.0 0.0.0.0 DNS Setting DNS Server OK Enter Manually 0.0.0.0 Cancel 666 Select IP Address. If the value has less than three digits, add leading zeroes. Once it has established the connection, it to... For details on the IP Address line. After you can use the WPS functionality. 111 On the Network Settings screen, set IP Setting to Enter Manually. When the IP Address entry window appears, enter three digits into each field on the correct DNS server settings, contact your Internet service provider (ISP...
IP Settings IP Setting IP Address Subnet Mask Gateway Enter Manually 0.0.0.0 0.0.0.0 0.0.0.0 DNS Setting DNS Server OK Enter Manually 0.0.0.0 Cancel 666 Select IP Address. If the value has less than three digits, add leading zeroes. Once it has established the connection, it to... For details on the IP Address line. After you can use the WPS functionality. 111 On the Network Settings screen, set IP Setting to Enter Manually. When the IP Address entry window appears, enter three digits into each field on the correct DNS server settings, contact your Internet service provider (ISP...
User Manual Ver.1.0 (English)
Page 36
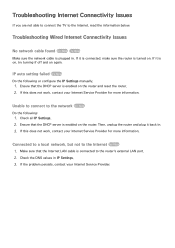
... on, try turning if off and on the router. Unable to connect to the network Try Now Do the following or configure the IP Settings manually. 111 Ensure that the DHCP server is enabled on again. Connected to a local network, but not to the Internet Try Now 111 Make sure that...
... on, try turning if off and on the router. Unable to connect to the network Try Now Do the following or configure the IP Settings manually. 111 Ensure that the DHCP server is enabled on again. Connected to a local network, but not to the Internet Try Now 111 Make sure that...
User Manual Ver.1.0 (English)
Page 37
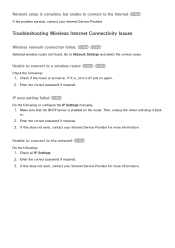
... not work , contact your Internet Service Provider. Unable to connect to a wireless router Try Now Try Now Check the following or configure the IP Settings manually. 111 Make sure that the DHCP server is enabled on . Go to Network Settings and select the correct router. IP auto setting failed Try Now...
... not work , contact your Internet Service Provider. Unable to connect to a wireless router Try Now Try Now Check the following or configure the IP Settings manually. 111 Make sure that the DHCP server is enabled on . Go to Network Settings and select the correct router. IP auto setting failed Try Now...

User Manual Ver.1.0 (English)
Page 51
e-Manual The embedded e-manual contains information about your TV automatically during set up. Deleting an App from that on a PC. Using Web Browser, you can surf the Internet on the Apps Screen. 111 On the SAMSUNG APPS screen, select to the app you want to remove. 222 Press and hold the E button. "" You ...Browser Web Browser is also deleted. Relocating an App on the TV in it's new location, press the E button. Deleting an App 111 On the SAMSUNG APPS screen, move to the app you want to move Recommended Apps. The selected app is in the same manner as you want to move...
e-Manual The embedded e-manual contains information about your TV automatically during set up. Deleting an App from that on a PC. Using Web Browser, you can surf the Internet on the Apps Screen. 111 On the SAMSUNG APPS screen, select to the app you want to remove. 222 Press and hold the E button. "" You ...Browser Web Browser is also deleted. Relocating an App on the TV in it's new location, press the E button. Deleting an App 111 On the SAMSUNG APPS screen, move to the app you want to move Recommended Apps. The selected app is in the same manner as you want to move...

User Manual Ver.1.0 (English)
Page 66
... it . "" If you only receive your remote. Move to the Repeat field. 555 Highlight the Repeat filed, and then select it . If you select manual, you must also highlight and select the days you want . 666 Move to know the channel, day or days of the Schedule Viewing screen. Select... Once, Manual, Sat~Sun, Mon~Fri, or Everyday. The Schedule Viewing screen appears. 333 On the Schedule Viewing screen, select the Antenna connection (Air or Cable), ...
... it . "" If you only receive your remote. Move to the Repeat field. 555 Highlight the Repeat filed, and then select it . If you select manual, you must also highlight and select the days you want . 666 Move to know the channel, day or days of the Schedule Viewing screen. Select... Once, Manual, Sat~Sun, Mon~Fri, or Everyday. The Schedule Viewing screen appears. 333 On the Schedule Viewing screen, select the Antenna connection (Air or Cable), ...
User Manual Ver.1.0 (English)
Page 88
... Reset. 10 Point: Divides red, green, and blue into 10 sections each, and lets you to Standard and is set to adjust the color space manually. ●● White Balance -- Adjusts the range of the 3 color's luminosity with the offset menu and the brightness with the gain menu. ●● Color...
... Reset. 10 Point: Divides red, green, and blue into 10 sections each, and lets you to Standard and is set to adjust the color space manually. ●● White Balance -- Adjusts the range of the 3 color's luminosity with the offset menu and the brightness with the gain menu. ●● Color...
User Manual Ver.1.0 (English)
Page 90
"" If you can configure Blur Reduction and Judder Reduction manually and set LED Clear Motion on for the LED 5203, 5303 and 4303 series. This frequency is not the same as the frequency of the ...
"" If you can configure Blur Reduction and Judder Reduction manually and set LED Clear Motion on for the LED 5203, 5303 and 4303 series. This frequency is not the same as the frequency of the ...
User Manual Ver.1.0 (English)
Page 100
... Mode to the correct time. Setting the Time and Using the Timer Setting the Current Time MENU > System > Time > Clock Try Now Set the clock manually or automatically. The accuracy of the time information received may vary depending on your remote. If the Clock is set the time... manually. The TV automatically downloads the correct time from a digital channel. "" Time Offset adjusts the time through normal digital broadcast signals. To view the time after...
... Mode to the correct time. Setting the Time and Using the Timer Setting the Current Time MENU > System > Time > Clock Try Now Set the clock manually or automatically. The accuracy of the time information received may vary depending on your remote. If the Clock is set the time... manually. The TV automatically downloads the correct time from a digital channel. "" Time Offset adjusts the time through normal digital broadcast signals. To view the time after...

