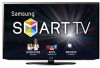
UN50EH5300F Manual - Samsung
UN50EH5300F Manual
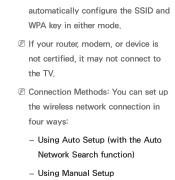
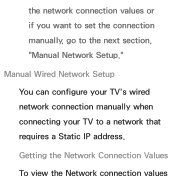
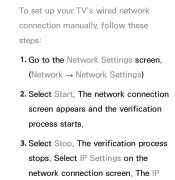
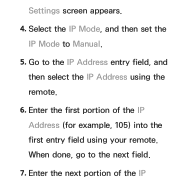
View Results Below
Free Samsung UN50EH5300F manuals!
Problems with Samsung UN50EH5300F?
Ask a Question
Free Samsung UN50EH5300F manuals!
Problems with Samsung UN50EH5300F?
Ask a Question
Related Manual Pages


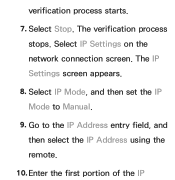
Similar Questions

How Do I Get A Copy Of The Manual That I Can Print Out?
I looked at the page for the manual for the Samsung UN48J5000AF and rather than letting me download ...
I looked at the page for the manual for the Samsung UN48J5000AF and rather than letting me download ...
(Posted by gkilbert 8 years ago)

Samsung No/le32r87bdx//xeu Remote No Manual Working,dvx Dvd Want To Play Films
how can i get the channel with the remote control to watch the cd films do you have a manual in pdf ...
how can i get the channel with the remote control to watch the cd films do you have a manual in pdf ...
(Posted by jrnapper 11 years ago)
Why Can't I Find A Printable Version Of The Samsung E-manual Without A Black Pag
I'm trying to find a E-manual for the Samsung E- manual for Model UN46D6900WF that does not have a b...
I'm trying to find a E-manual for the Samsung E- manual for Model UN46D6900WF that does not have a b...
(Posted by ralphpel 12 years ago)