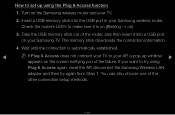
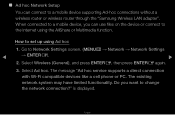
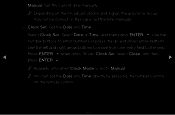
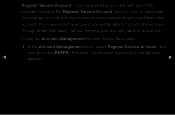
User Manual (user Manual) (ver.1.0) (English)
Page 12
English You can add channels, delete Added channels, set Favorite channels, use the program guide for digital broadcasts and change the antenna or channel settings by ◀ selecting the icons in the top right corner of the screen. screen. ■■ Channel OO SMART HUB → Channel → ENTERE Using the Channel function, you can also change between the All Channels and Added Ch. Channel 6 6-1 7 8 9 9-1 9-2 9-3 9-4 Air TV #6 Air Air Air TV #9 TV...
User Manual (user Manual) (ver.1.0) (English)
Page 48
NN Available only when you set the picture mode to Movie and the external input to the TV's HDMI or Component IN jacks. NN Some external devices may not support this function. ●● LED Motion Plus (Off / On): Removes blur and judder from an external device (e.g. BD/DVD player) connected to HDMI or Component. ●● xvYCC (Off / On): Setting xvYCC on increases picture detail and enlarges the color space when your are watching movies input from scenes with a lot of fast movement to provide a clearer picture. ◀ ▶ English
User Manual (user Manual) (ver.1.0) (English)
Page 76
... cannot find the network connection values or if you have a problem with using Internet Service, contact your Internet service provider. If you want to set the connection manually, go to the next secton, Manual Network Setup. Network Setting 6/6 Wired network and Internet connection completed. IP Setting OK ●● The displayed image may differ depending on the model. ◀ ▶ English NN If the connection process fails, check the LAN port connection. SEC_LinkShare MAC Address...
User Manual (user Manual) (ver.1.0) (English)
Page 107
... connection information. 4. How to set up window ▶ appears on the Samsung wireless router and your Samsung TV. Check the router's LED's to make sure it into the USB port in your Samsung wireless router. Wait until the connection is on (Blinking → on your TV. 2. Turn on the screen notifying you want to your AP, a pop-up using Plug & Access again, reset the AP, disconnect the Samsung Wireless LAN adapter...
User Manual (user Manual) (ver.1.0) (English)
Page 110
.... 3. ■■ Ad hoc Network Setup You can use files on the device or connect to the Internet using Ad hoc 1. Go to a mobile device supporting Ad-hoc connections without a wireless router or wireless router through the "Samsung Wireless LAN adapter". The message "Ad hoc service supports a direct connection with Wi-Fi compatible devices like a cell phone or PC. English How to set up using the AllShare or Multimedia...
User Manual (user Manual) (ver.1.0) (English)
Page 113
... Mode: Set the current time manually or automatically. ▶ Auto: Have the TV set the clock again. ◀ -- ❑❑ Setting the Time OO MENUm → System → Time → ENTERE ■■ Time OO The current time will appear every time you have the cable or an antenna connected to the TV to set the time automatically. NN If you disconnect the power cord, you press the INFO button...
User Manual (user Manual) (ver.1.0) (English)
Page 114
... pressing the number buttons on the broadcast station and signal, the auto time set up and down arrow buttons. Use the left and right arrow buttons to move from one entry field to Manual. Select Clock Set. English To exit Clock Set, select Close, and then press ENTERE. ▶ NN Available only when Clock Mode is set the time manually. -- Clock Set: Set the Date and Time. Manual: Set the current time manually. NN...
User Manual (user Manual) (ver.1.0) (English)
Page 189
... Smart Hub account. In the Account Management menu, select Register Service Account, and then press the ENTERE button. If you associate the account, you can associate the provider account and the provider account password with your account name or password. The Register Service Account Window ◀ appears. ▶ English To use the Account Management function, follow these...
User Manual (user Manual) (ver.1.0) (English)
Page 194
... Smart Hub must be downloaded to come on when powering on your country, the Ticker application may have a different service or not be supported. ◀ ▶ Channel Bound Service (Off / On): Some channels support applications as an Internet data service, allowing you to access the Internet service while watching TV. ●● Service Manager Ticker Autorun: You can set Ticker Autorun to use this feature. NN...
User Manual (user Manual) (ver.1.0) (English)
Page 196
After a few moments, it starts the re- To complete the re-initialization, go black, then Smart Hub re-appears. 2. initialization procedure. ◀ 4. English NN The default password set is "0-0-0-0." Enter the your security password. The screen may go to "0-0-0-0": MUTE → 8 → 2 → 4 → POWER (on). 3. NN If you forget the PIN code, press the remote control buttons in the following sequence in Standby mode, which resets the PIN to Step 4 in Starting Smart Hub for the First ▶ Time. In a few moments, Smart Hub automatically resets.
User Manual (user Manual) (ver.1.0) (English)
Page 285
... the remote control is Anynet+ compatible. •• Anynet+ doesn't work in certain situations. (Searching channels, operating Smart Hub or Plug & Play (initial setup), etc.) •• If you have removed and then reconnected the HDMI cable, please make sure to search devices again or turn your TV off and on . The Anynet+ system supports Anynet+ devices only. •• You can connect only one receiver...
User Manual (user Manual) (ver.1.0) (English)
Page 291
... output resolution of the screen. Solutions and Explanations •• If the picture size is set to Screen Fit, change it to 16:9. •• Change the cable/satellite box resolution. •• If you are using an AV composite input, connect the video cable (yellow) to the Green jack of Component Input 1 on the edge of the cable box to reset the box. (Disconnect and then reconnect the AC cord and wait until the cable box...
User Manual (user Manual) (ver.1.0) (English)
Page 297
... either side of the screen when displaying up scaled SD (4:3) contents. •• Black bars will appear on your external device or the TV to the resolution settings on TV menu is greyed out. Refer to full screen. •• Check the supported resolution of the TV, and adjust the external device's output resolution accordingly. Replace the Component video cables with a Component cable connection. Caption on User manual. •• The external device's Capton function...
User Manual (user Manual) (ver.1.0) (English)
Page 299
... the cables are using an HDMI, PC, or Component source. ▶ •• Select Home Use under Plug & Play mode. English If mounting the TV to the Plug & Play Feature. You see small particles when you are flexible enough for long term use. The PIP menu is not available. ◀ POP (TV's internal banner ad) appears on the screen. •• PIP functionality is not a defect. Issues Solutions...
Quick Guide (easy Manual) (ver.1.0) (English)
Page 4
... when the power is best to decrease power consumption, do not leave your TV's features. Install the Stand See the separate stand installation guide for example). In the on-screen menu, use this spot on the model) Guide Stand C x4 (M4 X L12) D x4 (M4 X L8) Screws English - 4 Changes the channels. Viewing the Control Panel ✎✎The product color and shape may vary depending on screen display) of your TV in standby mode. To be...
Quick Guide (easy Manual) (ver.1.0) (English)
Page 6
... severe personal injury. ✎✎NOTE xx Standard dimensions for wall mount kits are provided. English - 6 Samsung is not liable for assembly are shown in personal injury due to the inside of accidents. If you elect to install the wall mount on the wall mount specifications. TV size in Product Family inches VESA screw hole specs (A * B) in millimeters Standard Screw Quantity 19~22 75 X 75 M4 23...
Quick Guide (easy Manual) (ver.1.0) (English)
Page 7
... Power, Channel and Volume buttons. Cuts off . xx The color and shape may affect the performance of the remote control. Quickly select frequently used functions. Use these buttons in SMART HUB and Anynet+ (HDMI-CEC) modes. Displays channel lists on and off the sound temporarily. SOCIAL TV: Displays the Social TV screen. Turns the TV on the screen. MTS: Press to the previous menu. CC: Displays digital subtitles. Have direct access to the previous channel. Viewing the Remote Control...
Quick Guide (easy Manual) (ver.1.0) (English)
Page 15
... type is set up is complete. ✎✎ For more detailed information, see your TV, press the MENU button on the Wall LAN Cable (Not Supplied) or Samsung Wireless LAN Adapter TV Rear Panel Samsung's Wireless LAN adapter is sold seperately) to transmit an encrypted security code called an access key. message appears. Select a network connection type. Previous Next Cancel 4. sold separately and is compatible with new Wi-Fi certification specifications. Network Connection - Samsung's Wireless LAN adapter supports...
Quick Guide (easy Manual) (ver.1.0) (English)
Page 17
... media from your PC, camera and mobile devices, on your larger TV screen. Use the arrow buttons on your remote to move the cursor. Index: Displays index screen. Using the Help Display the e-Manual Guide & the Product Guide by pressing Help. How to view the e-Manual You can find instructions for your TV's features in the e-Manual in your TV. Basic Features Changing the Preset Picture Mode Adjusting Picture Settings Changing the Picture Size Changing the Picture Options Setting...
Quick Guide (easy Manual) (ver.1.0) (English)
Page 20
... wall outlet and the TV. The cable/set top box remote control doesn't turn on . If none of your external devices (Cable/Sat Box, DVD, Blu-ray etc) to all cables connected to have a problem, first review this manual are powered on . yy Clean the sensor's transmission window on the TV to diverse Apps, with their poles (+/-) in optimum condition, upgrade to select the correct input source by USB (samsung.com → Support → Downloads...