
User Manual
Page 2
Contents Connecting Antenna and External Using the Remote Control and devices Peripherals Antenna Connection Video Device Connections 2 HDMI Connection 3 Component Connection 4 Composite (A/V) Connection Audio Input and Output Connections 5 Digital Audio (Optical) Connection 6 Audio Output Connection Connecting to a Computer 7 Connecting Through the HDMI Port 8 Connecting With a DVI to HDMI Cable 9 Connecting Through Home Network Connecting To a Mobile Device 11 Screen Mirroring 13 Connecting Mobile Devices without a Wireless Router (Wi-Fi Direct) 14 Connecting Through Home Network 14 ...
Contents Connecting Antenna and External Using the Remote Control and devices Peripherals Antenna Connection Video Device Connections 2 HDMI Connection 3 Component Connection 4 Composite (A/V) Connection Audio Input and Output Connections 5 Digital Audio (Optical) Connection 6 Audio Output Connection Connecting to a Computer 7 Connecting Through the HDMI Port 8 Connecting With a DVI to HDMI Cable 9 Connecting Through Home Network Connecting To a Mobile Device 11 Screen Mirroring 13 Connecting Mobile Devices without a Wireless Router (Wi-Fi Direct) 14 Connecting Through Home Network 14 ...

User Manual
Page 3
...) 50 Playing Media Content Saved on a USB Device 51 Playing Multimedia Content Saved on a Computer/ Mobile Device 52 Playing Photos 53 Playing Videos 55 Playing Music 56 Functions on the Media Content List Screen Digital Broadcast Information at a Glance 57 Using the Guide 58 Viewing Detailed Information 58 Checking Current Program Info 58 Changing the broadcast signal 58 Digital Channel Signal Info and Strength Setting Up a Schedule Viewing 59 Digital Channel Schedule Viewing 60 Analog Channel Schedule Viewing 61...
...) 50 Playing Media Content Saved on a USB Device 51 Playing Multimedia Content Saved on a Computer/ Mobile Device 52 Playing Photos 53 Playing Videos 55 Playing Music 56 Functions on the Media Content List Screen Digital Broadcast Information at a Glance 57 Using the Guide 58 Viewing Detailed Information 58 Checking Current Program Info 58 Changing the broadcast signal 58 Digital Channel Signal Info and Strength Setting Up a Schedule Viewing 59 Digital Channel Schedule Viewing 60 Analog Channel Schedule Viewing 61...

User Manual
Page 4
...) Picture Support Functions 84 PIP Broadcast Viewing 85 Changing the Picture Size and Position 86 Listening to Audio Only with the Screen Turned Off (Picture Off) 86 Resetting the Picture Mode Settings Changing the Sound Mode and Using Sound Effects 87 Choosing the Right Sound Mode for the Environment 88 Using Sound Effects Sound Support Functions 88 Selecting Speakers 89 Designating the TV's Installation Type 89 Enabling Digital Audio Output 89 Resetting All Sound Settings General Setting the Time and Using the Timer 90 Setting the Current Time 91 Using the Timers Using Anynet+ (HDMI...
...) Picture Support Functions 84 PIP Broadcast Viewing 85 Changing the Picture Size and Position 86 Listening to Audio Only with the Screen Turned Off (Picture Off) 86 Resetting the Picture Mode Settings Changing the Sound Mode and Using Sound Effects 87 Choosing the Right Sound Mode for the Environment 88 Using Sound Effects Sound Support Functions 88 Selecting Speakers 89 Designating the TV's Installation Type 89 Enabling Digital Audio Output 89 Resetting All Sound Settings General Setting the Time and Using the Timer 90 Setting the Current Time 91 Using the Timers Using Anynet+ (HDMI...

User Manual
Page 10
... listed below. ●● Digital Audio (Optical) ●● Audio (Analog) "" For better audio quality, it to the TV first, and then connect the external device. "" Connecting a device using its remote control. "" Adjust the audio device's volume using an optical cable does not automatically turn off the TV speakers. "" An unusual noise coming from the audio device's manufacturer. Refer to the diagram and connect the optical cable to digital audio. "" Digital audio is reversed. To turn off the TV's speakers, set TV Sound Output (Sound > Speaker Settings > TV Sound...
... listed below. ●● Digital Audio (Optical) ●● Audio (Analog) "" For better audio quality, it to the TV first, and then connect the external device. "" Connecting a device using its remote control. "" Adjust the audio device's volume using an optical cable does not automatically turn off the TV speakers. "" An unusual noise coming from the audio device's manufacturer. Refer to the diagram and connect the optical cable to digital audio. "" Digital audio is reversed. To turn off the TV's speakers, set TV Sound Output (Sound > Speaker Settings > TV Sound...

User Manual
Page 57
... screen when you can play the background music through. ""This option is supported only when background music is pressed. ●● Pause / Play Start or stop the slideshow. Rotate Rotate the photo. Sound Mode Change the Sound Mode setting. Picture Mode Change the Picture Mode setting. Using slideshow, you can send the current photo to a factor of the storage devices supported by this function, you press the E button while viewing...
... screen when you can play the background music through. ""This option is supported only when background music is pressed. ●● Pause / Play Start or stop the slideshow. Rotate Rotate the photo. Sound Mode Change the Sound Mode setting. Picture Mode Change the Picture Mode setting. Using slideshow, you can send the current photo to a factor of the storage devices supported by this function, you press the E button while viewing...
User Manual
Page 59
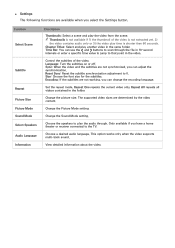
... seconds. Size: Choose the font size for the subtitles. The supported video sizes are not working, you have a home theater or receiver connected to scan through . Change the Sound Mode setting. This option works only when the video supports multi-track sound. View detailed information about the video. Time Bar: You can change the encoding language. Control the subtitles of the video is not extracted yet, 2) the video contains audio only or 3) the video play another video in...
... seconds. Size: Choose the font size for the subtitles. The supported video sizes are not working, you have a home theater or receiver connected to scan through . Change the Sound Mode setting. This option works only when the video supports multi-track sound. View detailed information about the video. Time Bar: You can change the encoding language. Control the subtitles of the video is not extracted yet, 2) the video contains audio only or 3) the video play another video in...
User Manual
Page 81
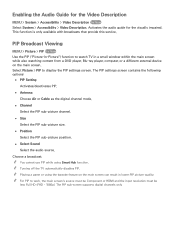
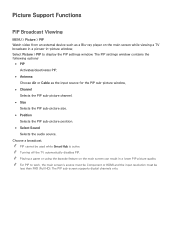
...; Antenna Choose Air or Cable as the digital channel mode. ●● Channel Select the PIP sub-picture channel. ●● Size Select the PIP sub-picture size. ●● Position Select the PIP sub-picture position. ●● Select Sound Select the audio source. Choose a broadcast. Select Picture > PIP to work, the main screen's source must be Component or HDMI and the input resolution must be less Full HD (FHD - 1080p). PIP Broadcast Viewing MENU > Picture > PIP Try Now Use the PIP ("Picture-In-Picture...
...; Antenna Choose Air or Cable as the digital channel mode. ●● Channel Select the PIP sub-picture channel. ●● Size Select the PIP sub-picture size. ●● Position Select the PIP sub-picture position. ●● Select Sound Select the audio source. Choose a broadcast. Select Picture > PIP to work, the main screen's source must be Component or HDMI and the input resolution must be less Full HD (FHD - 1080p). PIP Broadcast Viewing MENU > Picture > PIP Try Now Use the PIP ("Picture-In-Picture...
User Manual
Page 86
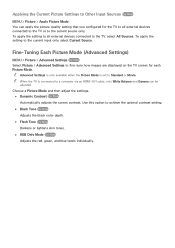
... Now Adjusts the red, green, and blue levels individually. To apply the setting to all external devices connected to the TV or to the current source only. Fine-Tuning Each Picture Mode (Advanced Settings) MENU > Picture > Advanced Settings Try Now Select Picture > Advanced Settings to fine-tune how images are displayed on the TV screen for the TV to all external devices connected to a computer via an HDMI-DVI cable, only White...
... Now Adjusts the red, green, and blue levels individually. To apply the setting to all external devices connected to the TV or to the current source only. Fine-Tuning Each Picture Mode (Advanced Settings) MENU > Picture > Advanced Settings Try Now Select Picture > Advanced Settings to fine-tune how images are displayed on the TV screen for the TV to all external devices connected to a computer via an HDMI-DVI cable, only White...
User Manual
Page 89
... Picture > PIP to work, the main screen's source must be Component or HDMI and the input resolution must be used while Smart Hub is active. Picture Support Functions PIP Broadcast Viewing MENU > Picture > PIP Watch video from an external device such as the input source for the PIP sub-picture window. ●● Channel Selects the PIP sub-picture channel. ●● Size Selects the PIP sub-picture size. ●● Position Selects the PIP sub-picture position. ●● Select Sound Selects the audio source. "" PIP...
... Picture > PIP to work, the main screen's source must be Component or HDMI and the input resolution must be used while Smart Hub is active. Picture Support Functions PIP Broadcast Viewing MENU > Picture > PIP Watch video from an external device such as the input source for the PIP sub-picture window. ●● Channel Selects the PIP sub-picture channel. ●● Size Selects the PIP sub-picture size. ●● Position Selects the PIP sub-picture position. ●● Select Sound Selects the audio source. "" PIP...
User Manual
Page 91
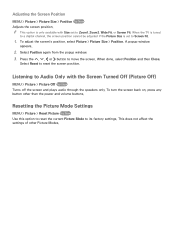
... Now Adjusts the screen position. "" This option is set to Screen Fit. 1. When the TV is tuned to its factory settings. To adjust the screen's position, select Picture > Picture Size > Position. Resetting the Picture Mode Settings MENU > Picture > Reset Picture Try Now Use this option to reset the current Picture Mode to a digital channel, the screen position cannot be adjusted if the Picture Size is only available with the Screen Turned Off (Picture Off) MENU > Picture > Picture Off Try Now Turns off the screen and plays audio through the speakers...
... Now Adjusts the screen position. "" This option is set to Screen Fit. 1. When the TV is tuned to its factory settings. To adjust the screen's position, select Picture > Picture Size > Position. Resetting the Picture Mode Settings MENU > Picture > Reset Picture Try Now Use this option to reset the current Picture Mode to a digital channel, the screen position cannot be adjusted if the Picture Size is only available with the Screen Turned Off (Picture Off) MENU > Picture > Picture Off Try Now Turns off the screen and plays audio through the speakers...

User Manual
Page 93
... audio through the TV's speakers and the speakers of a home theater or receiver connected to audio through external speakers. "" Using external speakers alone disables the volume button and the mute function. Using Sound Effects MENU > Sound > Sound Effect Try Now Use sound effects to mute the TV speakers, or turn off the receiver or home theater. Select Sound > Speaker Settings > TV Sound Output, and then select the speakers from the list. In addition, certain Sound options are sitting in specific geographical areas. Select Reset...
... audio through the TV's speakers and the speakers of a home theater or receiver connected to audio through external speakers. "" Using external speakers alone disables the volume button and the mute function. Using Sound Effects MENU > Sound > Sound Effect Try Now Use sound effects to mute the TV speakers, or turn off the receiver or home theater. Select Sound > Speaker Settings > TV Sound Output, and then select the speakers from the list. In addition, certain Sound options are sitting in specific geographical areas. Select Reset...
User Manual
Page 95
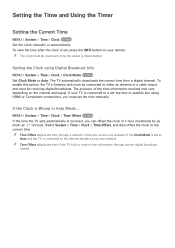
... set, press the INFO button on the channel and signal. "" Time Offset adjusts the time through normal digital broadcast signals. To view the time after the clock is connected to a set-top-box or satellite box using Digital Broadcast Info MENU > System > Time > Clock > Clock Mode Try Now Set Clock Mode to either an antenna or a cable output and must set to Auto and the TV is disconnected. Setting the Clock using HDMI or Component connections, you can offset the clock in Auto Mode...
... set, press the INFO button on the channel and signal. "" Time Offset adjusts the time through normal digital broadcast signals. To view the time after the clock is connected to a set-top-box or satellite box using Digital Broadcast Info MENU > System > Time > Clock > Clock Mode Try Now Set Clock Mode to either an antenna or a cable output and must set to Auto and the TV is disconnected. Setting the Clock using HDMI or Component connections, you can offset the clock in Auto Mode...

User Manual
Page 97
If you want the On Timer to when it turns on. ●● Source Select a signal source from an HDMI or Component source such as a DVD player, Bluray player, or set up . If you select Manual, you can set -top-box, you have set the Source to USB, specify a USB device folder containing music files in the music field and/or a folder containing photos in the photo field. It must...
If you want the On Timer to when it turns on. ●● Source Select a signal source from an HDMI or Component source such as a DVD player, Bluray player, or set up . If you select Manual, you can set -top-box, you have set the Source to USB, specify a USB device folder containing music files in the music field and/or a folder containing photos in the photo field. It must...

User Manual
Page 99
... > Auto Protection Time and then choose a time setting from the list to reduce the TV's power consumption. ●● Eco Sensor Try Now Automatically adjusts the TV's brightness level based on the ambient light level to On, the screen is not available on the screen for longer than usual. ●● No Signal Power Off Try Now Select a time from the list. Cell Light (in specific geographical areas. Using...
... > Auto Protection Time and then choose a time setting from the list to reduce the TV's power consumption. ●● Eco Sensor Try Now Automatically adjusts the TV's brightness level based on the ambient light level to On, the screen is not available on the screen for longer than usual. ●● No Signal Power Off Try Now Select a time from the list. Cell Light (in specific geographical areas. Using...
User Manual
Page 109
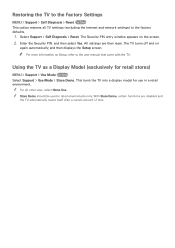
... displays the Setup screen. This turns the TV into a display model for retail stores) MENU > Support > Use Mode Try Now Select Support > Use Mode > Store Demo. The Security PIN entry window appears on the screen. 2. With Store Demo, certain functions are then reset. Using the TV as a Display Model (exclusively for use in retail environments only. "" For all TV settings (excluding the Internet and network settings) to the factory defaults. 1. Restoring the TV to the Factory Settings MENU > Support > Self Diagnosis > Reset...
... displays the Setup screen. This turns the TV into a display model for retail stores) MENU > Support > Use Mode Try Now Select Support > Use Mode > Store Demo. The Security PIN entry window appears on the screen. 2. With Store Demo, certain functions are then reset. Using the TV as a Display Model (exclusively for use in retail environments only. "" For all TV settings (excluding the Internet and network settings) to the factory defaults. 1. Restoring the TV to the Factory Settings MENU > Support > Self Diagnosis > Reset...
User Manual
Page 110
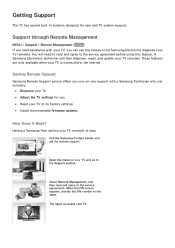
...; Reset your TV and go to its factory settings. ●● Install recommended firmware updates How Does it Work? Call the Samsung Contact Center and ask for user and TV system support. Having a Samsung Tech service your TV remotely. When the PIN screen appears, provide the PIN number to let Samsung Electronics diagnose your TV remotely is connected to the Internet. Support through Remote Management MENU > Support > Remote Management Try Now If you need to...
...; Reset your TV and go to its factory settings. ●● Install recommended firmware updates How Does it Work? Call the Samsung Contact Center and ask for user and TV system support. Having a Samsung Tech service your TV remotely. When the PIN screen appears, provide the PIN number to let Samsung Electronics diagnose your TV remotely is connected to the Internet. Support through Remote Management MENU > Support > Remote Management Try Now If you need to...
User Manual
Page 113
... used close to the TV's green component jack. Change the cable/satellite box resolution. The Problem Problems Powering On Try this! This is turned on, the remote control receiver flashes 5 times before calling the service department. If you have a cable/satellite box confirm that the remote control is firmly connected. If the Picture Size has been set top box. If you 're using AV composite input, connect the video cable (yellow) to the TV (within 3.2 ft) may cause color problems or a blank screen. Use HDMI or Component cables to digital...
... used close to the TV's green component jack. Change the cable/satellite box resolution. The Problem Problems Powering On Try this! This is turned on, the remote control receiver flashes 5 times before calling the service department. If you have a cable/satellite box confirm that the remote control is firmly connected. If the Picture Size has been set top box. If you 're using AV composite input, connect the video cable (yellow) to the TV (within 3.2 ft) may cause color problems or a blank screen. Use HDMI or Component cables to digital...
User Manual
Page 114
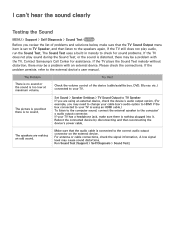
...' s audio output connector. Run Sound Test (Support > Self Diagnosis > Sound Test). Set Sound > Speaker Settings > TV Sound Output to the external device's user manual. A low signal level may be a problem with an external device. Contact Samsung's Call Center for sound problems. If the TV does not play audio, run the Sound Test. If the problem persists, refer to TV Speaker. The Problem There is no sound or the sound is no sound. For antenna or cable connections, check the signal information. Check the volume control...
...' s audio output connector. Run Sound Test (Support > Self Diagnosis > Sound Test). Set Sound > Speaker Settings > TV Sound Output to the external device's user manual. A low signal level may be a problem with an external device. Contact Samsung's Call Center for sound problems. If the TV does not play audio, run the Sound Test. If the problem persists, refer to TV Speaker. The Problem There is no sound or the sound is no sound. For antenna or cable connections, check the signal information. Check the volume control...

User Manual
Page 115
...> Setup) or Auto Program (Broadcasting > Auto Program). Try this ! Check the network connection status (MENU > Network > Network Status). There are using a DVI to HDMI cable, a separate audio cable is required. Some channels may cause picture distortions. If you are using an antenna, verify it on and connected to a cable box or satellite box: ●● Confirm that the coaxial cable is positioned correctly and the all channels. Run Network Setup (MENU > Network > Network Settings). If your PC's output resolution so it matches a resolution supported by turning...
...> Setup) or Auto Program (Broadcasting > Auto Program). Try this ! Check the network connection status (MENU > Network > Network Status). There are using a DVI to HDMI cable, a separate audio cable is required. Some channels may cause picture distortions. If you are using an antenna, verify it on and connected to a cable box or satellite box: ●● Confirm that the coaxial cable is positioned correctly and the all channels. Run Network Setup (MENU > Network > Network Settings). If your PC's output resolution so it matches a resolution supported by turning...
User Manual
Page 117
... not supported by the TV. Adjust the picture size options on your TV. Check the TV's supported resolutions and adjust the external device's output resolution accordingly. The output resolution of the attached device is only available for an extended period of the TV. You cannot select the Caption menu if you watch movies that the current channel is hot. The "Mode Not Supported" message appears. To view captions, turn on...
... not supported by the TV. Adjust the picture size options on your TV. Check the TV's supported resolutions and adjust the external device's output resolution accordingly. The output resolution of the attached device is only available for an extended period of the TV. You cannot select the Caption menu if you watch movies that the current channel is hot. The "Mode Not Supported" message appears. To view captions, turn on...


