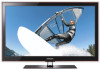
User Manual
Page 2
..., not stationary patterns or dark bars. For the location of LED Displays that exceed the above described warranty repairs must be changed without notice. Important Warranty Information Regarding Television Format Viewing ✎✎ See the warranty card for details. Uneven LED aging as a full screen picture. Figures and illustrations in this User Manual are provided for reference only and may be presented to the Service Center. Installation with a wall-mount. 4 inches 4 inches 4 inches 4 inches 4 inches 4 inches 4 inches 2 English...
..., not stationary patterns or dark bars. For the location of LED Displays that exceed the above described warranty repairs must be changed without notice. Important Warranty Information Regarding Television Format Viewing ✎✎ See the warranty card for details. Uneven LED aging as a full screen picture. Figures and illustrations in this User Manual are provided for reference only and may be presented to the Service Center. Installation with a wall-mount. 4 inches 4 inches 4 inches 4 inches 4 inches 4 inches 4 inches 2 English...
User Manual
Page 3
... yy Sound Menu 19 Changing the Preset Sound Mode 19 Adjusting Sound Settings 19 Sound Settings 19 yy Setup Menu 20 Setting the Time 20 Using the Sleep Timer 20 Setting the On / Off Timer 20 Locking Programs 21 Other Features 22 Picture In Picture (PIP) 23 yy Support Menu 24 Advanced Features yy Network Connection 25 Connecting to a Wired Network 25 Connecting to a Wireless Network 27 yy Media Play 30 Connecting a USB Device 30 Connecting to your PC through a Receiver 39 Troubleshooting for instructions on how to the Wall 45 yy Troubleshooting...
... yy Sound Menu 19 Changing the Preset Sound Mode 19 Adjusting Sound Settings 19 Sound Settings 19 yy Setup Menu 20 Setting the Time 20 Using the Sleep Timer 20 Setting the On / Off Timer 20 Locking Programs 21 Other Features 22 Picture In Picture (PIP) 23 yy Support Menu 24 Advanced Features yy Network Connection 25 Connecting to a Wired Network 25 Connecting to a Wireless Network 27 yy Media Play 30 Connecting a USB Device 30 Connecting to your PC through a Receiver 39 Troubleshooting for instructions on how to the Wall 45 yy Troubleshooting...

User Manual
Page 7
... channel list on the TV screen. SLEEP: Automatically shuts off the sound temporarily. MTS: Press to the previous menu. Displays Favorite Channel Lists on the menu. Selects the on-screen menu items and changes the values seen on the screen (p. 14). P.SIZE: Selects the picture size (p. 17). Changes channels. P.MODE: Press to select the sound mode (p. 19). xx The color and shape may affect the performance of the remote control. Adjusts the volume. Views Media Play (USB) (p. 30). Use these buttons in the Channel List, Media Play (USB) menu...
... channel list on the TV screen. SLEEP: Automatically shuts off the sound temporarily. MTS: Press to the previous menu. Displays Favorite Channel Lists on the menu. Selects the on-screen menu items and changes the values seen on the screen (p. 14). P.SIZE: Selects the picture size (p. 17). Changes channels. P.MODE: Press to select the sound mode (p. 19). xx The color and shape may affect the performance of the remote control. Adjusts the volume. Views Media Play (USB) (p. 30). Use these buttons in the Channel List, Media Play (USB) menu...

User Manual
Page 13
...;When connecting an HDMI/DVI cable to the HDMI IN 1(DVI) port, you should set to the previous menu. 4 EXIT button: Exits the on the screen: Picture, Sound, Channel, Setup, Input, Application, Support. Confirm the setting. 3 RETURN button: Returns to DVI PC or DVI Devices mode under Edit Name. Edit Name OO MENUm → Input → Edit Name → ENTERE ■■ VCR / DVD / Cable STB / Satellite STB / PVR STB / AV Receiver / Game...
...;When connecting an HDMI/DVI cable to the HDMI IN 1(DVI) port, you should set to the previous menu. 4 EXIT button: Exits the on the screen: Picture, Sound, Channel, Setup, Input, Application, Support. Confirm the setting. 3 RETURN button: Returns to DVI PC or DVI Devices mode under Edit Name. Edit Name OO MENUm → Input → Edit Name → ENTERE ■■ VCR / DVD / Cable STB / Satellite STB / PVR STB / AV Receiver / Game...
User Manual
Page 17
... / Movie mode) Compared to previous models, new Samsung TVs have its default position. 17 English Press the ► button to move the picture up or down. 4. R-Gain / G-Gain / B-Gain: Adjust each color's (red, green, blue) darkness. Press the ENTERE button to reset the picture to the Color Tone, Size, Digital Noise Filter and Auto Protection Time. Traces of borders displayed on the TV. ■■ Size: Your cable box/satellite receiver may cause...
... / Movie mode) Compared to previous models, new Samsung TVs have its default position. 17 English Press the ► button to move the picture up or down. 4. R-Gain / G-Gain / B-Gain: Adjust each color's (red, green, blue) darkness. Press the ENTERE button to reset the picture to the Color Tone, Size, Digital Noise Filter and Auto Protection Time. Traces of borders displayed on the TV. ■■ Size: Your cable box/satellite receiver may cause...

User Manual
Page 18
...: When changing analog channels, displays signal strength. ✎✎ Only available for analog channels. ✎✎ When bar is green, you are receiving the best possible signal. ■■ MPEG Noise Filter (Off / Low / Medium / High / Auto): Reduces MPEG noise to provide improved picture quality. ■■ HDMI Black Level (Normal / Low): Selects the black level on the screen to adjust the screen depth. ✎✎ Available only in HDMI mode...
...: When changing analog channels, displays signal strength. ✎✎ Only available for analog channels. ✎✎ When bar is green, you are receiving the best possible signal. ■■ MPEG Noise Filter (Off / Low / Medium / High / Auto): Reduces MPEG noise to provide improved picture quality. ■■ HDMI Black Level (Normal / Low): Selects the black level on the screen to adjust the screen depth. ✎✎ Available only in HDMI mode...
User Manual
Page 20
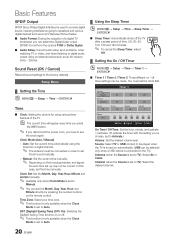
... power cord, you can be correct. Manual: Set the current time manually. ✎✎ Depending on automatically. (USB can select the Digital Audio output (SPDIF) format from a digital channel. ✎✎ The antenna must set the clock first. Source: Select TV or USB content to be played when the TV is turned on the broadcast station and signal, the auto time set up may not be selected only when a USB device is connected to the factory defaults. Sound Reset...
... power cord, you can be correct. Manual: Set the current time manually. ✎✎ Depending on automatically. (USB can select the Digital Audio output (SPDIF) format from a digital channel. ✎✎ The antenna must set the clock first. Source: Select TV or USB content to be played when the TV is turned on the broadcast station and signal, the auto time set up may not be selected only when a USB device is connected to the factory defaults. Sound Reset...

User Manual
Page 21
...; ENTERE Security The PIN input screen appears, Enter your children are deemed inappropriate for all TV ratings. xx Block All: Press to control what your 4 digit PIN number. ■■ V-Chip: The V-Chip feature automatically locks out programs that provides parents or guardians with more sensitive material. The Motion Picture Association of a new TV set up or changed. ✎✎ NOTE...
...; ENTERE Security The PIN input screen appears, Enter your children are deemed inappropriate for all TV ratings. xx Block All: Press to control what your 4 digit PIN number. ■■ V-Chip: The V-Chip feature automatically locks out programs that provides parents or guardians with more sensitive material. The Motion Picture Association of a new TV set up or changed. ✎✎ NOTE...

User Manual
Page 23
... used. PIP (Picture-in-Picture) does not function in Game Mode, the screen shakes slightly. xx While V-Chip is Standard. The default is in PIP mode, the PIP window will disappear. Background Color: Options include Default, White, Black, Red, Green, Blue, Yellow, Magenta and Cyan. Options include Default, Transparent, Translucent, Solid and Flashing. Network (Network Type / Network Setup / Network Test ) For details on the program being broadcasted. To disconnect the game console and connect another external device, set to its default settings...
... used. PIP (Picture-in-Picture) does not function in Game Mode, the screen shakes slightly. xx While V-Chip is Standard. The default is in PIP mode, the PIP window will disappear. Background Color: Options include Default, White, Black, Red, Green, Blue, Yellow, Magenta and Cyan. Options include Default, Transparent, Translucent, Solid and Flashing. Network (Network Type / Network Setup / Network Test ) For details on the program being broadcasted. To disconnect the game console and connect another external device, set to its default settings...

User Manual
Page 24
... the test pattern is set to the "Network Connection" instructions. ✎✎ If the internet connection doesn't operate properly, the connection may be a problem with your external equipment. samsung.com," to their default settings. When software is upgraded, video and audio settings you want to the external device's user manual. ■■ Signal Information: (Digital channels only) An HD channel's reception quality is muted by USB and upgrade. ■■ Alternative Software (backup): Displays the software version downloaded through By Online. If the...
... the test pattern is set to the "Network Connection" instructions. ✎✎ If the internet connection doesn't operate properly, the connection may be a problem with your external equipment. samsung.com," to their default settings. When software is upgraded, video and audio settings you want to the external device's user manual. ■■ Signal Information: (Digital channels only) An HD channel's reception quality is muted by USB and upgrade. ■■ Alternative Software (backup): Displays the software version downloaded through By Online. If the...
User Manual
Page 29
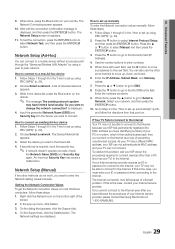
... "Samsung Wireless LAN Adapter" by using PBC (WPS)" (p. 28). 2. A list of the screen. 2. Choose Select a network. Select the device you need to change the network connection? Press the ▼ button to go to the Internet. If you have limited functionality. How to the Internet even after you cannot connect to set up menu, click Status. 3. When done with each time you want to connect an existing Ad-hoc device 1. Network Setup...
... "Samsung Wireless LAN Adapter" by using PBC (WPS)" (p. 28). 2. A list of the screen. 2. Choose Select a network. Select the device you need to change the network connection? Press the ▼ button to go to the Internet. If you have limited functionality. How to the Internet even after you cannot connect to set up menu, click Status. 3. When done with each time you want to connect an existing Ad-hoc device 1. Network Setup...

User Manual
Page 37
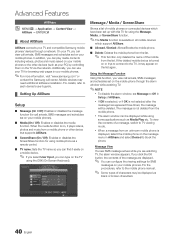
... only outputs 2 channel audio. To connect to the Amplifier or Home Theater, not the TV. You will only hear sound from the Home Theater's Front, Left and Right speakers and the subwoofer. Anynet Device 1 or 2) directly to a Samsung Home Theater TV Rear Panel Optical Cable (Not Supplied) Home Theater Anynet+ Device 1 Anynet+ Device 2, 3, 4 HDMI cable (Not Supplied) HDMI cable (Not Supplied) HDMI cable (Not Supplied) 1. xx Anynet+ works when the AV device supporting...
... only outputs 2 channel audio. To connect to the Amplifier or Home Theater, not the TV. You will only hear sound from the Home Theater's Front, Left and Right speakers and the subwoofer. Anynet Device 1 or 2) directly to a Samsung Home Theater TV Rear Panel Optical Cable (Not Supplied) Home Theater Anynet+ Device 1 Anynet+ Device 2, 3, 4 HDMI cable (Not Supplied) HDMI cable (Not Supplied) HDMI cable (Not Supplied) 1. xx Anynet+ works when the AV device supporting...

User Manual
Page 38
... the DVD recorder will record whatever you set to search devices. 2. Make sure to switch to an Anynet+ device by using a Samsung recorder. 1. If you are listed. ✎✎ If you cannot find a device you have selected external input mode by selecting Recording: (device_name). ✎✎ Pressing the � (REC) button will appear. Sound is only available for devices that support the...
... the DVD recorder will record whatever you set to search devices. 2. Make sure to switch to an Anynet+ device by using a Samsung recorder. 1. If you are listed. ✎✎ If you cannot find a device you have selected external input mode by selecting Recording: (device_name). ✎✎ Pressing the � (REC) button will appear. Sound is only available for devices that support the...
User Manual
Page 39
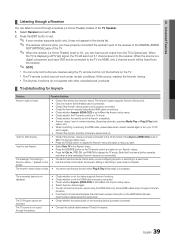
... a Receiver You can be connected. • Check if the Anynet+ device power cord is properly connected. • Check the Anynet+ device's Video/Audio/HDMI cable connections. • Check whether Anynet+ (HDMI-CEC) is set to On in the Anynet+ setup menu. • Check whether the TV remote control is in TV mode. • Check whether the remote control is Anynet+ compatible. • Anynet+ doesn't work in certain situations. (Searching channels, operating Media Play or Plug & Play (initial setup...
... a Receiver You can be connected. • Check if the Anynet+ device power cord is properly connected. • Check the Anynet+ device's Video/Audio/HDMI cable connections. • Check whether Anynet+ (HDMI-CEC) is set to On in the Anynet+ setup menu. • Check whether the TV remote control is in TV mode. • Check whether the remote control is Anynet+ compatible. • Anynet+ doesn't work in certain situations. (Searching channels, operating Media Play or Plug & Play (initial setup...
User Manual
Page 40
... be displayed as Media Play etc. The message is on, it plays videos, photos and music from the list. If you click the OK button, the contents of the mobile from a mobile phone or other devices (such as a remote control. ■■ TV name: Sets the TV name so you can find it may appear on your TV and compatible Samsung mobile...
... be displayed as Media Play etc. The message is on, it plays videos, photos and music from the list. If you click the OK button, the contents of the mobile from a mobile phone or other devices (such as a remote control. ■■ TV name: Sets the TV name so you can find it may appear on your TV and compatible Samsung mobile...
User Manual
Page 41
... be played at "AllShare Setup". If you can also change the setting (or resetting) of AllShare. For more detail information, refer to each mobile's user's guide. When operating the TV with your mobile phone, only the POWER, y, z and MUTE buttons are watching TV, the alarm window appears. "Unknown Device 0" is connected to unsecured or unfamiliar network, unwanted or inappropriate contents might be displayed...
... be played at "AllShare Setup". If you can also change the setting (or resetting) of AllShare. For more detail information, refer to each mobile's user's guide. When operating the TV with your mobile phone, only the POWER, y, z and MUTE buttons are watching TV, the alarm window appears. "Unknown Device 0" is connected to unsecured or unfamiliar network, unwanted or inappropriate contents might be displayed...
User Manual
Page 46
... signal. Sound Test) (p. 24) If the audio is not connected to have an analog cable/satellite box, upgrade to 1080i or 720p. The speakers are using an external device, check the device's audio output option (ex. Low signal level may take up . • Antenna connection: Try HD stations after performing Auto program. ✎✎ Many HD channels are connected to HDMI cable, a separate audio cable is properly displaying the test image. (go to MENU - Eco Solution - Picture...
... signal. Sound Test) (p. 24) If the audio is not connected to have an analog cable/satellite box, upgrade to 1080i or 720p. The speakers are using an external device, check the device's audio output option (ex. Low signal level may take up . • Antenna connection: Try HD stations after performing Auto program. ✎✎ Many HD channels are connected to HDMI cable, a separate audio cable is properly displaying the test image. (go to MENU - Eco Solution - Picture...
User Manual
Page 47
... power cord is always shown on digital channels. • Check Caption Setup menu. This is normal; Network Connection The wireless network connection failed. • The Samsung Wireless USB dongle is required to use a wireless network. • Make sure the Network Connection is set -top-box has a grounding issue. Software Upgrade over the network fails. • Try network test in Setup menu (p. 23). • If you are 3 options (STD, HRC and IRC) (p. 14) • Verify the Antenna is connected to operate the TV. Auto Program...
... power cord is always shown on digital channels. • Check Caption Setup menu. This is normal; Network Connection The wireless network connection failed. • The Samsung Wireless USB dongle is required to use a wireless network. • Make sure the Network Connection is set -top-box has a grounding issue. Software Upgrade over the network fails. • Try network test in Setup menu (p. 23). • If you are 3 options (STD, HRC and IRC) (p. 14) • Verify the Antenna is connected to operate the TV. Auto Program...
User Manual
Page 48
... of the TV, and adjust the external device's output resolution accordingly. Solutions and Explanations • Check the supported resolution of the TV. For details, refer to Plug & Play Feature (p. 8). ✎✎This TFT LED panel uses a panel consisting of audio or video can not be selected in the TV menu when connected via HDMI or Component (p. 22). • Caption must be activated on the product menu. 48 English All Rights...
... of the TV, and adjust the external device's output resolution accordingly. Solutions and Explanations • Check the supported resolution of the TV. For details, refer to Plug & Play Feature (p. 8). ✎✎This TFT LED panel uses a panel consisting of audio or video can not be selected in the TV menu when connected via HDMI or Component (p. 22). • Caption must be activated on the product menu. 48 English All Rights...
User Manual
Page 51
... M Media Play Melody Menu Transparency Mono Music N Navigate Network Connection Network Setup O ON/OFF button Optimal resolution P Photos Picture Size PIP (Picture in Picture) Plug & Play Power Indicator 7, 14 14 18 16 17 12 R Receiver Recording Remote Control Repeat Mode RGB Only Mode Rotate 9, 37 11, 37 2 22 48 S Select All Self Diagnosis Sharpness Signal Information Sleep Timer Slide Show Software Upgrade Source List Speaker Select Specifications Standby mode Symbol 30 T 23 23 Timer 19 Title 34 Tools Troubleshooting TV Speaker 13 U 25 26 USB Drive V 7 Video Formats 12 Videos Volume...
... M Media Play Melody Menu Transparency Mono Music N Navigate Network Connection Network Setup O ON/OFF button Optimal resolution P Photos Picture Size PIP (Picture in Picture) Plug & Play Power Indicator 7, 14 14 18 16 17 12 R Receiver Recording Remote Control Repeat Mode RGB Only Mode Rotate 9, 37 11, 37 2 22 48 S Select All Self Diagnosis Sharpness Signal Information Sleep Timer Slide Show Software Upgrade Source List Speaker Select Specifications Standby mode Symbol 30 T 23 23 Timer 19 Title 34 Tools Troubleshooting TV Speaker 13 U 25 26 USB Drive V 7 Video Formats 12 Videos Volume...


