
Open Source Guide (ENGLISH)
Page 1
... ALL NECESSARY SERVICING, REPAIR OR CORRECTION. 12. This product uses some software programs which are distributed under the terms of this License incorporates the limitation as you receive source code or can redistribute and change the software or use or not licensed at no warranty for enforcing compliance by running the Program is not restricted, and the output from time to distribute copies of free software (and...
... ALL NECESSARY SERVICING, REPAIR OR CORRECTION. 12. This product uses some software programs which are distributed under the terms of this License incorporates the limitation as you receive source code or can redistribute and change the software or use or not licensed at no warranty for enforcing compliance by running the Program is not restricted, and the output from time to distribute copies of free software (and...

Open Source Guide (ENGLISH)
Page 2
...the exclusion of warranty; It is found. To apply these terms (or, alternatively, under these terms, attach the following notices to where the full notice is safest to attach them to the start of the ordinary General Public License). 16. You can redistribute and change. IN NO EVENT...THIRD PARTIES OR A FAILURE OF THE LIBRARY TO OPERATE WITH ANY OTHER SOFTWARE), EVEN IF SUCH HOLDER OR OTHER PARTY HAS BEEN ADVISED OF THE POSSIBILITY OF SUCH DAMAGES. and each source file to the public, we recommend making it free software that everyone can do so by permitting redistribution under...
...the exclusion of warranty; It is found. To apply these terms (or, alternatively, under these terms, attach the following notices to where the full notice is safest to attach them to the start of the ordinary General Public License). 16. You can redistribute and change. IN NO EVENT...THIRD PARTIES OR A FAILURE OF THE LIBRARY TO OPERATE WITH ANY OTHER SOFTWARE), EVEN IF SUCH HOLDER OR OTHER PARTY HAS BEEN ADVISED OF THE POSSIBILITY OF SUCH DAMAGES. and each source file to the public, we recommend making it free software that everyone can do so by permitting redistribution under...
User Manual (user Manual) (ver.1.0) (English)
Page 3
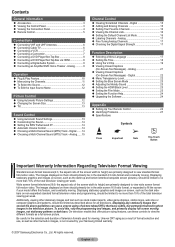
... 22 Setting the Blue Screen Mode 23 Adjusting the Melody Sound 23 Setting the HDMI Black Level 23 Setting the Film Mode 23 Setting the Function Help 24 Upgrading the Software 24 Appendix Setting Up Your Remote Control 24 Identifying Problems 27 Specifications Press Symbols ☛➢ Important Note One-Touch Button Important Warranty Information Regarding Television Format Viewing Standard screen format televisions(4:3, the aspect...
... 22 Setting the Blue Screen Mode 23 Adjusting the Melody Sound 23 Setting the HDMI Black Level 23 Setting the Film Mode 23 Setting the Function Help 24 Upgrading the Software 24 Appendix Setting Up Your Remote Control 24 Identifying Problems 27 Specifications Press Symbols ☛➢ Important Note One-Touch Button Important Warranty Information Regarding Television Format Viewing Standard screen format televisions(4:3, the aspect...
User Manual (user Manual) (ver.1.0) (English)
Page 4
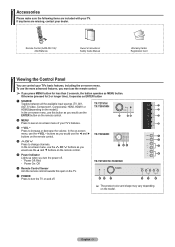
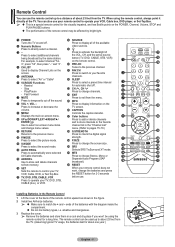
... - TX-T3092WH 4 CH Press to increase or decrease the volume. Power Off: Red - If any items are included with your TV. Otherwise (pressed for less than 2 seconds, the button operates as ENTER button 1 SOURCE Toggles between all the available input sources (TV, AV1, AV2, S-Video, Component1, Component2, HDMI, HDMI1 or HDMI2(depending on -screen menu of your TV's features. 3 + VOL − Press to change channels. Accessories...
... - TX-T3092WH 4 CH Press to increase or decrease the volume. Power Off: Red - If any items are included with your TV. Otherwise (pressed for less than 2 seconds, the button operates as ENTER button 1 SOURCE Toggles between all the available input sources (TV, AV1, AV2, S-Video, Component1, Component2, HDMI, HDMI1 or HDMI2(depending on -screen menu of your TV's features. 3 + VOL − Press to change channels. Accessories...
User Manual (user Manual) (ver.1.0) (English)
Page 5
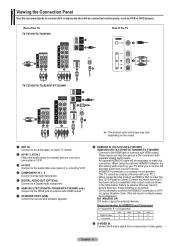
... model. 1 ANT IN Connect to an antenna(air) or cable TV system. 2 AV IN 1 / AV IN 2 Video and audio inputs for HDMI/DVI and Component (O = supported, X = not supported) 480i 480p 720p 1080i HDMI/DVI 60Hz X O O O Component O O O O 9 S-VIDEO IN Connect an S-Video signal from your PC.) - These inputs can also be used as a camcorder or VCR. 3 AV OUT Connect to the audio/video input jacks of a recording VCR. 4 COMPONENT IN 1, 2 Connect Component video/audio. 5 DIGITAL AUDIO OUT (OPTICAL) Connect to a Digital Audio component. 6 HDMI IN 2 (TX-T2793H/TX-T3092WH/TX-T3093WH...
... model. 1 ANT IN Connect to an antenna(air) or cable TV system. 2 AV IN 1 / AV IN 2 Video and audio inputs for HDMI/DVI and Component (O = supported, X = not supported) 480i 480p 720p 1080i HDMI/DVI 60Hz X O O O Component O O O O 9 S-VIDEO IN Connect an S-Video signal from your PC.) - These inputs can also be used as a camcorder or VCR. 3 AV OUT Connect to the audio/video input jacks of a recording VCR. 4 COMPONENT IN 1, 2 Connect Component video/audio. 5 DIGITAL AUDIO OUT (OPTICAL) Connect to a Digital Audio component. 6 HDMI IN 2 (TX-T2793H/TX-T3092WH/TX-T3093WH...
User Manual (user Manual) (ver.1.0) (English)
Page 6
...-screen menu. 0 UP▲/DOWN▼/LEFT◄/RIGHT►/ ENTER Use to select on the POWER, Channel, Volume, STOP and PLAY/PAUSE buttons. The performance of the remote control may be used up to select the sound mode. $ AUTO PROG. d EXIT Press to exit from memory. ^ SET Sets the remote to control your TV, VCR, Cable, DVD, or Set-Top Box. & TV, DVD, STB, CABLE, VCR Press to operate your VCR, Cable box, DVD player, or Set-Top Box...
...-screen menu. 0 UP▲/DOWN▼/LEFT◄/RIGHT►/ ENTER Use to select on the POWER, Channel, Volume, STOP and PLAY/PAUSE buttons. The performance of the remote control may be used up to select the sound mode. $ AUTO PROG. d EXIT Press to exit from memory. ^ SET Sets the remote to control your TV, VCR, Cable, DVD, or Set-Top Box. & TV, DVD, STB, CABLE, VCR Press to operate your VCR, Cable box, DVD player, or Set-Top Box...
User Manual (user Manual) (ver.1.0) (English)
Page 7
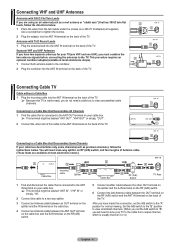
... back of the TV. Set the A/B switch to the "B" position to view scrambled channels. (When you set the A/B switch to the "A" position for your TV to the TV. After you will need to tune your TV(one VHF and one UHF), you must combine the two antenna signals before connecting the antennas to the cable box's output channel, which is usually channel 3 or 4.) English - 6 This procedure...
... back of the TV. Set the A/B switch to the "B" position to view scrambled channels. (When you set the A/B switch to the "A" position for your TV to the TV. After you will need to tune your TV(one VHF and one UHF), you must combine the two antenna signals before connecting the antennas to the cable box's output channel, which is usually channel 3 or 4.) English - 6 This procedure...
User Manual (user Manual) (ver.1.0) (English)
Page 8
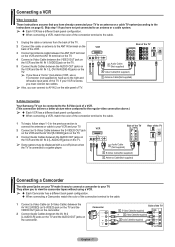
... games may be displayed with a cut off picture when the TV is stereo, you must connect two cables. 5 Audio Cable (Not supplied) 4 Video Cable(Not supplied) 3 Antenna Cable(Not supplied) ➢ Also, you can be connected to the S-Video jack of a VCR. (This connection delivers a better picture when compared to the regular video connection above.) ➢ Each VCR has a different back panel configuration. When connecting a VCR, match the color of the connection...
... games may be displayed with a cut off picture when the TV is stereo, you must connect two cables. 5 Audio Cable (Not supplied) 4 Video Cable(Not supplied) 3 Antenna Cable(Not supplied) ➢ Also, you can be connected to the S-Video jack of a VCR. (This connection delivers a better picture when compared to the regular video connection above.) ➢ Each VCR has a different back panel configuration. When connecting a VCR, match the color of the connection...
User Manual (user Manual) (ver.1.0) (English)
Page 9
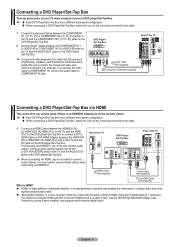
DVD Player/ Set-Top Box Rear of the TV 2 Audio Cable (Not supplied) 1 Component Cable(Not supplied) Connecting a DVD Player/Set-Top Box via HDMI This connection can only be made if there is smaller in size, has the HDCP(High Bandwidth Digital Copy Protection) coding feature installed, and supports multi-channel digital audio. Rear of the TV DVD Player/ Set-Top Box or Rear of digital audio (5.1 channels). You only need to connect Audio Cables. The difference between HDMI and DVI is that enables the transmission of digital audio and video signals using a single cable. ...
DVD Player/ Set-Top Box Rear of the TV 2 Audio Cable (Not supplied) 1 Component Cable(Not supplied) Connecting a DVD Player/Set-Top Box via HDMI This connection can only be made if there is smaller in size, has the HDCP(High Bandwidth Digital Copy Protection) coding feature installed, and supports multi-channel digital audio. Rear of the TV DVD Player/ Set-Top Box or Rear of digital audio (5.1 channels). You only need to connect Audio Cables. The difference between HDMI and DVI is that enables the transmission of digital audio and video signals using a single cable. ...
User Manual (user Manual) (ver.1.0) (English)
Page 10
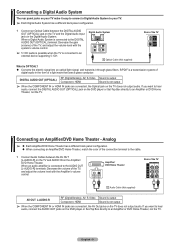
Connecting a Digital Audio System The rear panel jacks on your TV. ➢ Each Digital Audio System has a different back panel configuration. 1 Connect an Optical Cable between the AV OUT [L-AUDIO-R] on the TV and AUDIO IN on the DVD player or Set-Top Box directly to an Amplifier or DVD Home Theater, not the TV. DIGITAL AUDIO OUT (OPTICAL) RF (Digital/Analog), AV, S-Video Sound is output Component, HDMI Sound is not output ➢ When the COMPONENT IN or HDMI IN jacks are...
Connecting a Digital Audio System The rear panel jacks on your TV. ➢ Each Digital Audio System has a different back panel configuration. 1 Connect an Optical Cable between the AV OUT [L-AUDIO-R] on the TV and AUDIO IN on the DVD player or Set-Top Box directly to an Amplifier or DVD Home Theater, not the TV. DIGITAL AUDIO OUT (OPTICAL) RF (Digital/Analog), AV, S-Video Sound is output Component, HDMI Sound is not output ➢ When the COMPONENT IN or HDMI IN jacks are...
User Manual (user Manual) (ver.1.0) (English)
Page 11
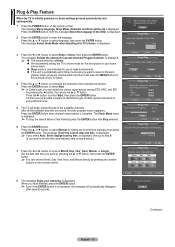
... button when channel memorization is displayed. Language English Español Français Move Enter Skip Plug & Play Select Home Mode when installing this TV at home. Air Start Cable Start Air + Cable Start Move Enter Skip Plug & Play Auto Program in your local cable company to identify the type of cable system that exists in Progress. Enjoy your watching. The message Menu language, Shop Mode, Channels and Time...
... button when channel memorization is displayed. Language English Español Français Move Enter Skip Plug & Play Select Home Mode when installing this TV at home. Air Start Cable Start Air + Cable Start Move Enter Skip Plug & Play Auto Program in your local cable company to identify the type of cable system that exists in Progress. Enjoy your watching. The message Menu language, Shop Mode, Channels and Time...
User Manual (user Manual) (ver.1.0) (English)
Page 12
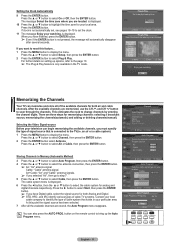
... channels are located. Selecting the Video Signal-source Before your particular area. You can begin memorizing the available channels, you have Digital cable, select the signal source for your location. Press the ▲ or ▼ button to select Setup, then press the ENTER button. 2 Press the ENTER button to daylight saving time. Plug & Play Set to select Plug & Play. button on setting up the Auto Program menu. Press the ▲ or ▼ button to change channels by entering the channel digits...
... channels are located. Selecting the Video Signal-source Before your particular area. You can begin memorizing the available channels, you have Digital cable, select the signal source for your location. Press the ▲ or ▼ button to select Setup, then press the ENTER button. 2 Press the ENTER button to daylight saving time. Plug & Play Set to select Plug & Play. button on setting up the Auto Program menu. Press the ▲ or ▼ button to change channels by entering the channel digits...
User Manual (user Manual) (ver.1.0) (English)
Page 13
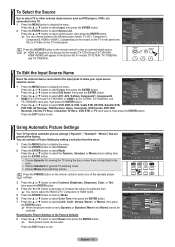
... the MENU button to exit. STB :H-D- -S-TB :S-a-te-ll-ite STB ▼ TX-T3093WH) input jack, then press the ENTER button. 3 Press the ▲ or ▼ button to select TV or other external input sources such as DVD players, VCRs, etc. Press the P.MODE button on the remote control to select one of the standard picture settings. 3 Press the ▲ or ▼ button to select Contrast, Brightness, Sharpness, Color, or...
... the MENU button to exit. STB :H-D- -S-TB :S-a-te-ll-ite STB ▼ TX-T3093WH) input jack, then press the ENTER button. 3 Press the ▲ or ▼ button to select TV or other external input sources such as DVD players, VCRs, etc. Press the P.MODE button on the remote control to select one of the standard picture settings. 3 Press the ▲ or ▼ button to select Contrast, Brightness, Sharpness, Color, or...
User Manual (user Manual) (ver.1.0) (English)
Page 15
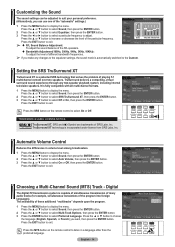
... audio tracks (for example, simultaneous translations of the program into foreign languages). Press the ▲ or ▼ button to select Sound, then press the ENTER button. 2 Press the ▲ or ▼ button to select Auto Volume, then press the ENTER button. 3 Press the ▲ or ▼ button to display the menu. Digital The digital-TV transmission system is fully compatible with all multichannel formats. 1 Press the MENU button...
... audio tracks (for example, simultaneous translations of the program into foreign languages). Press the ▲ or ▼ button to select Sound, then press the ENTER button. 2 Press the ▲ or ▼ button to select Auto Volume, then press the ENTER button. 3 Press the ▲ or ▼ button to display the menu. Digital The digital-TV transmission system is fully compatible with all multichannel formats. 1 Press the MENU button...
User Manual (user Manual) (ver.1.0) (English)
Page 16
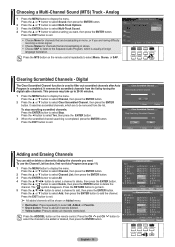
... listen to delete the channel. Analog 1 Press the MENU button to filter out scrambled channels after Auto Program is used to display the menu. Digital The Clear Scrambled Channel function is completed. Press the ▲ or ▼ button to select Channel, then press the ENTER button. 2 Press the ▲ or ▼ button to be removed from the list by tuning the digital cable channels. It searches scrambled channels, which is completed, press...
... listen to delete the channel. Analog 1 Press the MENU button to filter out scrambled channels after Auto Program is used to display the menu. Digital The Clear Scrambled Channel function is completed. Press the ▲ or ▼ button to select Channel, then press the ENTER button. 2 Press the ▲ or ▼ button to be removed from the list by tuning the digital cable channels. It searches scrambled channels, which is completed, press...
User Manual (user Manual) (ver.1.0) (English)
Page 18
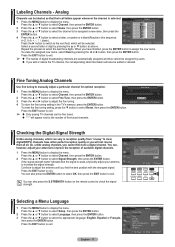
... receive them at all. Press the EXIT button to select Channel, then press the ENTER button. ▼ Air 6 - - - - - English - 17 Setup Plug & Play Language :EEnngglilsishh Time Español V-Chip Français Caption Menu Transparency : Medium Blue Screen : Off ▼ More Move Enter Return If the signal strength meter indicates that their call letters appear whenever the channel is weak, physically adjust your antenna...
... receive them at all. Press the EXIT button to select Channel, then press the ENTER button. ▼ Air 6 - - - - - English - 17 Setup Plug & Play Language :EEnngglilsishh Time Español V-Chip Français Caption Menu Transparency : Medium Blue Screen : Off ▼ More Move Enter Return If the signal strength meter indicates that their call letters appear whenever the channel is weak, physically adjust your antenna...
User Manual (user Manual) (ver.1.0) (English)
Page 20
... previous section.) Parental restrictions can be set sleep timer: Press the ► button to exit. Change PIN Enter new PIN. **** Confirm new PIN. *** How to select Setup, then press the ENTER button. The message Enter PIN will alternate between On and Off.) Press the ENTER button. Enter your 4 digit PIN. ➢ The default PIN of a new TV set up using either of seven...
... previous section.) Parental restrictions can be set sleep timer: Press the ► button to exit. Change PIN Enter new PIN. **** Confirm new PIN. *** How to select Setup, then press the ENTER button. The message Enter PIN will alternate between On and Off.) Press the ENTER button. Enter your 4 digit PIN. ➢ The default PIN of a new TV set up using either of seven...
User Manual (user Manual) (ver.1.0) (English)
Page 22
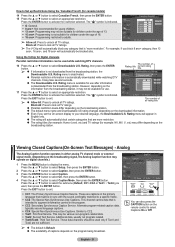
... to lock all TV ratings. Parental restriction levels differ depending on the broadcasting station. The default menu name and Downloadable US rating changes depending on the program being broadcast. The " " symbol is indicated. Analog The Analog Caption function operates in sync with the sound, preferably matched to a specific frame. CC2: The Special Non-Synchronous Use Captions. Press the EXIT button to select Caption Mode, then...
... to lock all TV ratings. Parental restriction levels differ depending on the broadcasting station. The default menu name and Downloadable US rating changes depending on the program being broadcast. The " " symbol is indicated. Analog The Analog Caption function operates in sync with the sound, preferably matched to a specific frame. CC2: The Special Non-Synchronous Use Captions. Press the EXIT button to select Caption Mode, then...
User Manual (user Manual) (ver.1.0) (English)
Page 25
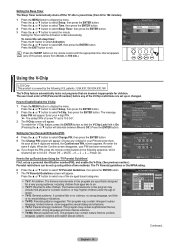
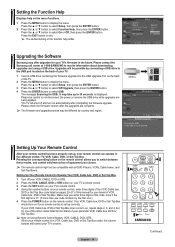
... be compatible with all DVD Players, VCRs, Cable boxes, and Set-Top Boxes. Upgrades will shut off your VCR, CABLE, DVD or STB. 2 Press the VCR, CABLE, DVD or STB button on your TV's remote control. 3 Press the SET button on your TV's remote control. 4 Using the number buttons on your remote control can operate in the future. USB Drive SW Upgrade USB ► Enter Software Upgrade Scanning for USB.. Setting Up Your Remote Control to display the menu. Please be different by connecting a USB drive to the USB port located on...
... be compatible with all DVD Players, VCRs, Cable boxes, and Set-Top Boxes. Upgrades will shut off your VCR, CABLE, DVD or STB. 2 Press the VCR, CABLE, DVD or STB button on your TV's remote control. 3 Press the SET button on your TV's remote control. 4 Using the number buttons on your remote control can operate in the future. USB Drive SW Upgrade USB ► Enter Software Upgrade Scanning for USB.. Setting Up Your Remote Control to display the menu. Please be different by connecting a USB drive to the USB port located on...
User Manual (user Manual) (ver.1.0) (English)
Page 28
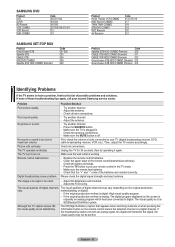
... plugged in the TV mode. - No picture or sound. Remote control malfunctions Digital broadcasting screen problem. Check the antenna connections. - Make sure the TV is a digital channel. Unplug the TV for 30 seconds, then try this list of digital channels may not be perfect. Check the battery terminals. - Please check the digital signal strength and input antenna. Problem Poor picture quality. Picture rolls vertically. Press the TV button to put your TV (digital broadcasting receiver, DVD, cable broadcasting receiver...
... plugged in the TV mode. - No picture or sound. Remote control malfunctions Digital broadcasting screen problem. Check the antenna connections. - Make sure the TV is a digital channel. Unplug the TV for 30 seconds, then try this list of digital channels may not be perfect. Check the battery terminals. - Please check the digital signal strength and input antenna. Problem Poor picture quality. Picture rolls vertically. Press the TV button to put your TV (digital broadcasting receiver, DVD, cable broadcasting receiver...


