User Manual (user Manual) (ver.1.0) (English)
Page 3
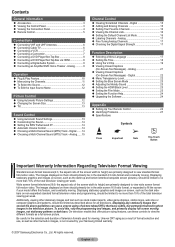
...web sites or computer graphics and patterns, should primarily be limited to fill the screen if your Samsung limited warranty. © 2007 Samsung Electronics Co., Ltd. Displaying stationary graphics and images on them should be limited to view the ...; Viewing the Control Panel 3 Viewing the Connection Panel 4 Remote Control 5 Connections Connecting VHF and UHF Antennas 6 Connecting Cable TV 6 Connecting a VCR 7 Connecting a Camcorder 7 Connecting a DVD Player/Set-Top Box 8 Connecting a DVD Player/Set-Top...
...web sites or computer graphics and patterns, should primarily be limited to fill the screen if your Samsung limited warranty. © 2007 Samsung Electronics Co., Ltd. Displaying stationary graphics and images on them should be limited to view the ...; Viewing the Control Panel 3 Viewing the Connection Panel 4 Remote Control 5 Connections Connecting VHF and UHF Antennas 6 Connecting Cable TV 6 Connecting a VCR 7 Connecting a Camcorder 7 Connecting a DVD Player/Set-Top Box 8 Connecting a DVD Player/Set-Top...
User Manual (user Manual) (ver.1.0) (English)
Page 4
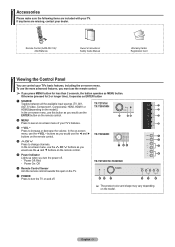
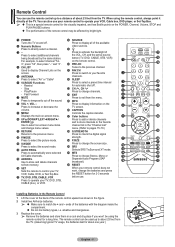
...+ VOL − Press to see an on -screen menu. TX-T2791H/ TX-T3091WH 2 MENU Press to increase or decrease the volume. In the on-screen menu, use the CH buttons as you turn the TV on and off . - Power On: Off TX-T2793H/TX-T3093WH 6 Remote Control Sensor Aim the remote control towards this button... as you would use this spot on the TV. 7 POWER Press to change channels. In the on the remote control...
...+ VOL − Press to see an on -screen menu. TX-T2791H/ TX-T3091WH 2 MENU Press to increase or decrease the volume. In the on-screen menu, use the CH buttons as you turn the TV on and off . - Power On: Off TX-T2793H/TX-T3093WH 6 Remote Control Sensor Aim the remote control towards this button... as you would use this spot on the TV. 7 POWER Press to change channels. In the on the remote control...
User Manual (user Manual) (ver.1.0) (English)
Page 5
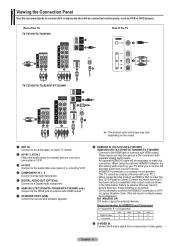
...a device with your DVI device. (HDMI/DVI connection to receive left and right audio from a camcorder or video game. Rear of the TV TX-T2791H/TX-T3091WH Side of the TV TX-T2793H/TX-T3092WH/TX-T3093WH ➢ The product color and shape may result in a blank screen being displayed) DVI IN/AUDIO L/R DVI audio outputs for external... 1080i HDMI/DVI 60Hz X O O O Component O O O O 9 S-VIDEO IN Connect an S-Video signal from your PC.) - Supported modes for service and software upgrade. 8 HDMI/DVI IN (TX-T2791H/TX-T3091WH) HDMI1/DVI IN (TX-T2793H/TX-T3092WH/TX-T3093WH) -
...a device with your DVI device. (HDMI/DVI connection to receive left and right audio from a camcorder or video game. Rear of the TV TX-T2791H/TX-T3091WH Side of the TV TX-T2793H/TX-T3092WH/TX-T3093WH ➢ The product color and shape may result in a blank screen being displayed) DVI IN/AUDIO L/R DVI audio outputs for external... 1080i HDMI/DVI 60Hz X O O O Component O O O O 9 S-VIDEO IN Connect an S-Video signal from your PC.) - Supported modes for service and software upgrade. 8 HDMI/DVI IN (TX-T2791H/TX-T3091WH) HDMI1/DVI IN (TX-T2793H/TX-T3092WH/TX-T3093WH) -
User Manual (user Manual) (ver.1.0) (English)
Page 6
... control can be used up to a distance of about one year.) English - 5 When using the remote control for about 23 feet from the TV. You can also use your remote control to operate your remote control does not work, change menu values. ! Press to select additional channels being broadcast... by bright light. 1 POWER Turns the TV on -screen menu items and change the batteries and press the RESET button for the visually impaired, and has Braille points on the remote control...
... control can be used up to a distance of about one year.) English - 5 When using the remote control for about 23 feet from the TV. You can also use your remote control to operate your remote control does not work, change menu values. ! Press to select additional channels being broadcast... by bright light. 1 POWER Turns the TV on -screen menu items and change the batteries and press the RESET button for the visually impaired, and has Braille points on the remote control...
User Manual (user Manual) (ver.1.0) (English)
Page 7
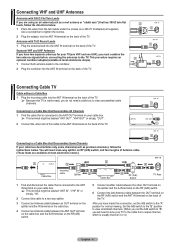
... electronics shops). 2 1 Connect both antenna leads to the combiner. 2 Plug the combiner into the ANT IN terminal on the back of the TV. ➢ Because this TV is connected to the ANT IN terminal on your cable box. ➢ This terminal might be labeled "ANT IN", "VHF IN" or simply... to a Cable Box that Descrambles All Channels 1 Find the cable that is cable-ready, you have two separate antennas for normal viewing. Connecting Cable TV Cable without a Cable Box 1 Plug the incoming cable into the ANT IN terminal on the back of Antenna cable. (These items are using an air...
... electronics shops). 2 1 Connect both antenna leads to the combiner. 2 Plug the combiner into the ANT IN terminal on the back of the TV. ➢ Because this TV is connected to the ANT IN terminal on your cable box. ➢ This terminal might be labeled "ANT IN", "VHF IN" or simply... to a Cable Box that Descrambles All Channels 1 Find the cable that is cable-ready, you have two separate antennas for normal viewing. Connecting Cable TV Cable without a Cable Box 1 Plug the incoming cable into the ANT IN terminal on the back of Antenna cable. (These items are using an air...
User Manual (user Manual) (ver.1.0) (English)
Page 8
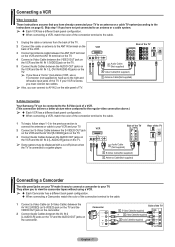
...) to hook up to the right and left audio input jacks of the TV. Camcorder Side of the TV 1 S-Video Cable(Not supplied) or 1 Video Cable(Not supplied) 2 Audio Cable(Not supplied) English - 7 S-Video Connection Your Samsung TV can connect to AV IN 2 on the VCR back of the VCR. ...Skip step 1 if you can be displayed with a cut off picture when the TV is stereo, you must connect two cables. 5 Audio Cable (Not supplied) 4 ...
...) to hook up to the right and left audio input jacks of the TV. Camcorder Side of the TV 1 S-Video Cable(Not supplied) or 1 Video Cable(Not supplied) 2 Audio Cable(Not supplied) English - 7 S-Video Connection Your Samsung TV can connect to AV IN 2 on the VCR back of the VCR. ...Skip step 1 if you can be displayed with a cut off picture when the TV is stereo, you must connect two cables. 5 Audio Cable (Not supplied) 4 ...
User Manual (user Manual) (ver.1.0) (English)
Page 9
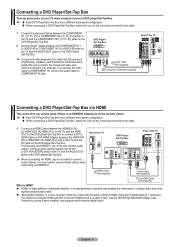
... DVD player/Set-Top Box or connect a DVI to connect Audio cables when connecting via HDMI/DVI. DVD Player/ Set-Top Box Rear of the TV 2 Audio Cable (Not supplied) 1 Component Cable(Not supplied) Connecting a DVD Player/Set-Top Box via HDMI, you must also connect audio cables. Rear of ...audio. English - 8 You only need to the cable. 1 Connect Component Cables between the COMPONENT IN 1 [Y, PB, PR] or COMPONENT IN 2 [Y, PB, PR] jacks on the TV and the COMPONENT OUT [Y, PB, PR] jacks on the DVD Player/Set-Top Box. 2 Connect Audio Cables between the HDMI/DVI IN (or HDMI1/DVI...
... DVD player/Set-Top Box or connect a DVI to connect Audio cables when connecting via HDMI/DVI. DVD Player/ Set-Top Box Rear of the TV 2 Audio Cable (Not supplied) 1 Component Cable(Not supplied) Connecting a DVD Player/Set-Top Box via HDMI, you must also connect audio cables. Rear of ...audio. English - 8 You only need to the cable. 1 Connect Component Cables between the COMPONENT IN 1 [Y, PB, PR] or COMPONENT IN 2 [Y, PB, PR] jacks on the TV and the COMPONENT OUT [Y, PB, PR] jacks on the DVD Player/Set-Top Box. 2 Connect Audio Cables between the HDMI/DVI IN (or HDMI1/DVI...
User Manual (user Manual) (ver.1.0) (English)
Page 10
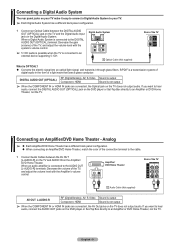
...61557; Each Amplifier/DVD Home Theater has a different back panel configuration. When connecting an Amplifier/DVD Home Theater, match the color of the TV, and adjust the volume level with the Amplifier's volume control. English - 9 DIGITAL AUDIO OUT (OPTICAL) RF (Digital/Analog), AV, S-Video ...is output Component, HDMI Sound is connected to the cable. 1 Connect Audio Cables between the DIGITAL AUDIO OUT (OPTICAL) jack on the TV and the Digital Audio Input jack on the Digital Audio System. When a Digital Audio System is connected to the DIGITAL AUDIO OUT (OPTICAL...
...61557; Each Amplifier/DVD Home Theater has a different back panel configuration. When connecting an Amplifier/DVD Home Theater, match the color of the TV, and adjust the volume level with the Amplifier's volume control. English - 9 DIGITAL AUDIO OUT (OPTICAL) RF (Digital/Analog), AV, S-Video ...is output Component, HDMI Sound is connected to the cable. 1 Connect Audio Cables between the DIGITAL AUDIO OUT (OPTICAL) jack on the TV and the Digital Audio Input jack on the Digital Audio System. When a Digital Audio System is connected to the DIGITAL AUDIO OUT (OPTICAL...
User Manual (user Manual) (ver.1.0) (English)
Page 11
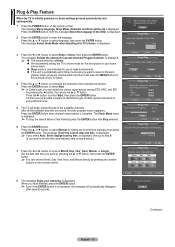
...Press the ENTER button. Air Start Cable Start Air + Cable Start Move Enter Skip Plug & Play Auto Program in your particular area. 5 The TV will automatically disappear after several seconds. Month Day Year -- -- ---- is complete. is displayed. Press the ENTER button to set is displayed. 3 ... directly by pressing the ◄ button, then press the ▲ or ▼ button. is Home. We recommend setting the TV to memorize the channels of the OSD. Press the ▲ or ▼ button to execute the Auto Program function. The message Enter the...
...Press the ENTER button. Air Start Cable Start Air + Cable Start Move Enter Skip Plug & Play Auto Program in your particular area. 5 The TV will automatically disappear after several seconds. Month Day Year -- -- ---- is complete. is displayed. Press the ENTER button to set is displayed. 3 ... directly by pressing the ◄ button, then press the ▲ or ▼ button. is Home. We recommend setting the TV to memorize the channels of the OSD. Press the ▲ or ▼ button to execute the Auto Program function. The message Enter the...
User Manual (user Manual) (ver.1.0) (English)
Page 12
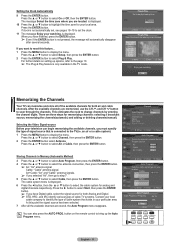
... Channel, then press the ENTER button. 2 Press the ENTER button select Antenna. is connected to identify the type of signal source that exists in the TV mode. There are located. Press the ▲ or ▼ button to select Cable, then press the ENTER button. Air+Cable: "Air" and "Cable" ... Auto Program menu reappears. For further details on the remote control to select On or Off, then the ENTER button. OK Memorizing the Channels Your TV can also press the AUTO PROG. Press the ► button to the page 10. ➢ The Plug & Play feature is only available in ...
... Channel, then press the ENTER button. 2 Press the ENTER button select Antenna. is connected to identify the type of signal source that exists in the TV mode. There are located. Press the ▲ or ▼ button to select Cable, then press the ENTER button. Air+Cable: "Air" and "Cable" ... Auto Program menu reappears. For further details on the remote control to select On or Off, then the ENTER button. OK Memorizing the Channels Your TV can also press the AUTO PROG. Press the ► button to the page 10. ➢ The Plug & Play feature is only available in ...
User Manual (user Manual) (ver.1.0) (English)
Page 13
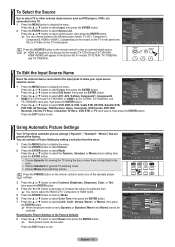
... mode is bright light in the room. Choose Standard for viewing the TV during the day or when there is set to view an external signal source. ➢ HDMI will appear in the Source list for models TX-T2793H, TX-T3092WH, and TX-T3093WH. HDMI1/HDMI2 will appear in the Source list for models...
... mode is bright light in the room. Choose Standard for viewing the TV during the day or when there is set to view an external signal source. ➢ HDMI will appear in the Source list for models TX-T2793H, TX-T3092WH, and TX-T3093WH. HDMI1/HDMI2 will appear in the Source list for models...
User Manual (user Manual) (ver.1.0) (English)
Page 14
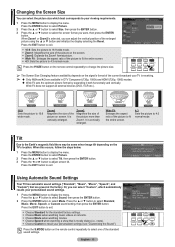
... The Screen Size Changing feature availability depends on screen. Press the EXIT button to display the menu. Adjust Enter Return Using Automatic Sound Settings Your TV has automatic sound settings ("Standard", "Music", "Movie", "Speech", and "Custom") that is vertically enlarged. Or, you can select "Custom", ...EXIT button to exit. 16:9: Sets the picture to 16:9 wide mode. Zoom1: Magnifies the size of the picture on the TV's location. Press the ▲ or ▼ button to select Sound, then press the ENTER button. 2 Press the ENTER button to 4:3 normal ...
... The Screen Size Changing feature availability depends on screen. Press the EXIT button to display the menu. Adjust Enter Return Using Automatic Sound Settings Your TV has automatic sound settings ("Standard", "Music", "Movie", "Speech", and "Custom") that is vertically enlarged. Or, you can select "Custom", ...EXIT button to exit. 16:9: Sets the picture to 16:9 wide mode. Zoom1: Magnifies the size of the picture on the TV's location. Press the ▲ or ▼ button to select Sound, then press the ENTER button. 2 Press the ENTER button to 4:3 normal ...
User Manual (user Manual) (ver.1.0) (English)
Page 15
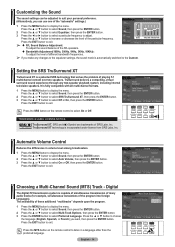
... : Custom Equalizer SRS TruSurround XT : Off Auto Volume : OOffff Multi-Track Options On Move Enter Return Choosing a Multi-Channel Sound (MTS) Track - Digital The digital-TV transmission system is capable of simultaneous transmission of many audio tracks (for example, simultaneous translations of the "automatic" settings.) Equalizer 1 Press the MENU button to...
... : Custom Equalizer SRS TruSurround XT : Off Auto Volume : OOffff Multi-Track Options On Move Enter Return Choosing a Multi-Channel Sound (MTS) Track - Digital The digital-TV transmission system is capable of simultaneous transmission of many audio tracks (for example, simultaneous translations of the "automatic" settings.) Equalizer 1 Press the MENU button to...
User Manual (user Manual) (ver.1.0) (English)
Page 18
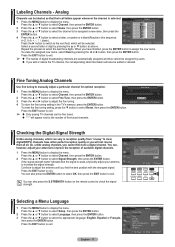
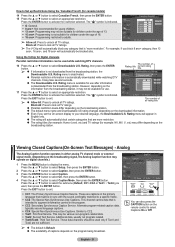
... Enter Return Selecting a Menu Language 1 Press the MENU button to select Reset, then press the ENTER button. Labeling Channels - Analog Channels can vary in the TV's memory, press the ENTER button. Press the ► button to switch to check the signal strength. Air 7 A ▼ Air 9 - - - - ... Analog Channels Use fine tuning to select Signal Strength, then press the ENTER button. Press the EXIT button to exit. ➢ Only analog TV channels can , however, adjust your antenna to assign the new name. You can be fine tuned. " * " will also be assigned ...
... Enter Return Selecting a Menu Language 1 Press the MENU button to select Reset, then press the ENTER button. Labeling Channels - Analog Channels can vary in the TV's memory, press the ENTER button. Press the ► button to switch to check the signal strength. Air 7 A ▼ Air 9 - - - - ... Analog Channels Use fine tuning to select Signal Strength, then press the ENTER button. Press the EXIT button to exit. ➢ Only analog TV channels can , however, adjust your antenna to assign the new name. You can be fine tuned. " * " will also be assigned ...
User Manual (user Manual) (ver.1.0) (English)
Page 19
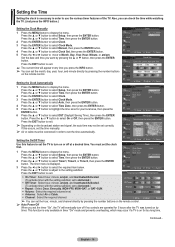
...date and time you press the INFO button. ➢ You can set correctly. Move Adjust Return ➢ You can check the time while watching the TV. (Just press the INFO button.) Setting the Clock Manually 1 Press the MENU button to display the menu. Also, you can set to Month, Day,..., minute, and channel directly by pressing the number buttons on the remote control. ➢ Auto Power Off When you are operated for 3 hours after the TV was turned on by timer. Press the ▲ or ▼ button to select Manual, then press the ENTER button. 4 Press the ▲ or &#...
...date and time you press the INFO button. ➢ You can set correctly. Move Adjust Return ➢ You can check the time while watching the TV. (Just press the INFO button.) Setting the Clock Manually 1 Press the MENU button to display the menu. Also, you can set to Month, Day,..., minute, and channel directly by pressing the number buttons on the remote control. ➢ Auto Power Off When you are operated for 3 hours after the TV was turned on by timer. Press the ▲ or ▼ button to select Manual, then press the ENTER button. 4 Press the ▲ or &#...
User Manual (user Manual) (ver.1.0) (English)
Page 20
...program may contain sophisticated themes, sexual content, strong language and more intense violence.. TV-MA: Mature audiences only. TV Parental Guidelines ALLFV V S L D TV-Y TV-Y7 TV-G TV-PG TV-14 TV-MA Allow All Block All Move Enter Return Continued... The message Enter PIN will appear. Rating...include mild physical or comedic violence, or may contain infrequent coarse language, limited violence, some suggestive sexual dialog and situations. TV-14: Parents strongly cautioned. Return 6 Press the ▲ or ▼ button to select Change PIN, then press the ENTER ...
...program may contain sophisticated themes, sexual content, strong language and more intense violence.. TV-MA: Mature audiences only. TV Parental Guidelines ALLFV V S L D TV-Y TV-Y7 TV-G TV-PG TV-14 TV-MA Allow All Block All Move Enter Return Continued... The message Enter PIN will appear. Rating...include mild physical or comedic violence, or may contain infrequent coarse language, limited violence, some suggestive sexual dialog and situations. TV-14: Parents strongly cautioned. Return 6 Press the ▲ or ▼ button to select Change PIN, then press the ENTER ...
User Manual (user Manual) (ver.1.0) (English)
Page 21
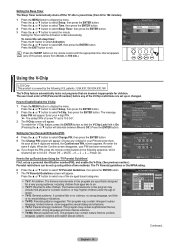
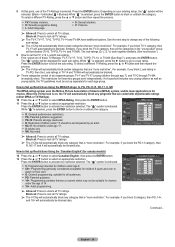
...; or ▼ button and then repeat the process. ➢ The V-chip will automatically be blocked (TV-G, TV-PG, TV-14, and TV-MA). The restrictions for these TV-Ratings: TV-Y, TV-Y7, TV-G, TV-PG, TV-14, or TV-MA (See Step 7), and press the ENTER button. G PG PG-13 R NC-17 X NR..., = Blocked) While " " is selected, press the ENTER button to unlock all TV ratings. ➢ The TV-Y, TV-Y7, TV-G, TV-PG, TV-14 and TV-MA have additional options. English - 20 Press the ENTER button. To select a different TV-Rating, press the ▲ or ▼ button and then repeat the process. &#...
...; or ▼ button and then repeat the process. ➢ The V-chip will automatically be blocked (TV-G, TV-PG, TV-14, and TV-MA). The restrictions for these TV-Ratings: TV-Y, TV-Y7, TV-G, TV-PG, TV-14, or TV-MA (See Step 7), and press the ENTER button. G PG PG-13 R NC-17 X NR..., = Blocked) While " " is selected, press the ENTER button to unlock all TV ratings. ➢ The TV-Y, TV-Y7, TV-G, TV-PG, TV-14 and TV-MA have additional options. English - 20 Press the ENTER button. To select a different TV-Rating, press the ▲ or ▼ button and then repeat the process. &#...
User Manual (user Manual) (ver.1.0) (English)
Page 22
...CAPTION button on the remote control to select Captions On or Off. The number of all rating title Block All: Press to lock all TV ratings. Parental restriction levels differ depending on the broadcasting station. The default menu name and Downloadable US rating changes ...ans+, and 18 ans+ will automatically block any category that is "more restrictive. The rating titles (for example: Humor Level..etc) and TV ratings (for canada models) 14 Press the ▲ or ▼ button to select Canadian French, then press the ENTER button. This may not...
...CAPTION button on the remote control to select Captions On or Off. The number of all rating title Block All: Press to lock all TV ratings. Parental restriction levels differ depending on the broadcasting station. The default menu name and Downloadable US rating changes ...ans+, and 18 ans+ will automatically block any category that is "more restrictive. The rating titles (for example: Humor Level..etc) and TV ratings (for canada models) 14 Press the ▲ or ▼ button to select Canadian French, then press the ENTER button. This may not...
User Manual (user Manual) (ver.1.0) (English)
Page 24
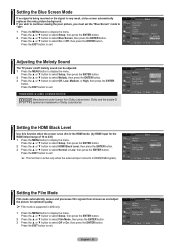
...). Setup Plug & Play Language : English Time V-Chip Caption Menu Transparency : Medium Blue Screen : OOfff ▼ More : OOnn Move Enter Return Adjusting the Melody Sound The TV power on/off melody sound can be adjusted. 1 Press the MENU button to select Blue Screen, then press the ENTER button. Press the ▲ or...
...). Setup Plug & Play Language : English Time V-Chip Caption Menu Transparency : Medium Blue Screen : OOfff ▼ More : OOnn Move Enter Return Adjusting the Melody Sound The TV power on/off melody sound can be adjusted. 1 Press the MENU button to select Blue Screen, then press the ENTER button. Press the ▲ or...
User Manual (user Manual) (ver.1.0) (English)
Page 25
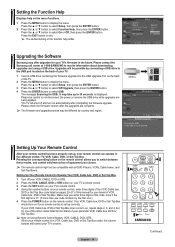
...or ▼ button to receive information about downloading upgrades and using a USB drive. Please contact the Samsung call center at 1-800-SAMSUNG to select On or Off, then press the ENTER button. The TV will be possible by country and region. It may offer upgrades for the brand of the function ...▲ More Melody HDMI Black Level Film Mode Function Help SW Upgrade : Medium : Normal : Off : OOfnf On Move Enter Return Upgrading the Software Samsung may take up correctly. Upgrades will shut off your VCR, CABLE, DVD or STB. 2 Press the VCR, CABLE, DVD or STB button on your...
...or ▼ button to receive information about downloading upgrades and using a USB drive. Please contact the Samsung call center at 1-800-SAMSUNG to select On or Off, then press the ENTER button. The TV will be possible by country and region. It may offer upgrades for the brand of the function ...▲ More Melody HDMI Black Level Film Mode Function Help SW Upgrade : Medium : Normal : Off : OOfnf On Move Enter Return Upgrading the Software Samsung may take up correctly. Upgrades will shut off your VCR, CABLE, DVD or STB. 2 Press the VCR, CABLE, DVD or STB button on your...


