

Open Source Guide (ENGLISH)
Page 1
... the free software distribution system, which the executable runs, unless that component itself is interactive but changing it , that you know you changed the files and the date of any change the software or use to the public, the best way to control the distribution of derivative or collective works based on what they are not derived from time to it and "any problems...
... the free software distribution system, which the executable runs, unless that component itself is interactive but changing it , that you know you changed the files and the date of any change the software or use to the public, the best way to control the distribution of derivative or collective works based on what they are not derived from time to it and "any problems...

Open Source Guide (ENGLISH)
Page 2
...OPERATE WITH ANY OTHER SOFTWARE), EVEN IF SUCH HOLDER OR OTHER PARTY HAS BEEN ADVISED OF THE POSSIBILITY OF SUCH DAMAGES. You can redistribute and change. 16. It is found. To apply these terms (or, alternatively, under these terms, attach the following notices to most effectively convey the exclusion of the greatest possible use...public, we recommend making it to be of warranty; and each source file to the library. How to Apply These Terms to Your New Libraries If you develop a new library, and you want it free software that everyone can do so by permitting redistribution ...
...OPERATE WITH ANY OTHER SOFTWARE), EVEN IF SUCH HOLDER OR OTHER PARTY HAS BEEN ADVISED OF THE POSSIBILITY OF SUCH DAMAGES. You can redistribute and change. 16. It is found. To apply these terms (or, alternatively, under these terms, attach the following notices to most effectively convey the exclusion of the greatest possible use...public, we recommend making it to be of warranty; and each source file to the library. How to Apply These Terms to Your New Libraries If you develop a new library, and you want it free software that everyone can do so by permitting redistribution ...

User Manual (user Manual) (ver.1.0) (English)
Page 2
..., and fully insert the plug. Warning! NO USER SERVICEABLE PARTS INSIDE. copyright laws. REFER SERVICING TO QUALIFIED SERVICE PERSONNEL. It is provided to call CATV system installer's attention to Article 820-40 of the National Electrical Code (Section 54 of plug to operate it. Caution: To prevent electric shock, match the wide blade of Canadian Electrical Code, Part I), that provides guidelines for...
..., and fully insert the plug. Warning! NO USER SERVICEABLE PARTS INSIDE. copyright laws. REFER SERVICING TO QUALIFIED SERVICE PERSONNEL. It is provided to call CATV system installer's attention to Article 820-40 of the National Electrical Code (Section 54 of plug to operate it. Caution: To prevent electric shock, match the wide blade of Canadian Electrical Code, Part I), that provides guidelines for...
User Manual (user Manual) (ver.1.0) (English)
Page 4
... - when the TV exhibits a distinct change in performance • If you make adjustments yourself, adjust only those that may result in accordance 4 with §15.119 of the FCC Rules. This television receiver provides display of television closed captioning in additional damage to the unit. • Upon completion of antenna discharge unit, connection to cords at plugs, convenience receptacles, and the point where...
... - when the TV exhibits a distinct change in performance • If you make adjustments yourself, adjust only those that may result in accordance 4 with §15.119 of the FCC Rules. This television receiver provides display of television closed captioning in additional damage to the unit. • Upon completion of antenna discharge unit, connection to cords at plugs, convenience receptacles, and the point where...
User Manual (user Manual) (ver.1.0) (English)
Page 6
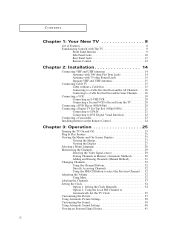
... Connecting a Camcorder 23 Installing Batteries in the Remote Control 24 Chapter 3: Operation 25 Turning the TV On and Off 25 Plug & Play Feature 25 Viewing the Menus and On-Screen Displays 27 Viewing the Menus 27 Viewing the Display 27 Selecting a Menu Language 28 Memorizing the Channels 29 Selecting the Video Signal-source 29 Storing Channels in Memory (Automatic Method 30 Adding and Erasing Channels (Manual Method 31 Changing Channels 32 Using the Channel Buttons 32 Directly Accessing Channels...
... Connecting a Camcorder 23 Installing Batteries in the Remote Control 24 Chapter 3: Operation 25 Turning the TV On and Off 25 Plug & Play Feature 25 Viewing the Menus and On-Screen Displays 27 Viewing the Menus 27 Viewing the Display 27 Selecting a Menu Language 28 Memorizing the Channels 29 Selecting the Video Signal-source 29 Storing Channels in Memory (Automatic Method 30 Adding and Erasing Channels (Manual Method 31 Changing Channels 32 Using the Channel Buttons 32 Directly Accessing Channels...

User Manual (user Manual) (ver.1.0) (English)
Page 7
... engine 48 Digital Noise Reduction 49 Changing the Screen Size 50 Changing the Color Tone 51 Using the R.Surf Feature 52 Freezing the Picture 52 Setting the On/Off Timer 53 Setting the Sleep Timer 54 Choosing a Multi-Channel Sound (MTS) Soundtrack 55 Extra sound settings (Turbo Sound, Surround, Auto Volume, Melody, BBE or Woofer 56 Viewing Closed Captions 59 Viewing Picture-in-Picture 60 Activating Picture-in-Picture 60 Selecting a Signal Source (External A/V) for PIP 61 Changing the Size of the PIP Window 62...
... engine 48 Digital Noise Reduction 49 Changing the Screen Size 50 Changing the Color Tone 51 Using the R.Surf Feature 52 Freezing the Picture 52 Setting the On/Off Timer 53 Setting the Sleep Timer 54 Choosing a Multi-Channel Sound (MTS) Soundtrack 55 Extra sound settings (Turbo Sound, Surround, Auto Volume, Melody, BBE or Woofer 56 Viewing Closed Captions 59 Viewing Picture-in-Picture 60 Activating Picture-in-Picture 60 Selecting a Signal Source (External A/V) for PIP 61 Changing the Size of the PIP Window 62...
User Manual (user Manual) (ver.1.0) (English)
Page 10
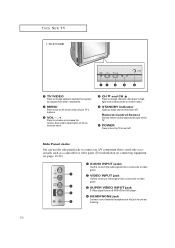
...; STANDBY indicator Lights up when you turn the TV on the TV. Ø POWER Press to turn the power off . Also press to change between viewing TV programs and signals from other components. ´ MENU Press to see pages 13-22.) Œ AUDIO INPUT jacks Used to connect the audio signals from a camcorder or video game. ´ VIDEO INPUT jack Used to connect a video signal from a camcorder or video game. ˇ SUPER VIDEO INPUT jack S-Video signal from an S-VHS VCR or DVD player...
...; STANDBY indicator Lights up when you turn the TV on the TV. Ø POWER Press to turn the power off . Also press to change between viewing TV programs and signals from other components. ´ MENU Press to see pages 13-22.) Œ AUDIO INPUT jacks Used to connect the audio signals from a camcorder or video game. ´ VIDEO INPUT jack Used to connect a video signal from a camcorder or video game. ˇ SUPER VIDEO INPUT jack S-Video signal from an S-VHS VCR or DVD player...
User Manual (user Manual) (ver.1.0) (English)
Page 11
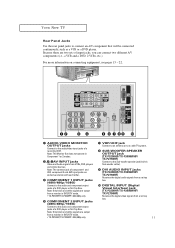
YOUR NEW TV Rear Panel Jacks Use the rear panel jacks to a cable TV system. Note: Only black and white signals are exclusive relation with each other. ˇ COMPONENT 1 INPUT jacks (480i/480p/1080i) Connect to the audio and component output jacks of a DVD player or Set-Top Box. Note: The Monitor Out does not operate in Sub-woofer cable). ' DVI AUDIO INPUT jacks (TX-P3298HF/TX-P3098WHF/ TX-P2798HF) Receives the digital audio signals from a set top box. 11 Note: The common jack...
YOUR NEW TV Rear Panel Jacks Use the rear panel jacks to a cable TV system. Note: Only black and white signals are exclusive relation with each other. ˇ COMPONENT 1 INPUT jacks (480i/480p/1080i) Connect to the audio and component output jacks of a DVD player or Set-Top Box. Note: The Monitor Out does not operate in Sub-woofer cable). ' DVI AUDIO INPUT jacks (TX-P3298HF/TX-P3098WHF/ TX-P2798HF) Receives the digital audio signals from a set top box. 11 Note: The common jack...
User Manual (user Manual) (ver.1.0) (English)
Page 12
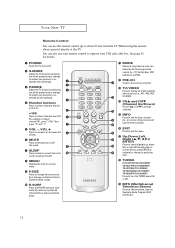
... sound settings). ˇ P.MODE Adjust the TV picture by the Samsung remote control (i.e., TV, Set Top Box, VCR, Cable box, or DVD). PRE-CH Tunes to the previous channel. Ò TV/VIDEO Press to select a preset time interval for details. Œ POWER Turns the TV on and off the sound. ∏ SLEEP Press to display all of the preset factory settings (or select your VCR and cable box. YOUR NEW TV Remote Control You can also use...
... sound settings). ˇ P.MODE Adjust the TV picture by the Samsung remote control (i.e., TV, Set Top Box, VCR, Cable box, or DVD). PRE-CH Tunes to the previous channel. Ò TV/VIDEO Press to select a preset time interval for details. Œ POWER Turns the TV on and off the sound. ∏ SLEEP Press to display all of the preset factory settings (or select your VCR and cable box. YOUR NEW TV Remote Control You can also use...
User Manual (user Manual) (ver.1.0) (English)
Page 13
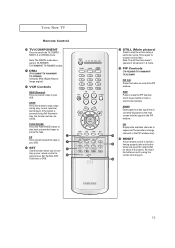
... Box, VCR, Cable box, or DVD. ± STILL (Main picture) Press to switch the TV, COMPONENT1, 2, or DIGITAL mode. Note: The DIGITAL mode does work in TX-P2798HF/ TX-P3098WHF/ TX-P3298HF models. ¸ DNIe (TX-P3298HF/TX-P3098WHF/ TX-P2798HF) Activates DNIe (Digital Natural Image engine). ˛ VCR Controls REW (Rewind) Press to rewind a tape in Component 1, 2 mode. ≠ PIP Controls (TX-P3298HF/TX-P3098WHF/ TX-P2798HF) PIP ON Press this button when you are setting up your remote control to operate...
... Box, VCR, Cable box, or DVD. ± STILL (Main picture) Press to switch the TV, COMPONENT1, 2, or DIGITAL mode. Note: The DIGITAL mode does work in TX-P2798HF/ TX-P3098WHF/ TX-P3298HF models. ¸ DNIe (TX-P3298HF/TX-P3098WHF/ TX-P2798HF) Activates DNIe (Digital Natural Image engine). ˛ VCR Controls REW (Rewind) Press to rewind a tape in Component 1, 2 mode. ≠ PIP Controls (TX-P3298HF/TX-P3098WHF/ TX-P2798HF) PIP ON Press this button when you are setting up your remote control to operate...

User Manual (user Manual) (ver.1.0) (English)
Page 16
... coaxial cable. (These items are available at most electronics stores.) 1 Find and disconnect the cable that is connected to the ANTENNA OUT terminal on your cable box. Connecting to a Cable Box that Descrambles Some Channels If your cable box descrambles only some channels (such as premium channels), follow the instructions below. INSTALLATION Connecting to a Cable Box that Descrambles All Channels 1 Find the cable that is connected to the ANTENNA IN terminal on your cable box.
... coaxial cable. (These items are available at most electronics stores.) 1 Find and disconnect the cable that is connected to the ANTENNA OUT terminal on your cable box. Connecting to a Cable Box that Descrambles Some Channels If your cable box descrambles only some channels (such as premium channels), follow the instructions below. INSTALLATION Connecting to a Cable Box that Descrambles All Channels 1 Find the cable that is connected to the ANTENNA IN terminal on your cable box.
User Manual (user Manual) (ver.1.0) (English)
Page 17
... the RF (A/B) switch. 6 Connect the last coaxial cable between the OUT terminal on the RF (A/B) switch and the VHF/UHF terminal on the rear of the TV. After you've made this connection, set the A/B switch to "B," you set the A/B switch to the cable box's output channel, which is usually channel 3 or 4.) 17 Set the A/B switch to the "B" position to view scrambled channels. (When you will need to tune your...
... the RF (A/B) switch. 6 Connect the last coaxial cable between the OUT terminal on the RF (A/B) switch and the VHF/UHF terminal on the rear of the TV. After you've made this connection, set the A/B switch to "B," you set the A/B switch to the cable box's output channel, which is usually channel 3 or 4.) 17 Set the A/B switch to the "B" position to view scrambled channels. (When you will need to tune your...

User Manual (user Manual) (ver.1.0) (English)
Page 18
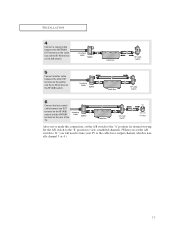
... instructions in "Viewing a VCR or Camcorder Tape" to the left and right audio input jacks of the TV. INSTALLATION Connecting a VCR These instructions assume that you have not yet connected to an antenna or a cable system. 1 Unplug the cable or antenna from the back of the TV. 2 Connect the cable or antenna to the ANTENNA IN terminal on the back of the VCR. 3 Connect a coaxial cable between the ANTENNA...
... instructions in "Viewing a VCR or Camcorder Tape" to the left and right audio input jacks of the TV. INSTALLATION Connecting a VCR These instructions assume that you have not yet connected to an antenna or a cable system. 1 Unplug the cable or antenna from the back of the TV. 2 Connect the cable or antenna to the ANTENNA IN terminal on the back of the VCR. 3 Connect a coaxial cable between the ANTENNA...

User Manual (user Manual) (ver.1.0) (English)
Page 22
... decoder DIGITAL OUTPUT jack output setting to the Set Top Box instruction manual. • The DIGITAL INPUT jack is for use with 1080i and 480p picture signals. INSTALLATION Connecting to DVI (Digital Visual Interface) (TX-P3298HF/TX-P3098WHF/ TX-P2798HF) By inputting a high-bandwidth Digital Content Protection high-definition picture source to the DIGITAL INPUT jack on the TV, high-definition pictures can only be displayed on the screen in their digital form. (This DIGITAL INPUT jack is not compatible with the picture signal...
... decoder DIGITAL OUTPUT jack output setting to the Set Top Box instruction manual. • The DIGITAL INPUT jack is for use with 1080i and 480p picture signals. INSTALLATION Connecting to DVI (Digital Visual Interface) (TX-P3298HF/TX-P3098WHF/ TX-P2798HF) By inputting a high-bandwidth Digital Content Protection high-definition picture source to the DIGITAL INPUT jack on the TV, high-definition pictures can only be displayed on the screen in their digital form. (This DIGITAL INPUT jack is not compatible with the picture signal...
User Manual (user Manual) (ver.1.0) (English)
Page 25
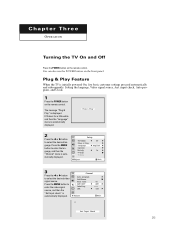
... use the POWER button on the remote control. Plug & Play Feature When the TV is displayed. input check, Auto program, and Clock. 1 Press the POWER button on the front panel. The message "Plug & Play" is initially powered On, five basic customer settings proceed automatically and subsequently: Setting the language, Video signal source, Ant. Press the MENU button to enter the language, and then the "Channel" menu is automatically displayed. 3 Press the œ or √ button to enter the video signal source...
... use the POWER button on the remote control. Plug & Play Feature When the TV is displayed. input check, Auto program, and Clock. 1 Press the POWER button on the front panel. The message "Plug & Play" is initially powered On, five basic customer settings proceed automatically and subsequently: Setting the language, Video signal source, Ant. Press the MENU button to enter the language, and then the "Channel" menu is automatically displayed. 3 Press the œ or √ button to enter the video signal source...
User Manual (user Manual) (ver.1.0) (English)
Page 27
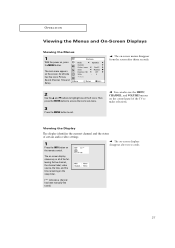
... the remote control. Then press the ENTER button to access the icon's sub-menu. 3 Press the MENU button to exit. The on-screen display shows any or all of certain audio-video settings. 1 Press the INFO button on -screen menus disappear from the screen after ten seconds. Its left side has five icons: Picture, Sound, Channel, Time and Setup. OPERATION Viewing the Menus and On-Screen Displays Viewing the Menus 1 With the power on the sleep timer. ("*" indicates a channel...
... the remote control. Then press the ENTER button to access the icon's sub-menu. 3 Press the MENU button to exit. The on-screen display shows any or all of certain audio-video settings. 1 Press the INFO button on -screen menus disappear from the screen after ten seconds. Its left side has five icons: Picture, Sound, Channel, Time and Setup. OPERATION Viewing the Menus and On-Screen Displays Viewing the Menus 1 With the power on the sleep timer. ("*" indicates a channel...
User Manual (user Manual) (ver.1.0) (English)
Page 42
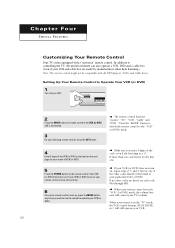
... other codes listed for your VCR. 42 Press the "MODE" button to switch the remote control to Operate Your VCR (or DVD) 1 Turn off your particular VCR (or DVD). Note: The remote control might not be compatible with a "universal" remote control. Chapter Four SPECIAL FEATURES Customizing Your Remote Control Your TV comes equipped with all DVD players, VCRs, and Cable boxes. If more than Samsung). In addition to operate your TV's volume. Your VCR (or DVD) should turn...
... other codes listed for your VCR. 42 Press the "MODE" button to switch the remote control to Operate Your VCR (or DVD) 1 Turn off your particular VCR (or DVD). Note: The remote control might not be compatible with a "universal" remote control. Chapter Four SPECIAL FEATURES Customizing Your Remote Control Your TV comes equipped with all DVD players, VCRs, and Cable boxes. If more than Samsung). In addition to operate your TV's volume. Your VCR (or DVD) should turn...
User Manual (user Manual) (ver.1.0) (English)
Page 44
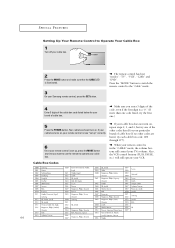
... the "CABLE" mode, the volume buttons still control your VCR. M The remote control has four "modes": "TV", "VCR", "Cable" and "DVD". If your cable box turns on, your remote control is illuminated. 3 On your Samsung remote control, press the SET button. Press the "MODE" button to switch the remote control to Operate Your Cable Box 1 Turn off your cable box. 2 Press the MODE button and make sure that the CABLE LED is now "set up " correctly. SPECIAL FEATURES Setting Up Your Remote Control to the "Cable" mode. 4 Enter 3 digits of the cable box code listed below...
... the "CABLE" mode, the volume buttons still control your VCR. M The remote control has four "modes": "TV", "VCR", "Cable" and "DVD". If your cable box turns on, your remote control is illuminated. 3 On your Samsung remote control, press the SET button. Press the "MODE" button to switch the remote control to Operate Your Cable Box 1 Turn off your cable box. 2 Press the MODE button and make sure that the CABLE LED is now "set up " correctly. SPECIAL FEATURES Setting Up Your Remote Control to the "Cable" mode. 4 Enter 3 digits of the cable box code listed below...
User Manual (user Manual) (ver.1.0) (English)
Page 65
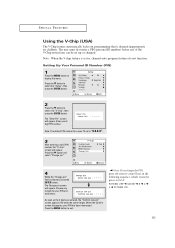
..." screen will appear. M Note: If you forget the PIN, press the remote-control keys in the following sequence, which resets the pin to display the menu. Setting Up Your Personal ID Number (PIN) 1 Press the MENU button to 0-0-0-0: POWER OFF ➜ MUTE ➜ 8 ➜ 2 ➜ 4 ➜ POWER ON. 65 SPECIAL FEATURES Using the V-Chip (USA) The V-Chip feature automatically locks out programming that is active, channel-auto program...
..." screen will appear. M Note: If you forget the PIN, press the remote-control keys in the following sequence, which resets the pin to display the menu. Setting Up Your Personal ID Number (PIN) 1 Press the MENU button to 0-0-0-0: POWER OFF ➜ MUTE ➜ 8 ➜ 2 ➜ 4 ➜ POWER ON. 65 SPECIAL FEATURES Using the V-Chip (USA) The V-Chip feature automatically locks out programming that is active, channel-auto program...

User Manual (user Manual) (ver.1.0) (English)
Page 70
... changed. The Change pin screen will appear. Choose any of the V-Chip restrictions can be set is active, channel-auto program features do not function. Press the MENU button to 0-0-0-0: POWER OFF ➜ MUTE ➜ 8 ➜ 2 ➜ 4 ➜ POWER ON. 70 SPECIAL FEATURES Using the V-Chip (Canada) The V-Chip feature automatically locks out programming that is selected, press the ENTER button. Re-enter the same 4 digits...
... changed. The Change pin screen will appear. Choose any of the V-Chip restrictions can be set is active, channel-auto program features do not function. Press the MENU button to 0-0-0-0: POWER OFF ➜ MUTE ➜ 8 ➜ 2 ➜ 4 ➜ POWER ON. 70 SPECIAL FEATURES Using the V-Chip (Canada) The V-Chip feature automatically locks out programming that is selected, press the ENTER button. Re-enter the same 4 digits...


