
User Manual (user Manual) (ver.1.0) (English)
Page 6
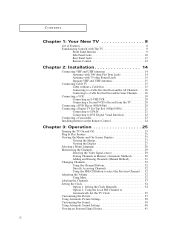
... Language 28 Memorizing the Channels 29 Selecting the Video Signal-source 29 Storing Channels in Memory (Automatic Method 30 Adding and Erasing Channels (Manual Method 31 Changing Channels 32 Using the Channel Buttons 32 Directly Accessing Channels 32 Using the PRE-CH Button to select the Previous Channel...32 Using Mute 32 Labeling the Channels 33 Setting the Clock 34 Option 1: Setting the Clock Manually 34 Option 2: Using the Local PBS Channel to Automatically Set the TV Clock 35 Customizing the Picture 37 Using Automatic Picture Settings 38 Customizing the Sound 39 Using ...
... Language 28 Memorizing the Channels 29 Selecting the Video Signal-source 29 Storing Channels in Memory (Automatic Method 30 Adding and Erasing Channels (Manual Method 31 Changing Channels 32 Using the Channel Buttons 32 Directly Accessing Channels 32 Using the PRE-CH Button to select the Previous Channel...32 Using Mute 32 Labeling the Channels 33 Setting the Clock 34 Option 1: Setting the Clock Manually 34 Option 2: Using the Local PBS Channel to Automatically Set the TV Clock 35 Customizing the Picture 37 Using Automatic Picture Settings 38 Customizing the Sound 39 Using ...

User Manual (user Manual) (ver.1.0) (English)
Page 20
...input jacks might be recorded by a second VCR. INSTALLATION Connecting a Second VCR to Record from the TV Your TV can send out signals of its picture and sound to be either on the front or on back ... a video cable between the COMPONENT 1 INPUT (Y/V, PB, PR) or COMPONENT 2 INPUT (Y/V, PB, PR)jacks on the TV and the DVDOUT (Y, PB, PR) jacks on the DVD player. Note: For an explanation of Component video, see your... information about how to record using this , connect your DVD player's owner's manual. 20 To do this kind of audio cables between the AV-2 INPUT(VCR) or AV-3 INPUT(VCR) ...
...input jacks might be recorded by a second VCR. INSTALLATION Connecting a Second VCR to Record from the TV Your TV can send out signals of its picture and sound to be either on the front or on back ... a video cable between the COMPONENT 1 INPUT (Y/V, PB, PR) or COMPONENT 2 INPUT (Y/V, PB, PR)jacks on the TV and the DVDOUT (Y, PB, PR) jacks on the DVD player. Note: For an explanation of Component video, see your... information about how to record using this , connect your DVD player's owner's manual. 20 To do this kind of audio cables between the AV-2 INPUT(VCR) or AV-3 INPUT(VCR) ...

User Manual (user Manual) (ver.1.0) (English)
Page 21
...inputs on the Set Top Box. INSTALLATION Connecting a Digital TV Set-Top Box (480p/1080i) Connecting to Y,Pb,Pr ...of audio cables between the AV-3 INPUT(VCR) or AV-2 INPUT(VCR) jacks on the TV and the AUDIO OUT jacks on the Set Top Box. 3 Connect a video cable between the... PR) or COMPONENT 1 INPUT (Y/V, PB, PR)jacks on the TV and the VIDEO OUT (Y, PB, PR) jacks on the TV. Next, connect the Left and Right audio from the set-top ... the corresponding L and R terminals on the TV. (The connections for a typical set-top box are shown below.) • TX-P2745FP/TX-P3245FP: 480p only. 1 Connect a coaxial ...
...inputs on the Set Top Box. INSTALLATION Connecting a Digital TV Set-Top Box (480p/1080i) Connecting to Y,Pb,Pr ...of audio cables between the AV-3 INPUT(VCR) or AV-2 INPUT(VCR) jacks on the TV and the AUDIO OUT jacks on the Set Top Box. 3 Connect a video cable between the... PR) or COMPONENT 1 INPUT (Y/V, PB, PR)jacks on the TV and the VIDEO OUT (Y, PB, PR) jacks on the TV. Next, connect the Left and Right audio from the set-top ... the corresponding L and R terminals on the TV. (The connections for a typical set-top box are shown below.) • TX-P2745FP/TX-P3245FP: 480p only. 1 Connect a coaxial ...

User Manual (user Manual) (ver.1.0) (English)
Page 22
INSTALLATION Connecting to DVI (Digital Visual Interface) (TX-P3298HF/TX-P3098WHF/ TX-P2798HF) By inputting a high-bandwidth Digital Content Protection high-definition picture source to the DIGITAL INPUT jack on the TV, high-definition pictures can only be displayed on the screen in their digital form. (This DIGITAL ...information, refer to the Set Top Box instruction manual. • The DIGITAL INPUT jack is for use with 1080i and 480p picture signals. Set the DTV decoder DIGITAL OUTPUT jack output setting to digitally connect the TV with the picture signal of audio cables between the...
INSTALLATION Connecting to DVI (Digital Visual Interface) (TX-P3298HF/TX-P3098WHF/ TX-P2798HF) By inputting a high-bandwidth Digital Content Protection high-definition picture source to the DIGITAL INPUT jack on the TV, high-definition pictures can only be displayed on the screen in their digital form. (This DIGITAL ...information, refer to the Set Top Box instruction manual. • The DIGITAL INPUT jack is for use with 1080i and 480p picture signals. Set the DTV decoder DIGITAL OUTPUT jack output setting to digitally connect the TV with the picture signal of audio cables between the...
User Manual (user Manual) (ver.1.0) (English)
Page 27
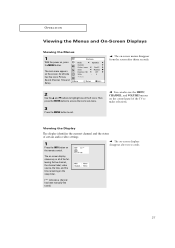
.... The on-screen display shows any or all of certain audio-video settings. 1 Press the INFO button on the sleep timer. ("*" indicates a channel has been manually fine tuned.) 27 M The on-screen displays disappear after thirty seconds. 2 Use the L and M buttons to highlight one of the...
.... The on-screen display shows any or all of certain audio-video settings. 1 Press the INFO button on the sleep timer. ("*" indicates a channel has been manually fine tuned.) 27 M The on-screen displays disappear after thirty seconds. 2 Use the L and M buttons to highlight one of the...

User Manual (user Manual) (ver.1.0) (English)
Page 29
... Contact your local cable company to identify the type of cable system that is connected to the TV (i.e., an antenna or a cable system). 1 Press the MENU button to display the menu. This... need to cycle through the channels. Selecting the Video Signal-source Before your particular area. OPERATION Memorizing the Channels Your TV can begin memorizing the available channels, you must specify the type of signal source that exists in Memory" (next page... for memorizing channels: selecting a broadcast source, memorizing the channels (automatic) and adding and deleting channels (manual).
... Contact your local cable company to identify the type of cable system that is connected to the TV (i.e., an antenna or a cable system). 1 Press the MENU button to display the menu. This... need to cycle through the channels. Selecting the Video Signal-source Before your particular area. OPERATION Memorizing the Channels Your TV can begin memorizing the available channels, you must specify the type of signal source that exists in Memory" (next page... for memorizing channels: selecting a broadcast source, memorizing the channels (automatic) and adding and deleting channels (manual).
User Manual (user Manual) (ver.1.0) (English)
Page 34
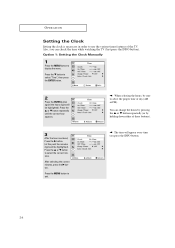
You can check the time while watching the TV (Just press the INFO button). After selecting the correct minutes, press the √ button. Option 1: Setting the Clock Manually 1 Press the MENU button to exit. M When selecting the hours, be highlighted). Press the MENU button to display the menu. Press the L or M button repeatedly...
You can check the time while watching the TV (Just press the INFO button). After selecting the correct minutes, press the √ button. Option 1: Setting the Clock Manually 1 Press the MENU button to exit. M When selecting the hours, be highlighted). Press the MENU button to display the menu. Press the L or M button repeatedly...
User Manual (user Manual) (ver.1.0) (English)
Page 45
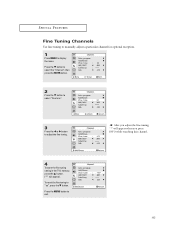
..., "*" will appear when you press INFO while watching this channel. 4 To store the fine tuning setting in the TV's memory, press the L button. ("*" will appear). SPECIAL FEATURES Fine Tuning Channels Use fine tuning to manually adjust a particular channel for optional reception. 1 Press MENU to exit. 45 To reset the fine tuning to...
..., "*" will appear when you press INFO while watching this channel. 4 To store the fine tuning setting in the TV's memory, press the L button. ("*" will appear). SPECIAL FEATURES Fine Tuning Channels Use fine tuning to manually adjust a particular channel for optional reception. 1 Press MENU to exit. 45 To reset the fine tuning to...


