

Open Source Guide (ENGLISH)
Page 1
... and appropriately publish on the Program), the recipient automatically receives a license from distribution of this service if you wish), that you receive source code or can do these conditions, and telling the user how to view a copy of warranty; You may differ in detail to address new problems or concerns. However, as a special exception, the source code distributed need to make exceptions for...
... and appropriately publish on the Program), the recipient automatically receives a license from distribution of this service if you wish), that you receive source code or can do these conditions, and telling the user how to view a copy of warranty; You may differ in detail to address new problems or concerns. However, as a special exception, the source code distributed need to make exceptions for...

Open Source Guide (ENGLISH)
Page 2
16. You can redistribute and change. and each source file to the public, we recommend making it to where the...THE USE OR INABILITY TO USE THE LIBRARY (INCLUDING BUT NOT LIMITED TO LOSS OF DATA OR DATA BEING RENDERED INACCURATE OR LOSSES SUSTAINED BY YOU OR THIRD PARTIES OR A FAILURE OF THE LIBRARY TO OPERATE WITH ANY OTHER SOFTWARE), ...Your New Libraries If you develop a new library, and you want it free software that everyone can do so by permitting redistribution under the terms of the greatest possible use to most effectively convey the exclusion of warranty; It is found.
16. You can redistribute and change. and each source file to the public, we recommend making it to where the...THE USE OR INABILITY TO USE THE LIBRARY (INCLUDING BUT NOT LIMITED TO LOSS OF DATA OR DATA BEING RENDERED INACCURATE OR LOSSES SUSTAINED BY YOU OR THIRD PARTIES OR A FAILURE OF THE LIBRARY TO OPERATE WITH ANY OTHER SOFTWARE), ...Your New Libraries If you develop a new library, and you want it free software that everyone can do so by permitting redistribution under the terms of the greatest possible use to most effectively convey the exclusion of warranty; It is found.
User Manual (user Manual) (ver.1.0) (English)
Page 2
... Connecting a DVD Player 17 Connecting a Camcorder 18 Installing Batteries in the Remote Control 19 Chapter 3: Operation 20 Turning the TV On and Off 20 Viewing the Menus and On-Screen Displays 20 Viewing the Menus 20 Viewing the Display 20 Selecting a Menu Language 21 Memorizing the Channels 22 Selecting the Video Signal-source 22 Storing Channels in Memory (Automatic Method 23 Adding and Erasing Channels (Manual Method 24 Changing Channels 25 Using the Channel Buttons 25 Directly Accessing Channels 25 Using...
... Connecting a DVD Player 17 Connecting a Camcorder 18 Installing Batteries in the Remote Control 19 Chapter 3: Operation 20 Turning the TV On and Off 20 Viewing the Menus and On-Screen Displays 20 Viewing the Menus 20 Viewing the Display 20 Selecting a Menu Language 21 Memorizing the Channels 22 Selecting the Video Signal-source 22 Storing Channels in Memory (Automatic Method 23 Adding and Erasing Channels (Manual Method 24 Changing Channels 25 Using the Channel Buttons 25 Directly Accessing Channels 25 Using...
User Manual (user Manual) (ver.1.0) (English)
Page 3
CONTENTS Chapter 4: Special Features 32 Fine Tuning Channels 32 Selecting the Color Tone 33 Changing the Screen Size 34 Using the Surf Feature 35 Choosing a Multi-Channel Sound (MTS) Soundtrack 36 Extra Sound Settings 37 Setting the On/Off Timer 38 Setting the Sleep Timer 39 Viewing Closed Captions 40 Using the V-Chip 41 Customizing Your Remote Control 46 Chapter 5: Troubleshooting 48 Identifying Problems 48 Appendix 49 Cleaning and Maintaining Your TV 49 Using Your TV in Another Country 49 Specifications 49 3
CONTENTS Chapter 4: Special Features 32 Fine Tuning Channels 32 Selecting the Color Tone 33 Changing the Screen Size 34 Using the Surf Feature 35 Choosing a Multi-Channel Sound (MTS) Soundtrack 36 Extra Sound Settings 37 Setting the On/Off Timer 38 Setting the Sleep Timer 39 Viewing Closed Captions 40 Using the V-Chip 41 Customizing Your Remote Control 46 Chapter 5: Troubleshooting 48 Identifying Problems 48 Appendix 49 Cleaning and Maintaining Your TV 49 Using Your TV in Another Country 49 Specifications 49 3
User Manual (user Manual) (ver.1.0) (English)
Page 4
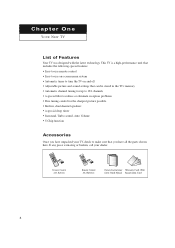
... on and off • Adjustable picture and sound settings that can be stored in the TV's memory • Automatic channel tuning for the sharpest picture possible • Built-in, dual channel speakers • A special sleep timer • Surround, Turbo sound, Auto Volume • V-Chip function Accessories Once you have unpacked your dealer. Remote Control AAA Batteries Remote Control AAA Batteries Owner's Instructions/ Warranty Card; 2EA/ Safety Guide Manual Registration Card 4 Chapter One...
... on and off • Adjustable picture and sound settings that can be stored in the TV's memory • Automatic channel tuning for the sharpest picture possible • Built-in, dual channel speakers • A special sleep timer • Surround, Turbo sound, Auto Volume • V-Chip function Accessories Once you have unpacked your dealer. Remote Control AAA Batteries Remote Control AAA Batteries Owner's Instructions/ Warranty Card; 2EA/ Safety Guide Manual Registration Card 4 Chapter One...
User Manual (user Manual) (ver.1.0) (English)
Page 5
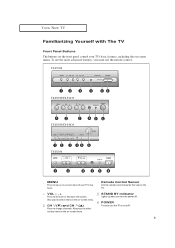
...turn the TV on -screen menu. STAND BY indicator Lights up when you must use the more advanced features, you turn the power off . 5 YOUR NEW TV Familiarizing Yourself with The TV Front Panel Buttons The buttons on the front panel control your TV's features. ‹ Remote Control Sensor Aim the remote control... POWER Press to change channels. TX-P2028 TX-P2030/TX-P1430 TX-P2034/TX-P1634 TX-P2036 ˛ MENU Press to see an on-screen menu of your TV's basic features, including the on -screen menu. To use the remote control. Also press to increase or decrease the volume. Also used ...
...turn the TV on -screen menu. STAND BY indicator Lights up when you must use the more advanced features, you turn the power off . 5 YOUR NEW TV Familiarizing Yourself with The TV Front Panel Buttons The buttons on the front panel control your TV's features. ‹ Remote Control Sensor Aim the remote control... POWER Press to change channels. TX-P2028 TX-P2030/TX-P1430 TX-P2034/TX-P1634 TX-P2036 ˛ MENU Press to see an on-screen menu of your TV's basic features, including the on -screen menu. To use the remote control. Also press to increase or decrease the volume. Also used ...
User Manual (user Manual) (ver.1.0) (English)
Page 6
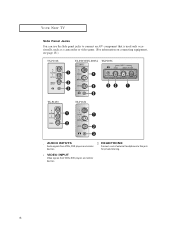
HEADPHONE Connect a set of external headphones to connect an A/V component that is used only occasionally, such as a camcorder or video game. (For information on connecting equipment, see page 18.) TX-P2028 TX-P2030/TX-P2034 TX-P2036 TX-P1430 TX-P1634 ˛ AUDIO INPUTS Audio signals from VCRs, DVD players and similar devices. « VIDEO INPUT Video signals from VCRs, DVD players and similar devices. YOUR NEW TV Side Panel Jacks You can use the Side panel jacks to this jack for private listening. 6
HEADPHONE Connect a set of external headphones to connect an A/V component that is used only occasionally, such as a camcorder or video game. (For information on connecting equipment, see page 18.) TX-P2028 TX-P2030/TX-P2034 TX-P2036 TX-P1430 TX-P1634 ˛ AUDIO INPUTS Audio signals from VCRs, DVD players and similar devices. « VIDEO INPUT Video signals from VCRs, DVD players and similar devices. YOUR NEW TV Side Panel Jacks You can use the Side panel jacks to this jack for private listening. 6
User Manual (user Manual) (ver.1.0) (English)
Page 7
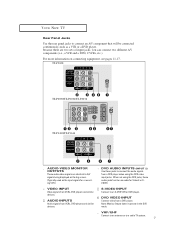
... TX-P1430/TX-P1634 ˛ AUDIO-VIDEO MONITOR OUTPUTS These audio-video signals are two sets of input jacks, you can connect two different A/V components (i.e., a VCR and a DVD, 2 VCRs, etc.) For more information on the big screen. (Typically used as the input signals for Video 2 or SVIDEO. « VIDEO INPUT Video signals from VCRs, DVD players and similar devices. AUDIO INPUTS Audio signals from VCRs, DVD players and similar devices. Note: Monitor Output doesn't operate in the DVD mode. , VHF/UHF Connect to an antenna or to connect the audio signals from a DVD player...
... TX-P1430/TX-P1634 ˛ AUDIO-VIDEO MONITOR OUTPUTS These audio-video signals are two sets of input jacks, you can connect two different A/V components (i.e., a VCR and a DVD, 2 VCRs, etc.) For more information on the big screen. (Typically used as the input signals for Video 2 or SVIDEO. « VIDEO INPUT Video signals from VCRs, DVD players and similar devices. AUDIO INPUTS Audio signals from VCRs, DVD players and similar devices. Note: Monitor Output doesn't operate in the DVD mode. , VHF/UHF Connect to an antenna or to connect the audio signals from a DVD player...
User Manual (user Manual) (ver.1.0) (English)
Page 8
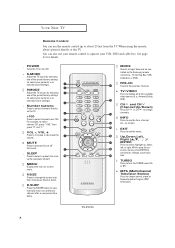
... 41 for details. ˛ POWER Turns the TV on and off the sound. , SLEEP Press to display all of the preset factory settings (or select your VCR, DVD and cable box. PRE-CH Tunes to the previous channel. æ TV/VIDEO Press to select a preset time interval for automatic shutoff. P.MODE Adjust the TV picture by the Samsung remote control (i.e., TV, Set Top Box, VCR, Cable box, or DVD). P.SIZE Press to change ) a particular item. ł...
... 41 for details. ˛ POWER Turns the TV on and off the sound. , SLEEP Press to display all of the preset factory settings (or select your VCR, DVD and cable box. PRE-CH Tunes to the previous channel. æ TV/VIDEO Press to select a preset time interval for automatic shutoff. P.MODE Adjust the TV picture by the Samsung remote control (i.e., TV, Set Top Box, VCR, Cable box, or DVD). P.SIZE Press to change ) a particular item. ł...
User Manual (user Manual) (ver.1.0) (English)
Page 10
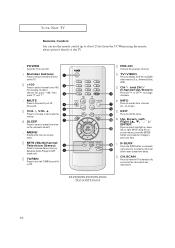
... TV automatically scan all of the channels it directly at the TV. ˛ POWER Turns the TV on and off. « Number buttons Press to select channels directly on the TV. +100 Press to temporarily cut off the sound. CH.SCAN Press to display all of the available video sources (i.e., Antenna/Cable, VCR). TURBO Press to a preferred channel after a user-preset time delay. While using the remote, always point...
... TV automatically scan all of the channels it directly at the TV. ˛ POWER Turns the TV on and off. « Number buttons Press to select channels directly on the TV. +100 Press to temporarily cut off the sound. CH.SCAN Press to display all of the available video sources (i.e., Antenna/Cable, VCR). TURBO Press to a preferred channel after a user-preset time delay. While using the remote, always point...
User Manual (user Manual) (ver.1.0) (English)
Page 12
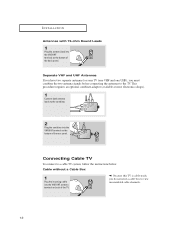
... connect to view unscrambled cable channels. 12 INSTALLATION Antennas with 75-ohm Round Leads 1 Plug the antenna lead into the VHF/UHF antenna terminal on back of the TV. ▼ Because this TV is cable-ready, you must combine the two antenna signals before connecting the antennas to the TV. Cable without a Cable Box 1 Plug the incoming cable into the VHF/UHF terminal on the bottom of the back panel...
... connect to view unscrambled cable channels. 12 INSTALLATION Antennas with 75-ohm Round Leads 1 Plug the antenna lead into the VHF/UHF antenna terminal on back of the TV. ▼ Because this TV is cable-ready, you must combine the two antenna signals before connecting the antennas to the TV. Cable without a Cable Box 1 Plug the incoming cable into the VHF/UHF terminal on the bottom of the back panel...

User Manual (user Manual) (ver.1.0) (English)
Page 13
... Cable Splitter Cable Box 13 You will need a two-way splitter, an RF (A/B) switch, and four lengths of the TV. INSTALLATION Connecting to a Cable Box that Descrambles All Channels 1 Find the cable that is connected to a two-way splitter. Incoming Cable Splitter 3 Connect a coaxial cable between an OUTPUT terminal on the splitter and the IN terminal on your cable box descrambles only some channels (such as premium channels), follow the instructions...
... Cable Splitter Cable Box 13 You will need a two-way splitter, an RF (A/B) switch, and four lengths of the TV. INSTALLATION Connecting to a Cable Box that Descrambles All Channels 1 Find the cable that is connected to a two-way splitter. Incoming Cable Splitter 3 Connect a coaxial cable between an OUTPUT terminal on the splitter and the IN terminal on your cable box descrambles only some channels (such as premium channels), follow the instructions...

User Manual (user Manual) (ver.1.0) (English)
Page 14
... Cable Box RF (A/B) Switch 6 Connect the last coaxial cable between the ANTENNA OUT terminal on the cable box and the B-IN terminal on the RF(A/B) switch. INSTALLATION 4 Connect a coaxial cable between the OUT terminal on the RF (A/B) switch and the VHF/UHF terminal on the RF (A/B) switch. Set the A/B switch to the "B" position to view scrambled channels. (When you set the A/B switch to "B", you 've made this connection, set the A/B switch to the cable box's output channel...
... Cable Box RF (A/B) Switch 6 Connect the last coaxial cable between the ANTENNA OUT terminal on the cable box and the B-IN terminal on the RF(A/B) switch. INSTALLATION 4 Connect a coaxial cable between the OUT terminal on the RF (A/B) switch and the VHF/UHF terminal on the RF (A/B) switch. Set the A/B switch to the "B" position to view scrambled channels. (When you set the A/B switch to "B", you 've made this connection, set the A/B switch to the cable box's output channel...
User Manual (user Manual) (ver.1.0) (English)
Page 15
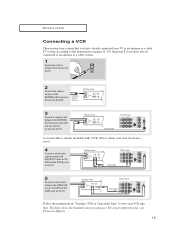
..., check your local electronics store). 4 Connect a set of the VCR. The actual configuration for your VCR tape. Note: This figure shows the Standard connector-jack panel. VCR Rear Panel TV Rear Panel Video Cable Follow the instructions in "Viewing a VCR or Camcorder Tape" to view your TV may be different. 15 Incoming Cable or Antenna VCR Rear Panel 3 Connect a coaxial cable between the VIDEO OUT jack on the VCR...
..., check your local electronics store). 4 Connect a set of the VCR. The actual configuration for your VCR tape. Note: This figure shows the Standard connector-jack panel. VCR Rear Panel TV Rear Panel Video Cable Follow the instructions in "Viewing a VCR or Camcorder Tape" to view your TV may be different. 15 Incoming Cable or Antenna VCR Rear Panel 3 Connect a coaxial cable between the VIDEO OUT jack on the VCR...
User Manual (user Manual) (ver.1.0) (English)
Page 17
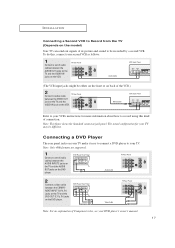
... your DVD player's owner's manual. 17 Note: Only 480i formats are supported. 1 Connect a set of audio cables between the AUDIO INPUT 2 jacks on the TV and the AUDIO OUT jacks on the DVD player. Connecting a DVD Player The rear panel jacks on your TV make it easy to connect a DVD player to record using this , connect your TV. To do this kind of Component video, see your TV may be recorded by a second VCR. DVD Player Rear Panel TV Rear Panel Audio Cable 2 Connect a video cable between the COMPONENT INPUT...
... your DVD player's owner's manual. 17 Note: Only 480i formats are supported. 1 Connect a set of audio cables between the AUDIO INPUT 2 jacks on the TV and the AUDIO OUT jacks on the DVD player. Connecting a DVD Player The rear panel jacks on your TV make it easy to connect a DVD player to record using this , connect your TV. To do this kind of Component video, see your TV may be recorded by a second VCR. DVD Player Rear Panel TV Rear Panel Audio Cable 2 Connect a video cable between the COMPONENT INPUT...
User Manual (user Manual) (ver.1.0) (English)
Page 20
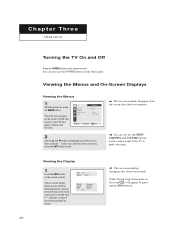
... VOLUME buttons on the control panel of the TV to highlight one of the following: Active channel, picture mode, audio mode, audio source and the time. ("*" indicates a channel has been manually fine tuned.) ANT 11* Signal : Mono Picture Sound MTS - - : - - When Closed Caption has been set, the icon( ) will appear by pressing the INFO button. 20 The on -screen displays disappear after about ten seconds. Press the EXIT button to access the icon's sub-menu. C h a pOtPEeRArTIOTN h r e e OPERATION Turning...
... VOLUME buttons on the control panel of the TV to highlight one of the following: Active channel, picture mode, audio mode, audio source and the time. ("*" indicates a channel has been manually fine tuned.) ANT 11* Signal : Mono Picture Sound MTS - - : - - When Closed Caption has been set, the icon( ) will appear by pressing the INFO button. 20 The on -screen displays disappear after about ten seconds. Press the EXIT button to access the icon's sub-menu. C h a pOtPEeRArTIOTN h r e e OPERATION Turning...
User Manual (user Manual) (ver.1.0) (English)
Page 40
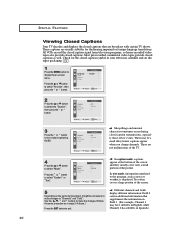
... you change channels. All VCRs record the closed caption signal from television programs, so home-recorded video tapes also provide closed captions. SPECIAL FEATURES Viewing Closed Captions Your TV decodes and displays the closed captions that supplements the information in Field 1. (For example, Channel 1 may be necessary to make changes to "Channels" and "Field": Use the and ˆ buttons to make the changes. (Follow the same procedure as news or weather, is displayed. Caption Mode Channels...
... you change channels. All VCRs record the closed caption signal from television programs, so home-recorded video tapes also provide closed captions. SPECIAL FEATURES Viewing Closed Captions Your TV decodes and displays the closed captions that supplements the information in Field 1. (For example, Channel 1 may be necessary to make changes to "Channels" and "Field": Use the and ˆ buttons to make the changes. (Follow the same procedure as news or weather, is displayed. Caption Mode Channels...
User Manual (user Manual) (ver.1.0) (English)
Page 41
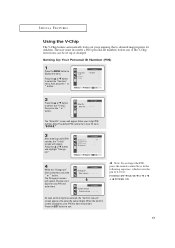
... remote-control keys in the following sequence, which resets the pin to select the "Function" menu, then press the ˇ or ˆ button. The "Enter Pin" screen will appear. Press the ▲ or ▼ button to 0-0-0-0: POWER OFF ➜ MUTE ➜ 8 ➜ 2 ➜ 4 ➜ POWER ON. 41 The Change pin screen will appear. Re-enter the same 4 digits. Setting Up Your Personal ID Number...
... remote-control keys in the following sequence, which resets the pin to select the "Function" menu, then press the ˇ or ˆ button. The "Enter Pin" screen will appear. Press the ▲ or ▼ button to 0-0-0-0: POWER OFF ➜ MUTE ➜ 8 ➜ 2 ➜ 4 ➜ POWER ON. 41 The Change pin screen will appear. Re-enter the same 4 digits. Setting Up Your Personal ID Number...
User Manual (user Manual) (ver.1.0) (English)
Page 46
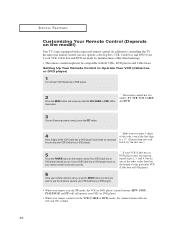
..., CABLE and DVD. 3 On your Samsung remote control, press the SET button. 4 Enter 3 digits of the VCR (Cable box or DVD player) code listed on the remote control. Setting Up Your Remote Control to Operate Your VCR (Cable box or DVD player) 1 Turn off your VCR (Cable box or DVD player). 2 Press the MODE button and make sure that the VCR (CABLE or DVD) LED is now set up, press the MODE button any time you want to use the remote to controlling the TV, the universal remote control can also operate a Set-Top Box, VCR, Cable box and DVD...
..., CABLE and DVD. 3 On your Samsung remote control, press the SET button. 4 Enter 3 digits of the VCR (Cable box or DVD player) code listed on the remote control. Setting Up Your Remote Control to Operate Your VCR (Cable box or DVD player) 1 Turn off your VCR (Cable box or DVD player). 2 Press the MODE button and make sure that the VCR (CABLE or DVD) LED is now set up, press the MODE button any time you want to use the remote to controlling the TV, the universal remote control can also operate a Set-Top Box, VCR, Cable box and DVD...
User Manual (user Manual) (ver.1.0) (English)
Page 48
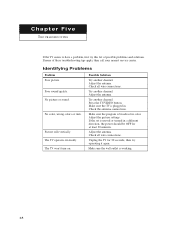
... connections. Identifying Problems Problem Poor picture Poor sound quality. Adjust the antenna. If the set is broadcast in a different direction, the power should be OFF for 30 seconds, then try this list of these troubleshooting tips apply, then call your nearest service center. Adjust the picture settings. The TV operates erratically The TV won't turn on. No color, wrong colors or tints. Possible Solution Try another channel. Press the TV/VIDEO button. Adjust...
... connections. Identifying Problems Problem Poor picture Poor sound quality. Adjust the antenna. If the set is broadcast in a different direction, the power should be OFF for 30 seconds, then try this list of these troubleshooting tips apply, then call your nearest service center. Adjust the picture settings. The TV operates erratically The TV won't turn on. No color, wrong colors or tints. Possible Solution Try another channel. Press the TV/VIDEO button. Adjust...


