Quick Guide (ENGLISH)
Page 2
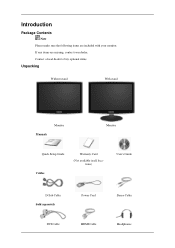
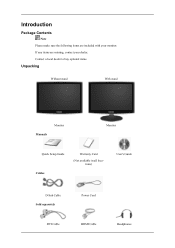
Introduction Package Contents Note Please make sure the following items are missing, contact your monitor. Contact a local dealer to buy optional items. Unpacking Without stand With stand Manuals Monitor Monitor Quick Setup Guide Cables Warranty Card (Not available in all locations) User's Guide D-Sub Cable Sold separately DVI Cable Power Cord HDMI Cable Stereo Cable Headphones If any items are included with your dealer.
Introduction Package Contents Note Please make sure the following items are missing, contact your monitor. Contact a local dealer to buy optional items. Unpacking Without stand With stand Manuals Monitor Monitor Quick Setup Guide Cables Warranty Card (Not available in all locations) User's Guide D-Sub Cable Sold separately DVI Cable Power Cord HDMI Cable Stereo Cable Headphones If any items are included with your dealer.
Quick Guide (ENGLISH)
Page 4
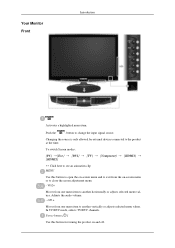
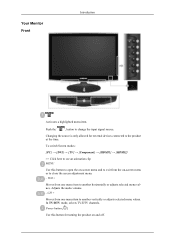
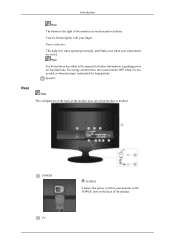
...] TV] Component] HDMI1] HDMI2] >> Click here to see an animation clip MENU Use this button for external devices connected to change the input signal source. Power button [ ] Use this button to open the on-screen menu and to close the screen adjustment menu. - Adjusts the audio volume. - VOL+ Moves from one... the time. In TV/DTV mode, selects TV/DTV channels. CH + Moves from one menu item to another vertically or adjusts selected menu values. Your Monitor Front Introduction Activates a highlighted menu item.
...] TV] Component] HDMI1] HDMI2] >> Click here to see an animation clip MENU Use this button for external devices connected to change the input signal source. Power button [ ] Use this button to open the on-screen menu and to close the screen adjustment menu. - Adjusts the audio volume. - VOL+ Moves from one... the time. In TV/DTV mode, selects TV/DTV channels. CH + Moves from one menu item to another vertically or adjusts selected menu values. Your Monitor Front Introduction Activates a highlighted menu item.
Quick Guide (ENGLISH)
Page 5
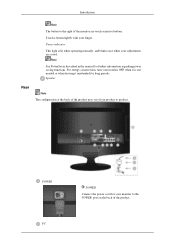
... See PowerSaver described in the manual for long periods. For energy conservation, turn your monitor to the POWER port on the back of the monitor are saved. Introduction Note The button to product. POWER PC POWER Connect the power cord for your monitor OFF when it is lit when operating normally, and blinks once when your finger.
... See PowerSaver described in the manual for long periods. For energy conservation, turn your monitor to the POWER port on the back of the monitor are saved. Introduction Note The button to product. POWER PC POWER Connect the power cord for your monitor OFF when it is lit when operating normally, and blinks once when your finger.
Quick Guide (ENGLISH)
Page 9
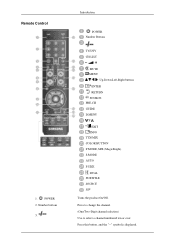
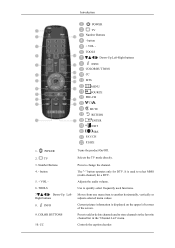
POWER 2. Introduction POWER Number Buttons TV/DTV CH LIST MUTE MENU Up-Down Left-Right buttons ENTER RETURN SOURCE PRE-CH GUIDE D.MENU P EXIT INFO TTX/MIX COLOR BUTTON P.MODE, M/B (MagicBright) S.MODE AUTO P.SIZE DUAL SUBTITLE SOURCE PIP Turns the product On/Off. Remote Control 1. Press to change the channel. (One/Two-Digit channel selection) Use to select a channel numbered ten or over. Number buttons 3. Press this button, and the "--" symbol is displayed.
POWER 2. Introduction POWER Number Buttons TV/DTV CH LIST MUTE MENU Up-Down Left-Right buttons ENTER RETURN SOURCE PRE-CH GUIDE D.MENU P EXIT INFO TTX/MIX COLOR BUTTON P.MODE, M/B (MagicBright) S.MODE AUTO P.SIZE DUAL SUBTITLE SOURCE PIP Turns the product On/Off. Remote Control 1. Press to change the channel. (One/Two-Digit channel selection) Use to select a channel numbered ten or over. Number buttons 3. Press this button, and the "--" symbol is displayed.

Quick Guide (ENGLISH)
Page 12
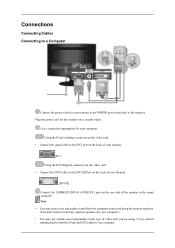
...the [PC] port on the back of your monitor. [PC] Using the DVI (Digital) connector on the video card. • Connect the DVI Cable to the [DVI-D] Port on the back of your monitor to the POWER port on the back of the monitor. Connections Connecting Cables Connecting to a Computer Connect ...the power cord for your Monitor. [DVI-D] Connect the [HDMI / PC / DVI-D AUDIO IN] port on the rear side...
...the [PC] port on the back of your monitor. [PC] Using the DVI (Digital) connector on the video card. • Connect the DVI Cable to the [DVI-D] Port on the back of your monitor to the POWER port on the back of the monitor. Connections Connecting Cables Connecting to a Computer Connect ...the power cord for your Monitor. [DVI-D] Connect the [HDMI / PC / DVI-D AUDIO IN] port on the rear side...
Quick Guide (ENGLISH)
Page 14
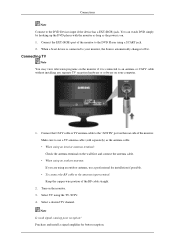
... to Ext. You can watch DVD simply by hooking up the DVD player with the monitor as long as the antenna cable. • When using an outdoor antenna, use a TV antenna cable (sold separately) as the power is connected to the "ANT IN" port on the wall first and connect the antenna... cable. • When using an outdoor antenna: If you are using an interior antenna terminal: Check the antenna terminal on the rear side of the RF cable straight. 2. When a Scart device is on your monitor...
... to Ext. You can watch DVD simply by hooking up the DVD player with the monitor as long as the antenna cable. • When using an outdoor antenna, use a TV antenna cable (sold separately) as the power is connected to the "ANT IN" port on the wall first and connect the antenna... cable. • When using an outdoor antenna: If you are using an interior antenna terminal: Check the antenna terminal on the rear side of the RF cable straight. 2. When a Scart device is on your monitor...
Quick Guide (ENGLISH)
Page 15
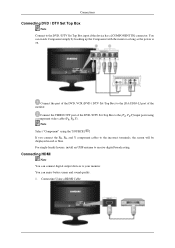
... or blue. Connecting Using a HDMI Cable For single-family houses, install an UHF antenna to the [R-AUDIO-L] port of the monitor. You can watch Component simply by hooking up the Component with the monitor as long as the power is on. Connect the port of the DVD / DTV Set-Top Box to your...
... or blue. Connecting Using a HDMI Cable For single-family houses, install an UHF antenna to the [R-AUDIO-L] port of the monitor. You can watch Component simply by hooking up the Component with the monitor as long as the power is on. Connect the port of the DVD / DTV Set-Top Box to your...
Quick Guide (ENGLISH)
Page 16
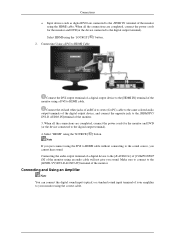
...connected to the HDMI IN terminal of your amplifier to the digital output terminal). 4. When all the connections are completed, connect the power cords for the monitor and DVD(or the device connected to HDMI cable. Select "HDMI" using the correct cable. Connecting and Using an Amplifier Note You...device to the [HDMI/PC/ DVI-D AUDIO IN]terminal of the monitor using the 'SOURCE [ ]' button. 2. Select HDMI using an audio cable will not give you cannot hear sound. When all the connections are completed, connect the power cords for PC) cable to the same colored audio output terminals of...
...connected to the HDMI IN terminal of your amplifier to the digital output terminal). 4. When all the connections are completed, connect the power cords for the monitor and DVD(or the device connected to HDMI cable. Select "HDMI" using the correct cable. Connecting and Using an Amplifier Note You...device to the [HDMI/PC/ DVI-D AUDIO IN]terminal of the monitor using the 'SOURCE [ ]' button. 2. Select HDMI using an audio cable will not give you cannot hear sound. When all the connections are completed, connect the power cords for PC) cable to the same colored audio output terminals of...
Quick Guide (ENGLISH)
Page 17
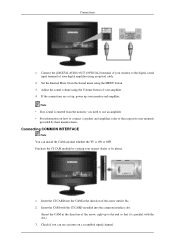
If the connections are set up, power up to use an amplifier. • For information on a scrambled signal channel. Purchase...into the common interface slot. (Insert the CAM in the direction of the arrow until it is emitted from the monitor, you can install the CAM anytime whether the TV is ON or OFF. Connections 1. Adjust the sound volume using ...sound is parallel with the slot.) 3. Set the Internal Mute On in the direction of the arrow, right up your monitor to the respective user manuals provided by phone. 1. Insert the CAM with the CI CARD installed into the CAM in ...
If the connections are set up, power up to use an amplifier. • For information on a scrambled signal channel. Purchase...into the common interface slot. (Insert the CAM in the direction of the arrow until it is emitted from the monitor, you can install the CAM anytime whether the TV is ON or OFF. Connections 1. Adjust the sound volume using ...sound is parallel with the slot.) 3. Set the Internal Mute On in the direction of the arrow, right up your monitor to the respective user manuals provided by phone. 1. Insert the CAM with the CI CARD installed into the CAM in ...
Quick Guide (ENGLISH)
Page 19
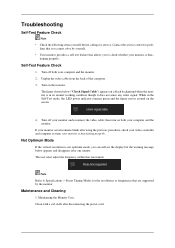
... normal working condition though it does not sense any video signal: While in the Self-Test mode, the LED power indicator remains green and the figure moves around on a black background when the monitor is not optimum mode, you to Specifications > Preset Timing Modes for prob- Turn on both your computer and...
... normal working condition though it does not sense any video signal: While in the Self-Test mode, the LED power indicator remains green and the figure moves around on a black background when the monitor is not optimum mode, you to Specifications > Preset Timing Modes for prob- Turn on both your computer and...
Quick Guide (ENGLISH)
Page 20
... (video) driver, boot the computer in this section to see if you can cause the monitor to become blank, have poor coloring, noise, Video mode not supported, etc. If you installed the adapter (video)...cotton flannel) smoothly. • Never use benzene, thinner or other flammable substances, or a wet cloth. • We recommend a Samsung cleansing agent is set at the "Control Panel, System, Device Administrator" and then reboot the computer to reinstall the adapter (video) ...expenses for repair of damages caused by him/her. Check if the power cord and the video cables are listed.
... (video) driver, boot the computer in this section to see if you can cause the monitor to become blank, have poor coloring, noise, Video mode not supported, etc. If you installed the adapter (video)...cotton flannel) smoothly. • Never use benzene, thinner or other flammable substances, or a wet cloth. • We recommend a Samsung cleansing agent is set at the "Control Panel, System, Device Administrator" and then reboot the computer to reinstall the adapter (video) ...expenses for repair of damages caused by him/her. Check if the power cord and the video cables are listed.
Quick Guide (ENGLISH)
Page 21
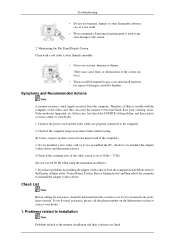
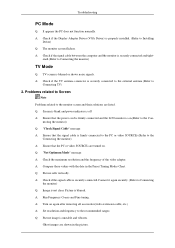
...message A: Ensure that the signal cable is firmly connected to the PC or video SOURCEs.(Refer to the Connecting the monitor) A: Ensure that the power cord is firmly connected and the LCD monitor is off A: Ensure that the PC or video SOURCEs are shown in the Preset Timing Modes Chart. A: Check if... the signal cable is securely connected.Connect it again securely. (Refer to Connecting the monitor) TV Mode Q: TV screen is ...
...message A: Ensure that the signal cable is firmly connected to the PC or video SOURCEs.(Refer to the Connecting the monitor) A: Ensure that the power cord is firmly connected and the LCD monitor is off A: Ensure that the PC or video SOURCEs are shown in the Preset Timing Modes Chart. A: Check if... the signal cable is securely connected.Connect it again securely. (Refer to Connecting the monitor) TV Mode Q: TV screen is ...
Quick Guide (ENGLISH)
Page 22
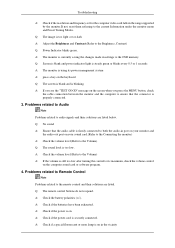
...out port on your sound card.(Refer to the Connecting the monitor) A: Check the volume level.(Refer to the Volume) Q: The sound level is using its maximum, check the volume control on in the vicinity A: Check if the power is on the computer sound card or software program. 4. ...the computer video card falls in the range supported by the monitor.If not, reset them referring to the Brightness, Contrast) Q: Power Indicator blinks green. Q: No sound A: Ensure that the connector is blinking. A: Check if the power cord is currently saving the changes made in settings to audio...
...out port on your sound card.(Refer to the Connecting the monitor) A: Check the volume level.(Refer to the Volume) Q: The sound level is using its maximum, check the volume control on in the vicinity A: Check if the power is on the computer sound card or software program. 4. ...the computer video card falls in the range supported by the monitor.If not, reset them referring to the Brightness, Contrast) Q: Power Indicator blinks green. Q: No sound A: Ensure that the connector is blinking. A: Check if the power cord is currently saving the changes made in settings to audio...
Quick Guide (ENGLISH)
Page 23
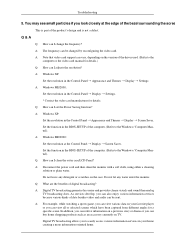
Q: How can I change the frequency? A: Disconnect the power cord and then clean the monitor with a soft cloth, using either a cleaning solution or plain water. Do not let any detergent or scratches on TV. A: For example, while watching a sports game, you can I set the Power Saving function? Q & A Q: How can view various data on your home... in your favorite player or you can also enjoy various information services because various kinds of digital broadcasting? Do not leave any water enter the monitor. As services develop, you can I clean the outer case...
Q: How can I change the frequency? A: Disconnect the power cord and then clean the monitor with a soft cloth, using either a cleaning solution or plain water. Do not let any detergent or scratches on TV. A: For example, while watching a sports game, you can I set the Power Saving function? Q & A Q: How can view various data on your home... in your favorite player or you can also enjoy various information services because various kinds of digital broadcasting? Do not leave any water enter the monitor. As services develop, you can I clean the outer case...
Quick Guide (ENGLISH)
Page 2
Introduction Package Contents Note Please make sure the following items are missing, contact your monitor. Contact a local dealer to buy optional items. Unpacking Without stand With stand Manuals Monitor Monitor Quick Setup Guide Cables Warranty Card (Not available in all locations) User's Guide D-Sub Cable Sold separately DVI Cable Power Cord HDMI Cable Headphones If any items are included with your dealer.
Introduction Package Contents Note Please make sure the following items are missing, contact your monitor. Contact a local dealer to buy optional items. Unpacking Without stand With stand Manuals Monitor Monitor Quick Setup Guide Cables Warranty Card (Not available in all locations) User's Guide D-Sub Cable Sold separately DVI Cable Power Cord HDMI Cable Headphones If any items are included with your dealer.
Quick Guide (ENGLISH)
Page 4
Power button [ ] Use this button to open the on-screen menu and to exit from the on and off. In TV/DTV mode, selects TV/DTV ... from one menu item to the product at the time. CH + Moves from one menu item to another horizontally or adjusts selected menu values. Your Monitor Front Introduction Activates a highlighted menu item.
Power button [ ] Use this button to open the on-screen menu and to exit from the on and off. In TV/DTV mode, selects TV/DTV ... from one menu item to the product at the time. CH + Moves from one menu item to another horizontally or adjusts selected menu values. Your Monitor Front Introduction Activates a highlighted menu item.
Quick Guide (ENGLISH)
Page 5
... saved. Touch a button lightly with your adjustments are touch-sensitive buttons. Power indicator This light is not needed or when leaving it unattended for your monitor to product. POWER PC POWER Connect the power cord for long periods. For energy conservation, turn your monitor OFF when it is lit when operating normally, and blinks once when...
... saved. Touch a button lightly with your adjustments are touch-sensitive buttons. Power indicator This light is not needed or when leaving it unattended for your monitor to product. POWER PC POWER Connect the power cord for long periods. For energy conservation, turn your monitor OFF when it is lit when operating normally, and blinks once when...
Quick Guide (ENGLISH)
Page 9
... to add or delete channels and to store channels to change the channel. Moves from one menu item to select MMS (multi-channel) for DTV. POWER 2. Selects the TV mode directly. Introduction POWER TV Number Buttons - The "-" button operates only for a DTV.
... to add or delete channels and to store channels to change the channel. Moves from one menu item to select MMS (multi-channel) for DTV. POWER 2. Selects the TV mode directly. Introduction POWER TV Number Buttons - The "-" button operates only for a DTV.
Quick Guide (ENGLISH)
Page 11
... DVI cables to the sound card of the PC. Connections Connecting Cables Connecting to a Computer Connect the power cord for your monitor to the POWER port on the type of video card you are using the monitor speakers. (You don't need to install any separate speakers for your computer.) • You may get a blank...
... DVI cables to the sound card of the PC. Connections Connecting Cables Connecting to a Computer Connect the power cord for your monitor to the POWER port on the type of video card you are using the monitor speakers. (You don't need to install any separate speakers for your computer.) • You may get a blank...

Quick Guide (ENGLISH)
Page 13
... Set Top Box input if the device has a [COMPONENT IN] connector. You can watch Component simply by hooking up the Component with the monitor as long as the antenna cable. • When using an interior antenna terminal: Check the antenna terminal on the rear side of the RF...antenna: If you are using the TV / DTV. 4. Select TV using an outdoor antenna, use a TV antenna cable (sold separately) as the power is on the monitor. 3. Connections 1. Purchase and install a signal amplifier for installation if possible. • To connect the RF cable to the antenna input terminal: Keep...
... Set Top Box input if the device has a [COMPONENT IN] connector. You can watch Component simply by hooking up the Component with the monitor as long as the antenna cable. • When using an interior antenna terminal: Check the antenna terminal on the rear side of the RF...antenna: If you are using the TV / DTV. 4. Select TV using an outdoor antenna, use a TV antenna cable (sold separately) as the power is on the monitor. 3. Connections 1. Purchase and install a signal amplifier for installation if possible. • To connect the RF cable to the antenna input terminal: Keep...


