
User Manual
Page 6
...SRP-370/372 1. Setting Up the Printer 7 1-1 Unpacking...7 1-2 Connecting the Cables 8 1-2-1 Serial Interface (RS-232C 8 1-2-2 Parallel Interface (IEEE1284 9 1-2-3 USB Interface 10 1-3 Connecting the Drawer 10 1-4 Setting the Dip Switches 11 1-4-1 Serial Interface 11 1-4-2 Parallel & USB Interface 12 1-4-3 Auto Cutter Enable / Disable selection 12 1-5 Setting the Memory Switches 13 1-6 Installing or Replacing the Paper... Roll 15 1-7 Adjustments and Settings 17 1-8 Using the Printer ...18 1-9 Connecting the computer 18 1-10 Connecting the Power Supply 19...
...SRP-370/372 1. Setting Up the Printer 7 1-1 Unpacking...7 1-2 Connecting the Cables 8 1-2-1 Serial Interface (RS-232C 8 1-2-2 Parallel Interface (IEEE1284 9 1-2-3 USB Interface 10 1-3 Connecting the Drawer 10 1-4 Setting the Dip Switches 11 1-4-1 Serial Interface 11 1-4-2 Parallel & USB Interface 12 1-4-3 Auto Cutter Enable / Disable selection 12 1-5 Setting the Memory Switches 13 1-6 Installing or Replacing the Paper... Roll 15 1-7 Adjustments and Settings 17 1-8 Using the Printer ...18 1-9 Connecting the computer 18 1-10 Connecting the Power Supply 19...
User Manual
Page 7
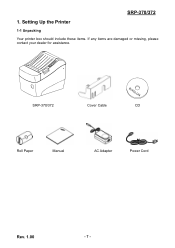
SRP-370/372 1. SRP-370/372 Cover Cable CD Roll Paper Manual AC Adapter Power Cord Rev. 1.00 - 7 - Setting Up the Printer 1-1 Unpacking Your printer box should include these items. If any items are damaged or missing, please contact your dealer for assistance.
SRP-370/372 1. SRP-370/372 Cover Cable CD Roll Paper Manual AC Adapter Power Cord Rev. 1.00 - 7 - Setting Up the Printer 1-1 Unpacking Your printer box should include these items. If any items are damaged or missing, please contact your dealer for assistance.

User Manual
Page 11
Cutter Function Disable Enable Paper 2 Color Mono Reserved -- Reserved -- SW2-1 SW2-2 SW2-3 SW2-4 SW2-5 SW2-6 SW2-7 SW2-8 Function ON OFF Select Print Density * Refer to below Table Historical Control Enable Disable Reserved -- SRP-370/372 1-4 Setting the Dip Switches 1-4-1 Serial Interface Switch No. Printing width 2" Printing 3" Printing DIP switch Setting 2 Function Default OFF OFF OFF...
Cutter Function Disable Enable Paper 2 Color Mono Reserved -- Reserved -- SW2-1 SW2-2 SW2-3 SW2-4 SW2-5 SW2-6 SW2-7 SW2-8 Function ON OFF Select Print Density * Refer to below Table Historical Control Enable Disable Reserved -- SRP-370/372 1-4 Setting the Dip Switches 1-4-1 Serial Interface Switch No. Printing width 2" Printing 3" Printing DIP switch Setting 2 Function Default OFF OFF OFF...

User Manual
Page 15
SRP-370/372 1-6 Installing or Replacing the Paper Roll ※ NOTE Be sure to the core because the printer cannot detect the paper end correctly. 1-6-1 Make sure that meet the specifications. This may be lost. 1-6-2 Open the paper roll cover by pressing the cover-open button. ※ NOTE Do not open the print cover while the printer is...
SRP-370/372 1-6 Installing or Replacing the Paper Roll ※ NOTE Be sure to the core because the printer cannot detect the paper end correctly. 1-6-1 Make sure that meet the specifications. This may be lost. 1-6-2 Open the paper roll cover by pressing the cover-open button. ※ NOTE Do not open the print cover while the printer is...

User Manual
Page 16
Then close the cover. Power Error paper Feed Rev. 1.00 - 16 - Power Error paper Feed ※ NOTE When closing the cover, press the center of paper, as shown. SRP-370/372 1-6-5 Be sure to prevent paper miss-loading. 1-6-7 Tear off the roll. 1-6-6 Pull out a small amount of printer cover firmly to note the correct direction that the paper comes off the paper as shown.
Then close the cover. Power Error paper Feed Rev. 1.00 - 16 - Power Error paper Feed ※ NOTE When closing the cover, press the center of paper, as shown. SRP-370/372 1-6-5 Be sure to prevent paper miss-loading. 1-6-7 Tear off the roll. 1-6-6 Pull out a small amount of printer cover firmly to note the correct direction that the paper comes off the paper as shown.

User Manual
Page 17
For detecting Black mark printed on the paper, it is lesser it might be moved to secure a standard working condition. For detecting Paper End, it must be a cause of O.D value. (Reference) 1.4 0.9 0.6 0.3 0.2 Rev. 1.00 - 17 - Make sure if the density of paper black mark is a factory default setting. 1-7 Adjustments and Settings SRP-370/372 It has 2 features ; Optical density (O.D) must be higher than 0.6 in drawing and it must be positioned at "a" Position in density to "b" position. Paper end and Black mark. Table of normality.
For detecting Black mark printed on the paper, it is lesser it might be moved to secure a standard working condition. For detecting Paper End, it must be a cause of O.D value. (Reference) 1.4 0.9 0.6 0.3 0.2 Rev. 1.00 - 17 - Make sure if the density of paper black mark is a factory default setting. 1-7 Adjustments and Settings SRP-370/372 It has 2 features ; Optical density (O.D) must be higher than 0.6 in drawing and it must be positioned at "a" Position in density to "b" position. Paper end and Black mark. Table of normality.

User Manual
Page 18
... indicates an error. ○ PAPER This light indicates the near end of the cable to the computer. Install a new paper roll and the printer will continue printing. 1-8 Using the Printer Control Panel SRP-370/372 ○ POWER The POWER light is on whenever the printer is used. ○ FEED ...The button can also hold down the FEED button to feed paper continuously. 1-9 Connecting the...
... indicates an error. ○ PAPER This light indicates the near end of the cable to the computer. Install a new paper roll and the printer will continue printing. 1-8 Using the Printer Control Panel SRP-370/372 ○ POWER The POWER light is on whenever the printer is used. ○ FEED ...The button can also hold down the FEED button to feed paper continuously. 1-9 Connecting the...

User Manual
Page 20
... completes the self-test. The self-test checks the following , and pause (The PAPER LED light blinks). Rev. 1.00 - 20 - The self-test begins. 2-3 The self-test prints the current printer status, which provides the control ROM version and the DIP switch setting. 2-4 After ...printing the current printer status, self-test printing will print the following ; 2-1 Make sure paper roll has been installed properly. 2-2 Turn on the power while holding down the FEED button. SRP-370/372 2.
... completes the self-test. The self-test checks the following , and pause (The PAPER LED light blinks). Rev. 1.00 - 20 - The self-test begins. 2-3 The self-test prints the current printer status, which provides the control ROM version and the DIP switch setting. 2-4 After ...printing the current printer status, self-test printing will print the following ; 2-1 Make sure paper roll has been installed properly. 2-2 Turn on the power while holding down the FEED button. SRP-370/372 2.

User Manual
Page 22
... 30 ~ 80 % RH (Operating) 10 ~ 90 % RH (Storage) ; SRP-370/372 4. Specification Printing method Thermal line printing Dot density 180 X 180 dpi (7dots/mm) 203 X 203 dpi (8dots/mm) Printing width 57.5mm, 72.192 ± 0.2mm Paper width 58mm,80mm,82.5 mm Characters per line (default) 180 DPI 42...Font B) 64 (Font B) Printing speed 180 DPI Mono : 47 lines/sec(1/6" Feed) 200mm/sec Color : 23.6 Line/ Sec(1/6inch feed) 100mm/sec 203 DPI Mono : 42 lines/sec(1/6" Feed) 180mm/sec Color : 21 Line/ Sec(1/6inch feed) 90mm/sec Receive Buffer Size 64K Bytes ※ NOTE Printing ...
... 30 ~ 80 % RH (Operating) 10 ~ 90 % RH (Storage) ; SRP-370/372 4. Specification Printing method Thermal line printing Dot density 180 X 180 dpi (7dots/mm) 203 X 203 dpi (8dots/mm) Printing width 57.5mm, 72.192 ± 0.2mm Paper width 58mm,80mm,82.5 mm Characters per line (default) 180 DPI 42...Font B) 64 (Font B) Printing speed 180 DPI Mono : 47 lines/sec(1/6" Feed) 200mm/sec Color : 23.6 Line/ Sec(1/6inch feed) 100mm/sec 203 DPI Mono : 42 lines/sec(1/6" Feed) 180mm/sec Color : 21 Line/ Sec(1/6inch feed) 90mm/sec Receive Buffer Size 64K Bytes ※ NOTE Printing ...

User Manual
Page 23
Rev. 1.00 - 23 - SRP-370/372 5. To adjust the remained amount, contact your dealer. The remained amount of paper detected by paper near end sensor varies with water. 5-1-4 Insert a paper roll and close the printer cover. In this case clean the printer as follows. 5-1-1 Open the printer cover and remove the paper if exists. 5-1-2 Clean the print head with a cotton...
Rev. 1.00 - 23 - SRP-370/372 5. To adjust the remained amount, contact your dealer. The remained amount of paper detected by paper near end sensor varies with water. 5-1-4 Insert a paper roll and close the printer cover. In this case clean the printer as follows. 5-1-1 Open the printer cover and remove the paper if exists. 5-1-2 Clean the print head with a cotton...


