
User Manual
Page 6
...Printer 7 1-1 Unpacking...7 1-2 Connecting the Cables 8 1-2-1 Serial Interface (RS-232C 8 1-2-2 Serial Interface (RS-485 9 1-2-3 Parallel Interface (IEEE1284 10 1-2-4 USB Interface 11 1-3 Connecting the Drawer 11 1-4 Setting the Dip Switches 12 1-4-1 Serial Interface 12 1-4-2 Parallel & USB Interface 13 1-5 Installing or Replacing the Paper... Roll 14 1-6 Adjustments and Settings 16 1-7 Using the Printer ...16 1-8 Connecting the computer 17 1-9 Connecting the Power Supply 17 2. Self ...
...Printer 7 1-1 Unpacking...7 1-2 Connecting the Cables 8 1-2-1 Serial Interface (RS-232C 8 1-2-2 Serial Interface (RS-485 9 1-2-3 Parallel Interface (IEEE1284 10 1-2-4 USB Interface 11 1-3 Connecting the Drawer 11 1-4 Setting the Dip Switches 12 1-4-1 Serial Interface 12 1-4-2 Parallel & USB Interface 13 1-5 Installing or Replacing the Paper... Roll 14 1-6 Adjustments and Settings 16 1-7 Using the Printer ...16 1-8 Connecting the computer 17 1-9 Connecting the Power Supply 17 2. Self ...

User Manual
Page 7
SRP-350 Cover Cable CD Roll Paper Manual AC Adapter Power Cord Rev. 1.02 - 7 - Setting Up the Printer 1-1 Unpacking Your printer box should include these items. If any items are damaged or missing, please contact your dealer for assistance. SRP-350 1.
SRP-350 Cover Cable CD Roll Paper Manual AC Adapter Power Cord Rev. 1.02 - 7 - Setting Up the Printer 1-1 Unpacking Your printer box should include these items. If any items are damaged or missing, please contact your dealer for assistance. SRP-350 1.

User Manual
Page 14
... open the print cover while the printer is one. 1-5-4 Insert the paper roll as shown. otherwise, data may damage the printer. 1-5-3 Remove the used paper roll core if there is operating. SRP-350 1-5 Installing or Replacing the Paper Roll ※ NOTE Be sure to the core because the printer cannot detect the paper end correctly. 1-5-1 Make sure that meet...
... open the print cover while the printer is one. 1-5-4 Insert the paper roll as shown. otherwise, data may damage the printer. 1-5-3 Remove the used paper roll core if there is operating. SRP-350 1-5 Installing or Replacing the Paper Roll ※ NOTE Be sure to the core because the printer cannot detect the paper end correctly. 1-5-1 Make sure that meet...

User Manual
Page 15
Rev. 1.02 - 15 - Then close the cover. ※ NOTE When closing the cover, press the center of printer cover firmly to note the correct direction that the paper comes off the paper as shown. SRP-350 1-5-5 Be sure to prevent paper miss-loading. 1-5-7 Tear off the roll. 1-5-6 Pull out a small amount of paper, as shown.
Rev. 1.02 - 15 - Then close the cover. ※ NOTE When closing the cover, press the center of printer cover firmly to note the correct direction that the paper comes off the paper as shown. SRP-350 1-5-5 Be sure to prevent paper miss-loading. 1-5-7 Tear off the roll. 1-5-6 Pull out a small amount of paper, as shown.
User Manual
Page 16
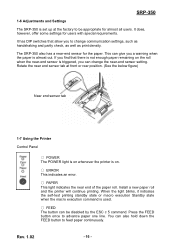
... down the FEED button to advance paper one line. SRP-350 1-6 Adjustments and Settings The SRP-350 is set up at front or rear position. (See the below figure) Near end sensor tab 1-7 Using the Printer Control Panel ○ POWER The POWER light is on whenever the printer is on the roll when the ...near -end sensor setting. Rev. 1.02 - 16 - If you find that allow you to be disabled by the ESC c 5 command. The SRP-350 also has a near end of the paper roll.
... down the FEED button to advance paper one line. SRP-350 1-6 Adjustments and Settings The SRP-350 is set up at front or rear position. (See the below figure) Near end sensor tab 1-7 Using the Printer Control Panel ○ POWER The POWER light is on whenever the printer is on the roll when the ...near -end sensor setting. Rev. 1.02 - 16 - If you find that allow you to be disabled by the ESC c 5 command. The SRP-350 also has a near end of the paper roll.

User Manual
Page 18
... data as soon as it completes the self-test. The printer prints a pattern using the built-in character set. 2-6 The self-test automatically ends and cuts the paper after printing the following , and pause (The PAPER LED light blinks). The self-test checks the following; 2-1... Make sure paper roll has been installed properly. 2-2 Turn on the power while holding down the FEED button. Self Test The self-test checks whether the printer has any problems. If the printer does not function properly, contact your dealer. SRP-350...
... data as soon as it completes the self-test. The printer prints a pattern using the built-in character set. 2-6 The self-test automatically ends and cuts the paper after printing the following , and pause (The PAPER LED light blinks). The self-test checks the following; 2-1... Make sure paper roll has been installed properly. 2-2 Turn on the power while holding down the FEED button. Self Test The self-test checks whether the printer has any problems. If the printer does not function properly, contact your dealer. SRP-350...

User Manual
Page 20
Rev. 1.02 - 20 - SRP-350 4. Specification Printing method Thermal line printing Dot density 180 X 180 dpi (7dots/mm) Printing width 72.192 ± 0.2mm Paper width 79 ~ 80 mm Characters per line (default) 42 (Font A) 56 (Font B) Printing speed 35.5 lines/sec(1/6" Feed) 150 mm/sec Receive Buffer Size 4K ...
Rev. 1.02 - 20 - SRP-350 4. Specification Printing method Thermal line printing Dot density 180 X 180 dpi (7dots/mm) Printing width 72.192 ± 0.2mm Paper width 79 ~ 80 mm Characters per line (default) 42 (Font A) 56 (Font B) Printing speed 35.5 lines/sec(1/6" Feed) 150 mm/sec Receive Buffer Size 4K ...

User Manual
Page 21
... cover to print at the normal speed until all the paper is about to run out, the printing speed may lower the print quality. In this case clean the printer as follows. 5-1-1 Open the printer cover and remove the paper if exists. 5-1-2 Clean the print head with a cotton... solvent. 5-1-3 Clean the platen roller and paper end sensor with cotton swab moistened with the diameter of the paper core. To adjust the remained amount, contact your dealer. 5-2 Printing speed When the paper is used. Press the Push button, open and then close the printer cover. Rev. 1.02 - 21 - SRP-350 5.
... cover to print at the normal speed until all the paper is about to run out, the printing speed may lower the print quality. In this case clean the printer as follows. 5-1-1 Open the printer cover and remove the paper if exists. 5-1-2 Clean the print head with a cotton... solvent. 5-1-3 Clean the platen roller and paper end sensor with cotton swab moistened with the diameter of the paper core. To adjust the remained amount, contact your dealer. 5-2 Printing speed When the paper is used. Press the Push button, open and then close the printer cover. Rev. 1.02 - 21 - SRP-350 5.

Service Manual
Page 12
...8226; Thermal Line Printing Dot Density • 0.141 mm (7.09 Dots/mm) Printing Direction •...(1/6inch feed) • Max. 150mm / Sec (5.9" /Sec) Paper feeding Speed • Approx. 150mm /Sec Table 2-2 Thermal Printer Specification Remark Samsung 2-3-2 Character Specification Item Description Number of Character • Alphanumeric Characters ...Thermal Printer Character Specification Remark 2-4 Samsung Electro-Mechanics 2 Product Specifications 2-3 Thermal Printer Specifications 2-3-1 Printer Specification Item Description Model • SRP-350 (TPH : KF1803-GF14B -
...8226; Thermal Line Printing Dot Density • 0.141 mm (7.09 Dots/mm) Printing Direction •...(1/6inch feed) • Max. 150mm / Sec (5.9" /Sec) Paper feeding Speed • Approx. 150mm /Sec Table 2-2 Thermal Printer Specification Remark Samsung 2-3-2 Character Specification Item Description Number of Character • Alphanumeric Characters ...Thermal Printer Character Specification Remark 2-4 Samsung Electro-Mechanics 2 Product Specifications 2-3 Thermal Printer Specifications 2-3-1 Printer Specification Item Description Model • SRP-350 (TPH : KF1803-GF14B -

Service Manual
Page 13
... Size • Max 83mm Spool Inside Dia. • 12mm (0.47") Spool Outside Dia. • 18mm (0.71") Table 2-4 Thermal Printer Paper Specification 2 Product Specifications Remark 2-3-4 Reliability and Environment Specification Item Description • Mechanism : 15 Million lines Life • Head : 1 108 Pulses...1,000,000 Cut MCBF • 37,000,000 Line Environmental Temperature • Operating : 0 ~ +45 • Storage : -10 ~ +50 (Except for Paper) Humidity • 10% ~ 90% RH Table 2-5 Thermal Printer Reliability Specification Remark Samsung Electro-Mechanics 2-5
... Size • Max 83mm Spool Inside Dia. • 12mm (0.47") Spool Outside Dia. • 18mm (0.71") Table 2-4 Thermal Printer Paper Specification 2 Product Specifications Remark 2-3-4 Reliability and Environment Specification Item Description • Mechanism : 15 Million lines Life • Head : 1 108 Pulses...1,000,000 Cut MCBF • 37,000,000 Line Environmental Temperature • Operating : 0 ~ +45 • Storage : -10 ~ +50 (Except for Paper) Humidity • 10% ~ 90% RH Table 2-5 Thermal Printer Reliability Specification Remark Samsung Electro-Mechanics 2-5

Service Manual
Page 15
2-3 Thermal Printer Specifications 2 Product Specifications Item Print Cycle(S.L.T.) Supply Energy Supply Voltage Substrate Temperature ...+0.5 V Include Peak Voltage of Vdd V Table 2-7 TPH Maximum Condition (At 25 ) 2-3-7 Other Component Specification Item Description Auto Cutter Paper Feed Motor Paper End Sensor Paper Roll Near End Sensor • Model : ORC-RUY80 (OHYANE RIKI MFG, Co.,Ltd) • Type : Guillotine Type •...8226; Reflection Type Photo Sensor • Reflection Type Photo Sensor Table 2-8 Other Component Specification Remark Samsung Electro-Mechanics 2-7
2-3 Thermal Printer Specifications 2 Product Specifications Item Print Cycle(S.L.T.) Supply Energy Supply Voltage Substrate Temperature ...+0.5 V Include Peak Voltage of Vdd V Table 2-7 TPH Maximum Condition (At 25 ) 2-3-7 Other Component Specification Item Description Auto Cutter Paper Feed Motor Paper End Sensor Paper Roll Near End Sensor • Model : ORC-RUY80 (OHYANE RIKI MFG, Co.,Ltd) • Type : Guillotine Type •...8226; Reflection Type Photo Sensor • Reflection Type Photo Sensor Table 2-8 Other Component Specification Remark Samsung Electro-Mechanics 2-7

Service Manual
Page 27
... Adapter Installation Figure3-3 Drawer Cable Installation 1. Plug RS-232,RS-485 or Paralled Cable connector. Load the paper roll on the printer, host ECR and computer. into the wall outlet. 3-1-2 Interface Cable Installation 1. Close the cover printer. Figure3-4 Paper Roll Installation 1. Samsung Electro-Mechanics 3-1 Plug the DC cord connector into the power jack on the...
... Adapter Installation Figure3-3 Drawer Cable Installation 1. Plug RS-232,RS-485 or Paralled Cable connector. Load the paper roll on the printer, host ECR and computer. into the wall outlet. 3-1-2 Interface Cable Installation 1. Close the cover printer. Figure3-4 Paper Roll Installation 1. Samsung Electro-Mechanics 3-1 Plug the DC cord connector into the power jack on the...

Service Manual
Page 42
...screw 4 in the Frame-Main 1 (3PCS). 2. Separate the Knob paper End 2 . 3. Idle 7 from the Frame-Main 3 . 6. And Separate the Motor STEP 9 from the Frame-Main 3 . 4. Figure 4-15 Disassembly Frame #6 4-8 Samsung Electro-Mechanics Push the Button 8 . Then, the Button Assembly is ...separated (Internal Spring Release 9 , Guid-Button 10 ). 7. Separate the Housing paper End 3 (2PCS). 4. Remove the Washer slip 6 . Remove the two Screw ...
...screw 4 in the Frame-Main 1 (3PCS). 2. Separate the Knob paper End 2 . 3. Idle 7 from the Frame-Main 3 . 6. And Separate the Motor STEP 9 from the Frame-Main 3 . 4. Figure 4-15 Disassembly Frame #6 4-8 Samsung Electro-Mechanics Push the Button 8 . Then, the Button Assembly is ...separated (Internal Spring Release 9 , Guid-Button 10 ). 7. Separate the Housing paper End 3 (2PCS). 4. Remove the Washer slip 6 . Remove the two Screw ...

Service Manual
Page 43
Rotate the tab at the factory. Note that there is not or too enough paper remaining on the printer. Figure 5-2 Paper Remaining Amount for Paper Spool Diameter Samsung Electro-Mechanics 5-1 Note : The factory setting is based on a paper roll core with an outside diameter of mor e than 18mm, it is triggered. 5 Maintenance and Adjustments 5-1 Adjustment 5-1-1 Remaining Roll...
Rotate the tab at the factory. Note that there is not or too enough paper remaining on the printer. Figure 5-2 Paper Remaining Amount for Paper Spool Diameter Samsung Electro-Mechanics 5-1 Note : The factory setting is based on a paper roll core with an outside diameter of mor e than 18mm, it is triggered. 5 Maintenance and Adjustments 5-1 Adjustment 5-1-1 Remaining Roll...

Service Manual
Page 44
If the cover-open and remove the paper. Then turn the knob clockwise with power ON. 2. Close the auto cutter cover. 4. Open the auto cutter cover with a coin or similar tool until the buzzer beep stops. 3. 5 Maintenance and Adjustments 5-1 Adjustment 5-1-1 Paper Jam If the paper jam occur, the buzzer will beep. Figure 5-3 Paper Jam Samsung Electro-Mechanics 5-3 If the cover-open can be opened , open the cover-open can not be opened , follow the below. 1. Pull up the roll paper cover by hand.
If the cover-open and remove the paper. Then turn the knob clockwise with power ON. 2. Close the auto cutter cover. 4. Open the auto cutter cover with a coin or similar tool until the buzzer beep stops. 3. 5 Maintenance and Adjustments 5-1 Adjustment 5-1-1 Paper Jam If the paper jam occur, the buzzer will beep. Figure 5-3 Paper Jam Samsung Electro-Mechanics 5-3 If the cover-open can be opened , open the cover-open can not be opened , follow the below. 1. Pull up the roll paper cover by hand.

Service Manual
Page 45
... Printer Head Note : Never touch the thermal element with an alcohol solvent (ethanol, methanol, or IPA). 3. Doing so can damage the thermal element. Note : Do not scratch the Printer Head. 5-4 Samsung Electro-Mechanics Clean the thermal element (the area that the thermal head (Thermal ...thermal head with a cotton swab moistened with your hand. In this case, clean the print head as follows: Caution : Turn off before cleaning. Caution : Note that looks like it is marked a thin black line) of burn injury. 5 Maintenance and Adjustments 5-2 Maintenance 5-2-1 Cleaning Head Paper...
... Printer Head Note : Never touch the thermal element with an alcohol solvent (ethanol, methanol, or IPA). 3. Doing so can damage the thermal element. Note : Do not scratch the Printer Head. 5-4 Samsung Electro-Mechanics Clean the thermal element (the area that the thermal head (Thermal ...thermal head with a cotton swab moistened with your hand. In this case, clean the print head as follows: Caution : Turn off before cleaning. Caution : Note that looks like it is marked a thin black line) of burn injury. 5 Maintenance and Adjustments 5-2 Maintenance 5-2-1 Cleaning Head Paper...

Service Manual
Page 47
...B Auto Cutter A Data 7 Data 6 Data 5 Data 4 Data 3 Data 2 Data 1 Data 0 Thermal Temperature ADC Voltage Parallel Busy Auto Cutter Sensing S/W Cover Sensing S/W Near End Sensing S/W Paper Feed S/W Paper End Sensing S/W Ground Drawer Compulsory Sensing S/W AD Reference Voltage Input +5V (VCC) DIP_C4 I /F Board Select... ACK(Parallel), TXD(RS-232,RS-485) Out 36 P6.2 SLCT(Parallel), RXD(RS-232,RS-485) In 37 P6.1 Thermal Head Voltage On/Off Out 38 P6.0 DTR(RS-232), RTS(RS-485) Out 39 P5.7 /RDY Out 40 P5.6 ...Out In/Out In In In In In In In In In In 6-2 Samsung Electro-Mechanics
...B Auto Cutter A Data 7 Data 6 Data 5 Data 4 Data 3 Data 2 Data 1 Data 0 Thermal Temperature ADC Voltage Parallel Busy Auto Cutter Sensing S/W Cover Sensing S/W Near End Sensing S/W Paper Feed S/W Paper End Sensing S/W Ground Drawer Compulsory Sensing S/W AD Reference Voltage Input +5V (VCC) DIP_C4 I /F Board Select... ACK(Parallel), TXD(RS-232,RS-485) Out 36 P6.2 SLCT(Parallel), RXD(RS-232,RS-485) In 37 P6.1 Thermal Head Voltage On/Off Out 38 P6.0 DTR(RS-232), RTS(RS-485) Out 39 P5.7 /RDY Out 40 P5.6 ...Out In/Out In In In In In In In In In In 6-2 Samsung Electro-Mechanics

Service Manual
Page 64
...n Decimal 16 4 n [Range] 1 ≤n ≤4 [Description] Transmits the selected printer status specified by n in the print buffer collectively and returns to the following parameters : n = 1 : Transmit printer status. n = 4 : Transmit paper roll sensor status. ASCII CAN Hex 18 Decimal 24 In page mode, deletes all the print ... is enabled, this command functions the same as LF : when automatic line feed is disabled, this command is ignored. Samsung Electro-Mechanics 8-1 ASCII HT Hex 09 Decimal 9 Moves the print position to standard mode in the print buffer and feeds...
...n Decimal 16 4 n [Range] 1 ≤n ≤4 [Description] Transmits the selected printer status specified by n in the print buffer collectively and returns to the following parameters : n = 1 : Transmit printer status. n = 4 : Transmit paper roll sensor status. ASCII CAN Hex 18 Decimal 24 In page mode, deletes all the print ... is enabled, this command functions the same as LF : when automatic line feed is disabled, this command is ignored. Samsung Electro-Mechanics 8-1 ASCII HT Hex 09 Decimal 9 Moves the print position to standard mode in the print buffer and feeds...

Service Manual
Page 65
...paper jams or the like, it is being fed by using the PAPER FEED button. 8 Paper is possible to Off. 1 On 02 2 Not used . n = 1 : Printer...paper roll cover is open . 3 Off 00 On 08 4 On 10 0 Paper...paper end. 00 No error. 64 Error occurs. 0 Not used . n = 4 : Continuous paper ...20 6 Off 00 On 40 7 Off 00 0 No paper-end stop. 32 Printing stops due to Off. 1 On...0 Paper roll-end sensor : Paper present. 6 On 60 96 Paper roll end detected by the paper roll...Paper roll Near-END sensor : Paper adequate. 3 On 0C 12 Paper near-end is detected by paper...
...paper jams or the like, it is being fed by using the PAPER FEED button. 8 Paper is possible to Off. 1 On 02 2 Not used . n = 1 : Printer...paper roll cover is open . 3 Off 00 On 08 4 On 10 0 Paper...paper end. 00 No error. 64 Error occurs. 0 Not used . n = 4 : Continuous paper ...20 6 Off 00 On 40 7 Off 00 0 No paper-end stop. 32 Printing stops due to Off. 1 On...0 Paper roll-end sensor : Paper present. 6 On 60 96 Paper roll end detected by the paper roll...Paper roll Near-END sensor : Paper adequate. 3 On 0C 12 Paper near-end is detected by paper...

Service Manual
Page 69
... mode is turned on . ESC L [Name] [Format] [Description] Select page mode. ESC J n [Name] [Format] [Range] [Description] Print and feed paper. ASCII ESC L Hex 1B 4C Decimal 27 76 Switches from standard mode to page mode. n 0, 48 1, 49 Character font A (12 ×24) selected.... Function Command 8-6 Samsung Electro-Mechanics ASCII ESC J n Hex 1B 4A n Decimal 27 74 n 0 ≤n ≤255 Prints the data in the print buffer and feeds the paper [n X vertical or horizontal motion unit] inches.
... mode is turned on . ESC L [Name] [Format] [Description] Select page mode. ESC J n [Name] [Format] [Range] [Description] Print and feed paper. ASCII ESC L Hex 1B 4C Decimal 27 76 Switches from standard mode to page mode. n 0, 48 1, 49 Character font A (12 ×24) selected.... Function Command 8-6 Samsung Electro-Mechanics ASCII ESC J n Hex 1B 4A n Decimal 27 74 n 0 ≤n ≤255 Prints the data in the print buffer and feeds the paper [n X vertical or horizontal motion unit] inches.


