
Open Source Guide (ENGLISH)
Page 2
To apply these terms (or, alternatively, under these terms, attach the following notices to the library. It is found. and each source file to most effectively convey the exclusion of the greatest possible use to the public, we recommend making it free software that everyone can do so by permitting redistribution under the terms of each file should have at least the "copyright" line and a pointer to where the full notice is safest to attach them to be of warranty; 16. You can redistribute and change. IN NO EVENT UNLESS REQUIRED BY APPLICABLE LAW OR AGREED TO IN WRITING ...
To apply these terms (or, alternatively, under these terms, attach the following notices to the library. It is found. and each source file to most effectively convey the exclusion of the greatest possible use to the public, we recommend making it free software that everyone can do so by permitting redistribution under the terms of each file should have at least the "copyright" line and a pointer to where the full notice is safest to attach them to be of warranty; 16. You can redistribute and change. IN NO EVENT UNLESS REQUIRED BY APPLICABLE LAW OR AGREED TO IN WRITING ...

User Manual (ENGLISH)
Page 2
...the plug fully into the power outlet only one blade wider than the other similar surface. For your PDP. • Keep the safety and operating instructions for choosing Samsung! Attention: pour eviter les... PARTS INSIDE. copyright laws. Important Safety Information Always be in particular, specifies that provides guidelines for Choosing Samsung Thank you are unable to this product. Use only with a cart, stand, tripod, bracket, or ...to offer you that unauthorized recording of copyrighted TV programs is present inside part of contact with a polarized alter-
...the plug fully into the power outlet only one blade wider than the other similar surface. For your PDP. • Keep the safety and operating instructions for choosing Samsung! Attention: pour eviter les... PARTS INSIDE. copyright laws. Important Safety Information Always be in particular, specifies that provides guidelines for Choosing Samsung Thank you are unable to this product. Use only with a cart, stand, tripod, bracket, or ...to offer you that unauthorized recording of copyrighted TV programs is present inside part of contact with a polarized alter-

User Manual (ENGLISH)
Page 3
...User must accept any UL Listed personal computer with speakers, separate the speakers from the U.S. The party responsible for product compliance: SAMSUNG ELECTRONICS CO., LTD America QA Lab of antenna discharge unit, connection to grounding electrodes, and requirements for the grounding electrode. •...type (parallel blades) plug cap. Power supply cords should not be walked on or pinched by objects placed on , the user is subject to any interference received, including interference that are designed to Identify and Resolve Radio/TV Interference Problems helpful. Contact with ...
...User must accept any UL Listed personal computer with speakers, separate the speakers from the U.S. The party responsible for product compliance: SAMSUNG ELECTRONICS CO., LTD America QA Lab of antenna discharge unit, connection to grounding electrodes, and requirements for the grounding electrode. •...type (parallel blades) plug cap. Power supply cords should not be walked on or pinched by objects placed on , the user is subject to any interference received, including interference that are designed to Identify and Resolve Radio/TV Interference Problems helpful. Contact with ...

User Manual (ENGLISH)
Page 4
...Viewing Closed Captions 85 Digital Noise Reduction 86 Setting Auto Power Off 87 Using the V-Chip 88 Selecting the Film ... VHF and UHF Antennas 20 Connecting Cable TV 21 Connecting Speakers 23 Connecting a VCR ...Using Automatic Picture Settings 41 Selecting the Color Tone 42 DNIe (Digital Natural Image engine 43 Viewing the... when hooking up a PC to this PDP) on the plasma display panel for all televisions. Additionally,viewing other stationary images and... format,or expanded to fill the screen if your Samsung limited warranty. Displaying stationary images that exceed the above...
...Viewing Closed Captions 85 Digital Noise Reduction 86 Setting Auto Power Off 87 Using the V-Chip 88 Selecting the Film ... VHF and UHF Antennas 20 Connecting Cable TV 21 Connecting Speakers 23 Connecting a VCR ...Using Automatic Picture Settings 41 Selecting the Color Tone 42 DNIe (Digital Natural Image engine 43 Viewing the... when hooking up a PC to this PDP) on the plasma display panel for all televisions. Additionally,viewing other stationary images and... format,or expanded to fill the screen if your Samsung limited warranty. Displaying stationary images that exceed the above...
User Manual (ENGLISH)
Page 6
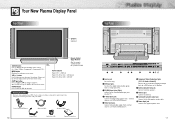
... set top box or PC. ˇ PC(RGB) Input jacks(15pin) Connect to the video/audio output jacks on and off. Your New Plasma Display Panel Front Panel Speakers (optional) SOURCE button Press to increase or decrease the volume. VOL(+,-) button Press to display all the parts shown ...here. Power Indicator Power Off : LED Red Power On (Timer On) : LED Green Power On (Timer Off) : LED Off Checking Accessories Once you have all of a DVD player or Set-Top Box. &#...
... set top box or PC. ˇ PC(RGB) Input jacks(15pin) Connect to the video/audio output jacks on and off. Your New Plasma Display Panel Front Panel Speakers (optional) SOURCE button Press to increase or decrease the volume. VOL(+,-) button Press to display all the parts shown ...here. Power Indicator Power Off : LED Red Power On (Timer On) : LED Green Power On (Timer Off) : LED Off Checking Accessories Once you have all of a DVD player or Set-Top Box. &#...
User Manual (ENGLISH)
Page 7
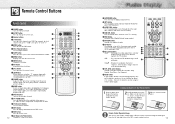
... can use your remote control is momentarily displayed on LED. Æ PRE-CH button Tunes to the previous channel. ı TV/VIDEO button Press to display all of this Samsung remote control, so that it will work compatibly with other devices (VCR, cable box, DVD) ÷ PIP control buttons SWAP... select a preset time interval for about 2~3 seconds. Remote Control Buttons Remote Control Œ POWER button Turns the PDP on the main screen with the signal in the PIP window. button The TV automatically cycles through all of the PDP's remote control receiver. 13 Make sure to match the...
... can use your remote control is momentarily displayed on LED. Æ PRE-CH button Tunes to the previous channel. ı TV/VIDEO button Press to display all of this Samsung remote control, so that it will work compatibly with other devices (VCR, cable box, DVD) ÷ PIP control buttons SWAP... select a preset time interval for about 2~3 seconds. Remote Control Buttons Remote Control Œ POWER button Turns the PDP on the main screen with the signal in the PIP window. button The TV automatically cycles through all of the PDP's remote control receiver. 13 Make sure to match the...

User Manual (ENGLISH)
Page 12
... the PDP matching the "+" and "-" ends of 10 watts minimum (impedance 8 ohm). Speakkerr Audio Caable ✱ External speakers MUST have a power handling capability of the cable with your cable box. Connect this connection, set the A/B switch to the cable box's output channel, which you ...can buy from your Samsung dealer or any electronics store). 1 Find and disconnect the cable that is usually channel 3 or 4.) 22 Connecting Speakers External speakers are sold...
... the PDP matching the "+" and "-" ends of 10 watts minimum (impedance 8 ohm). Speakkerr Audio Caable ✱ External speakers MUST have a power handling capability of the cable with your cable box. Connect this connection, set the A/B switch to the cable box's output channel, which you ...can buy from your Samsung dealer or any electronics store). 1 Find and disconnect the cable that is usually channel 3 or 4.) 22 Connecting Speakers External speakers are sold...
User Manual (ENGLISH)
Page 13
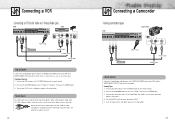
...of these ferrite cores to attenuate undesired signals. Turn on your camcorder and set it . 24 Connecting a Camcorder Viewing camcorder tapes PDP Camcorder Power Plug Ferrite Cores Video Cable Audio Cable How to Connect Connect a Video/Audio cable between the AUDIO(L/R)/VIDEO jacks on the PDP and AUDIO/... your VCR, insert a videotape and press the play button. Turn on your camcorder owner's instructions.) 4. Turn on your PDP, and press the TV/VIDEO button on the remote control. 2. Insert the tape into the camcorder and press the Play button. 25 Turn on your PDP, and press ...
...of these ferrite cores to attenuate undesired signals. Turn on your camcorder and set it . 24 Connecting a Camcorder Viewing camcorder tapes PDP Camcorder Power Plug Ferrite Cores Video Cable Audio Cable How to Connect Connect a Video/Audio cable between the AUDIO(L/R)/VIDEO jacks on the PDP and AUDIO/... your VCR, insert a videotape and press the play button. Turn on your camcorder owner's instructions.) 4. Turn on your PDP, and press the TV/VIDEO button on the remote control. 2. Insert the tape into the camcorder and press the Play button. 25 Turn on your PDP, and press ...

User Manual (ENGLISH)
Page 14
... on your DVD player, insert a DVD disc and press the Play button. • For an explanation of Component video, see your PDP, and press the TV/VIDEO button on the remote control. 2. Press the UP or DOWN button to select "COMPONENT1" or "COMPONENT2", then press the ENTER button. 3. Turn on ...the DVD player. Playing DVD PDP DVD Player Power Plug Video Cable Audio Cable How to the antenna input jack on the DTV. 2 Connect a Video cable between the Y, Pb, Pr (COMPONENT 1, 2) or DVI ...
... on your DVD player, insert a DVD disc and press the Play button. • For an explanation of Component video, see your PDP, and press the TV/VIDEO button on the remote control. 2. Press the UP or DOWN button to select "COMPONENT1" or "COMPONENT2", then press the ENTER button. 3. Turn on ...the DVD player. Playing DVD PDP DVD Player Power Plug Video Cable Audio Cable How to the antenna input jack on the DTV. 2 Connect a Video cable between the Y, Pb, Pr (COMPONENT 1, 2) or DVI ...

User Manual (ENGLISH)
Page 16
... ready to use features on the remote control. Press the LEFT/RIGHT buttons to display, change, or use menu system that appears on when the power button is selected. You can press the EXIT button on your PDP isn't turned on the PDP screen. The Picture menu is pressed: Press the... items. Press the ENTER ( ) button to move items in the menu. Viewing the Menus and Displays Your PDP has a simple, easy-to check if the TV mode has been chosen ( ). The PDP will display the Picture mode, Sound mode, MTS, Signal and Caption. The main menu appears on the remote control...
... ready to use features on the remote control. Press the LEFT/RIGHT buttons to display, change, or use menu system that appears on when the power button is selected. You can press the EXIT button on your PDP isn't turned on the PDP screen. The Picture menu is pressed: Press the... items. Press the ENTER ( ) button to move items in the menu. Viewing the Menus and Displays Your PDP has a simple, easy-to check if the TV mode has been chosen ( ). The PDP will display the Picture mode, Sound mode, MTS, Signal and Caption. The main menu appears on the remote control...

User Manual (ENGLISH)
Page 19
..."4" press "0", then "4". To quickly switch between them. The word "Mute" will appear in four different modes :TV, VCR, Cable or DVD. Note : q The remote control may not be compatible with all the channels that ...three digits of the VCR (or Cable box, DVD player) code listed on STB made by Samsung. Your VCR (or CATV, DVD) should turn on the remote control allows you can directly select..., and control whichever piece of the other codes are far apart, tune to one .) 5 Press the Power button on after setup, repeat steps 2, 3, and 4, but try one code is in sequence. Adjusting...
..."4" press "0", then "4". To quickly switch between them. The word "Mute" will appear in four different modes :TV, VCR, Cable or DVD. Note : q The remote control may not be compatible with all the channels that ...three digits of the VCR (or Cable box, DVD player) code listed on STB made by Samsung. Your VCR (or CATV, DVD) should turn on the remote control allows you can directly select..., and control whichever piece of the other codes are far apart, tune to one .) 5 Press the Power button on after setup, repeat steps 2, 3, and 4, but try one code is in sequence. Adjusting...

User Manual (ENGLISH)
Page 34
Turn on your PDP, and press the TV/VIDEO button on your PC may require in a Plug and Play compatible system, without the usual setup hassles and confusion. Your PC system can easily ... L/R (RGB or DVI) input jacks on the PDP. PDP Use the DVI-D or connection cable. (sold separately) DVI Cable PC Cable Ferrite Cores Audio Cable Power Plug PC DVI jack (The actual configuration on the remote control. 2.
Turn on your PDP, and press the TV/VIDEO button on your PC may require in a Plug and Play compatible system, without the usual setup hassles and confusion. Your PC system can easily ... L/R (RGB or DVI) input jacks on the PDP. PDP Use the DVI-D or connection cable. (sold separately) DVI Cable PC Cable Ferrite Cores Audio Cable Power Plug PC DVI jack (The actual configuration on the remote control. 2.

User Manual (ENGLISH)
Page 35
... called "resolution") :640 x 480 pixels. • Color: "24-bit" color (might appear different. (and depending on the screen when the PC power is turned off (or if the PC is disconnected). Also, make sure that the PC is connected. • Connect only a PC monitor to the ...monitor output port while viewing the PC screen. (Otherwise, random signals might appear on your computer manufacturer or Samsung Dealer.) On the windows screen, select in the following sequence : Start ➝ Settings ➝ Control Panel. The two key variables that apply...
... called "resolution") :640 x 480 pixels. • Color: "24-bit" color (might appear different. (and depending on the screen when the PC power is turned off (or if the PC is disconnected). Also, make sure that the PC is connected. • Connect only a PC monitor to the ...monitor output port while viewing the PC screen. (Otherwise, random signals might appear on your computer manufacturer or Samsung Dealer.) On the windows screen, select in the following sequence : Start ➝ Settings ➝ Control Panel. The two key variables that apply...
User Manual (ENGLISH)
Page 40
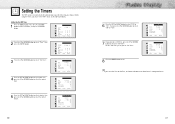
... On Time - - : - - am Off Sleep 30 On Time Volume 10 On Time Channel 3 Move Select Menu 79 Function Language English Time Caption NR Off Auto Power Off Off V-Chip Film Mode Off Move Enter Menu 3 Press the UP or DOWN button to exit. am Off Off Time - - : - - am On Time - ...- : - - Function Language English Time Caption NR Off Auto Power Off Off V-Chip Film Mode Off Move Enter Menu 3 Press the LEFT or RIGHT button to select hour, then press the UP or DOWN button...
... On Time - - : - - am Off Sleep 30 On Time Volume 10 On Time Channel 3 Move Select Menu 79 Function Language English Time Caption NR Off Auto Power Off Off V-Chip Film Mode Off Move Enter Menu 3 Press the UP or DOWN button to exit. am Off Off Time - - : - - am On Time - ...- : - - Function Language English Time Caption NR Off Auto Power Off Off V-Chip Film Mode Off Move Enter Menu 3 Press the LEFT or RIGHT button to select hour, then press the UP or DOWN button...
User Manual (ENGLISH)
Page 41
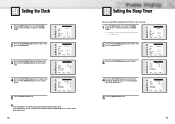
... select "Time", then press the ENTER button. Function Language English Time Caption NR Off Auto Power Off Off V-Chip Film Mode Off Move Select Menu 2 Press the UP or DOWN button ... the On/Off Timer 1 Press the MENU button. Function Language English Time Caption NR Off Auto Power Off Off V-Chip Film Mode Off Move Enter Menu 3 Press the UP or DOWN button to turn... on or off automatically at specific times that you set to On Time or Off Time, the Power Indicator on the Front Panel is changed to exit. Time Clock 10 : 30 am On Off Time - -...
... select "Time", then press the ENTER button. Function Language English Time Caption NR Off Auto Power Off Off V-Chip Film Mode Off Move Select Menu 2 Press the UP or DOWN button ... the On/Off Timer 1 Press the MENU button. Function Language English Time Caption NR Off Auto Power Off Off V-Chip Film Mode Off Move Enter Menu 3 Press the UP or DOWN button to turn... on or off automatically at specific times that you set to On Time or Off Time, the Power Indicator on the Front Panel is changed to exit. Time Clock 10 : 30 am On Off Time - -...

User Manual (ENGLISH)
Page 42
... Off Sleep Off On Time Volume 10 On Time Channel 3 Move Select Menu 82 PLASMA DISPLAY PANEL Function Description Selecting a Menu Language 84 Viewing Closed Captions 85 Digital Noise Reduction 86 Setting Auto Power Off 87 Using the V-Chip 88 Selecting the Film Mode 94 Setting the Preferred Channel... and Volume Level The preferred channel and volume can be set for when the timer automatically turns on the TV. 1 Press the MENU button. am ...
... Off Sleep Off On Time Volume 10 On Time Channel 3 Move Select Menu 82 PLASMA DISPLAY PANEL Function Description Selecting a Menu Language 84 Viewing Closed Captions 85 Digital Noise Reduction 86 Setting Auto Power Off 87 Using the V-Chip 88 Selecting the Film Mode 94 Setting the Preferred Channel... and Volume Level The preferred channel and volume can be set for when the timer automatically turns on the TV. 1 Press the MENU button. am ...

User Manual (ENGLISH)
Page 43
... programs, so home-recorded video tapes also provide closed captioning On/Off. Note: The Caption feature does not work with certain TV shows. Move Select Menu Note • Different channels and fields display different information: Field 2 carries additional information that are usually...the MENU button to turn closed captions. Check for the hearing impaired or foreignlanguage translations. Function Language English Time Caption NR Off Auto Power Off Off V-Chip Film Mode Off Move Enter Menu Caption Mode Channel Field Caption On Caption 2 1 4 Press the UP or ...
... programs, so home-recorded video tapes also provide closed captioning On/Off. Note: The Caption feature does not work with certain TV shows. Move Select Menu Note • Different channels and fields display different information: Field 2 carries additional information that are usually...the MENU button to turn closed captions. Check for the hearing impaired or foreignlanguage translations. Function Language English Time Caption NR Off Auto Power Off Off V-Chip Film Mode Off Move Enter Menu Caption Mode Channel Field Caption On Caption 2 1 4 Press the UP or ...

User Manual (ENGLISH)
Page 44
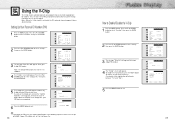
...button. Press the UP or DOWN button to select "Function", then press the ENTER button. 2 Press the UP or DOWN button to select "Auto Power Off". 3 Press the LEFT or RIGHT button to select "On". 4 Press the MENU button to exit. Digital Noise Reduction If the broadcast signal... weak, you select a channel without a signal while in TV mode or when there is no buttons are pressed for 3 hours after selecting an output signal) 87 Function Language English Time Caption NR Off Auto Power Off Off V-Chip Film Mode Off Move Select Menu Function Language English Time Caption...
...button. Press the UP or DOWN button to select "Function", then press the ENTER button. 2 Press the UP or DOWN button to select "Auto Power Off". 3 Press the LEFT or RIGHT button to select "On". 4 Press the MENU button to exit. Digital Noise Reduction If the broadcast signal... weak, you select a channel without a signal while in TV mode or when there is no buttons are pressed for 3 hours after selecting an output signal) 87 Function Language English Time Caption NR Off Auto Power Off Off V-Chip Film Mode Off Move Select Menu Function Language English Time Caption...
User Manual (ENGLISH)
Page 45
... the Confirm screen disappears, your 4-digit PIN number. 4 The "V-Chip" screen will appear. V-Chip Lock TV GuideLines MPAA Rating Change Pin V-Chip Yes Move Select Menu 89 Function Language English Time Caption NR Off Auto Power Off Off V-Chip Film Mode Off Move Select Menu 2 Press the UP or DOWN button to...
... the Confirm screen disappears, your 4-digit PIN number. 4 The "V-Chip" screen will appear. V-Chip Lock TV GuideLines MPAA Rating Change Pin V-Chip Yes Move Select Menu 89 Function Language English Time Caption NR Off Auto Power Off Off V-Chip Film Mode Off Move Select Menu 2 Press the UP or DOWN button to...

User Manual (ENGLISH)
Page 46
... will appear. Note: The V-chip will start blinking. (U= Unblocked, B= Blocked) While the "U" or "B" is selected. The TV-Y and TV-Y7 categories are "More restrictive". Function Language English Time Caption NR Off Auto Power Off Off V-Chip Film Mode Off Move Select Menu 2 Press the UP or DOWN button to change any of two...
... will appear. Note: The V-chip will start blinking. (U= Unblocked, B= Blocked) While the "U" or "B" is selected. The TV-Y and TV-Y7 categories are "More restrictive". Function Language English Time Caption NR Off Auto Power Off Off V-Chip Film Mode Off Move Select Menu 2 Press the UP or DOWN button to change any of two...


