Samsung SMH8165ST Research
Related Manual Pages


Similar Questions

How To Replace Door On My Samsung Smh8165st Microwave
(Posted by jpaulMort 9 years ago)

Samsung Microwave Oven Mod. Smh8165st How To Replace Door Handle
(Posted by wanders21 10 years ago)


Related Terms
The following terms were also used when searching for Samsung SMH8165ST Research:- samsung smh8165st
- smh8165st installation
- samsung smh8165st microwave
- model smh8165st
- samsung smh8165st installation
- smh8165st samsung
- samsung smh8165st over the range microwave
- smh8165st mount
- samsung smh8165st price
- samsung smh8165st mount
- smh8165st microwave
- smh8165st over the range microwave
- smh8165st over-the-range microwave
- smh8165st price
- samsung smh8165st manual
- samsung smh8165st over-the-range microwave
- samsung smh8165st parts
- smh8165st parts
- smh8165st xaa
- smh8165st installation manual
- smh8165st mounting bracket
- smh8165st xac
- smh8165st/xac
- how to install samsung smh8165st
- how to install smh8165st
- samsung microwave smh8165st
- samsung smh8165st 5e error
- samsung smh8165st bracket
- samsung smh8165st control panel
- samsung smh8165st dimensions
- samsung smh8165st door
- samsung smh8165st door handle
- samsung smh8165st door parts
- samsung smh8165st error codes
- samsung smh8165st error se
- samsung smh8165st handle
- samsung smh8165st installation guide
- samsung smh8165st installation manual
- samsung smh8165st issues
- samsung smh8165st light comes on
- samsung smh8165st microwave keypad
- samsung smh8165st microwave oven
- samsung smh8165st microwave recall
- samsung smh8165st microwave specs
- samsung smh8165st mounting bracket
- samsung smh8165st mounting plate
- samsung smh8165st no power
- samsung smh8165st parts list
- samsung smh8165st recall
- samsung smh8165st repair manual
- samsung smh8165st roller ring guide
- samsung smh8165st se
- samsung smh8165st se code
- samsung smh8165st se error
- samsung smh8165st service manual
- samsung smh8165st specs
- samsung smh8165st where to buy
- samsung smh8165st xaa
- samsung smh8165st xac
- smh8165st
- smh8165st 5e error
- smh8165st bracket
- smh8165st control panel
- smh8165st dimensions
- smh8165st door
- smh8165st door handle
- smh8165st door parts
- smh8165st error code
- smh8165st error code se
- smh8165st error codes
- smh8165st error se
- smh8165st filter
- smh8165st fuse
- smh8165st handle
- smh8165st installation guide
- smh8165st installation instructions
- smh8165st installation template
- smh8165st issues
- smh8165st keypad
- smh8165st light comes on
- smh8165st manual
- smh8165st microwave keypad
- smh8165st microwave oven
- smh8165st microwave recall
- smh8165st microwave specs
- smh8165st mounting
- smh8165st mounting plate
- smh8165st no power
- smh8165st parts list
- smh8165st recall
- smh8165st repair manual
- smh8165st roller ring guide
- smh8165st samsung microwave
- smh8165st se
- smh8165st se code
- smh8165st se error
- smh8165st service manual
- smh8165st short circuit
- smh8165st specs
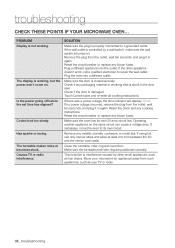
- smh8165st troubleshooting
- smh8165st user manual
- smh8165st where to buy
- smh8165st/xaa