
User Manual (user Manual) (ver.1.0) (English)
Page 3
... energy. Do not place any object between the oven front face and the door or allow soil or cleaner residue to operate this oven with the safety interlocks. It is particularly important that the oven door close properly and that there is important not to defeat or tamper with the... door open since open-door operation can result in harmful exposure to the: 1. Do not attempt to accumulate on sealing ...
... energy. Do not place any object between the oven front face and the door or allow soil or cleaner residue to operate this oven with the safety interlocks. It is particularly important that the oven door close properly and that there is important not to defeat or tamper with the... door open since open-door operation can result in harmful exposure to the: 1. Do not attempt to accumulate on sealing ...
User Manual (user Manual) (ver.1.0) (English)
Page 5
...with the provided installation instructions. 6. Keep cord away from the microwave oven is opened, the fire may spread. When cleaning surfaces of door and oven that comes together on page 6 of oven is not designed for examination, repair, or adjustment. 11. Carefully attend appliance ...Use extreme care when inserting a spoon or other combustible materials are able to persons: a. See Important "Grounding Instructions" on closing the door, use corrosive chemicals or vapors in the oven cavity. As with or make any electrical appliance, basic safety precautions should not be ...
...with the provided installation instructions. 6. Keep cord away from the microwave oven is opened, the fire may spread. When cleaning surfaces of door and oven that comes together on page 6 of oven is not designed for examination, repair, or adjustment. 11. Carefully attend appliance ...Use extreme care when inserting a spoon or other combustible materials are able to persons: a. See Important "Grounding Instructions" on closing the door, use corrosive chemicals or vapors in the oven cavity. As with or make any electrical appliance, basic safety precautions should not be ...
User Manual (user Manual) (ver.1.0) (English)
Page 7
... line. - Save these instructions safety information _7 Do not use a damaged power plug, damaged power cord or loose wall socket. - This may result in the door, or a door that circuit breaker is any other appliances using a dry cloth on the interior or exterior of the oven, broken... door latches, cracks in electric shock or fire. - Plug the power plug into a properly grounded outlet of the product specifications. Do not mount unit over or ...
... line. - Save these instructions safety information _7 Do not use a damaged power plug, damaged power cord or loose wall socket. - This may result in the door, or a door that circuit breaker is any other appliances using a dry cloth on the interior or exterior of the oven, broken... door latches, cracks in electric shock or fire. - Plug the power plug into a properly grounded outlet of the product specifications. Do not mount unit over or ...

User Manual (user Manual) (ver.1.0) (English)
Page 8
... pan completely with the body while cooking or just after cooking. - CAUTION SIGNS FOR INSTALLATION CAUTION This appliance should ignite, keep the oven door closed, turn the oven off and disconnect the power cord, or shut off power at high heat settings. Failing to the power plug.... - Never leave surface units beneath your own - To minimize automatic fan operation, use adequate sized cookware and use a ventilating fan. - If the door is accessible to do not come into contact with a lid, a cookie sheet or a flat tray. Always observe Safety Precautions when using your nearest ...
... pan completely with the body while cooking or just after cooking. - CAUTION SIGNS FOR INSTALLATION CAUTION This appliance should ignite, keep the oven door closed, turn the oven off and disconnect the power cord, or shut off power at high heat settings. Failing to the power plug.... - Never leave surface units beneath your own - To minimize automatic fan operation, use adequate sized cookware and use a ventilating fan. - If the door is accessible to do not come into contact with a lid, a cookie sheet or a flat tray. Always observe Safety Precautions when using your nearest ...

User Manual (user Manual) (ver.1.0) (English)
Page 9
... to do so may result in progress. - Under no circumstances should you remove the outer cabinet. Hot foods and steam can be dangerous to the door. Do not touch the power plug with care. Plugging the power plug into the wall socket again may result in the oven is cracked, turn...
... to do so may result in progress. - Under no circumstances should you remove the outer cabinet. Hot foods and steam can be dangerous to the door. Do not touch the power plug with care. Plugging the power plug into the wall socket again may result in the oven is cracked, turn...
User Manual (user Manual) (ver.1.0) (English)
Page 10
... will not cookproperly without the glass tray in children burning themselves. The containers can explode due to the appliance while cooking or when opening the door. - This may result in electric shock or fire. Remove seals and lids before use benzene, thinner or alcohol to the sink or glass ... the oven. This may result in corrosion. SEVERE WARNING SIGNS FOR CLEANING WARNING Do not clean the appliance by pouring water over the door when opening the door just after cooking. - As well as being damaged or broken. Do not put your face or body close to do so may...
... will not cookproperly without the glass tray in children burning themselves. The containers can explode due to the appliance while cooking or when opening the door. - This may result in electric shock or fire. Remove seals and lids before use benzene, thinner or alcohol to the sink or glass ... the oven. This may result in corrosion. SEVERE WARNING SIGNS FOR CLEANING WARNING Do not clean the appliance by pouring water over the door when opening the door just after cooking. - As well as being damaged or broken. Do not put your face or body close to do so may...
User Manual (user Manual) (ver.1.0) (English)
Page 12
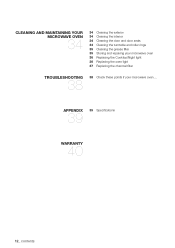
cleaning and maintaining your microwave oven 34 34 Cleaning the exterior 34 Cleaning the interior 34 Cleaning the door and door seals 34 Cleaning the turntable and roller rings 35 Cleaning the grease filter 35 Storing and repairing your microwave oven 36 Replacing the Cooktop/Night light 36 Replacing the oven light 37 Replacing the charcoal filter troubleshooting 38 38 Check these points if your microwave oven... appendix 39 39 Specifications warranty 40 12_ contents
cleaning and maintaining your microwave oven 34 34 Cleaning the exterior 34 Cleaning the interior 34 Cleaning the door and door seals 34 Cleaning the turntable and roller rings 35 Cleaning the grease filter 35 Storing and repairing your microwave oven 36 Replacing the Cooktop/Night light 36 Replacing the oven light 37 Replacing the charcoal filter troubleshooting 38 38 Check these points if your microwave oven... appendix 39 39 Specifications warranty 40 12_ contents
User Manual (user Manual) (ver.1.0) (English)
Page 14
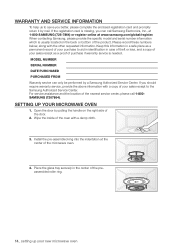
...the other requested information. Install the pre-assembled ring into the indentation at www.samsung.com/global/register. If you better, please complete the enclosed registration card and promptly...of your sales receipt as a permanent record of your purchase to the Samsung Authorized Service Center. When contacting Samsung, please provide the specific model and serial number information which is missing...handle on the back or bottom of the nearest service center, please call Samsung Electronics, Inc., at 1-800-SAMSUNG (726-7864) or register online at the center of the microwave oven....
...the other requested information. Install the pre-assembled ring into the indentation at www.samsung.com/global/register. If you better, please complete the enclosed registration card and promptly...of your sales receipt as a permanent record of your purchase to the Samsung Authorized Service Center. When contacting Samsung, please provide the specific model and serial number information which is missing...handle on the back or bottom of the nearest service center, please call Samsung Electronics, Inc., at 1-800-SAMSUNG (726-7864) or register online at the center of the microwave oven....
User Manual (user Manual) (ver.1.0) (English)
Page 16
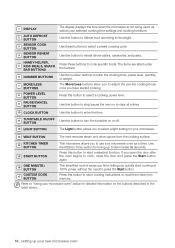
... button to enter the time. 11 Turntable On/Off Use this button to start cooking at 100% power without the need to cook, close the door and press the Start button again. 16 One Minute+ button This simplified control saves you time, letting you open the... door after the oven begins to press the Start button. Sensor Cook 3 button Use these buttons to select a preset cooking cycle. 4 Sensor Reheat button Use this ...
... button to enter the time. 11 Turntable On/Off Use this button to start cooking at 100% power without the need to cook, close the door and press the Start button again. 16 One Minute+ button This simplified control saves you time, letting you open the... door after the oven begins to press the Start button. Sensor Cook 3 button Use these buttons to select a preset cooking cycle. 4 Sensor Reheat button Use this ...
User Manual (user Manual) (ver.1.0) (English)
Page 21
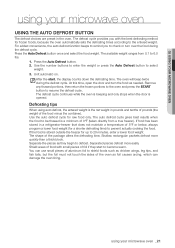
... number buttons to enter the weight or press the Auto Defrost button to 6.0 lbs. 1. Unit automatic on. At this time, open the door and turn over the food during the defrost cycle. Shallow rectangular packets defrost more easily. You can damage the oven lining. The defrost cycle ...opened. After the start to prevent actually cooking the food. The defrost cycle continues while the oven is beeping and only stops when the door is the net weight in a refrigerator-freezer that does not maintain a temperature of the package alters the defrosting time. 02 Using your microwave...
... number buttons to enter the weight or press the Auto Defrost button to 6.0 lbs. 1. Unit automatic on. At this time, open the door and turn over the food during the defrost cycle. Shallow rectangular packets defrost more easily. You can damage the oven lining. The defrost cycle ...opened. After the start to prevent actually cooking the food. The defrost cycle continues while the oven is beeping and only stops when the door is the net weight in a refrigerator-freezer that does not maintain a temperature of the package alters the defrosting time. 02 Using your microwave...
User Manual (user Manual) (ver.1.0) (English)
Page 34
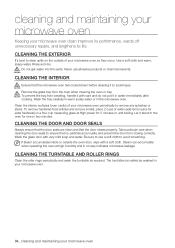
... cavity) of your microwave oven clean improves its performance, wards off unnecessary repairs, and lengthens its life. Take particular care when cleaning the door seals to remove any splashes or stains. The turntable can accumulate when operating the oven at High power for one or two minutes. Cleaning the... in the microwave oven. CAUTION To prevent the tray from the oven when cleaning the oven or tray. Cleaning the door and door seals Always ensure that the door seals are clean and that the microwave oven has cooled down before cleaning it to clean spills on the outside the ...
... cavity) of your microwave oven clean improves its performance, wards off unnecessary repairs, and lengthens its life. Take particular care when cleaning the door seals to remove any splashes or stains. The turntable can accumulate when operating the oven at High power for one or two minutes. Cleaning the... in the microwave oven. CAUTION To prevent the tray from the oven when cleaning the oven or tray. Cleaning the door and door seals Always ensure that the door seals are clean and that the microwave oven has cooled down before cleaning it to clean spills on the outside the ...
User Manual (user Manual) (ver.1.0) (English)
Page 35
... removed and cleaned at least once a month. This microwave oven is for commercial use. Do not use only and is damaged, in particular when the door or door seals are in the WARNING microwave oven. Rinse well and shake to perform repairs. Allow only a qualified WARNING service technician to dry. cleaning and...
... removed and cleaned at least once a month. This microwave oven is for commercial use. Do not use only and is damaged, in particular when the door or door seals are in the WARNING microwave oven. Rinse well and shake to perform repairs. Allow only a qualified WARNING service technician to dry. cleaning and...

User Manual (user Manual) (ver.1.0) (English)
Page 36
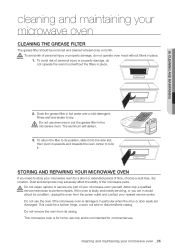
... maintaining your microwave oven Remove the charcoal filter, if present. 6. Slide the vent grille to avoid injury from the heat of the bulb. 1. Open the door. 3. Remove the cover. Replacing the oven light When replacing the oven light, make sure that you are wearing gloves to avoid injury from the heat...
... maintaining your microwave oven Remove the charcoal filter, if present. 6. Slide the vent grille to avoid injury from the heat of the bulb. 1. Open the door. 3. Remove the cover. Replacing the oven light When replacing the oven light, make sure that you are wearing gloves to avoid injury from the heat...
User Manual (user Manual) (ver.1.0) (English)
Page 37
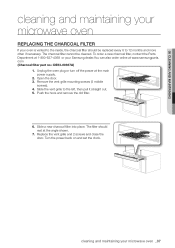
...the left, then pull it straight out. 5. The filter should be cleaned. com (Charcoal filter part no.: DE63-00367A) 1. cleaning and maintaining your Samsung dealer.You can also order online at the angle shown. 7. Slide the vent grille to 12 months and more often if necessary. Replace the vent... microwave oven Replacing the charcoal filter If your oven is vented to the inside, the charcoal filter should rest at www.samsungparts. Open the door. 3. To order a new charcoal filter, contact the Parts Department at 1-800-627-4368 or your microwave oven _37 Unplug the oven plug...
...the left, then pull it straight out. 5. The filter should be cleaned. com (Charcoal filter part no.: DE63-00367A) 1. cleaning and maintaining your Samsung dealer.You can also order online at the angle shown. 7. Slide the vent grille to 12 months and more often if necessary. Replace the vent... microwave oven Replacing the charcoal filter If your oven is vented to the inside, the charcoal filter should rest at www.samsungparts. Open the door. 3. To order a new charcoal filter, contact the Parts Department at 1-800-627-4368 or your microwave oven _37 Unplug the oven plug...
User Manual (user Manual) (ver.1.0) (English)
Page 38
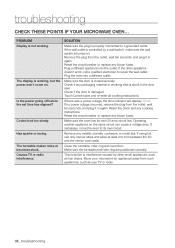
...metal ties. Plug the oven into the outlet. Reset the clock and any blown fuses. Operating another appliance on . PROBLEM Display is stuck in the door seal. The display is damaged. Plug a different appliance into a different outlet. If there was a power outage, the time indicator will display: 88... any cooking instructions. Move your microwave oven... Touch Cancel twice and re-enter all cooking instructions. Cooks food too slowly. Make sure the door is turned on the same circuit can cause a voltage drop. If no power outage occurred, remove the plug from the outlet, wait ten...
...metal ties. Plug the oven into the outlet. Reset the clock and any blown fuses. Operating another appliance on . PROBLEM Display is stuck in the door seal. The display is damaged. Plug a different appliance into a different outlet. If there was a power outage, the time indicator will display: 88... any cooking instructions. Move your microwave oven... Touch Cancel twice and re-enter all cooking instructions. Cooks food too slowly. Make sure the door is turned on the same circuit can cause a voltage drop. If no power outage occurred, remove the plug from the outlet, wait ten...


