
Quick Guide (easy Manual) (ver.1.0) (English)
Page 3
...z This may cause electric shock or equipment damage. Installation Be sure to do so may cause an electric shock or fire inside the monitor. Do not drop the monitor when moving it operates for 24 hours such as the airport, the train station or etc. z An improper ground may cause an ...nor touch the plug with the heavy dust, high or low temperatures, high humidity, chemical substance and where it . z This may cause damage to your monitor in a location with wet hands. Do not connect too many extension cords or plugs to do so may cause fire. z This may cause a serious ...
...z This may cause electric shock or equipment damage. Installation Be sure to do so may cause an electric shock or fire inside the monitor. Do not drop the monitor when moving it operates for 24 hours such as the airport, the train station or etc. z An improper ground may cause an ...nor touch the plug with the heavy dust, high or low temperatures, high humidity, chemical substance and where it . z This may cause damage to your monitor in a location with wet hands. Do not connect too many extension cords or plugs to do so may cause fire. z This may cause a serious ...
Quick Guide (easy Manual) (ver.1.0) (English)
Page 4
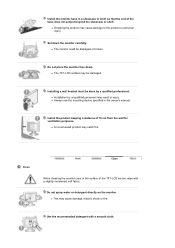
... to the product or personal injury. Clean When cleaning the monitor case or the surface of the TFT-LCD screen, wipe with a smooth cloth. Do not spray water or detergent directly on the monitor. Set down . z The TFT-LCD surface may be damaged or broken. Install the product keeping ...a distance of the base does not project beyond the showcase or shelf. z Dropping the product may catch fire. Do not place the monitor face down the monitor carefully. Use the...
... to the product or personal injury. Clean When cleaning the monitor case or the surface of the TFT-LCD screen, wipe with a smooth cloth. Do not spray water or detergent directly on the monitor. Set down . z The TFT-LCD surface may be damaged or broken. Install the product keeping ...a distance of the base does not project beyond the showcase or shelf. z Dropping the product may catch fire. Do not place the monitor face down the monitor carefully. Use the...
Quick Guide (easy Manual) (ver.1.0) (English)
Page 5
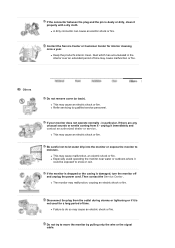
...of time. z This may cause malfunction, an electric shock or fire. Be careful not to let water drip into the monitor or expose the monitor to move the monitor by pulling only the wire or the signal cable. Disconnect the plug from it could be exposed to qualified service personnel.... If your monitor does not operate normally - Then contact the Service Center . Do not try to moisture. z Keep the product's interior clean. unplug it properly with a ...
...of time. z This may cause malfunction, an electric shock or fire. Be careful not to let water drip into the monitor or expose the monitor to move the monitor by pulling only the wire or the signal cable. Disconnect the plug from it could be exposed to qualified service personnel.... If your monitor does not operate normally - Then contact the Service Center . Do not try to moisture. z Keep the product's interior clean. unplug it properly with a ...
Quick Guide (easy Manual) (ver.1.0) (English)
Page 6
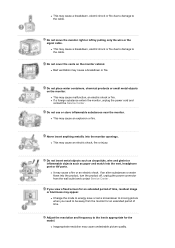
...pulling only the wire or the signal cable. z Bad ventilation may cause malfunction, an electric shock or fire. z If a foreign substance enters the monitor, unplug the power cord and contact the Service Center . z This may cause a breakdown, electric shock or fire due to damage to the cable.... Never insert anything metallic into the monitor openings. If you need to the levels appropriate for an extended period of time. z This may cause a breakdown, electric shock or fire due...
...pulling only the wire or the signal cable. z Bad ventilation may cause malfunction, an electric shock or fire. z If a foreign substance enters the monitor, unplug the power cord and contact the Service Center . z This may cause a breakdown, electric shock or fire due to damage to the cable.... Never insert anything metallic into the monitor openings. If you need to the levels appropriate for an extended period of time. z This may cause a breakdown, electric shock or fire due...

Quick Guide (easy Manual) (ver.1.0) (English)
Page 7
Using the product in eyesight damage. 17 inch - 1280 X 1024 Watching the monitor continuously at least a five-minute break after every hour of the product or may catch fire. z Dropping the product may cause damage to fire or ... personal injury. Make sure that all cables, including the antenna cable and cables connected to vibrations. When moving the monitor. z Failure to disconnect the cable may shorten the lifetime of using the monitor. Do not install the product on an unstable, uneven surface or a location prone to other devices, are disconnected before...
Using the product in eyesight damage. 17 inch - 1280 X 1024 Watching the monitor continuously at least a five-minute break after every hour of the product or may catch fire. z Dropping the product may cause damage to fire or ... personal injury. Make sure that all cables, including the antenna cable and cables connected to vibrations. When moving the monitor. z Failure to disconnect the cable may shorten the lifetime of using the monitor. Do not install the product on an unstable, uneven surface or a location prone to other devices, are disconnected before...

Quick Guide (easy Manual) (ver.1.0) (English)
Page 8
If any items are included with your dealer. Please make sure the following items are missing, contact your monitor. Contact a local dealer to buy optional items. Unpacking Manual Monitor Bottom Quick Setup Guide Cable Warranty Card (Not available in all locations) User's Guide, Monitor Driver, Natural Color software, MagicTune™ software D-Sub Cable Power Cord
If any items are included with your dealer. Please make sure the following items are missing, contact your monitor. Contact a local dealer to buy optional items. Unpacking Manual Monitor Bottom Quick Setup Guide Cable Warranty Card (Not available in all locations) User's Guide, Monitor Driver, Natural Color software, MagicTune™ software D-Sub Cable Power Cord

Quick Guide (easy Manual) (ver.1.0) (English)
Page 10
... [ ] When OSD is not needed, or when leaving it is not on the screen, push the button to adjust brightness. For energy conservation, turn the monitor on the back Connect the DVI cable to the 15-pin, D-sub connector on and off . (When the source button is pressed to change the... input mode, a message appears in the menu. Connect the signal cable to the DVI port on the back of the monitor may vary from product to product.) Power port DVI port D-sub 15-pin port Connect the power cord for long periods. Enter button [ ] / Source button...
... [ ] When OSD is not needed, or when leaving it is not on the screen, push the button to adjust brightness. For energy conservation, turn the monitor on the back Connect the DVI cable to the 15-pin, D-sub connector on and off . (When the source button is pressed to change the... input mode, a message appears in the menu. Connect the signal cable to the DVI port on the back of the monitor may vary from product to product.) Power port DVI port D-sub 15-pin port Connect the power cord for long periods. Enter button [ ] / Source button...

Quick Guide (easy Manual) (ver.1.0) (English)
Page 11
of your monitor. See Connecting the Monitor for further information regarding cable connections.
of your monitor. See Connecting the Monitor for further information regarding cable connections.

Quick Guide (easy Manual) (ver.1.0) (English)
Page 12
... cable to the 15-pin, D-sub connector on the back of the monitor. In the case of your monitor. 2-2. Connect the power cord for the monitor into a nearby outlet. 2-1. Plug the power cord for your computer and monitor. Turn on the video card. Connected to the Macintosh computer using a ...special Mac adapter. 3. If your monitor. 2-3. Connect the DVI cable to the power port on the video card. Connect the monitor to a Macintosh. Using the D-sub (Analog) connector on your monitor to the DVI port on the back of an old model Macintosh...
... cable to the 15-pin, D-sub connector on the back of the monitor. In the case of your monitor. 2-2. Connect the power cord for the monitor into a nearby outlet. 2-1. Plug the power cord for your computer and monitor. Turn on the video card. Connected to the Macintosh computer using a ...special Mac adapter. 3. If your monitor. 2-3. Connect the DVI cable to the power port on the video card. Connect the monitor to a Macintosh. Using the D-sub (Analog) connector on your monitor to the DVI port on the back of an old model Macintosh...

Quick Guide (easy Manual) (ver.1.0) (English)
Page 13
...have. Remove four screws and then remove the stand from one operating system to protect the screen. 3. Follow the directions appropriate for the monitor driver, insert the CD-ROM included with a cushion beneath it with four screws that came with the arm-type base, wall mount ...hanger or other base. Driver installation is slightly different from the LCD monitor. 4. Lay the LCD monitor face-down on a flat surface with this monitor. Align the mounting interface Pad with the holes in the rear cover mounting pad and secure it to another...
...have. Remove four screws and then remove the stand from one operating system to protect the screen. 3. Follow the directions appropriate for the monitor driver, insert the CD-ROM included with a cushion beneath it with four screws that came with the arm-type base, wall mount ...hanger or other base. Driver installation is slightly different from the LCD monitor. 4. Lay the LCD monitor face-down on a flat surface with this monitor. Align the mounting interface Pad with the holes in the rear cover mounting pad and secure it to another...

Quick Guide (easy Manual) (ver.1.0) (English)
Page 14
...the "OK" button. 4. Then click "OK" button. Windows XP/2000 1. z Internet web site : http://www.samsung.com/ (Worldwide) http://www.samsungusa.com/monitor (USA) http://www.sec.co.kr/monitor (Korea) http://www.samsungmonitor.com.cn/ (China) Windows ME 1. Insert CD into the CD-ROM drive. 2. If ...you can see following message window, then click the "Continue Anyway" button. Click "Windows XP/2000 Driver" 3. Choose your monitor model in the "Warning" window. 5. Insert CD into the CD-ROM drive. 2. Prepare a blank disk and download the driver program file at...
...the "OK" button. 4. Then click "OK" button. Windows XP/2000 1. z Internet web site : http://www.samsung.com/ (Worldwide) http://www.samsungusa.com/monitor (USA) http://www.sec.co.kr/monitor (Korea) http://www.samsungmonitor.com.cn/ (China) Windows ME 1. Insert CD into the CD-ROM drive. 2. If ...you can see following message window, then click the "Continue Anyway" button. Click "Windows XP/2000 Driver" 3. Choose your monitor model in the "Warning" window. 5. Insert CD into the CD-ROM drive. 2. Prepare a blank disk and download the driver program file at...

Quick Guide (easy Manual) (ver.1.0) (English)
Page 15
...one operating system to another. Driver installation is completed. z Internet web site : http://www.samsung.com/ (Worldwide) http://www.samsungusa.com/monitor (USA) http://www.sec.co.kr/monitor (Korea) http://www.samsungmonitor.com.cn/ (China) Microsoft® Windows® XP Operating System... and Themes" icon. 3. Follow the directions appropriate for the monitor driver, insert the CD-ROM included with this installation don't damage your system.The certified driver will be posted on Samsung Monitor Homepage http://www.samsung.com/. 5. Windows XP | Windows 2000 |Windows Me |Windows...
...one operating system to another. Driver installation is completed. z Internet web site : http://www.samsung.com/ (Worldwide) http://www.samsungusa.com/monitor (USA) http://www.sec.co.kr/monitor (Korea) http://www.samsungmonitor.com.cn/ (China) Microsoft® Windows® XP Operating System... and Themes" icon. 3. Follow the directions appropriate for the monitor driver, insert the CD-ROM included with this installation don't damage your system.The certified driver will be posted on Samsung Monitor Homepage http://www.samsung.com/. 5. Windows XP | Windows 2000 |Windows Me |Windows...
Quick Guide (easy Manual) (ver.1.0) (English)
Page 16
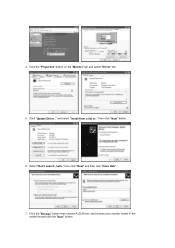
Click "Update Driver.." then click "Next" button. 6. 4. Click the "Browse" button then choose A:(D:\Driver) and choose your monitor model in the model list and click the "Next" button. Click the "Properties" button on the "Monitor" tab and select "Driver" tab. 5. and select "Install from a list or.." Select "Don't search ,I will.." then click "Next" and then click "Have disk". 7.
Click "Update Driver.." then click "Next" button. 6. 4. Click the "Browse" button then choose A:(D:\Driver) and choose your monitor model in the model list and click the "Next" button. Click the "Properties" button on the "Monitor" tab and select "Driver" tab. 5. and select "Install from a list or.." Select "Don't search ,I will.." then click "Next" and then click "Have disk". 7.

Quick Guide (easy Manual) (ver.1.0) (English)
Page 17
... is completed. Choose "OK" button on Samsung Monitor homepage. How to install If you can see "Digital Signature Not Found" on the "File Needed" window. 3. Click the "Close" button then click "OK" button ... "Browse" button on your system.The certified driver will be posted on the "Insert disk" window. 2. 8. http://www.samsung.com/ 9. Monitor driver installation is under certified MS logo,and this installation doesn't damage your monitor, follow these steps. 1. Choose A:(D:\Driver) then click the "Open" button and then click "OK" button. Microsoft® Windows...
... is completed. Choose "OK" button on Samsung Monitor homepage. How to install If you can see "Digital Signature Not Found" on the "File Needed" window. 3. Click the "Close" button then click "OK" button ... "Browse" button on your system.The certified driver will be posted on the "Insert disk" window. 2. 8. http://www.samsung.com/ 9. Monitor driver installation is under certified MS logo,and this installation doesn't damage your monitor, follow these steps. 1. Choose A:(D:\Driver) then click the "Open" button and then click "OK" button. Microsoft® Windows...

Quick Guide (easy Manual) (ver.1.0) (English)
Page 18
... the X86Config file. 2. The third screen is properly configured. Case1: If the "Properties" button is inactive, it means your monitor is for selecting a keyboard. 5. This information will not affect the actual execution of all the driver in a specific location.." ...Next" and then click "Have disk". 7. Click Start, Settings, Control Panel, and then double-click Display icon. 2. Set a vertical frequency for your monitor. Execute X-Window after clicking Test. Click "Start" , "Setting" , "Control Panel". 2. Choose the "Settings" tab and then click "Advanced..". ...
... the X86Config file. 2. The third screen is properly configured. Case1: If the "Properties" button is inactive, it means your monitor is for selecting a keyboard. 5. This information will not affect the actual execution of all the driver in a specific location.." ...Next" and then click "Have disk". 7. Click Start, Settings, Control Panel, and then double-click Display icon. 2. Set a vertical frequency for your monitor. Execute X-Window after clicking Test. Click "Start" , "Setting" , "Control Panel". 2. Choose the "Settings" tab and then click "Advanced..". ...

Quick Guide (easy Manual) (ver.1.0) (English)
Page 19
... shown on the "Start" menu and then double-click "Add/Delete a program". To install the program manually, insert the CD included with the Samsung monitor into the CD-ROM Drive. Select Natural Color from the list and then click the "Add/Delete" button. This system is available only for this... developed by a scanner or a digital camera are not the same as the printed or scanned images. How to Help (F1) in association with the Samsung monitor into the CDROM Drive, click the [Start] button of the program Natural Color will be executed. It is not D:\, enter the applicable drive.) How ...
... shown on the "Start" menu and then double-click "Add/Delete a program". To install the program manually, insert the CD included with the Samsung monitor into the CD-ROM Drive. Select Natural Color from the list and then click the "Add/Delete" button. This system is available only for this... developed by a scanner or a digital camera are not the same as the printed or scanned images. How to Help (F1) in association with the Samsung monitor into the CDROM Drive, click the [Start] button of the program Natural Color will be executed. It is not D:\, enter the applicable drive.) How ...

Quick Guide (easy Manual) (ver.1.0) (English)
Page 21
Auto adjustment allows the monitor to self-adjust to adjust picture with more accuracy. - If you change resolution in analog mode only) To make the automatic adjustment function sharper, execute ...
Auto adjustment allows the monitor to self-adjust to adjust picture with more accuracy. - If you change resolution in analog mode only) To make the automatic adjustment function sharper, execute ...
Quick Guide (easy Manual) (ver.1.0) (English)
Page 26
... in analog mode only) Changes the clearance of image. (Not available in MagicColor mode of Full and Intelligent.) Changes the horizontal position of the monitor's entire display. (Available in analog mode only) Changes the vertical position of the monitor's entire display. (Available in analog mode only) Removes noise such as vertical stripes.
... in analog mode only) Changes the clearance of image. (Not available in MagicColor mode of Full and Intelligent.) Changes the horizontal position of the monitor's entire display. (Available in analog mode only) Changes the vertical position of the monitor's entire display. (Available in analog mode only) Removes noise such as vertical stripes.

Quick Guide (easy Manual) (ver.1.0) (English)
Page 27
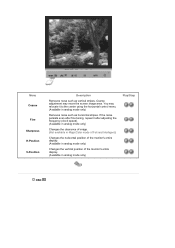
You can change the horizontal position where the OSD menu appears on your monitor. You can change the vertical position where the OSD menu appears on the computer. Play/Stop Change the transparency of the background of the OSD. ... Display Time Description You can set the amount of time the menu will be automatically turned if no effect on any software running on your monitor. The menu will wait before it is turned off. You can choose one of eight languages. (English, German, Spanish, French, Italian, Swedish, Russian, Portuguese) Note...
You can change the horizontal position where the OSD menu appears on your monitor. You can change the vertical position where the OSD menu appears on the computer. Play/Stop Change the transparency of the background of the OSD. ... Display Time Description You can set the amount of time the menu will be automatically turned if no effect on any software running on your monitor. The menu will wait before it is turned off. You can choose one of eight languages. (English, German, Spanish, French, Italian, Swedish, Russian, Portuguese) Note...
Quick Guide (easy Manual) (ver.1.0) (English)
Page 28
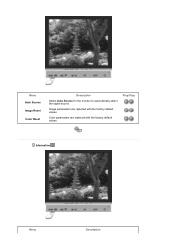
Play/Stop Information Menu Description Menu Auto Source Image Reset Color Reset Description Select Auto Source for the monitor to automatically select the signal source. Color parameters are replaced with the factory default values. Image parameters are replaced with the factory default values.
Play/Stop Information Menu Description Menu Auto Source Image Reset Color Reset Description Select Auto Source for the monitor to automatically select the signal source. Color parameters are replaced with the factory default values. Image parameters are replaced with the factory default values.


