
User Manual Ver.1.0 (English)
Page 4
BASIC Replacing the toner cartridge 197 Replacing the imaging unit 200 Tips for avoiding paper jams 204 Clearing original document jams 205 Clearing paper jams 217 Understanding display messages 239 Power and cable connecting problems ...
BASIC Replacing the toner cartridge 197 Replacing the imaging unit 200 Tips for avoiding paper jams 204 Clearing original document jams 205 Clearing paper jams 217 Understanding display messages 239 Power and cable connecting problems ...
User Manual Ver.1.0 (English)
Page 19
... toner gets on your body or clothes. Do not burn any covers or guards that contain toner dust (toner cartridge, waste toner bottle, imaging unit, etc.) follow the instructions below. • When disposing of recycled supplies, a service fee will be charged. The warranty does not cover damages ...only be careful not to wash it after emptying the bottle. When changing the toner cartridge or removing jammed paper, be repaired by a Samsung service technician. 8 Supply usage Caution Do not disassemble the toner cartridge. Toner dust can be dangerous if inhaled or ingested. 1. Toner ...
... toner gets on your body or clothes. Do not burn any covers or guards that contain toner dust (toner cartridge, waste toner bottle, imaging unit, etc.) follow the instructions below. • When disposing of recycled supplies, a service fee will be charged. The warranty does not cover damages ...only be careful not to wash it after emptying the bottle. When changing the toner cartridge or removing jammed paper, be repaired by a Samsung service technician. 8 Supply usage Caution Do not disassemble the toner cartridge. Toner dust can be dangerous if inhaled or ingested. 1. Toner ...
User Manual Ver.1.0 (English)
Page 20
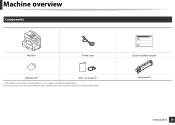
The software CD contains the print drivers, user's guide, and software applications. accessoriesb a. Quick installation guide Imaging unit 1. Introduction 20 Machine overview 9 Components Machine Power cord Software CDa Misc. b. Miscellaneous accessories included with your machine may vary by country of purchase and specific model.
The software CD contains the print drivers, user's guide, and software applications. accessoriesb a. Quick installation guide Imaging unit 1. Introduction 20 Machine overview 9 Components Machine Power cord Software CDa Misc. b. Miscellaneous accessories included with your machine may vary by country of purchase and specific model.
User Manual Ver.1.0 (English)
Page 22
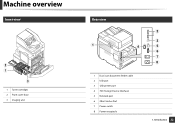
Machine overview 11 Inner view 2 1 3 1 Toner cartridges 2 Front cover door 3 Imaging unit 12 Rear view 1 2 3 FDI 4 5 6 7 8 1 Dual scan document feeder cable 2 USB port 3 USB printer port 4 FDI (Foreign Device Interface) 5 Network port 6 2Bin Finisher Port 7 Power switch 8 Power receptacle 1. Introduction 22
Machine overview 11 Inner view 2 1 3 1 Toner cartridges 2 Front cover door 3 Imaging unit 12 Rear view 1 2 3 FDI 4 5 6 7 8 1 Dual scan document feeder cable 2 USB port 3 USB printer port 4 FDI (Foreign Device Interface) 5 Network port 6 2Bin Finisher Port 7 Power switch 8 Power receptacle 1. Introduction 22
User Manual Ver.1.0 (English)
Page 28
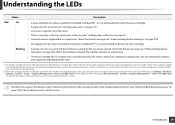
... or continue printing from the SyncThru™Web Service (Settings > Machine Settings > System > Setup > Supplies Management>Toner Cartridge Stop) or Samsung Easy Printer Manager (Device Settings > System > Supplies Management > Toner Cartridge Stop). Blinking • A minor error has occurred and the machine...the display screen. When the problem is cleared, the machine resumes its original task. • The toner cartridge lifea or imaging unit is designed pursuant to print may be cleared. You can choose to replace the toner cartridge. Estimated cartridge life means the ...
... or continue printing from the SyncThru™Web Service (Settings > Machine Settings > System > Setup > Supplies Management>Toner Cartridge Stop) or Samsung Easy Printer Manager (Device Settings > System > Supplies Management > Toner Cartridge Stop). Blinking • A minor error has occurred and the machine...the display screen. When the problem is cleared, the machine resumes its original task. • The toner cartridge lifea or imaging unit is designed pursuant to print may be cleared. You can choose to replace the toner cartridge. Estimated cartridge life means the ...
User Manual Ver.1.0 (English)
Page 169
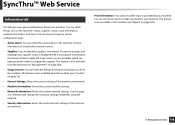
For toner cartridges and imaging units, supplies' status is also available from the machine (see "Counter" on page 36). • Current Settings: Shows the current settings of the machine and network. &#...
For toner cartridges and imaging units, supplies' status is also available from the machine (see "Counter" on page 36). • Current Settings: Shows the current settings of the machine and network. &#...

User Manual Ver.1.0 (English)
Page 193
...; Solving other problems 249 If you encounter an error. This chapter includes: • Redistributing toner 194 • Replacing the toner cartridge 197 • Replacing the imaging unit 200 • Tips for what to do if you cannot solve problems using this chapter, contact your administrator or service center. You can see the...
...; Solving other problems 249 If you encounter an error. This chapter includes: • Redistributing toner 194 • Replacing the toner cartridge 197 • Replacing the imaging unit 200 • Tips for what to do if you cannot solve problems using this chapter, contact your administrator or service center. You can see the...
User Manual Ver.1.0 (English)
Page 200
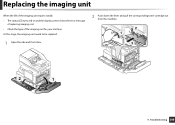
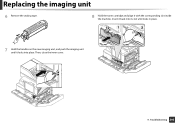
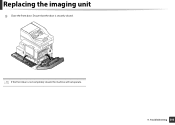
At this stage, the imaging unit needs to be replaced. 1 Open the side and front door. 2 Push down the lever and pull the corresponding toner cartridge out from the machine. 2 1 3 2 1 9. Troubleshooting 200 Replacing the imaging unit When the life of the imaging unit expires totally • The status LED turns red on and the display screen shows the error message of replacing imaging unit. • Check the type of the imaging unit for your machine.
At this stage, the imaging unit needs to be replaced. 1 Open the side and front door. 2 Push down the lever and pull the corresponding toner cartridge out from the machine. 2 1 3 2 1 9. Troubleshooting 200 Replacing the imaging unit When the life of the imaging unit expires totally • The status LED turns red on and the display screen shows the error message of replacing imaging unit. • Check the type of the imaging unit for your machine.
User Manual Ver.1.0 (English)
Page 201
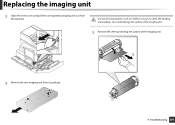
Replacing the imaging unit 3 Open the inner cover and pull the corresponding imaging unit out from its package. 9. Do not use sharp objects, such as a knife or scissors, to open the imaging unit package. Troubleshooting 201 You could damage the surface of the imaging unit. 5 Remove the sheet protecting the surface of the imaging unit. 1 2 4 Remove the new imaging unit from the machine.
Replacing the imaging unit 3 Open the inner cover and pull the corresponding imaging unit out from its package. 9. Do not use sharp objects, such as a knife or scissors, to open the imaging unit package. Troubleshooting 201 You could damage the surface of the imaging unit. 5 Remove the sheet protecting the surface of the imaging unit. 1 2 4 Remove the new imaging unit from the machine.
User Manual Ver.1.0 (English)
Page 202
Then, close the inner cover. 9. Troubleshooting 202 Replacing the imaging unit 6 Remove the sealing tape. 8 Hold the toner cartridge and align it locks into place. Insert it back into its slot until locks in place. 1 2 7 Hold the handles on the new imaging unit, and push the imaging unit until it with the corresponding slot inside the machine.
Then, close the inner cover. 9. Troubleshooting 202 Replacing the imaging unit 6 Remove the sealing tape. 8 Hold the toner cartridge and align it locks into place. Insert it back into its slot until locks in place. 1 2 7 Hold the handles on the new imaging unit, and push the imaging unit until it with the corresponding slot inside the machine.
User Manual Ver.1.0 (English)
Page 203
Ensure that the door is securely closed. 1 2 If the front door is not completely closed, the machine will not operate. 9. Troubleshooting 203 Replacing the imaging unit 9 Close the front door.
Ensure that the door is securely closed. 1 2 If the front door is not completely closed, the machine will not operate. 9. Troubleshooting 203 Replacing the imaging unit 9 Close the front door.
User Manual Ver.1.0 (English)
Page 239
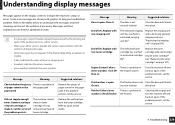
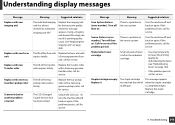
...sealing tape from the toner cartridge. If the problem persists, call for service, provide the service representative with a Samsung-genuine imaging unit (see "Replacing the imaging unit" on the display screen to understand the messages and their explanations are shown with a Samsungg enuine toner cartridgeb .... Replace the toner cartridge with graphics to Quick Install Guide. Troubleshooting 239 End of life, Replace with new imaging unit The indicated imaging unit has reached its estimated cartridge lifea. Turn the machine off and back on There is a problem in the ...
...sealing tape from the toner cartridge. If the problem persists, call for service, provide the service representative with a Samsung-genuine imaging unit (see "Replacing the imaging unit" on the display screen to understand the messages and their explanations are shown with a Samsungg enuine toner cartridgeb .... Replace the toner cartridge with graphics to Quick Install Guide. Troubleshooting 239 End of life, Replace with new imaging unit The indicated imaging unit has reached its estimated cartridge lifea. Turn the machine off and back on There is a problem in the ...
User Manual Ver.1.0 (English)
Page 240
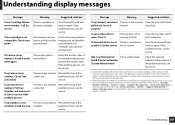
... back on There is open . HCF [number] cassette is The HCF is a problem in the finisher. Install imaging unit again The imaging unit is a problem in the imaging unit. Turn the machine off then on again. Turn the machine off and back on . If the problem persists, call... There is not installed. Close the HCF door until it Close it locks pulled out. problem persists, call for service. Imaging unit Failure: [error number]. Imaging unit Failure: [error number]. Turn the machine off then on again. If the problem persists, call for service. locks into ...
... back on There is open . HCF [number] cassette is The HCF is a problem in the finisher. Install imaging unit again The imaging unit is a problem in the imaging unit. Turn the machine off then on again. Turn the machine off and back on . If the problem persists, call... There is not installed. Close the HCF door until it Close it locks pulled out. problem persists, call for service. Imaging unit Failure: [error number]. Imaging unit Failure: [error number]. Turn the machine off then on again. If the problem persists, call for service. locks into ...

User Manual Ver.1.0 (English)
Page 241
...LSU Failure: [error number]. Mailbox door is not for service. Troubleshooting 241 Check users guide The imaging unit you are loading. Install the unit The imaging unit is not installed or the imaging unit is a problem in the HCF Open and close the tray. Check tray [number] connection There.... into place. Input System Failure There is a problem in [error number]. Turn off and back on again. Install a Samsung-genuine imaging unit, designed for service if the problem persists There is a problem in the printer properties does not match the paper you have ...
...LSU Failure: [error number]. Mailbox door is not for service. Troubleshooting 241 Check users guide The imaging unit you are loading. Install the unit The imaging unit is not installed or the imaging unit is a problem in the HCF Open and close the tray. Check tray [number] connection There.... into place. Input System Failure There is a problem in [error number]. Turn off and back on again. Install a Samsung-genuine imaging unit, designed for service if the problem persists There is a problem in the printer properties does not match the paper you have ...

User Manual Ver.1.0 (English)
Page 244
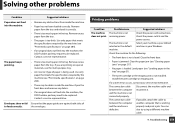
...the jam (see "Redistributing toner" on page 200). There is a problem in Call for a replacement (see "Replacing the imaging unit" on page 194). Prepare a new imaging unit for service & change the ppm data. You may temporarily increase the printing quality by redistributing the toner (see "Paper jam in... 3" on page 217) or close . Troubleshooting 244 PPM data is open Paper has jammed in tray 4 Clear the jam. Prepare new imaging unit The estimated lifea of the tray. If the machine stops printing, replace the toner cartridge (see "Paper jam in tray 1" on page ...
...the jam (see "Redistributing toner" on page 200). There is a problem in Call for a replacement (see "Replacing the imaging unit" on page 194). Prepare a new imaging unit for service & change the ppm data. You may temporarily increase the printing quality by redistributing the toner (see "Paper jam in... 3" on page 217) or close . Troubleshooting 244 PPM data is open Paper has jammed in tray 4 Clear the jam. Prepare new imaging unit The estimated lifea of the tray. If the machine stops printing, replace the toner cartridge (see "Paper jam in tray 1" on page ...
User Manual Ver.1.0 (English)
Page 245
... for service. Sensor Failure: [error number]. Staple cartridge is completely empty. Replace the transfer roller with expires totally. a Samsung-genuine fuser unit, call for service. Turn the machine off and back on again. quality by redistributing the toner (see "Replacing the imaging unit" on again. The life of the tray pickup roller expires totally.
... for service. Sensor Failure: [error number]. Staple cartridge is completely empty. Replace the transfer roller with expires totally. a Samsung-genuine fuser unit, call for service. Turn the machine off and back on again. quality by redistributing the toner (see "Replacing the imaging unit" on again. The life of the tray pickup roller expires totally.
User Manual Ver.1.0 (English)
Page 247
... Understanding display messages Message Meaning Suggested solutions Toner Cartridge Failure: [error number]. Toner cartridge is open. Check users guide The imaging unit you can choose to print may be affected by the percentage of pages may damage the device's system. 9. problem persists,... > System > Supplies Management > Toner Cartridge Stop). properly Tray [number] door is not compatible. a. Install a Samsung-genuine imaging unit, designed for service. 802.1x authentication Fail to reinstall the transfer roller. Install the transfer roller. Tray Failure [error...
... Understanding display messages Message Meaning Suggested solutions Toner Cartridge Failure: [error number]. Toner cartridge is open. Check users guide The imaging unit you can choose to print may be affected by the percentage of pages may damage the device's system. 9. problem persists,... > System > Supplies Management > Toner Cartridge Stop). properly Tray [number] door is not compatible. a. Install a Samsung-genuine imaging unit, designed for service. 802.1x authentication Fail to reinstall the transfer roller. Install the transfer roller. Tray Failure [error...
User Manual Ver.1.0 (English)
Page 250
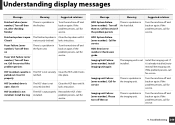
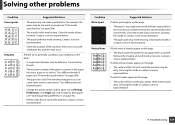
... • There is being used. Use only paper that the paper guides are printing on page 51). • The toner cartridge or the imaging unit is too much paper in the tray. Close the front door. • Paper is not Check the power cord connections. Install the toner cartridge... or imaging unit. The paper keeps jamming. • There is not installed. Open the front door and remove any obstructions from the tray and reload it ...
... • There is being used. Use only paper that the paper guides are printing on page 51). • The toner cartridge or the imaging unit is too much paper in the tray. Close the front door. • Paper is not Check the power cord connections. Install the toner cartridge... or imaging unit. The paper keeps jamming. • There is not installed. Open the front door and remove any obstructions from the tray and reload it ...
User Manual Ver.1.0 (English)
Page 254
... the paper has moist spots on the page: • The drum inside or contact a service representative. • The paper path may be dirty. Remove the imaging unit and install a new one. If white vertical streaks appear on page 284). • The transfer roller may be dirty. Contact a service representative. Clean the inside...
... the paper has moist spots on the page: • The drum inside or contact a service representative. • The paper path may be dirty. Remove the imaging unit and install a new one. If white vertical streaks appear on page 284). • The transfer roller may be dirty. Contact a service representative. Clean the inside...
User Manual Ver.1.0 (English)
Page 255
... the printed side of a printed page, adjust the print resolution through several times to avoid printing over areas that have the same problems, remove the imaging unit and install a new one . If the defects occur on the back of the page, the problem will likely correct itself after a few more pages.... • The fusing assembly may have toner on page 284). • Remove the imaging unit and install a new one . Do not open packages of paper until necessary so that the paper does not absorb too much moisture. • If ...
... the printed side of a printed page, adjust the print resolution through several times to avoid printing over areas that have the same problems, remove the imaging unit and install a new one . If the defects occur on the back of the page, the problem will likely correct itself after a few more pages.... • The fusing assembly may have toner on page 284). • Remove the imaging unit and install a new one . Do not open packages of paper until necessary so that the paper does not absorb too much moisture. • If ...


