

User Manual
Page 1
SHR-7080/7082/7160/7162 SHR-8080/8082/8160/8162 8 Channel/16 Channel DVR User's Manual imagine the possibilities Thanks you for purchasing this Samsung product. To receive a more complete service, please register your product at www.samsungsecurity.com
SHR-7080/7082/7160/7162 SHR-8080/8082/8160/8162 8 Channel/16 Channel DVR User's Manual imagine the possibilities Thanks you for purchasing this Samsung product. To receive a more complete service, please register your product at www.samsungsecurity.com
User Manual
Page 2
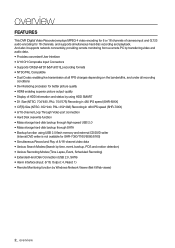
overview FEATURES This DVR (Digital Video Recorder) employs MPEG-4 video encoding for 8 or 16 channels of camera input and G.723 audio encoding for SHR-7080/7160/8080/8160) • Simultaneous Record and Play of HDD information and status by Windows Network Viewer (Net-I/Web viewer) 2_ overview And also it ...• D1 Size (NTSC: 704*480, PAL: 704*576) Recording in 480 IPS speed (SHR-8XXX) • CIF(S) Size (NTSC: 352*240, PAL: 352*288) Recording in 480 IPS speed (SHR-7XXX) • 8/16-channel Loop Through Video port connection • Hard Disk overwrite function • Mass storage ...
overview FEATURES This DVR (Digital Video Recorder) employs MPEG-4 video encoding for 8 or 16 channels of camera input and G.723 audio encoding for SHR-7080/7160/8080/8160) • Simultaneous Record and Play of HDD information and status by Windows Network Viewer (Net-I/Web viewer) 2_ overview And also it ...• D1 Size (NTSC: 704*480, PAL: 704*576) Recording in 480 IPS speed (SHR-8XXX) • CIF(S) Size (NTSC: 352*240, PAL: 352*288) Recording in 480 IPS speed (SHR-7XXX) • 8/16-channel Loop Through Video port connection • Hard Disk overwrite function • Mass storage ...

User Manual
Page 4
... 0.2mA • Operating temperature: -20°C ~ +85°C (-4°F ~ +185°F) CALIFORNIA USA ONLY This Perchlorate warning applies only to this DVR, check the compatibility. Warning ❖ Battery Exchanging a wrong battery in the pop-up menu, you are not liable for any or all losses to the... in order to other equipment, menu setup, and the like. For information on the front of your DVR. overview BEFORE START This user's manual provides Information for using DVR such as brief introduction, part names, functions, connection to prevent damage caused by your use the same...
... 0.2mA • Operating temperature: -20°C ~ +85°C (-4°F ~ +185°F) CALIFORNIA USA ONLY This Perchlorate warning applies only to this DVR, check the compatibility. Warning ❖ Battery Exchanging a wrong battery in the pop-up menu, you are not liable for any or all losses to the... in order to other equipment, menu setup, and the like. For information on the front of your DVR. overview BEFORE START This user's manual provides Information for using DVR such as brief introduction, part names, functions, connection to prevent damage caused by your use the same...
User Manual
Page 6
...) 12 Remote Control INSTALLATION 14 14 Checking the installation environment 15 Rack Installation 15 HDD Addition CONNECTING WITH OTHER DEVICE 19 19 Connecting the Video, Audio, and Monitor 19 Connecting the Network 20 Connecting the USB 20 Connecting External SATA HDD 21 Connecting POS Device 21 Connecting the Alarm... 29 Live Mode 31 SPOT OUT 32 Zoom 32 AUDIO ON/OFF 32 Freeze 33 Event Monitoring USING THE DVR 34 34 System Setup 41 Setting the Device 48 Setting the Recording 51 Setting the Event 54 Backup 55 Network Configuration 62 Controlling a PTZ device 6_ overview SEARCH & PLAY ...
...) 12 Remote Control INSTALLATION 14 14 Checking the installation environment 15 Rack Installation 15 HDD Addition CONNECTING WITH OTHER DEVICE 19 19 Connecting the Video, Audio, and Monitor 19 Connecting the Network 20 Connecting the USB 20 Connecting External SATA HDD 21 Connecting POS Device 21 Connecting the Alarm... 29 Live Mode 31 SPOT OUT 32 Zoom 32 AUDIO ON/OFF 32 Freeze 33 Event Monitoring USING THE DVR 34 34 System Setup 41 Setting the Device 48 Setting the Recording 51 Setting the Event 54 Backup 55 Network Configuration 62 Controlling a PTZ device 6_ overview SEARCH & PLAY ...
User Manual
Page 9
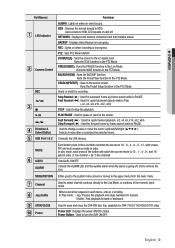
HDD : Displays the normal access to the x2 digital zoom. REC : Lights on when recording is in Play. (-x2,-x4,-x8,-x16,-x32,-x64) STOP : Used to ...channel + (N-1) live channel) Sets Audio ON/OFF. Runs the WIDE function in PAUSE. Starts or ends the recording. PLAY/PAUSE : Used to turn the DVR ON/OFF. Fast Forward () : Used for quick forward playback. (x2, x4, x8, x16, x32,... Mode. Runs the Preset Setup function in the PTZ Mode. Step Rewind ( ) : Used for SHR-7082/7162/8082/8162 only) Power LED : Displays the power ON/OFF status. split screen, PIP, and auto sequence mode...
HDD : Displays the normal access to the x2 digital zoom. REC : Lights on when recording is in Play. (-x2,-x4,-x8,-x16,-x32,-x64) STOP : Used to ...channel + (N-1) live channel) Sets Audio ON/OFF. Runs the WIDE function in PAUSE. Starts or ends the recording. PLAY/PAUSE : Used to turn the DVR ON/OFF. Fast Forward () : Used for quick forward playback. (x2, x4, x8, x16, x32,... Mode. Runs the Preset Setup function in the PTZ Mode. Step Rewind ( ) : Used for SHR-7082/7162/8082/8162 only) Power LED : Displays the power ON/OFF status. split screen, PIP, and auto sequence mode...
User Manual
Page 12
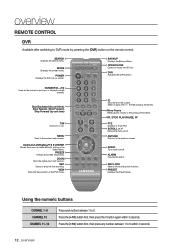
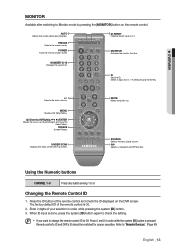
... Up/Down/Left/Right ENTER Moves the cursor up screenĕ BACKUP Displays the Backup Menu. Select 2 digits from 0 ~ 9 while pressing the ID Key. REC LOCK Selects the recording lock function. Move Frame While paused, moves to the previous screen. Moves the menu scroll. RETURN Returns ... Using the numeric buttons CHANNEL 1-9 CHANNEL 10 CHANNEL 11-16 Press each button between 1 to 6 within 3 seconds. overview REMOTE CONTROL DVR Available after switching to DVR mode by unit time) T/W Zooms in the PTZ modeĕ ID Sets the ID of the system. Press the [+10] button ...
... Up/Down/Left/Right ENTER Moves the cursor up screenĕ BACKUP Displays the Backup Menu. Select 2 digits from 0 ~ 9 while pressing the ID Key. REC LOCK Selects the recording lock function. Move Frame While paused, moves to the previous screen. Moves the menu scroll. RETURN Returns ... Using the numeric buttons CHANNEL 1-9 CHANNEL 10 CHANNEL 11-16 Press each button between 1 to 6 within 3 seconds. overview REMOTE CONTROL DVR Available after switching to DVR mode by unit time) T/W Zooms in the PTZ modeĕ ID Sets the ID of the system. Press the [+10] button ...
User Manual
Page 13
...system [ID] button is pressed. Refer to 9. FREEZE Screen Freezeĕ UNDER SCAN Displays the video screen within a screenĕ MUTE Mutes the audio out. When ID input is 00. 2.... NUMBER [0~9] Changes the system ID. Changing the Remote Control ID 1. Remote control's ID and DVR's ID should be matched for proper operation. PIP Selects or deselects the PIP function. ID Sets ... switching to 08: Press 0 and 8 in order, while pressing the system [ID] button. 3. Select 2 digits from 0 ~ 9 while pressing the ID Key. +/Adjusts the audio volumeĕ MENU Displays the Setup Menu&#...
...system [ID] button is pressed. Refer to 9. FREEZE Screen Freezeĕ UNDER SCAN Displays the video screen within a screenĕ MUTE Mutes the audio out. When ID input is 00. 2.... NUMBER [0~9] Changes the system ID. Changing the Remote Control ID 1. Remote control's ID and DVR's ID should be matched for proper operation. PIP Selects or deselects the PIP function. ID Sets ... switching to 08: Press 0 and 8 in order, while pressing the system [ID] button. 3. Select 2 digits from 0 ~ 9 while pressing the ID Key. +/Adjusts the audio volumeĕ MENU Displays the Setup Menu&#...
User Manual
Page 14
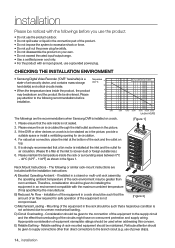
...the product may be greater than direct connections to the branch circuit (e.g. D) Circuit Overloading - CHECKING THE INSTALLATION ENVIRONMENT • Samsung Digital Video Recorder ("DVR" hereinafter) is a state-of the equipment in a closed or multi-unit rack assembly, the operating ambient temperature of the product... convection, place the inlet at the inlet to the following or similar rack-mount instructions are the recommendations when Samsung DVR is circulated through the inlet/outlet as shown in a rack should be used when addressing this concern. Particular ...
...the product may be greater than direct connections to the branch circuit (e.g. D) Circuit Overloading - CHECKING THE INSTALLATION ENVIRONMENT • Samsung Digital Video Recorder ("DVR" hereinafter) is a state-of the equipment in a closed or multi-unit rack assembly, the operating ambient temperature of the product... convection, place the inlet at the inlet to the following or similar rack-mount instructions are the recommendations when Samsung DVR is circulated through the inlet/outlet as shown in a rack should be used when addressing this concern. Particular ...

User Manual
Page 15
Before adding a HDD, please check the compatibility with this DVR product. Data may be damaged if the DVR is suddenly stopped by vibrations. HDD may damage the product. Number of HDDs supported : SHR-7082/7162/8082/8162: Default 1 HDD + Up to 4 HDDs added SHR-7080/7160/8080/8160: Default 1 HDD + Up to 5... contact your provider for any damage to the HDD incurred by user's carelessness or externalities. Cases might cause damage to HDD or recorded data To minimize the risk of data loss from a damaged HDD, please backup data as often as not to lose the disassembly screws or...
Before adding a HDD, please check the compatibility with this DVR product. Data may be damaged if the DVR is suddenly stopped by vibrations. HDD may damage the product. Number of HDDs supported : SHR-7082/7162/8082/8162: Default 1 HDD + Up to 4 HDDs added SHR-7080/7160/8080/8160: Default 1 HDD + Up to 5... contact your provider for any damage to the HDD incurred by user's carelessness or externalities. Cases might cause damage to HDD or recorded data To minimize the risk of data loss from a damaged HDD, please backup data as often as not to lose the disassembly screws or...

User Manual
Page 17
... 43) Note that the order of additional HDDs is done, insert the lower and upper brackets into the DVR and fix them with the operation. Upper Bracket Lower Bracket English _17 When the installation of each connector. 2) ...adding HDDs to connectors ~ on the main board. You can check the HDD map directly on the DVR. Upper Bracket Lower Bracket 6. Just make arrangements of the connectors considering the length of additional HDDs is nothing ...power cable and connect the HDD signal cables (SATA Cable) to SHR-7082, 7162, 8082 & 8162 2. INSTALLATION 5.
... 43) Note that the order of additional HDDs is done, insert the lower and upper brackets into the DVR and fix them with the operation. Upper Bracket Lower Bracket English _17 When the installation of each connector. 2) ...adding HDDs to connectors ~ on the main board. You can check the HDD map directly on the DVR. Upper Bracket Lower Bracket 6. Just make arrangements of the connectors considering the length of additional HDDs is nothing ...power cable and connect the HDD signal cables (SATA Cable) to SHR-7082, 7162, 8082 & 8162 2. INSTALLATION 5.

User Manual
Page 18
... Add Lower Bracket Installed by default 5. Check if the connectors are properly connected and there is done, insert the lower and upper brackets into the DVR and fix them with the provided screws. Install HDDs (x3) on the upper bracket and fix them with screws. When the installation of additional HDDs...
... Add Lower Bracket Installed by default 5. Check if the connectors are properly connected and there is done, insert the lower and upper brackets into the DVR and fix them with the provided screws. Install HDDs (x3) on the upper bracket and fix them with screws. When the installation of additional HDDs...

User Manual
Page 20
... Hub/Switcher Phone(ADSL) Line RJ45 Ethernet Cable (Direct Cable) ADSL MODEM Windows NET-i CONNECTING THE USB 1. There are two external SATA ports on the DVR. This product supports hot-plugging, which connects/removes the USB device during the system operation. connecting with other device Connecting to allow connection and disconnection...
... Hub/Switcher Phone(ADSL) Line RJ45 Ethernet Cable (Direct Cable) ADSL MODEM Windows NET-i CONNECTING THE USB 1. There are two external SATA ports on the DVR. This product supports hot-plugging, which connects/removes the USB device during the system operation. connecting with other device Connecting to allow connection and disconnection...

User Manual
Page 22
... is compatible with the Tx(+) product first. Pay attention not to the respective PTZ Tx(-) Camera's documentation. Ex : DVR(TX+/-) SCC-C6433,35(RX+/-) Tx(+) Rx(+) DVR(TX+/-) SCC-C6403,07(TX+/-) 22_ connecting with other device Rx(-) Rx(-) For further information, refer to change the polarity (+/-) of the...
... is compatible with the Tx(+) product first. Pay attention not to the respective PTZ Tx(-) Camera's documentation. Ex : DVR(TX+/-) SCC-C6433,35(RX+/-) Tx(+) Rx(+) DVR(TX+/-) SCC-C6403,07(TX+/-) 22_ connecting with other device Rx(-) Rx(-) For further information, refer to change the polarity (+/-) of the...

User Manual
Page 23
... will shut down the system if you sure to shutdown? Connect the power cable of icons appeared. You will last about 1 minute in to the DVR. Press the Power button on the remote control or the front panel to move to and press the [ENTER] button or click . Shutdown 3. live screen... if you have the permission to shut down . The initialization process will see the initialization screen. You should have logged in the order of the DVR to the wall outlet. 2. Are you are not an admin. 1. Press the [POWER] button on the remote control or the front panel, or right-click...
... will shut down the system if you sure to shutdown? Connect the power cable of icons appeared. You will last about 1 minute in to the DVR. Press the Power button on the remote control or the front panel to move to and press the [ENTER] button or click . Shutdown 3. live screen... if you have the permission to shut down . The initialization process will see the initialization screen. You should have logged in the order of the DVR to the wall outlet. 2. Are you are not an admin. 1. Press the [POWER] button on the remote control or the front panel, or right-click...

User Manual
Page 24
... dialog to "Permission Management > Setting Permissions". (Page 38) Login ID Password admin OK Cancel 24_ live In live mode, right-click any area of the DVR when the corresponding menu requires logging in. You can also see the context sensitive menu as in to the... DVR. 1. live Login To access a DVR or restricted menu, you press a menu button on the remote control or the front panel of the screen. Click . Scene Mode Audio Off Freeze Stop Alarm Record Play Search Backup Main Menu Shutdown Launcher hide Login 2.
... dialog to "Permission Management > Setting Permissions". (Page 38) Login ID Password admin OK Cancel 24_ live In live mode, right-click any area of the DVR when the corresponding menu requires logging in. You can also see the context sensitive menu as in to the... DVR. 1. live Login To access a DVR or restricted menu, you press a menu button on the remote control or the front panel of the screen. Click . Scene Mode Audio Off Freeze Stop Alarm Record Play Search Backup Main Menu Shutdown Launcher hide Login 2.
User Manual
Page 25
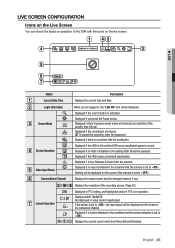
... _25 LIVE SCREEN CONFIGURATION Icons on the Live Screen You can check the status or operation of the DVR with the cooling fan. Displayed if the HDD is set to record. Displays the current record mode from the network. Displayed if a new firmware is a problem with the icons on ... Date, Time Login Information Screen Mode System Operation Video Input Status Camera Name/ Channel Camera Operation Description Displays the current time and date. Displays the camera name and the changed channel, if any. If the sensor is full and the DVR has an insufficient space to , the...
... _25 LIVE SCREEN CONFIGURATION Icons on the Live Screen You can check the status or operation of the DVR with the cooling fan. Displayed if the HDD is set to record. Displays the current record mode from the network. Displayed if a new firmware is a problem with the icons on ... Date, Time Login Information Screen Mode System Operation Video Input Status Camera Name/ Channel Camera Operation Description Displays the current time and date. Displays the camera name and the changed channel, if any. If the sensor is full and the DVR has an insufficient space to , the...
User Manual
Page 27
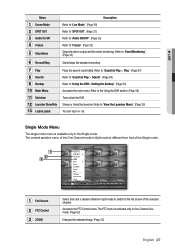
... or hides the launcher. Refer to the Using the DVR section. (Page 34) Turns down the DVR. Single Mode Menu The single mode menu is different from that of the selected channel. Refer to "Event Monitoring". (Page 33) Record/Stop Starts/stops the standard recording. Refer to the full screen of the Single mode...
... or hides the launcher. Refer to the Using the DVR section. (Page 34) Turns down the DVR. Single Mode Menu The single mode menu is different from that of the selected channel. Refer to "Event Monitoring". (Page 33) Record/Stop Starts/stops the standard recording. Refer to the full screen of the Single mode...

User Manual
Page 34
...; Date : Sets the date appears on the front panel. If not logged in, it prompts with login window. Select . using the DVR In this case, setup does not allow time adjustment. System property setup menu is standard World Time and the basis of your changes. DST 08...English • Time Sync. : You can check and setup the current Date/Time and time related properties, as well as the language used for recording, event, backup and network. Date/Time/Language Date/Time/Language Holiday Date 2009 -01-01 YYYY-MM-DD Time Time Zone Time Sync. Setting ...
...; Date : Sets the date appears on the front panel. If not logged in, it prompts with login window. Select . using the DVR In this case, setup does not allow time adjustment. System property setup menu is standard World Time and the basis of your changes. DST 08...English • Time Sync. : You can check and setup the current Date/Time and time related properties, as well as the language used for recording, event, backup and network. Date/Time/Language Date/Time/Language Holiday Date 2009 -01-01 YYYY-MM-DD Time Time Zone Time Sync. Setting ...

User Manual
Page 35
....248.240.103 Time Zone GMT+08:00 Last Sync Time Fail Time Sync. Setup Not Used Activate as Server: Set to to allow the DVR to make every January 12th and 2nd Monday of the time server. - Check both on the left/right side of its time zone by 1 year... DST Dec First (Sun) 0H Dec First (Sun) 0H OK Cancel Language English • Language : Select your preferences. Use the up Daylight Saving Time with recorded data to be searched will see the "Setting Holiday" screen. Ex: Select January 12th and check on the remote control or front panel to...
....248.240.103 Time Zone GMT+08:00 Last Sync Time Fail Time Sync. Setup Not Used Activate as Server: Set to to allow the DVR to make every January 12th and 2nd Monday of the time server. - Check both on the left/right side of its time zone by 1 year... DST Dec First (Sun) 0H Dec First (Sun) 0H OK Cancel Language English • Language : Select your preferences. Use the up Daylight Saving Time with recorded data to be searched will see the "Setting Holiday" screen. Ex: Select January 12th and check on the remote control or front panel to...

User Manual
Page 36
...Number only) Setup 5. Using the mouse may help easy setup. 3. M By default, initial ID and password are set permissions of each user over the DVR's specific function and settings. When the administrator setup is the same to , and press [ENTER] button. 4. Password only allows numbers. You can ...set to a desired character, and press the [ENTER] button. using the DVR Permission Management You can use number buttons on the remote control or front panel. 36_ using the...
...Number only) Setup 5. Using the mouse may help easy setup. 3. M By default, initial ID and password are set permissions of each user over the DVR's specific function and settings. When the administrator setup is the same to , and press [ENTER] button. 4. Password only allows numbers. You can ...set to a desired character, and press the [ENTER] button. using the DVR Permission Management You can use number buttons on the remote control or front panel. 36_ using the...


