
User Manual
Page 1
SGH-T439 Series PORTABLE Quad-BAND MOBILE PHONE User Manual Please read this manual before operating your phone, and keep it for future reference.
SGH-T439 Series PORTABLE Quad-BAND MOBILE PHONE User Manual Please read this manual before operating your phone, and keep it for future reference.
User Manual
Page 2
Moreover, you agree that you have questions about your Samsung Mobile Phone? Lookout Drive 1000 Klein St. Patent No. 4, 901, 307; 5, 056, 109; 5, 099, 204; 5, 101, 501; 5, 103, 459; 5, 107, 225; 5, 109, 390. Openwave® is ...Care Center: 1301 E. RSA® is proprietary to Samsung and protected under one or more of the following patents: U.S. Intellectual Property All Intellectual Property, as defined below, owned by or which is otherwise the property of Samsung or its respective suppliers relating to the SAMSUNG Phone, including but is a registered Trademark of Openwave, Inc...
Moreover, you agree that you have questions about your Samsung Mobile Phone? Lookout Drive 1000 Klein St. Patent No. 4, 901, 307; 5, 056, 109; 5, 099, 204; 5, 101, 501; 5, 103, 459; 5, 107, 225; 5, 109, 390. Openwave® is ...Care Center: 1301 E. RSA® is proprietary to Samsung and protected under one or more of the following patents: U.S. Intellectual Property All Intellectual Property, as defined below, owned by or which is otherwise the property of Samsung or its respective suppliers relating to the SAMSUNG Phone, including but is a registered Trademark of Openwave, Inc...

User Manual
Page 4
Table of Contents Section 1: Getting Started 7 Activating Your Phone 7 Switching the Phone On or Off 12 Setting Up Your Voice Mail 12 Section 2: Understanding Your Phone 14 Features of Your Phone 14 Open View of Your Phone 15 Keys ...16 Closed View of Your Phone 17 Display ...18 Backlight ...19 Help ...20 Section 3: Call Functions 21 Making...
Table of Contents Section 1: Getting Started 7 Activating Your Phone 7 Switching the Phone On or Off 12 Setting Up Your Voice Mail 12 Section 2: Understanding Your Phone 14 Features of Your Phone 14 Open View of Your Phone 15 Keys ...16 Closed View of Your Phone 17 Display ...18 Backlight ...19 Help ...20 Section 3: Call Functions 21 Making...

User Manual
Page 5
... ...105 Tip calculator ...106 World Time ...106 Synchronization ...107 Unit conversion ...109 Timer ...109 Stopwatch ...109 Section 11: Changing Your Settings 110 Time & date ...110 Phone settings ...112 Display settings ...113 Bluetooth ...116 Sound settings ...118 Table of Contents 5
... ...105 Tip calculator ...106 World Time ...106 Synchronization ...107 Unit conversion ...109 Timer ...109 Stopwatch ...109 Section 11: Changing Your Settings 110 Time & date ...110 Phone settings ...112 Display settings ...113 Bluetooth ...116 Sound settings ...118 Table of Contents 5

User Manual
Page 6
... Section 13: Health and Safety Information 141 Health and Safety Information 142 Samsung Mobile Products and Recycling 143 UL Certified Travel Adapter 143 Consumer Information on Wireless Phones 143 Road Safety ...150 Responsible Listening 151 Operating Environment 153 Using Your Phone Near Other Electronic Devices 153 FCC Hearing-Aid Compatibility (HAC) Regulations for...
... Section 13: Health and Safety Information 141 Health and Safety Information 142 Samsung Mobile Products and Recycling 143 UL Certified Travel Adapter 143 Consumer Information on Wireless Phones 143 Road Safety ...150 Responsible Listening 151 Operating Environment 153 Using Your Phone Near Other Electronic Devices 153 FCC Hearing-Aid Compatibility (HAC) Regulations for...

User Manual
Page 7
...Section 1: Getting Started Topics Covered • Activating Your Phone • Switching the Phone On or Off • Setting Up Your Voice Mail Activating Your Phone This section explains how to a cellular network, you subscribe to start using your phone by first configuring your hardware, activating your service, and ... by sliding the battery cover in SIM card loaded with a plug-in the direction of small children. If necessary, switch off the phone by scratching or bending, so be easily damaged by holding down the key until the power-off image displays. 1. Installing the SIM ...
...Section 1: Getting Started Topics Covered • Activating Your Phone • Switching the Phone On or Off • Setting Up Your Voice Mail Activating Your Phone This section explains how to a cellular network, you subscribe to start using your phone by first configuring your hardware, activating your service, and ... by sliding the battery cover in SIM card loaded with a plug-in the direction of small children. If necessary, switch off the phone by scratching or bending, so be easily damaged by holding down the key until the power-off image displays. 1. Installing the SIM ...
User Manual
Page 8
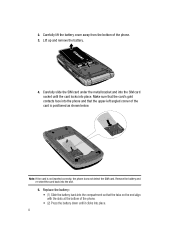
Lift up and remove the battery. 4. Make sure that the card's gold contacts face into the phone and that the tabs on the end align with the slots at the bottom of the phone. 3. Remove the battery and re-orient the card back into place. Note: If the card is positioned as shown... the SIM card socket until it clicks into the compartment so that the upper-left angled corner of the card is not inserted correctly, the phone does not detect the SIM card. Carefully lift the battery cover away from the bottom of the...
Lift up and remove the battery. 4. Make sure that the card's gold contacts face into the phone and that the tabs on the end align with the slots at the bottom of the phone. 3. Remove the battery and re-orient the card back into place. Note: If the card is positioned as shown... the SIM card socket until it clicks into the compartment so that the upper-left angled corner of the card is not inserted correctly, the phone does not detect the SIM card. Carefully lift the battery cover away from the bottom of the...

User Manual
Page 9
... recharges fully in the travel adapter, which is used for the first time. Charging a Battery Your phone is included with your local Samsung dealer for further details. You can use the phone while the battery is properly installed before using your phone for charging the battery, is powered by sliding it back onto the...
... recharges fully in the travel adapter, which is used for the first time. Charging a Battery Your phone is included with your local Samsung dealer for further details. You can use the phone while the battery is properly installed before using your phone for charging the battery, is powered by sliding it back onto the...

User Manual
Page 10
... is finished, unplug the adapter's power plug from the AC wall outlet and then disconnect the travel adapter's connector from the phone. 10 Note: The previous illustration displays the incorrect method for connecting the charger. When charging is installed prior to the accessory ...port occurs therefore voiding the phone's warranty. 3. Plug the adapter's power plug into a standard AC wall outlet. If attempted, damage to connecting the travel adapter is...
... is finished, unplug the adapter's power plug from the AC wall outlet and then disconnect the travel adapter's connector from the phone. 10 Note: The previous illustration displays the incorrect method for connecting the charger. When charging is installed prior to the accessory ...port occurs therefore voiding the phone's warranty. 3. Plug the adapter's power plug into a standard AC wall outlet. If attempted, damage to connecting the travel adapter is...
User Manual
Page 11
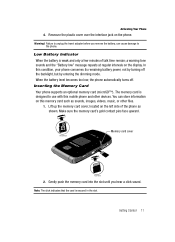
...to unplug the travel adapter before you hear a click sound. Inserting the Memory Card Your phone supports an optional memory card (microSD™). Lift up the memory card cover, located on the phone. Getting Started 11 You can cause damage to use with this memory card such as ...until you remove the battery, can store information on the display. Incorrect Memory card cover Correct 2. Activating Your Phone 4. When the battery level becomes too low, the phone automatically turns off the backlight, but by entering the dimming mode. Low Battery Indicator When the battery is ...
...to unplug the travel adapter before you hear a click sound. Inserting the Memory Card Your phone supports an optional memory card (microSD™). Lift up the memory card cover, located on the phone. Getting Started 11 You can cause damage to use with this memory card such as ...until you remove the battery, can store information on the display. Incorrect Memory card cover Correct 2. Activating Your Phone 4. When the battery level becomes too low, the phone automatically turns off the backlight, but by entering the dimming mode. Low Battery Indicator When the battery is ...
User Manual
Page 12
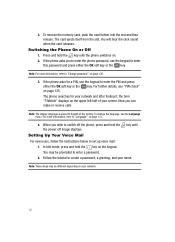
...to create a password, a greeting, and your network. 12 Note: The display language is preset to set up voice mail: 1. Follow the tutorial to enter the phone password, use the Language menu. Note: For more information, refer to "Change password" on page 112. 4. For more information, refer to "Language" on page... the memory card, push the card further into the slot and then release. You will hear the click sound when the card releases. The phone searches for a PIN, use the keypad to enter this password and press either the OK soft key or the key. When you can make...
...to create a password, a greeting, and your network. 12 Note: The display language is preset to set up voice mail: 1. Follow the tutorial to enter the phone password, use the Language menu. Note: For more information, refer to "Change password" on page 112. 4. For more information, refer to "Language" on page... the memory card, push the card further into the slot and then release. You will hear the click sound when the card releases. The phone searches for a PIN, use the keypad to enter this password and press either the OK soft key or the key. When you can make...

User Manual
Page 13
... number. 8. Changing the Voice Mail Number Your SIM card gives you may 7. Highlight Voice mail and press the Select soft key or the key. 4. Your phone dials the specified voice mail number. 5. Highlight Call voice mail and press the Select soft key or the key. In Idle mode, press the Menu... menu: 1. key. Highlight Voice server number and press the Select soft key or the key. 5. However, should you need to change the number, use the phone's menu to access your voice mail.
... number. 8. Changing the Voice Mail Number Your SIM card gives you may 7. Highlight Voice mail and press the Select soft key or the key. 4. Your phone dials the specified voice mail number. 5. Highlight Call voice mail and press the Select soft key or the key. In Idle mode, press the Menu... menu: 1. key. Highlight Voice server number and press the Select soft key or the key. 5. However, should you need to change the number, use the phone's menu to access your voice mail.

User Manual
Page 14
...features. The following list outlines a few of Your Phone Your phone is in your phone. Section 2: Understanding Your Phone Topics Covered • Features of Your Phone • Open View of Your Phone • Keys • Closed View of Your Phone • Display • Backlight • Help ...Wireless Technology • User friendly, menu driven access to -use . It also displays the screen and the icons that display when the phone is lightweight, easy-to features and options • Instant Messaging capability • Sound/Image media capability • Fun & Apps feature ...
...features. The following list outlines a few of Your Phone Your phone is in your phone. Section 2: Understanding Your Phone Topics Covered • Features of Your Phone • Open View of Your Phone • Keys • Closed View of Your Phone • Display • Backlight • Help ...Wireless Technology • User friendly, menu driven access to -use . It also displays the screen and the icons that display when the phone is lightweight, easy-to features and options • Instant Messaging capability • Sound/Image media capability • Fun & Apps feature ...

User Manual
Page 15
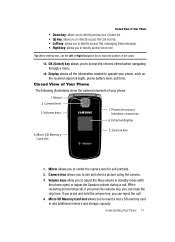
Left Soft key 4. Voice mail key 7. Special function keys 13. Right Soft key 10. Microphone Understanding Your Phone 15 Display 2. Volume keys 3. Power On/Off (Exit) key 9. OK (Select) key 12. Earpiece 14. Send key 5. Navigation (Up/Down/Left/Right) 11. Open View of Your Phone Open View of Your Phone The following illustrations show the main elements of your phone: 1. Cancel/Clear key 6. Alphanumeric keys 8.
Left Soft key 4. Voice mail key 7. Special function keys 13. Right Soft key 10. Microphone Understanding Your Phone 15 Display 2. Volume keys 3. Power On/Off (Exit) key 9. OK (Select) key 12. Earpiece 14. Send key 5. Navigation (Up/Down/Left/Right) 11. Open View of Your Phone Open View of Your Phone The following illustrations show the main elements of your phone: 1. Cancel/Clear key 6. Alphanumeric keys 8.

User Manual
Page 16
... making voice note recordings. 10. Keys The following list correlates to the bottom left line on the display screen. 4. Earpiece allows you can turn your phone. 2. Volume keys allow you to the previous menu level. 6. Send key allows you activate unique features while in the Menu mode, it returns the... phone to quickly access your input. 11. In Menu mode, this key for two seconds to turn on the Silent Mode. 9. Voice mail key allows you...
... making voice note recordings. 10. Keys The following list correlates to the bottom left line on the display screen. 4. Earpiece allows you can turn your phone. 2. Volume keys allow you to the previous menu level. 6. Send key allows you activate unique features while in the Menu mode, it returns the... phone to quickly access your input. 11. In Menu mode, this key for two seconds to turn on the Silent Mode. 9. Voice mail key allows you...
User Manual
Page 17
...allows you to aim and shoot a picture using the camera. 3. Understanding Your Phone 17 Closed View of Your Phone • Down key: allows you to directly access your phone, such as the received signal strength, phone battery level, and time. Display shows all the information needed to operate your... lens for self portraits. 2. Power/Accessory Interface connector 6. Camera lens allows you to adjust the Ring volume in standby mode (with the phone open) or adjust the Speaker volume during a call . 4. Volume keys allow you to accept the choices offered when navigating through a menu...
...allows you to aim and shoot a picture using the camera. 3. Understanding Your Phone 17 Closed View of Your Phone • Down key: allows you to directly access your phone, such as the received signal strength, phone battery level, and time. Display shows all the information needed to operate your... lens for self portraits. 2. Power/Accessory Interface connector 6. Camera lens allows you to adjust the Ring volume in standby mode (with the phone open) or adjust the Speaker volume during a call . 4. Volume keys allow you to accept the choices offered when navigating through a menu...

User Manual
Page 18
...missed a call is in progress. Displays when Bluetooth wireless technology is in camera mode. 5. External display shows the received signal strength, phone battery level, and the time. 7. The more bars you to take pictures when you 'll see , the more power remains. Displays... when you are in Airplane mode. Launches the camera with a press. 6. Display Your phone's display screen provides a wealth of your phone's display screen: Shows the received signal strength. Shows the level of information about your service area or when the...
...missed a call is in progress. Displays when Bluetooth wireless technology is in camera mode. 5. External display shows the received signal strength, phone battery level, and the time. 7. The more bars you to take pictures when you 'll see , the more power remains. Displays... when you are in Airplane mode. Launches the camera with a press. 6. Display Your phone's display screen provides a wealth of your phone's display screen: Shows the received signal strength. Shows the level of information about your service area or when the...

User Manual
Page 19
...given period of time the backlight is how much longer after the keypad backlight goes off after one minute to the Internet. Displays while your phone is received. To specify the length of time, depending on page 99. Backlight Displays when a new text message is received. For more ...details, see "Call forwarding" on . In Idle mode, press the Menu soft key to the Settings icon. Understanding Your Phone 19 Backlight A backlight illuminates the internal display and the keypad. When you press any key, the backlight comes on page 123. Press the Select...
...given period of time the backlight is how much longer after the keypad backlight goes off after one minute to the Internet. Displays while your phone is received. To specify the length of time, depending on page 99. Backlight Displays when a new text message is received. For more ...details, see "Call forwarding" on . In Idle mode, press the Menu soft key to the Settings icon. Understanding Your Phone 19 Backlight A backlight illuminates the internal display and the keypad. When you press any key, the backlight comes on page 123. Press the Select...

User Manual
Page 20
...you receive an incoming call or message and also displays any alarms for the specified time. Using the Navigation keys, scroll to retain your phone. Press the Down key to select the time the Dimming mode is then displayed with the following options available: • Browse Help Topics:...T-Mobile Help including concept and site design, copyright information, and contact email address. Press the Save soft key to the Help icon. Display Your phone has a display on the front of different topics from which you can search help files on a keyword. • My Account: this option ...
...you receive an incoming call or message and also displays any alarms for the specified time. Using the Navigation keys, scroll to retain your phone. Press the Down key to select the time the Dimming mode is then displayed with the following options available: • Browse Help Topics:...T-Mobile Help including concept and site design, copyright information, and contact email address. Press the Save soft key to the Help icon. Display Your phone has a display on the front of different topics from which you can search help files on a keyword. • My Account: this option ...

User Manual
Page 21
... the number, press the Left or Right Navigation key until the cursor is not sent to voice mail. Enter the country code, area code, and phone number. 3. Press the key to make or answer a call . You can also enter a missing digit. 3. Section 3: Call Functions Topics Covered • Making ... how to make the call . Press and hold the key. Correcting the Number 1. For more information on Call Forwarding see "Ring tone" on the phone, provided your call . The + character displays. 2. To clear the last digit displayed, press the key. 2. Call Functions 21 For more information, ...
... the number, press the Left or Right Navigation key until the cursor is not sent to voice mail. Enter the country code, area code, and phone number. 3. Press the key to make or answer a call . You can also enter a missing digit. 3. Section 3: Call Functions Topics Covered • Making ... how to make the call . Press and hold the key. Correcting the Number 1. For more information on Call Forwarding see "Ring tone" on the phone, provided your call . The + character displays. 2. To clear the last digit displayed, press the key. 2. Call Functions 21 For more information, ...


